
Table of Contents >> Show >> Hide
- Why Does macOS Hide Files and Folders?
- Method 1: Use the Finder Keyboard Shortcut
- Method 2: Show Hidden Files With Terminal
- Method 3: Jump Straight to a Hidden Folder With Go to Folder
- Method 4: Show Hidden Files in Open and Save Dialogs
- Which Method Should You Use?
- Common Hidden Files and Folders Mac Users Look For
- Tips for Staying Safe While Viewing Hidden Files
- Troubleshooting: Why Hidden Files Might Still Not Appear
- Real-World Experiences With Hidden Files on a Mac
- Conclusion
If your Mac feels like it’s keeping secrets, that’s because it is. macOS hides certain files and folders on purpose so you don’t accidentally delete something important and turn your smooth-running machine into a very expensive paperweight. Still, there are plenty of legitimate reasons to reveal hidden files on a Mac. Maybe you need to open the ~/Library folder, track down app leftovers, find a buried settings file, or troubleshoot a program that’s acting like it had too much coffee.
The good news is that showing hidden files and folders on a Mac is not some forbidden wizard ritual. In fact, there are several easy ways to do it, depending on whether you want a quick peek, a more persistent setup, or direct access to a specific hidden folder. In this guide, you’ll learn four simple methods, when to use each one, and how to avoid making a mess while you’re snooping around macOS’s backstage area.
Why Does macOS Hide Files and Folders?
Before we start uncovering the digital skeletons in the closet, it helps to know why hidden files exist in the first place. Macs hide files for a simple reason: protection. Many hidden items are system files, configuration files, caches, logs, or support folders that apps need in order to work correctly. Some hidden filenames begin with a period, such as .DS_Store, while others are tucked away in directories that Apple keeps out of sight by default.
This hidden status is not meant to annoy you. It is meant to stop everyday users from dragging the wrong folder to the Trash and then wondering why Mail, Safari, or some random app suddenly imploded. That said, advanced users, developers, and even perfectly normal people trying to fix a stubborn app often need access to these files. The trick is to reveal them carefully, use what you need, and then back away slowly.
Method 1: Use the Finder Keyboard Shortcut
If you want the fastest answer to the question “How do I show hidden files on a Mac?” this is it. Finder has a built-in keyboard shortcut that toggles hidden files on and off. No Terminal, no downloads, no dramatic soundtrack required.
How to show hidden files in Finder
- Open Finder.
- Go to the folder where you want to view hidden files.
- Press Command + Shift + . (that is the period key).
Poof. Hidden files and folders should appear right away, usually looking slightly faded or ghosted compared with regular files. Press the same shortcut again, and they disappear. It is basically a light switch for your Mac’s invisible clutter.
Why this method is great
This is the easiest method because it is quick, reversible, and built right into macOS. You can use it when you only need a temporary look at hidden items in a specific Finder window. It is especially handy if you’re trying to inspect a folder, locate a hidden app support file, or access the hidden Library folder inside your home directory.
Example
Let’s say an app tells you to delete a preferences file in your user Library. You open Finder, go to your Home folder, hit Command + Shift + ., and suddenly Library is right there instead of playing hard to get. Problem solved, ego boosted.
Method 2: Show Hidden Files With Terminal
If you want a more forceful approach, Terminal can tell Finder to display hidden files more broadly. This is the classic power-user method. It sounds intimidating, but the command is simple. Just copy it exactly, and you’ll be fine.
How to use Terminal to reveal hidden files
- Open Terminal. You’ll find it in Applications > Utilities, or you can use Spotlight to search for it.
- Enter this command and press Return:
- Then enter this command and press Return:
Finder will restart, and hidden files should now be visible. If you want to hide them again later, use the reverse command:
When Terminal makes sense
Use this method when the Finder shortcut is not convenient enough, when you’re doing repeated troubleshooting, or when you want hidden files to stay visible until you explicitly turn them off. It is also useful if you are following technical instructions that involve system directories or dotfiles.
A word of caution
Terminal is powerful, which is another way of saying it will absolutely let you create chaos if you start improvising. Stick to the commands above unless you know exactly what you are doing. Showing hidden files is fine. Randomly deleting them because they “look unimportant” is how you end up Googling phrases like “why is my Mac suddenly possessed?”
Method 3: Jump Straight to a Hidden Folder With Go to Folder
Sometimes you do not actually need to show every hidden file on your Mac. You just need to get to one specific hidden folder, such as ~/Library or /usr/local/bin. In those cases, Finder’s Go to Folder feature is cleaner, faster, and far less visually chaotic.
How to use Go to Folder
- Open Finder.
- Click Go in the menu bar.
- Select Go to Folder, or press Shift + Command + G.
- Type the path you want to open.
Useful examples
~/Library/for your user Library folder/Library/for the top-level Library folder shared by the system and apps/usr/local/bin/for command-line tools/System/Library/for system files you should admire respectfully and rarely touch
This method is ideal when you know exactly what you need. Instead of revealing a thousand hidden items you do not care about, you teleport directly to the folder in question like a practical genius.
Bonus tip: Open the hidden Library folder from the Go menu
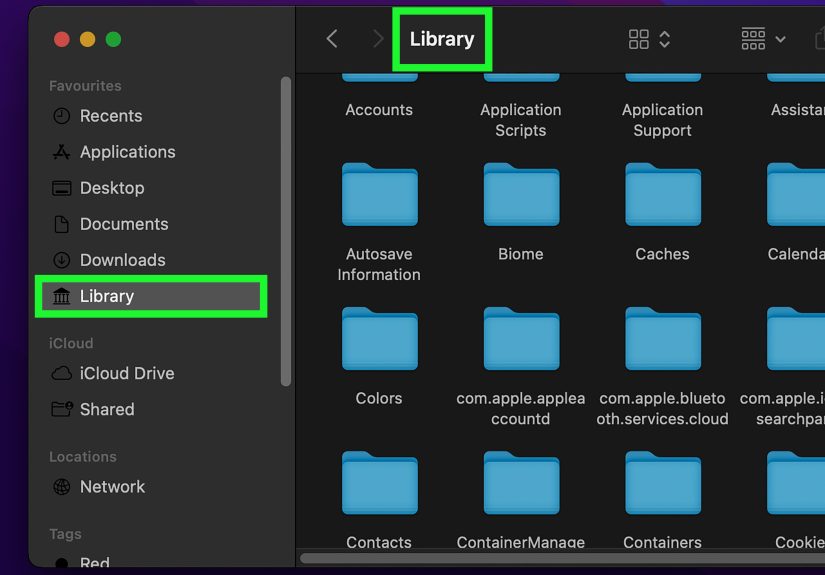
There is also a neat little trick for the user Library folder. In Finder, click Go in the menu bar and hold down the Option key. The hidden Library item appears in the menu. Click it, and you’re in.
This is one of the best methods for everyday troubleshooting because it is simple, safe, and focused. If all you need is your hidden Library folder, there is no reason to turn your entire Finder into a haunted house of faded files.
Method 4: Show Hidden Files in Open and Save Dialogs
Here’s the method many Mac users miss: the same hidden-files shortcut can also work in Open and Save dialog boxes. That means if an app asks you to choose a file and the file is hidden, you may not need to leave the app, open Finder, or perform any elaborate dance routine.
How to do it
- Open any app that uses a file picker, such as TextEdit, Preview, or another Mac app.
- Bring up an Open or Save dialog.
- Press Command + Shift + ..
Hidden files and folders should become visible right inside the dialog. Press the shortcut again to hide them.
Why this method is useful
This approach is perfect when you need to import, attach, or select a hidden file without changing your broader Finder view. For example, if you are choosing a configuration file, opening an app data folder, or digging through a hidden Library directory from within an app, this shortcut saves time.
It is one of those Mac tricks that feels almost unfairly handy. Once you know it, you start wondering how many tiny frustrations in life could be fixed with a keyboard shortcut and a smug little grin.
Which Method Should You Use?
The best way to show hidden files and folders on a Mac depends on what you are trying to do.
Use the Finder shortcut if:
You want the fastest, easiest, and most temporary way to reveal hidden files in a folder.
Use Terminal if:
You want hidden files to remain visible more persistently while troubleshooting or working with system files.
Use Go to Folder if:
You know the path to the hidden folder you need and want to avoid showing everything else.
Use the Open/Save dialog shortcut if:
You only need access to a hidden file from inside an app’s file browser.
In other words, you do not need to use a sledgehammer when a flashlight will do.
Common Hidden Files and Folders Mac Users Look For
If you’re exploring hidden files on macOS, you’ll usually be looking for one of a few usual suspects:
~/Library: Stores app support files, preferences, caches, Mail data, Safari information, and more for your user account..DS_Store: Finder metadata files that store folder view preferences./usr,/bin, and/etc: Unix-style system directories that are better visited with purpose, not curiosity alone.- App support and cache folders: Useful when uninstalling stubborn apps or cleaning out broken settings.
These hidden folders are not automatically bad, dangerous, or mysterious. They are mostly just behind the curtain because most people never need to deal with them. Think of them as the wiring behind the walls of your house: important, occasionally useful, and not something you poke for entertainment.
Tips for Staying Safe While Viewing Hidden Files
Showing hidden files on a Mac is generally safe. Changing or deleting them carelessly is where the trouble starts. Here are a few practical rules to keep your adventure from becoming a cautionary tale:
- Only open what you actually need.
- Do not delete system files unless you are following trusted instructions.
- Back up your Mac before making major changes, especially in Library or system directories.
- Re-hide hidden files when you’re finished so Finder stays easier to read.
- If you are unsure about a file, research it before touching it.
A good rule of thumb is this: viewing is usually fine, editing requires confidence, and deleting requires purpose. If your plan is “I’ll know it when I see it,” maybe take one step back.
Troubleshooting: Why Hidden Files Might Still Not Appear
If hidden files are not showing up, do not panic. Your Mac is not necessarily being dramatic. A few simple issues might be getting in the way.
Check the active window
The Finder shortcut works in the active Finder window, so make sure Finder is selected when you press it.
Try a different folder
Not every folder contains obvious hidden files. Test the shortcut in your Home folder or at the top level of your drive.
Restart Finder
If you used the Terminal method and nothing changed, make sure you ran killall Finder afterward. Finder needs to relaunch for the setting to take effect.
Confirm the path
If you are using Go to Folder, check your path carefully. A missing slash or tilde can send you somewhere else entirely.
Remember that some items are protected
On modern macOS, some system locations have extra protection. Even if you can view them, that does not mean you can freely edit them. Apple built those guardrails for a reason.
Real-World Experiences With Hidden Files on a Mac
In real life, most people do not go looking for hidden files because they’re bored on a Tuesday night. They go looking because something is broken, missing, weird, or behaving like it has entered its villain era. That is why learning these four methods is genuinely useful, not just a neat party trick for the world’s nerdiest cocktail hour.
One common experience is troubleshooting a stubborn app. Let’s say you uninstall an app, reinstall it, and somehow all the same weird settings come right back. That usually means the app left behind support files, preference files, or cache folders in your hidden Library directory. Once you know how to reveal hidden folders in Finder or jump straight to ~/Library, you stop feeling stuck. You can actually see where the leftovers are hiding instead of muttering at your screen like it betrayed you personally.
Another very common scenario involves setup guides for developer tools. Maybe you are installing a package manager, a coding environment, or a command-line utility, and the instructions tell you to edit a hidden file like .zshrc or visit /usr/local/bin. If you have never worked with hidden files on a Mac before, that kind of instruction can look absurdly cryptic. But once you learn the Finder shortcut and the Go to Folder path method, it becomes much less intimidating. Suddenly, that hidden dotfile is not a mythical object. It is just a file with a period in front of its name, quietly minding its own business.
There is also the classic “Where did my Library folder go?” moment. Newer Mac users often assume something is wrong because they cannot see Library inside their home folder. In reality, Apple hides it by default. Once people learn the Option + Go trick or the Finder toggle, they usually have the same reaction: first relief, then mild annoyance, then the satisfying feeling of having outsmarted the machine. It is a small win, but we take those.
Photographers, designers, writers, and other creative users run into hidden files too, especially when cleaning up app caches or hunting for autosave and support data. If a project file goes missing or an app keeps opening corrupted settings, the hidden Library folder often holds the clues. The same goes for people trying to free up storage space. Hidden caches and support folders can pile up over time, and while you should not delete them recklessly, being able to inspect them helps you understand what is taking up room.
Perhaps the biggest real-world benefit is confidence. Mac problems feel smaller when you know where the hidden stuff lives and how to access it without guesswork. You do not need to become a Terminal wizard or a full-time IT hero. You just need a few reliable methods. Once you have them, hidden files stop feeling mysterious and start feeling manageable. Your Mac is still keeping secrets, sure, but now you know how to politely ask it to spill them.
Conclusion
Showing hidden files and folders on a Mac is easier than many people think. For a quick reveal, use the Finder shortcut. For a broader toggle, use Terminal. For precise access, use Go to Folder or the Option key in Finder’s Go menu. And when you are working inside an app, do not forget the hidden-files shortcut in Open and Save dialogs.
The key is choosing the method that fits the job. If all you need is one hidden folder, do not turn your entire Mac into a greyed-out scavenger hunt. Use the simplest path, make the change you need, and then hide everything again when you are done. Clean, efficient, and just a little bit satisfying.






