
Table of Contents >> Show >> Hide
- What “Mini Hasselblad-Style” Really Means (No, It’s Not a Tiny Swedish Luxury Camera)
- The Big Idea: A Raspberry Pi Camera That Doesn’t Settle for a Tiny Sensor
- Meet the “Not-So-Mini” Sensor: What a 1-Inch Sensor Actually Is
- How the Camera Actually Works: Pi 5 + 4-Lane MIPI + A Sensor That Demands Bandwidth
- Viewfinding Like It’s 1957 (But With a 4-Inch HDMI Screen)
- Lenses: C-Mount Glass, TV Lenses, and the “Adapter Rabbit Hole”
- Software Features That Make It Feel Like a “Real” Camera
- The Build Side: 3D Printing, Steel PLA, and the World’s Most Stylish Short Circuit
- Why This Project Matters (Beyond “Because It’s Cool”)
- If You Want to Build Something Similar, Here’s the Reality Check (and the Fun Part)
- Quick FAQ
- Experiences: What It’s Like to Live With a Mini Hasselblad-Style DIY Camera (The Good, the Funny, the “Why Is It Doing That?”)
- Conclusion: A “Mini” Camera That Aims Big
“Mini camera” usually means “cute, pocketable, and ready to produce photos that look like they were shot through a juice box.” Not this one.
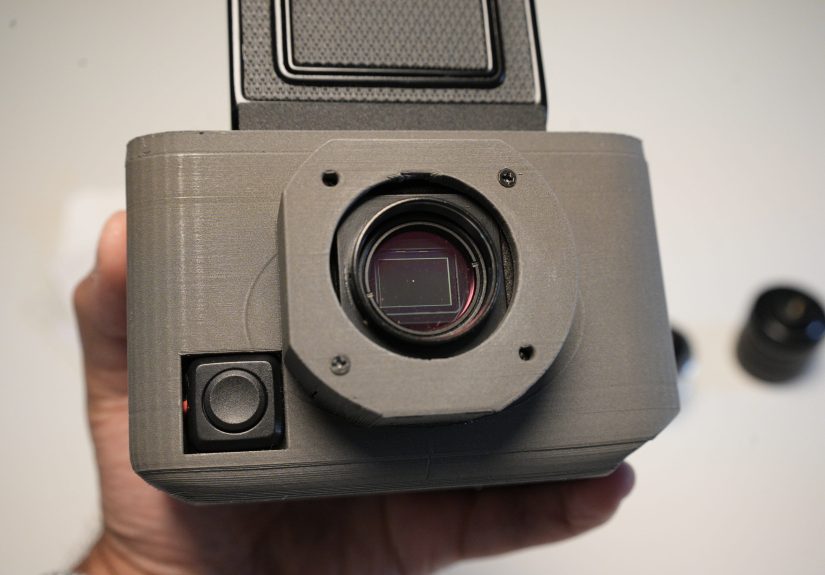
A photographer and maker named Malcolm Wilson built a DIY, waist-level, Hasselblad-inspired digital camera around a Raspberry Pi 5 and a genuinely beefy 1-inch Sony sensor. The body is small(ish). The vibes are vintage. The sensor? Absolutely not mini. It’s the kind of project that makes you say, “Wait… that’s legal?” while you simultaneously price out 18650 batteries.
What “Mini Hasselblad-Style” Really Means (No, It’s Not a Tiny Swedish Luxury Camera)
When people say “Hasselblad-style,” they’re usually talking about the classic medium-format experience: a modular camera system with a top-mounted viewfinder you look down into, a clean, boxy silhouette, and a slower, more deliberate pace. Traditional Hasselblad 500-series cameras are famous for their modular design (swap backs, finders, lenses) and waist-level shooting options.
This DIY build borrows that feelingespecially the waist-level “look down and compose” workflowwithout pretending it’s a real Hasselblad. Think of it as a love letter to classic design, written in modern maker language: ribbon cables, Python scripts, and the occasional “why is the case… conductive?”
The Big Idea: A Raspberry Pi Camera That Doesn’t Settle for a Tiny Sensor
Raspberry Pi-based camera projects are everywhere because they’re fun, flexible, and surprisingly capable. But “capable” often hits a wall when you want cleaner low-light images, better detail, and more real-world dynamic range. The biggest limiter is usually the sensor.
Malcolm’s solution: build the camera around a 1-inch Sony IMX283 sensor module (the OneInchEye V2.0) and then wrap it in a camera body that feels like a photographic object, not just a dev board with a lens attached.
Meet the “Not-So-Mini” Sensor: What a 1-Inch Sensor Actually Is
First, the quick reality check: a “1-inch sensor” is not literally one inch across. The name is a historical leftover that confuses everyone at least once (usually right before they start arguing on forums). In practical terms, a 1-inch-type sensor measures about 13.2 × 8.8 mm.
That might sound small if you’re used to full-frame (36 × 24 mm), but in the world of compact cameras and maker modules, it’s a serious step up. It’s substantially larger than the sensors commonly found in many hobbyist camera modules and older point-and-shoot designs, and it’s a well-known “sweet spot” size that has powered a lot of beloved premium compact cameras.
Why a bigger sensor feels “more professional”
Sensor size isn’t magic, but it is physics. A larger sensor can capture more light overall for a given framing and exposure, which tends to help with:
- Lower noise (especially in dim scenes)
- Better dynamic range (more detail in highlights and shadows)
- More flexibility in post (files fall apart less aggressively when edited)
- More control over depth of field compared with tiny sensors (still not full-frame, but noticeably different from “phone tiny”)
The specific sensor and module used here
The OneInchEye V2.0 module is built around the Sony IMX283 family (listed as IMX283CQJ on the product page), described as a one-inch CMOS sensor with roughly 20.3 million effective pixels and a 12-bit digital output. In plain English: it can capture a lot of detail and has the kind of bit depth that’s friendlier to serious image processing.
The module is also packed like a real maker-friendly product: it includes a CS mount setup (and adapter options), plus extra onboard sensors like a temperature sensor and a 6-axis IMU in the V2.0 update. It’s the opposite of “just solder some wires and hope.”
How the Camera Actually Works: Pi 5 + 4-Lane MIPI + A Sensor That Demands Bandwidth
A big, high-resolution sensor isn’t useful if the computer can’t ingest the data fast enough. That’s why the interface matters as much as the sensor itself.
The Raspberry Pi 5 has two high-speed MIPI connectors that can be used for cameras or displays, and they support four-lane MIPI connections. That extra bandwidth is a big deal for higher-throughput camera modules. The OneInchEye is designed around a 4-lane MIPI requirement, which is why it’s associated with Compute Module boards and newer Pi hardware that can actually feed it properly.
Translation: this isn’t the “plug it into any random board and go” kind of camera module. It’s more like adopting a high-energy dogyou need the right space and the right routine, or it will eat your couch.
Viewfinding Like It’s 1957 (But With a 4-Inch HDMI Screen)
The most charming part of this camera isn’t the spec sheet. It’s the user experience.
Malcolm built it as a waist-level viewfinder camerayou hold it around chest height and look down into the top. In his build guide, he describes the setup as a Raspberry Pi 5 paired with a 4-inch HDMI display and a vintage Mamiya C220 TLR viewfinder. That’s the secret sauce behind the “Mini Hasselblad” look and feel: the act of composing becomes slower, steadier, and weirdly satisfying.
There’s also a practical benefit: waist-level shooting can feel more stable and less “in your face” for candid moments. People often react differently when you’re not holding a camera directly up to your eye like a tiny paparazzo.
Lenses: C-Mount Glass, TV Lenses, and the “Adapter Rabbit Hole”
The OneInchEye module is set up for CS/C-mount style hardware, which is common in industrial and CCTV-style optics. That’s convenient because C-mount is widely supported in the maker worldthough “widely supported” doesn’t always mean “cheap and perfect.”
In Malcolm’s build, he used Fujinon TV lenses he already owned (including fast options like 25mm f/1.4 and 9mm f/1.4). These kinds of lenses can be surprisingly fun: compact, characterful, and sometimes shockingly sharp in the center. But you also have to watch for coverage, vignetting, and corner performanceespecially as sensor size increases.
If you’ve ever seen someone with a drawer full of lens adapters, that’s not a warning sign. That’s simply what happens when a person says, “I’ll just test one more mount.”
Software Features That Make It Feel Like a “Real” Camera
One reason DIY cameras can feel like science projects is the lack of camera-like tools: exposure feedback, focusing aids, and simple ways to review and move files.
Malcolm lists a set of features that push this build into “actually usable” territory:
- PNG capture (useful for preserving quality and avoiding extra compression decisions)
- Wi-Fi image transfer (because nobody wants to yank storage media every five minutes)
- Focus peaking (a lifesaver when you’re shooting manually)
- Histogram (because your screen lies and the histogram is your blunt, honest friend)
- Shutter speed control and Auto ISO
Put those together and you get something that behaves more like a camera and less like “a computer that occasionally takes pictures.”
The Build Side: 3D Printing, Steel PLA, and the World’s Most Stylish Short Circuit
The body was 3D printed, and part of the visual appeal comes from the material choice: a metallic-looking steel-filled PLA. It adds weight and a “this feels like equipment” heft. It also comes with a plot twist: steel-filled PLA can be conductive.
Malcolm learned that the hard way and notes that the conductive case caused a short that killed a Raspberry Pi. His fix: print a second inner shell in standard PLA to isolate the electronics and then use the steel PLA as the outer “skin.” That’s a classic maker lesson: the same feature that makes a project cool can also be the reason it tries to destroy itself.
Why This Project Matters (Beyond “Because It’s Cool”)
Sure, it’s a fun build. But it’s also a peek at where DIY photography can go when people stop treating sensors as an afterthought.
A 1-inch sensor sits in a very interesting middle ground: it’s large enough to deliver a meaningful image-quality leap over tiny modules, but still small enough that lenses and bodies can remain compact. That balance is exactly why 1-inch sensors have shown up in popular premium compact cameras for years.
In other words: this isn’t “a Raspberry Pi camera.” It’s “a camera that happens to be powered by a Raspberry Pi.” That mindset shift is the whole story.
If You Want to Build Something Similar, Here’s the Reality Check (and the Fun Part)
What’s straightforward
- 3D printing a body and fitting a Pi + battery module inside (if you’ve built maker projects before)
- Adding a shutter button via GPIO
- Using a small HDMI display for live view
What can get spicy
- Drivers and software: the OneInchEye project notes that driver development may require kernel compilation. If “compile the Linux kernel” makes you break into a sweat, budget time (and snacks).
- Thermals: high-res sensors and small enclosures can warm up. Temperature monitoring is a clue that the designers are thinking about this.
- Lens matching: bigger sensors expose optical weaknesses faster. That can be part of the fun, but it’s still a factor.
- Electrical safety: if your filament conducts electricity, it’s not “premium,” it’s “dangerously premium.”
Quick FAQ
Is a 1-inch sensor “big” compared to real Hasselblad cameras?
Not remotely. Hasselblad is famous for medium format, which is significantly larger than 1-inch. But in the context of DIY Raspberry Pi camera builds, 1-inch is a meaningful jump and absolutely earns the “not mini” headline.
Why not just use the Raspberry Pi High Quality Camera?
The Pi HQ camera is a great value and very capable, but it’s built around a smaller sensor class. If your goal is to squeeze more image qualityespecially in low lighta larger sensor can be a compelling reason to upgrade.
Is this a “beginner project”?
If you’re brand-new to electronics, you might want a few smaller builds first. But if you’re comfortable with 3D printing, basic wiring, and tinkering with software, it’s a rewarding project that feels like building a real photographic tool.
Experiences: What It’s Like to Live With a Mini Hasselblad-Style DIY Camera (The Good, the Funny, the “Why Is It Doing That?”)
The first experience you notice with a camera like this is that it changes your postureand that changes your mindset. You don’t snap pictures the way you do with a phone. You set the camera at chest height, tilt your head down, and suddenly you’re composing like a thoughtful documentary photographer… even if you’re just photographing your neighbor’s cat doing something suspicious with a garden hose.
The waist-level view is quietly addictive. It feels calmer. Your elbows tuck in. The camera becomes steadier. And because you’re not aiming a lens directly at someone’s face, people often relax more. In casual street-style situations, that can mean more natural expressions and fewer “Waitare you taking my picture?” moments. It’s not invisibility, but it’s a softer presence.
Then there’s the “big sensor in a small body” momentthe first time you load up a scene that would normally look crunchy and sad on a tiny module. You point it at a dim corner of a room, or a moody late-afternoon window, and you realize you’re getting files with real flexibility. Shadows hold together longer. Highlights don’t instantly blow out and vanish into pure white. It doesn’t magically become medium format, but it stops feeling like a toy. That’s a surprisingly emotional upgrade.
Of course, DIY cameras have personality, and not all of it is charming. Sometimes the “camera ritual” includes a boot sequence. Sometimes the ribbon cable decides it wants attention. Sometimes you discover a new kind of dust you’ve never seen before because a large sensor plus a bright screen makes every speck look like a UFO. You’ll also learn quickly that lenses are not just “glass,” they’re “glass plus alignment plus coverage plus why are the corners doing that.”
If you’re using compact C-mount or TV lenses, you’ll probably have a phase where you try everything you can find: sharp ones, weird ones, old ones that smell faintly like a basement. Some will surprise you with gorgeous center detail. Some will vignette like they’re reenacting a silent film. And you’ll keep using the weird ones anyway, because character is a powerful drug.
The most satisfying experience, though, is that this kind of build makes you pay attention again. You start looking for light, not just subjects. You start thinking, “Do I want texture or softness?” You start noticing the difference between “bright” and “interesting.” A DIY camera with a big sensor and a waist-level viewfinder is like a small rebellion against modern frictionless shooting. It doesn’t remove effortit makes effort feel worth it.
And yes, you may also experience the universal maker rite of passage: staring at your project late at night, whispering, “Please don’t be conductive,” while holding a multimeter like it’s a holy artifact.
Conclusion: A “Mini” Camera That Aims Big
The headline is funny because it’s true: the camera is compact and playful, but the sensor choice is serious. By pairing a Raspberry Pi 5 with a 1-inch Sony IMX283-based module and wrapping it all in a waist-level, Hasselblad-inspired experience, this build shows what happens when maker creativity meets photographic intent.
You don’t have to build one to appreciate the lesson: “small camera” doesn’t have to mean “small ambition.” Sometimes it just means you’re clever with your spaceand very selective with your sensor.






