Table of Contents >> Show >> Hide
- Why Floor Stencils Are a DIY Secret Weapon
- Know Your Floor Before You Paint
- What You Need for a Floor Stencil Project
- Step-by-Step: How to Stencil a Floor Like You’ve Done This Before
- Design Ideas That Make Stenciled Floors Look Expensive
- Common Floor Stencil Mistakes and How to Avoid Them
- How Long Do Stenciled Floors Last?
- Is a Floor Stencil Project Worth It?
- Real-World Experience and Lessons From Floor Stencil Projects
- Conclusion
Let’s be honest: old floors can be a mood-killer. They squeak, they scuff, they look tired, and somehow they always make the whole room feel more “meh” than it deserves. But before you start pricing out tile, hardwood, or a full renovation that makes your wallet cry, there’s a smarter move: floor stencils.
Floor stenciling is one of the best low-cost, high-impact upgrades you can do in a weekend (or two, if you’re a snack-break enthusiast). With the right prep, the right paint, and a little patience, you can transform dated tile, worn wood, or plain concrete into a floor that looks custom and stylish. Think faux encaustic tile, classic geometric patterns, modern minimalist grids, or even a soft vintage look that hides wear beautifully.
This guide walks you through exactly how to stencil a floor so it looks polished, lasts longer, and doesn’t end up looking like a “learning experience” you’d rather not discuss. We’ll cover prep, paint choices, stencil technique, sealing, maintenance, and a real-world experience section at the end with practical lessons people wish they knew before they started.
Why Floor Stencils Are a DIY Secret Weapon
Floor stencils hit a sweet spot between budget-friendly and designer-looking. You get the visual drama of patterned tile or painted flooring without demolition, dust storms, or a giant installation bill. They’re especially popular for kitchens, bathrooms, mudrooms, laundry rooms, entryways, porches, and basementsbasically any place where you want style but also need practical durability.
Big benefits of stenciled floors
- Budget-friendly update: A stencil, primer, paint, and sealer usually cost far less than replacing the floor.
- Custom look: You can choose patterns, colors, and scale to match farmhouse, modern, boho, traditional, or anything in between.
- Fast visual payoff: Even one room can look dramatically different after a stencil pattern goes down.
- Temporary or long-term: With good prep and sealing, it can last for yearsbut it’s still easier to change than tile.
- Great for imperfect floors: Patterns help camouflage minor cosmetic flaws better than a flat single-color coat.
That said, stenciling is not magic. It won’t fix cracked tile, loose boards, or moisture problems. It’s a finish upgrade, not a structural repair. If your floor is actively failing, fix that first. Pretty patterns do not negotiate with bad subfloors.
Know Your Floor Before You Paint
The best stenciled floors start with a simple question: Is this floor a good candidate? The answer depends on the surface, the condition, and how much traffic the room gets.
Tile floors
Tile is one of the most popular stencil surfaces, especially if the tile itself is solid but ugly (a very common condition). If the tile is chipped, cracked, or crumbling, paint and stencil work won’t hold up well. If the tile is in good shape, clean it thoroughly, use a bonding primer if needed, and choose a paint made for floors or tile.
Wood floors
Painted and stenciled wood floors can look incredible, especially in older homes. The key is prep: remove waxy buildup, lightly sand glossy finishes, and use a quality primer and floor paint. A satin or low-luster finish is often a better choice than high gloss because it’s less slippery and tends to look more forgiving in real life.
Concrete floors
Concrete is a fantastic candidate for stenciling, especially in mudrooms, porches, basements, and utility spaces. But concrete demands extra prep. It has to be clean, dry, and properly prepped for adhesion. Depending on the product and the condition of the slab, that may include etching, grinding, or a primer/sealer step. Don’t skip moisture checks or prep instructions on the paint label.
Safety note for older homes
If you’re sanding painted surfaces in a home built before 1978, treat lead as a real possibility. Use lead-safe work practices, contain dust, wear protective gear, and keep the work area clean. This is especially important if kids or pets are around.
What You Need for a Floor Stencil Project
Your exact materials will vary by surface, but most projects use the same core setup.
Core supplies
- Vacuum, broom, microfiber mop, and cleaning cloths
- Grease-cutting cleaner or surface-appropriate cleaner
- Painter’s tape
- Bonding primer (if required or recommended)
- Floor paint, porch-and-floor paint, epoxy-modified floor enamel, or tile/floor coating
- Base coat color + stencil color (and optional accent color)
- Foam roller (small high-density rollers work great for stencils)
- Small angled brush and/or stencil brush
- Stencil sized to your tile or pattern layout
- Low-tack adhesive spray (optional) or tape
- Water-based clear urethane/polyurethane or other compatible topcoat
- Sandpaper (often 120–150 grit for wood; light sanding for tile if needed)
- Chalk line, measuring tape, and cardboard for testing
Pro tip: Read every product label before you start. Some floor coatings need primer, some don’t. Some need 24 hours before recoating, some less. Some are made for interior use only. The paint can and technical data sheet should be treated like the boss of the project.
Step-by-Step: How to Stencil a Floor Like You’ve Done This Before
1) Clean like you mean it
Prep is where floor stencil projects succeed or fail. Dust, grease, pet hair, and mystery grime will absolutely show up under paint. Vacuum or sweep first, then scrub thoroughly. On tile, pay extra attention to grout lines and corners. On wood, remove dirt and old residue. On concrete, use a cleaner made for concrete if needed, especially in garages or utility spaces.
After cleaning, rinse away residue and let the surface dry fully. “Dry enough” is not a scientific unit. If moisture is trapped under paint, adhesion problems are coming.
2) Repair and prep the surface
Fix small issues before paint goes down. Fill minor cracks (with the correct repair product for your surface), remove loose material, and sand where required.
- Tile: Light sanding can help on glossy surfaces (follow product guidance).
- Wood: Sand glossy or previously coated floors to dull the finish and improve adhesion.
- Concrete: You may need etching or grinding depending on the coating system and existing sealers.
Then tape off baseboards, cabinets, and transitions. This is boring. It is also the difference between “clean DIY” and “why is there white paint on the dog bowl stand?”
3) Prime (if needed) and paint your base coat
Apply primer if your system requires it or if the surface needs extra adhesion help. Bonding primer is common for tile, and it’s also useful for tricky surfaces. On wood, a quality primer is often recommended unless the existing coating is in great shape and your paint system allows scuff-and-coat.
Once primer is dry, apply your base coat using a brush for edges and a roller for the field. Most floors need at least two coats for an even finish. Let the base coat dry completelyreally completelybefore stenciling. Many DIYers rush here and end up with lifted paint or smudged patterns. Don’t be that person. Future You deserves better.
4) Measure your layout and test first
Before you stencil the whole floor, test the pattern on cardboard (or in a hidden corner). This helps you practice your roller pressure and check how your colors look together. It also gives you a chance to adjust before committing to 80 repeating tiles of regret.
Measure the room and decide where the pattern starts. Centered layouts look balanced, but in some spaces it’s smarter to start at a doorway and work your way out. On concrete or larger layouts, chalk lines can help keep everything aligned and prevent pattern drift.
5) Stencil the pattern without bleed-through drama
Place the stencil, tape the corners (or use a light, low-tack adhesive), and load a foam roller or stencil brush with your stencil color. Then remove excess paint before applying it. This is the golden rule of stenciling:
Less paint on the roller = cleaner lines on the floor.
Use light pressure and build coverage gradually. If you flood the stencil, paint can seep under the edges and blur the pattern. For detailed areas, use a stencil brush or small brush with a gentle dabbing motion.
If your stencil overlaps multiple tiles or shapes, let sections dry before placing the stencil on top of fresh paint. Some DIYers work in staggered rows to avoid smudging. It’s slower, but it keeps your blood pressure in a healthy range.
For repeating patterns, use registration marks or the stencil’s built-in alignment features. Many floor stencils are designed to line up with previously painted sections so the repeat stays consistent.
6) Touch up, then seal for durability
Once the stencil pattern is fully dry, do a quick touch-up pass. Clean up minor bleeds with a small artist brush. If paint has built up on the stencil, wash it so it sits flat againbuilt-up paint causes fuzzy edges.
Finish with a compatible clear topcoat (often a water-based urethane or polyurethane for indoor floor stencil projects). This protective layer is what helps your hard work survive feet, furniture, and everyday life. Many projects benefit from two coats of sealer. Follow the label for recoat and cure times.
And yes, cure time matters. A floor may feel dry enough to touch in a day, but full cure often takes longer. Light foot traffic might be okay after 24 hours on some products, while heavy furniture should wait several days or more. If the label says wait, wait.
Design Ideas That Make Stenciled Floors Look Expensive
Go faux tile
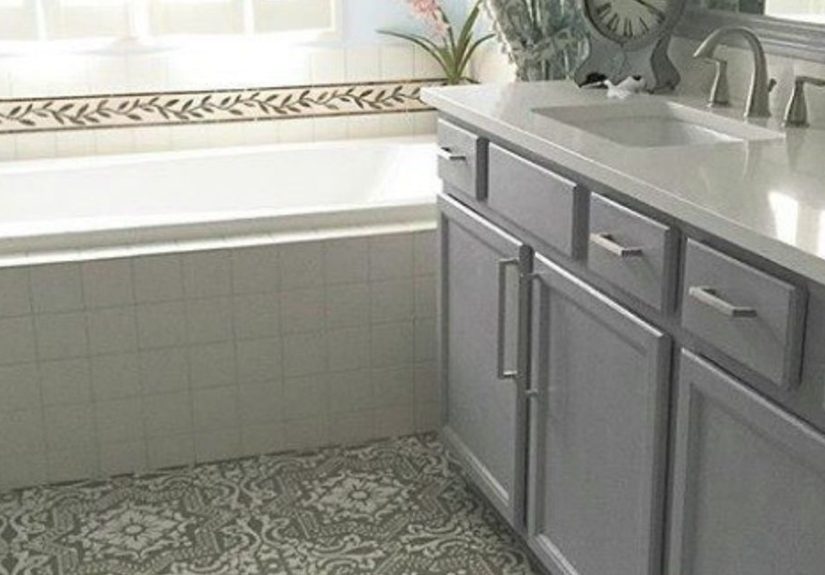
One of the most popular looks is faux encaustic or cement tile. Use a neutral base with a contrasting stencil color (white + charcoal, greige + black, soft sage + cream) for a classic, timeless look.
Use a slightly imperfect base on purpose
For concrete or rustic spaces, a slightly layered base coat can add depth. A subtle variation in tone makes the stenciled pattern feel more like real stone or vintage tile and less like a flat painted surface.
Scale matters
Small bathrooms look best with patterns that fit the tile size or room scale. Oversized patterns can work beautifully in porches, mudrooms, and basements, but can overwhelm tiny spaces if the repeat is too large.
Choose a sheen wisely
Glossy floors can look dramatic, but satin or low-luster finishes are often more practical. They’re generally less slippery-looking (and sometimes less slippery in use) and hide dust and micro-scuffs better.
Common Floor Stencil Mistakes and How to Avoid Them
- Skipping deep cleaning: Paint doesn’t stick well to grease, soap residue, or dust.
- Using wall paint: Floors need a coating made for floor traffic.
- Too much paint on the stencil roller: This causes bleed-through and blurry lines.
- Rushing dry times: Smudges, lifted paint, and soft finish problems usually start here.
- Ignoring topcoat compatibility: Make sure your sealer works with your paint system.
- No traffic plan: You need a path out of the room. Paint yourself into a corner only if you enjoy parkour.
- Not testing first: Pattern alignment and color contrast are easier to fix on cardboard than on 100 square feet of floor.
How Long Do Stenciled Floors Last?
It depends on the surface, prep, traffic, and product quality. In lower-traffic rooms with careful prep and a good sealer, stenciled floors can hold up very well. In high-traffic or wet areas, they may need touch-ups sooner. Painted tile floors are often best treated as a stylish refresh rather than a permanent forever-floorthough with good maintenance, they can still look great for years.
Maintenance tips
- Use a soft mop and mild cleaner (avoid harsh abrasives).
- Wipe standing water, especially on tile and wood stencil projects.
- Use felt pads on furniture legs.
- Don’t drag furniture across the floor.
- Consider a maintenance topcoat refresh in heavy-use zones after a few years.
Is a Floor Stencil Project Worth It?
For many homeowners, absolutely. Floor stenciling gives you a huge style upgrade without full replacement costs. It’s especially worth it when the floor is structurally sound but visually outdated. You’ll spend more time than money, which is basically the official DIY exchange rate.
If you want a clean, modern, custom-looking floor and you’re willing to follow prep and curing instructions, this project can be one of the most satisfying transformations in the house. The key is respecting the process: clean, prep, prime, paint, stencil, seal, cure. In that order. Not in “whatever feels right” order.
Real-World Experience and Lessons From Floor Stencil Projects
Here’s what people often learn after actually living with stenciled floorsnot just posting the “after” photos.
The biggest surprise is usually how much prep and patience matter. Many DIYers expect the stencil part to be the hard part, but the real work is in cleaning, sanding, priming, and waiting for coats to dry. The stencil step is actually fun once the base is ready. It feels repetitive in a strangely satisfying way, like coloring inside the lines, except the lines are on your floor and your knees are filing a formal complaint.
Another common experience: people underestimate how much tiny layout decisions affect the final look. Starting in the center gives a balanced pattern in many rooms, but some DIYers later wish they had started at the most visible doorway so the “hero view” looked perfect first. In small bathrooms, the cut edges near the toilet or vanity can make or break the polished look. A quick dry layout or chalk line plan saves a lot of second-guessing.
Many floor stencil projects also teach the same lesson about paint control: less is more. DIYers who load too much paint on the roller often get bleed-through and fuzzy edges during the first few tiles. Once they start offloading paint and using lighter pressure, the pattern gets crisp fast. It’s one of those skills that clicks about 20 minutes inright after the first “oops” tile. The good news is small imperfections usually disappear visually once the whole floor is done. A floor is not a phone screen; no one is inspecting it from six inches away.
Durability-wise, people who are happiest long term are usually the ones who treated the project like a real floor coating job, not just a craft project. They used floor-rated paint, followed cure times, and sealed the finish. They also waited before moving furniture back, even when the room looked done. That waiting period is painful, but it prevents dents, marks, and lifted paint that can happen when the coating hasn’t fully cured.
In daily life, stenciled floors tend to perform best when homeowners use a few simple habits: soft cleaning tools, mild soap, felt furniture pads, and no dragging heavy furniture. Some people even keep a small jar of stencil color for future touch-ups, which is honestly genius. A five-minute touch-up once in a while is much easier than redoing a whole room.
And maybe the best “experience” takeaway: a stenciled floor often changes more than just the floor. People end up repainting walls, swapping hardware, adding a rug, or styling the room differently because the space suddenly feels worth the effort. One budget-friendly floor makeover turns into a full room glow-up. That’s the danger of successful DIYyou fix one thing, and now everything else wants to look fabulous too.
Conclusion
If your floors are old, tired, or just painfully boring, floor stencils are a practical and stylish way to make them look new againwithout a full remodel. The formula is simple: choose the right surface, prep it properly, use floor-rated paint, stencil with a light hand, seal it well, and respect cure times. Do that, and you can get a designer-style floor for a fraction of the cost of replacement.
In short: floor stencils are proof that you don’t always need a bigger budget. Sometimes you just need a good stencil, a foam roller, and the courage to trust the process.