Table of Contents >> Show >> Hide
- Before You Start: Know What You Are Removing
- Tools and Materials You Will Need
- Safety First: Dust, Electricity, and Old Paint
- Step 1: Protect the Countertop and Cabinets
- Step 2: Cut the Caulk and Paint Lines
- Step 3: Loosen the Granite Strip
- Step 4: Remove the Granite Without Damaging the Countertop
- Step 5: Scrape Adhesive and Inspect the Wall
- Step 6: Plan the New Backsplash Layout
- Step 7: Choose the Right Adhesive Method
- Step 8: Set the First Row Carefully
- Step 9: Cut Around Outlets, Corners, and Obstacles
- Step 10: Let the Tile Set Before Grouting
- Step 11: Grout the Backsplash
- Step 12: Caulk the Countertop Joint
- Design Ideas After Removing a 4" Granite Backsplash
- Common Mistakes to Avoid
- How Long Does This DIY Project Take?
- When to Call a Professional
- Real-World Experience: What This Project Feels Like
- Conclusion
A kitchen backsplash is the design equivalent of putting on a great jacket: suddenly the whole room looks intentional. But if your countertop still has that old 4-inch granite backsplash lip, the project starts with a little demolition before the pretty tile can make its grand entrance. The good news? Removing a 4" granite backsplash and installing a new tile backsplash is a realistic DIY project for careful homeowners with patience, the right tools, and a healthy respect for sharp stone, dust, and walls that like to surprise you.
This guide walks through how to remove a 4-inch granite backsplash, repair the wall, plan a new backsplash layout, install tile, grout it, caulk it, and avoid the classic DIY disasters: crooked first rows, cracked drywall, smeared grout haze, and the mysterious moment when one outlet cover suddenly refuses to fit. We will keep the process practical, budget-conscious, and beginner-friendly without pretending granite removal is as easy as peeling a banana. It is not. Bananas rarely require pry bars.
Before You Start: Know What You Are Removing
A 4" granite backsplash is usually a narrow stone strip installed along the back edge of a granite countertop. It may be attached to the wall with construction adhesive, silicone, or both. Sometimes it is also caulked along the countertop seam and painted over along the top edge. Your job is to break those bonds carefully without damaging the countertop, tearing up the drywall more than necessary, or sending a granite strip into your toes.
The goal is not speed. The goal is controlled removal. Granite is heavy, brittle at narrow widths, and unforgiving if you lever against it too aggressively. Work slowly, protect the countertop, and assume the wall behind the stone will need some patching. That way, if the drywall comes out looking perfect, you can enjoy the rare DIY miracle and maybe buy a lottery ticket.
Tools and Materials You Will Need
For 4" Granite Backsplash Removal
- Safety glasses, work gloves, dust mask or respirator
- Painter’s tape and heavy cardboard or drop cloths
- Utility knife with fresh blades
- Putty knife or thin pry bar
- Small pry bar or trim puller
- Rubber mallet
- Oscillating multi-tool with scraper blade, optional but helpful
- Plastic shims or wood shims
- Trash bags or a box for stone pieces
For Wall Repair and Backsplash Installation
- Joint compound or setting-type drywall compound
- Drywall knife, sanding sponge, and primer
- Tile, spacers, and tile trim if needed
- Tile adhesive, thinset mortar, mastic, or adhesive mat depending on tile type
- Notched trowel sized for your tile
- Level, tape measure, pencil, and straightedge
- Wet saw, manual tile cutter, or tile nippers
- Grout float, grout sponge, buckets, and microfiber cloths
- Unsanded or sanded grout based on joint size and tile surface
- 100% silicone caulk for the countertop-to-backsplash joint
- Outlet extenders if tile thickness requires them
Safety First: Dust, Electricity, and Old Paint
Turn off power to backsplash-area outlets before removing covers or working around electrical boxes. Confirm the outlets are off with a non-contact voltage tester. Kitchen backsplash projects often involve tile cuts, exposed boxes, metal tools, and water from sponges or wet saws. That is a bad place to “wing it.”
If your home was built before 1978, be cautious about disturbing painted surfaces because old layers may contain lead-based paint. Use lead-safe practices, control dust, and consider professional help if the work area is extensive or if you are unsure what is behind the old backsplash. For cutting tile or stone, avoid dry cutting whenever possible because ceramic, porcelain, stone, and mortar products can create respirable crystalline silica dust. Use wet-cutting methods, good ventilation, and appropriate respiratory protection. A beautiful backsplash is nice; healthy lungs are better.
Step 1: Protect the Countertop and Cabinets
Start by clearing everything off the counter. Remove small appliances, knife blocks, coffee gear, fruit bowls, mail piles, and that one jar of mystery screws that has lived near the toaster since 2019. Cover the countertop with cardboard, then tape the cardboard down so grit cannot sneak underneath and scratch the granite. Tape along cabinet edges and nearby painted surfaces.
Remove outlet and switch plates, then label the screws in a small bag. If you are installing thicker tile, you may need outlet box extenders later so the devices sit flush with the new finished wall surface.
Step 2: Cut the Caulk and Paint Lines
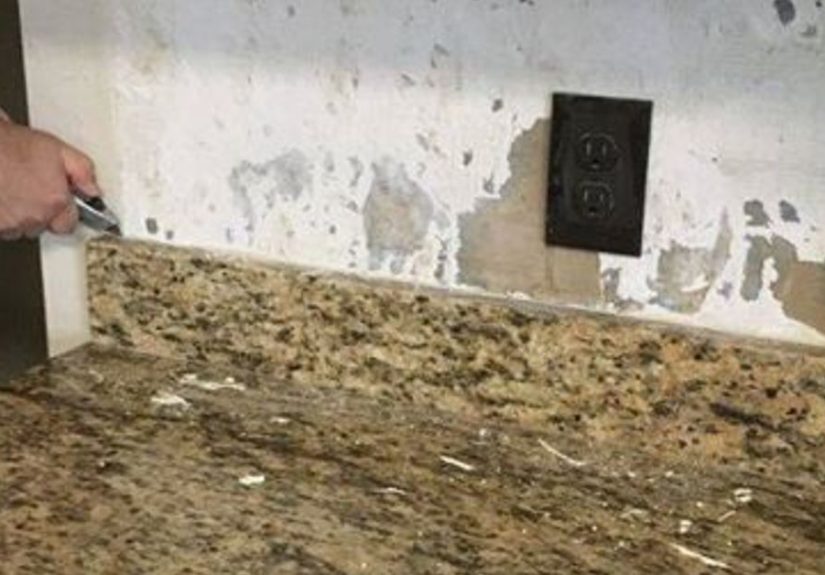
Use a sharp utility knife to slice the caulk line where the 4" granite backsplash meets the countertop. Then cut along the top edge where the granite meets the wall. If paint bridges the stone and drywall, score it carefully to prevent the wall paint from tearing upward in long, dramatic strips. DIY drama belongs in before-and-after photos, not in your drywall paper.
Make several gentle passes instead of forcing one deep cut. You are trying to separate sealant and paint, not carve the Grand Canyon into the wall.
Step 3: Loosen the Granite Strip
Slide a stiff putty knife behind one end of the granite backsplash. If it will not slide in, tap it lightly with a rubber mallet. Once you create a small gap, insert a shim to hold the space open. Move a few inches over and repeat. Work along the length gradually, creating even separation instead of prying hard from one point.
If the adhesive is stubborn, an oscillating multi-tool with a scraper blade can help cut behind the stone. Keep the blade shallow and controlled so you do not gouge the countertop or electrical wiring. For long sections, it may be safer to remove the granite in pieces. Granite strips can crack, and that is not always a failure. Sometimes breaking a stubborn strip into manageable sections is the least destructive option.
Step 4: Remove the Granite Without Damaging the Countertop
Once the adhesive begins to release, use a small pry bar or trim puller behind the stone, always protecting the countertop with cardboard or a thin wood block. Do not pry downward against the countertop edge. Instead, apply gentle outward pressure toward the room. If the stone resists, stop and cut more adhesive.
Have a helper hold the loose section if it is long. A 4" strip may look small, but granite has the personality of a gym weight in formalwear. When it comes free, carry it away carefully and place it where no one will trip over it.
Step 5: Scrape Adhesive and Inspect the Wall
After the granite is gone, the wall will probably look rough. You may see adhesive ridges, torn drywall paper, caulk residue, or chunks of paper facing missing. Scrape off high spots with a putty knife. Do not obsess over getting the wall museum-smooth at this stage; you just need a flat, solid surface that can support tile.
If drywall paper is torn, seal the damaged paper with a primer before applying joint compound. If you apply wet compound directly over fuzzy brown drywall paper, it can bubble. Patch gouges, let the compound dry, sand lightly, and prime again. Tile loves a stable, clean, dry surface. It does not love dust, grease, loose paper, or optimism used as adhesive.
Step 6: Plan the New Backsplash Layout
Measure the backsplash area from countertop to cabinets and from wall to wall. Mark the centerline behind the sink or range if that is the visual focal point. Dry-lay your tile on the counter with spacers to see where cuts will fall. A good layout avoids tiny slivers at corners and gives the eye a balanced pattern.
For subway tile, decide whether you want a classic running bond, stacked vertical, herringbone, or another pattern. For mosaic sheets, check that the sheets interlock naturally and do not create visible grid lines. With handmade or color-varied tile, mix pieces from several boxes so one area does not accidentally become “the weirdly darker corner.”
Step 7: Choose the Right Adhesive Method
For many ceramic backsplash tiles, premixed tile adhesive or mastic can work well on clean, dry drywall in non-shower kitchen applications. For porcelain, glass, natural stone, large-format tile, or areas near heat and moisture, a polymer-modified thinset mortar may be the better choice. Adhesive mats are another option for simple backsplash projects, especially when using compatible tile and wanting less mess.
Always check the tile manufacturer’s instructions. Glass tile, stone tile, and some mosaics can be picky about adhesive color, trowel size, and setting method. White thinset is often preferred behind translucent glass or light stone because gray mortar can darken the final appearance.
Step 8: Set the First Row Carefully
The first row determines the whole backsplash. Find the lowest point of the countertop with a level. Countertops may look flat, but they often have tiny variations. Leave a small gap between the tile and countertop for silicone caulk later. Do not grout this joint. Grout is rigid; countertops and walls move slightly. Silicone caulk is flexible and much better at handling that change of plane.
Apply adhesive in a small area you can tile before it skins over. Comb it with the notched side of the trowel, holding the trowel at a consistent angle. Press each tile into place with a slight twisting motion, then add spacers. Check level often. Small errors multiply quickly across a wall, like gossip at a family reunion.
Step 9: Cut Around Outlets, Corners, and Obstacles
Outlet cuts are where backsplash confidence goes to be tested. Measure carefully, mark the tile, and make the cut with the proper tool. A wet saw is best for many ceramic, porcelain, glass, and stone cuts. Tile nippers can refine small notches. Keep cuts hidden under outlet covers when possible, but do not make the cover do all the work. The outlet device should be properly supported and flush with the finished tile surface, often with box extenders.
At inside corners, leave a small gap rather than forcing tile tight against tile. This joint should also be caulked, not grouted, because corners can move. At exposed ends, use bullnose tile, metal edging, pencil trim, or a clean finished edge depending on your design.
Step 10: Let the Tile Set Before Grouting
Do not rush into grout. Let the adhesive cure according to the product directions. This waiting period is when the project looks almost done and tempts you to sprint. Resist. Grouting too soon can shift tile, trap moisture, or weaken the installation. Use the time to clean tools, admire your straight lines, and warn everyone in the house not to touch the wall “just to see if it is dry.”
Step 11: Grout the Backsplash
Choose grout based on the tile and joint width. Unsanded grout is often used for narrow joints and delicate surfaces that might scratch. Sanded grout is typically used for wider joints. Some modern premixed or high-performance grouts simplify the process, but each product has its own cleaning window and cure time.
Use a grout float to press grout diagonally across the joints. Remove excess with the float, then wipe with a damp sponge. The sponge should be damp, not dripping. Too much water can weaken grout or wash color out. After the grout firms up, polish haze with a microfiber cloth. If grout haze remains the next day, use a haze remover compatible with your tile.
Step 12: Caulk the Countertop Joint
Once grout has cured as directed, caulk the joint where the backsplash meets the countertop with 100% silicone. This is especially important after removing a 4" granite backsplash because the old stone strip probably hid that transition. Tape both sides of the joint for a crisp line, apply a steady bead, tool it smooth, and pull the tape before the silicone skins over.
Use silicone at inside corners and other changes of plane. It is a small detail, but it separates a durable backsplash from one that develops cracked grout lines after a few seasons of cabinet movement, countertop vibration, and everyday kitchen life.
Design Ideas After Removing a 4" Granite Backsplash
Full-Height Subway Tile
Classic subway tile from countertop to upper cabinets is affordable, timeless, and forgiving for DIY installers. White tile with light gray grout gives a clean look, while darker grout emphasizes the pattern.
Vertical Stack Tile
Vertical stacked tile can make the wall feel taller and more modern. It works especially well in kitchens with simple cabinet lines and minimal hardware.
Marble or Stone Mosaic
Natural stone mosaic adds texture and movement, but it may require sealing and more careful maintenance. It also needs a flat wall because mesh-backed mosaics reveal humps and dips quickly.
Peel-and-Stick Backsplash
Peel-and-stick tile can be a budget-friendly option for renters or low-commitment updates. It is easier to install than mortar-set tile, but surface prep matters. Grease, dust, and uneven walls can cause adhesion problems.
Common Mistakes to Avoid
- Prying too aggressively: This can crack drywall, chip the countertop, or break the granite strip unpredictably.
- Skipping wall repair: Tile needs a solid, flat surface. Adhesive cannot fix a weak wall.
- Starting without a layout: Dry-fit first so you do not end with tiny cuts in obvious places.
- Using grout at the countertop seam: Use silicone caulk instead for flexibility.
- Forgetting outlet depth: Tile adds thickness, and outlets may need extenders.
- Cleaning grout with too much water: Over-washing can weaken grout and create color issues.
How Long Does This DIY Project Take?
For a typical kitchen, removing a 4" granite backsplash may take a few hours, depending on adhesive and wall condition. Wall repair can take one to two days because compound and primer need drying time. Tile installation may take a day, with grouting the next day and caulking after the grout cures. Realistically, plan for a weekend plus a few short evening sessions. DIY time is not just working time; it is also drying time, cleanup time, and “standing with a cup of coffee staring at the wall” time.
When to Call a Professional
Call a professional if the granite backsplash is part of a larger slab system, if removal risks damaging expensive countertops, if electrical boxes need relocation, if you suspect lead paint or mold, or if the tile design requires advanced cuts. Also call a pro if the wall behind the granite is severely damaged or if you discover plumbing, wiring, or structural surprises. DIY confidence is excellent. DIY denial is expensive.
Real-World Experience: What This Project Feels Like
The first surprise in a 4" granite removal DIY project is usually how strongly that little backsplash strip is attached. You may start the morning thinking, “I’ll pop this off in twenty minutes,” and by lunch you have developed a personal rivalry with construction adhesive. That is normal. The trick is to slow down and work in small sections. Scoring the caulk thoroughly makes a bigger difference than most beginners expect. If you skip that step, the paint and drywall paper can tear far beyond the tile area, turning a backsplash project into a surprise wall-refinishing seminar.
Another experience many DIYers share is the emotional dip after demolition. Once the granite strip is removed, the wall often looks worse before it looks better. Adhesive ridges, torn paper, and old caulk can make you wonder whether you have ruined the kitchen. You probably have not. Most of that damage disappears after scraping, sealing, patching, sanding, and priming. The wall does not need to look like a finished living-room wall; it needs to be clean, flat, dry, and stable enough for tile.
Layout is where patience pays off. Dry-fitting tile may feel like extra work, but it saves you from awkward cuts around outlets and corners. One helpful habit is to mark the wall lightly with vertical reference lines and check them as you go. Do not trust your eye alone, especially with subway tile. A row can drift slightly and still look fine up close, then suddenly announce its crookedness from across the kitchen like it has been waiting for an audience.
Cutting tile around outlets is the part that separates careful DIY from chaos. Measure twice, cut once, and keep outlet covers nearby to confirm coverage. However, never rely on the cover plate to hide unsafe or sloppy electrical work. The outlet should be secure, accessible, and properly extended to the tile face. If anything electrical feels confusing, stop and bring in an electrician. There is no shame in outsourcing sparks.
Grouting is satisfying but messy. It is also the moment when people often use too much water. A barely damp sponge and repeated light passes work better than aggressive scrubbing. Expect haze. Haze is not failure; it is part of the process. Buffing with a dry microfiber cloth after the grout firms up can make the tile suddenly shine, which is one of the best rewards of the entire project.
The final silicone bead along the countertop may seem minor, but it has a huge effect on the finished look. Tape the edges, use steady pressure, tool the bead once, and remove the tape promptly. A clean caulk line makes the backsplash look intentional and professional. It also protects the seam from water, crumbs, sauce splashes, and the tiny mysteries that collect behind coffee makers.
In the end, removing a 4" granite backsplash and installing a new tile backsplash is not just a cosmetic upgrade. It changes the proportions of the kitchen. The wall feels taller, the countertop looks cleaner, and the backsplash becomes a real design feature instead of an afterthought. The project rewards planning more than brute force, patience more than speed, and careful cleanup more than fancy tools. If you can respect those rules, your kitchen can go from dated to polished without a full remodel.
Conclusion
Learning how to make a backsplash and handle 4" granite removal DIY is a practical way to refresh a kitchen without replacing the entire countertop. The key is careful demolition, proper wall prep, thoughtful tile layout, correct adhesive selection, patient grouting, and flexible silicone caulk at movement joints. Work safely, protect your surfaces, control dust, and give each material the drying or curing time it deserves. The result is a backsplash that looks cleaner, taller, brighter, and far more custom than the old granite lip ever did.