
Table of Contents >> Show >> Hide
- Table of Contents
- Why Nyan Cat Made Me Do It
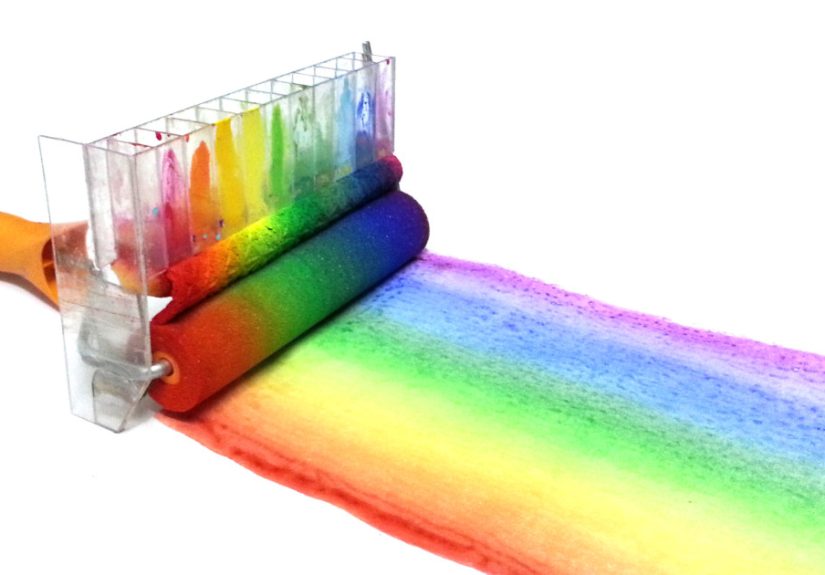
- What a Rainbow Roller Actually Is
- Materials & Tools
- How I Built the DIY Rainbow Roller
- Paint “Science” That Keeps Colors Crisp
- Where This Thing Shines
- Cleanup, Storage, and Not Ruining Your Sink
- Troubleshooting
- FAQ
- Extra: My Rainbow Roller After-Action Report (Yes, It Got Weird)
- Conclusion
- SEO Tags
I wasn’t planning to reinvent the paint roller. I was planning to paint a boring, responsible wall like an adult. Then my brain did what brains do: it played the Nyan Cat song on loop, and suddenly “boring wall” turned into “cosmic rainbow highway.”
So I built a DIY rainbow rollera paint roller that lays down multiple colors in one passbecause nothing says “home improvement” like turning your hallway into a mildly aggressive burst of joy. If you’ve ever wanted a rainbow accent wall, a colorful craft tool, or a reason to justify owning six paint cups you didn’t need yesterday, welcome. We have snacks. They’re probably covered in glitter.
Why Nyan Cat Made Me Do It
Nyan Cat is basically the internet’s way of saying, “What if a cat was also a pastry and also a comet and also a song you can’t un-hear?” The whole vibe is unapologetic color: a flying cat trailing a rainbow through space like it’s late for a meeting it doesn’t want to attend.
That rainbow trail is the key. It’s not just stripesit’s motion. It’s cheerful chaos with a suspiciously catchy soundtrack. I wanted that energy, but in paint form: a tool that could lay down a rainbow quickly, consistently, and with enough drama to make my inner 12-year-old clap like a tiny seal.
What a Rainbow Roller Actually Is
A rainbow paint roller is a roller loaded with multiple colors across its width, so one roll creates parallel bands of color. With the right setup, those bands can stay crisp like stripesor soften into a blended gradient that looks like a sunset decided to become a wall.
Store-bought multi-color rollers exist, but they often lean “kid craft,” “novelty,” or “why is this dripping like it’s auditioning for a soap opera?” The DIY version gives you control: how many colors, how wide each band is, and whether you want bold stripes or a smoother rainbow fade.
Materials & Tools
This build is basically a mashup of painting best practices and craft-store optimism. Here’s what I used, plus smart substitutions.
The Core Supplies
- Roller frame (standard 9-inch works great; a 4-inch mini roller is perfect for small projects).
- Roller cover (more on nap/texture in the build steps).
- Paint tray or shallow pan (wide enough for your roller).
- Divider material: foam board, corrugated plastic, or sturdy cardboard.
- Hot glue or waterproof adhesive (optional but extremely helpful).
- 6–7 paint colors (classic rainbow: red, orange, yellow, green, blue, purple; add pink if you want extra “nyan”).
- Small cups (one per color) and stir sticks.
- Painter’s tape + drop cloth.
Nice-to-Have Upgrades (a.k.a. “I’m Feeling Fancy”)
- Plastic craft syringes or squeeze bottles for cleaner paint loading.
- Roller spinner for faster cleanup (optional, but feels like a power move).
- FrogTape / sharp-line tape if you’re doing stripes next to trim.
- Clear caulk if you’re chasing razor-sharp tape lines.
How I Built the DIY Rainbow Roller
My goal: load one roller with multiple colors without turning them into Sad Beige Soup. The secret is a divided tray systemthink of it as a tiny paint parking garage where each color has its own assigned spot and its own attitude.
Step 1: Pick the Right Roller Cover (Nap Matters)
If you’re painting walls, choose a roller nap that matches the texture:
- 3/8-inch nap is a sweet spot for smooth to lightly textured drywall.
- 1/2-inch nap holds more paint for slightly rougher surfaces.
- Foam rollers give smoother results for crafts, boards, and smaller surfaces (and they’re great for “rainbow stamping” looks).
Translation: the rougher the wall, the fluffier the rollerbecause paint needs to reach into all those tiny valleys your wall insists on having.
Step 2: Build a Divided “Rainbow Loading Dock” Tray
- Measure the inside width of your tray where the roller rolls.
- Cut divider strips (foam board or corrugated plastic is sturdier than plain cardboard).
- Make 6–7 channels, each about 1 to 1.25 inches wide for a 9-inch roller (adjust based on your color count).
- Glue the dividers down so paint can’t sneak underneath and start a color turf war.
- Seal edges with a thin bead of hot glue if your tray is rough or if you’re using thinner paint.
The goal is not “watertight like a submarine,” but close enough that your yellow doesn’t immediately move in with your blue and become green before the roller even meets the wall.
Step 3: Prep Paint So It Rolls, Not Runs
Use interior wall paint for walls, acrylic craft paint for paper/canvas, and always stir well. If your paint is thick like pudding, add tiny amounts of water (for water-based paints) until it’s closer to “warm yogurt.” If it’s already thin, don’t thin it moreyour tray will become Niagara Falls.
Pro move: keep each color in its own cup and top up the tray channels gradually instead of dumping in half a gallon of “oops.”
Step 4: Load Each Color Channel
- Pour paint into each channel in rainbow order (or in whatever order your soul demands).
- Keep the paint depth shallowenough to coat the roller but not so much that it floods over the dividers.
- Roll the dry roller slowly across the channels a few times to pick up distinct bands of color.
The first few passes might look uneven. That’s normal. The roller is basically waking up. Give it a minute to understand it has a job now.
Step 5: “Prime” the Rainbow on Scrap First
Before you touch your actual wall (or tote bag, or poster board), do 3–6 test rolls on scrap cardboard or kraft paper. This evens out the paint load, reduces drips, and lets you decide:
- Crisp stripes: fewer rolls, lighter pressure, keep bands distinct.
- Blended rainbow: a few extra test rolls and slightly more overlap to soften the transitions.
Step 6: Roll Like a Pro (Even If You Are Not)
Work in sections. Roll in a gentle “W” or “M” pattern to distribute paint, then fill in without pressing hard. Heavy pressure squishes paint sideways, which makes colors mingle. Sometimes mingling is cute (hello, gradient). Sometimes it makes mud. Choose your own adventure.
Paint “Science” That Keeps Colors Crisp
Multi-color rolling is basically paint management. Here’s what kept my rainbow looking like a rainbow instead of “mysterious bruise.”
Control Moisture and Open Time
Paint blends more when it stays wet longer. That can be great for gradients and terrible for stripes. If you want stripes, work faster and avoid over-rolling the same area.
Use Tape Tricks for Clean Borders
If you’re painting next to trim or creating framed rainbow panels, painter’s tape is your friendif you treat it with respect. Press it down firmly, and consider sealing the edge with a tiny bead of clear caulk or a quick pass of the base wall color to block bleed.
When it’s time to remove tape, go slow and peel at about a 45-degree angle. Timing matters: some folks remove tape while paint is slightly tacky, others wait until it’s dry to the touch and score the edge first. Follow the tape brand’s guidance and test on a small spot if you’re nervous.
Keep Channels Fresh
As you roll, paint levels in each channel drop at different rates (yellow always acts like it’s on a budget). Refill small amounts often. If one channel gets too low, the roller loads unevenly and your rainbow starts skipping colors like a broken playlist.
Where This Thing Shines
The DIY rainbow roller is surprisingly versatile. It can be whimsical without being nursery-only.
1) Accent Walls and Feature Panels
Try a vertical rainbow behind a desk, a half-wall “color burst,” or a framed rectangle that looks like a portal to a happier dimension. If you’re worried about commitment, paint a large piece of smooth paneling instead and hang it like wall art.
2) Kids’ Craft Stations (and Adult Craft Stations Disguised as “for the kids”)
Foam mini rollers are perfect for paper rolls, poster board, and cardboard. It’s fast, repeatable, and makes kids feel like they’re operating heavy equipment. Which, honestly, they areemotionally.
3) Furniture and Decor
A rainbow band across a dresser drawer. A cosmic stripe on a bookshelf back panel. A “nyan trail” across a picture frame. Prime properly for slick surfaces, let coats dry, and seal if the item will get handled a lot.
4) Party Backdrops and Photo Walls
If you need a backdrop that screams “fun” louder than your uncle at karaoke, this is it. Roll rainbow bands on large kraft paper, tape it up, and pretend you are a responsible event planner.
Cleanup, Storage, and Not Ruining Your Sink
Cleaning is the part where DIY dreams go to dieunless you do it immediately. For water-based paint, scrape excess paint off the roller, then wash with warm water and dish soap until the water runs clear. Squeeze and rinse repeatedly. It’s tedious, but it saves the roller.
If you need to pause overnight, wrap the roller tightly in plastic (or an airtight bag). This keeps it from drying out and turning into a crusty artifact from the Museum of Regret.
Important safety note: paint thinner and strong solvents are for specific paint types and should be handled carefully. Don’t use solvents on your skin, don’t treat plastic like it’s solvent-proof, and always follow product directions for disposal and ventilation.
Troubleshooting
My colors are turning muddy.
You’re over-rolling or pressing too hard. Reload more often, roll lighter, and do fewer passes in the same spot. Also make sure the tray dividers are actually stopping paint from mixing before it hits the roller.
The roller is dripping like it’s nervous.
Too much paint in the channels or paint that’s too thin. Reduce paint depth, do more “prime rolls” on scrap, and slow down.
My rainbow has gaps or faint stripes.
Uneven loading. One channel is too low, or the roller nap isn’t holding enough paint for your surface. Refill channels evenly and consider a slightly higher nap for textured walls.
My tape lines are jagged.
The tape edge wasn’t fully sealed, or it was pulled too aggressively. Press tape firmly, seal edges if needed, and remove slowly at a 45-degree angle. Scoring along the edge can help if paint has bridged over the tape.
FAQ
Can I use a DIY rainbow roller with regular wall paint?
Yeswater-based interior wall paint works well. Choose the right roller nap for your wall texture and do test rolls first.
Is this better for stripes or gradients?
Both. For stripes, use lighter pressure and fewer overlapping passes. For gradients, do extra test rolls and gently overlap while the paint is still wet.
Will it work on rough walls?
It can, but rough texture encourages blending. Use a thicker nap and embrace a softer, more “rainbow mist” look rather than razor-sharp bands.
Do I have to build the divided tray?
If you want consistent results, yes. You can “stripe load” with brushes directly onto the roller, but the tray keeps colors replenished and predictable.
Extra: My Rainbow Roller After-Action Report (Yes, It Got Weird)
Let me tell you what the tutorials don’t prepare you for: the emotional arc of painting a rainbow. It starts with confidence (“I am a creative genius!”), dips into chaos (“Why is green everywhere?”), and ends with pride (“This wall is now a serotonin vending machine.”).
Attempt #1 was… optimistic. I poured paint into the channels like I was feeding hungry ducklings. The roller loaded up, surebut it also dripped rainbow tears across my drop cloth in a pattern I can only describe as “modern art: tax season.” The fix was simple: less paint in the channels, more patience, and a quick reminder that gravity has never once cared about my plans.
Attempt #2 was the turning point. I did more test rolls on scrap cardboard, and suddenly the roller bands looked cleanlike a pack of highlighters decided to unionize. When I hit the wall, I used feather-light pressure and rolled slower than usual. That’s when it clicked: this isn’t “slam paint onto wall” energy. This is “guide the rainbow like you’re landing a plane made of feelings.”
The funniest surprise was how different colors behave. Yellow is the extrovertit shows up loud and early, and it’s always running out first. Blue is the introvertsteady, deep, and somehow ends up everywhere anyway. Red is dramatic and loves to announce itself. Purple is the mysterious friend who arrives late but makes the outfit.
I also learned that a rainbow roller is a great excuse to practice boundaries. You have to stop and refill channels before they’re empty. You have to clean the roller before paint dries. You have to resist over-rolling the same section because you want it “perfect,” even though that’s the exact moment the colors start mingling like strangers at a wedding open bar.
Then there was the tape situation. I tried framing a rainbow panel with painter’s tape and got cocky. I pressed the tape down… sort of. I didn’t seal the edge. I painted like a caffeinated raccoon. When I peeled the tape, I got a few little bleeds that looked like the rainbow had tried to escape. The fix was easytouch-up brush, calm breathing, and redoing the tape the right waybut it taught me a valuable lesson: painter’s tape is not magic. It’s a contract. Sign it properly.
Cleanup, surprisingly, became my victory lap. I scraped excess paint, washed the roller with warm soapy water, and realized the roller wasn’t ruined. It felt like a small miracle. I even wrapped the roller to keep it usable during breaks, which made me feel like I’d unlocked a secret level of DIY adulthood. The kind where you still paint rainbows, but you also label your cups. Growth.
And the final result? A rainbow trail that genuinely feels Nyan Cat–adjacent: bright, fast, unapologetic. The wall looks like it’s moving even when you’re standing still. People walk in, smile immediately, and then ask the inevitable question: “Where did you buy that roller?” And I get to say, with the smug joy of a person who survived a glitter incident, “Oh. I made it.”
Conclusion
Building a DIY rainbow roller inspired by Nyan Cat is one of those projects that’s equal parts practical and ridiculousin the best way. You get a custom tool, a faster way to lay down colorful stripes or gradients, and a story you’ll tell every time someone compliments the wall. Keep your paint controlled, test-roll before the real surface, and clean up quickly. The rainbow will do the rest.






