
Table of Contents >> Show >> Hide
- Before You Start: Know What Kind of Blade You Have
- Supplies You Will Need
- How to Sharpen Dog Clippers: 9 Steps
- Step 1: Unplug the clipper and remove the blade
- Step 2: Inspect the blade before you sharpen anything
- Step 3: Clean the blade thoroughly first
- Step 4: Mark the blade surface so you can track your progress
- Step 5: Sharpen the flat surfaces gently and evenly
- Step 6: Remove burrs and polish the edge lightly
- Step 7: Reassemble the blade correctly
- Step 8: Oil the blade at the right points
- Step 9: Test the blade before using it on your dog
- Common Mistakes That Ruin Dog Clipper Blades
- When to Sharpen, When to Replace, and When to Send It Out
- How to Keep Dog Clippers Sharp Longer
- Quick FAQ About Dog Clipper Sharpening
- Experience-Based Lessons: What People Learn the Hard Way About Sharpening Dog Clippers
- Conclusion
- SEO Tags
If your dog clippers sound like they are chewing hair instead of cutting it, congratulations: your blades are either dull, dirty, dry, misaligned, or staging a tiny metal rebellion. The good news is that you do not always need to buy a brand-new blade the moment your clipper starts dragging through the coat like it is pulling a sled uphill.
The better news? You can often restore performance with a smart mix of cleaning, light sharpening, oiling, and reassembly. The reality, though, is a little less glamorous than some internet tutorials make it seem. True professional blade sharpening is not just “rub it on a rock and hope for the best.” Many dog clipper blades, especially adjustable, ceramic, or 5-in-1 styles, are often better replaced or sent to a professional sharpener than heavily reshaped at home.
This guide focuses on the safest, most practical route for pet owners and beginning groomers: a careful edge refresh for detachable steel clipper blades, plus the maintenance steps that make your blades cut smoothly again. We will also cover when to stop, when to replace the blade, and when to let a sharpening service take the wheel.
Before You Start: Know What Kind of Blade You Have
Not all dog clipper blades are created equal. Some detachable steel blades can handle a light home sharpening session. Others are better off in the hands of a professional. If your blade is ceramic, a 5-in-1 blade, badly chipped, rust-pitted, or has broken teeth, this is not the moment to channel your inner blacksmith.
In plain English: if the blade is merely dull, a careful refresh may help. If it is damaged, bent, missing teeth, or cutting like a butter knife after maintenance, replace it or send it out for professional clipper blade sharpening.
Supplies You Will Need
- Detachable dog clipper blade
- Screwdriver that fits the blade screws
- Blade cleaning brush or soft toothbrush
- Blade wash or clipper cleaning solution
- Lint-free cloth or paper towels
- Fine sharpening stone, lapping plate, or fine diamond stone
- Permanent marker
- Clipper oil
- Optional: magnifying glass and cut-resistant gloves
Fancy workshop gear is nice, but not required for a light blade touch-up. What is required is patience. Sharpening is one of those jobs where rushing creates the exact opposite of efficiency. Ask any groomer who has turned a decent blade into a decorative paperweight.
How to Sharpen Dog Clippers: 9 Steps
Step 1: Unplug the clipper and remove the blade
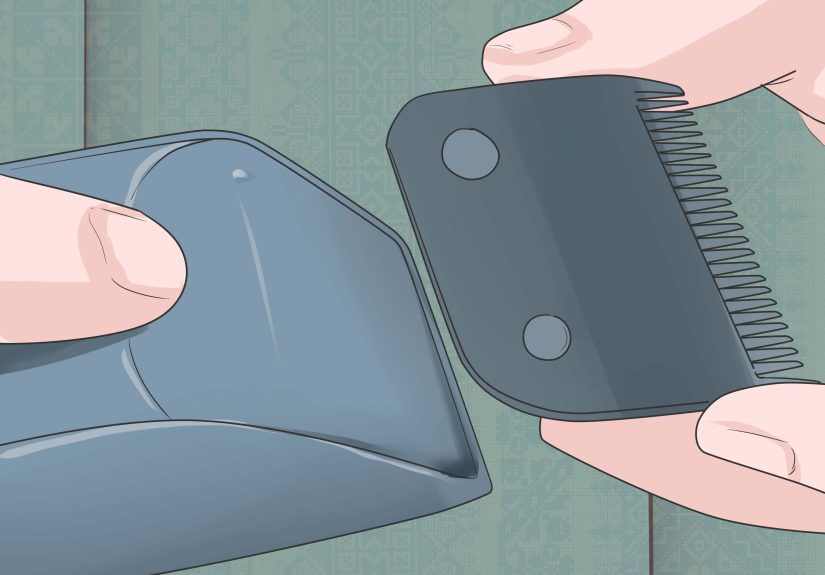
This sounds obvious, but “obvious” is where half of grooming mistakes begin. Turn the clipper off, unplug it if corded, and remove the blade completely. Never attempt to sharpen a blade while it is still attached to the clipper. That is not sharpening. That is auditioning for a cautionary tale.
If you are using a detachable blade system, pop the blade off carefully. If screws hold the blade assembly together, keep them in a small dish so they do not roll away into the mysterious dimension where socks and bobby pins go to retire.
Step 2: Inspect the blade before you sharpen anything
Look closely at the teeth, cutter, rails, and blade surface. You are checking for:
- Broken or bent teeth
- Rust or pitting
- Excessive wear
- Warping
- Hair, dander, or sticky residue packed between teeth
If a tooth is broken, do not sharpen it and hope for the best. Replace it. A damaged tooth can nick your dog’s skin, leave lines in the coat, and turn a routine groom into a stressful one. Likewise, if the blade is severely worn or warped, home sharpening is not your hero move.
Step 3: Clean the blade thoroughly first
This step gets skipped far too often, and it is one of the biggest reasons people think they need sharpening when they really need housekeeping. Hair, skin oils, bath residue, and microscopic grit can make a decent blade behave like a dull one.
Use your cleaning brush or toothbrush to remove visible debris. Then clean the blade with blade wash or a clipper-safe cleaning solution. Dry it fully with a lint-free cloth. Do not leave moisture hanging around like an unwanted party guest. Moisture invites rust, and rust is the sworn enemy of smooth grooming.
Sometimes, after cleaning alone, a blade that “needed sharpening” suddenly decides to behave. That is why this step comes before the sharpening stone, not after.
Step 4: Mark the blade surface so you can track your progress
Take a permanent marker and color the flat sharpening surface lightly. This old trick gives you a visual guide. As you sharpen, the marker rubs away from the high spots first, helping you see whether you are contacting the blade evenly.
If the marker disappears unevenly, your pressure or angle is off. That matters because uneven sharpening can create poor contact between the cutter and comb blade, which leads to pulling, chewing, heat, and every other annoyance you were trying to avoid in the first place.
Step 5: Sharpen the flat surfaces gently and evenly
Place the blade flat against your fine sharpening surface. The key word here is flat. You are not trying to invent a new angle or carve a dramatic bevel. Dog clipper blades rely on precision contact between parts, so keep the blade level and use light, controlled motions.
Move the blade in smooth figure-eight or straight passes, depending on the sharpening surface you are using. Use gentle pressure. A few passes are better than aggressive grinding. Then repeat on the cutter if your blade assembly allows it.
The goal is not to remove a bunch of metal. The goal is to refresh the cutting surface while maintaining blade geometry. If you go too hard, you can shorten blade life, ruin alignment, and turn “DIY savings” into “online shopping for replacement blades at midnight.”
Step 6: Remove burrs and polish the edge lightly
After a few careful passes, check the blade surface and edge. If a burr has formed, use the fine surface to remove it gently. Do not leave rough metal behind. A burr may feel sharp at first, but it usually cuts poorly, wears quickly, and can create a scratchy, grabby grooming experience.
This is where restraint pays off. You want a clean, consistent surface, not an overworked one. If the blade still looks rough after repeated passes, that is usually a sign it needs professional attention rather than more enthusiastic rubbing.
Step 7: Reassemble the blade correctly
Once the parts are clean and sharpened, put the blade back together carefully. Make sure the cutter sits properly and the screws are snug, but do not over-tighten them like you are securing a submarine hatch. Misassembly can make even a freshly sharpened blade cut terribly.
If you are dealing with an adjustable or two-hole blade system, alignment matters even more. A misaligned blade can cut too close, snag, or fail to cut at all. Follow your manufacturer’s alignment guidance for your specific model. Tiny differences in position can make a huge difference in performance.
Step 8: Oil the blade at the right points
Freshly sharpened metal without lubrication is like a bicycle chain without grease: technically capable of movement, but not politely. Apply a few drops of clipper oil to the moving points and teeth according to your clipper’s design.
Do not drown the blade. More oil is not more wisdom. Too much oil drips, attracts debris, and makes the coat look greasy. A small amount spread properly is enough. Turn the clipper on briefly after oiling so the lubricant distributes across the cutting surfaces.
If your blade was squealing before, this is often the moment it stops sounding like a tiny haunted violin.
Step 9: Test the blade before using it on your dog
Never go straight from sharpening bench to dog. Test the blade first on a clean towel, a patch of spare hair, or another safe test material. You are checking for:
- Smooth cutting
- No pulling or snagging
- No unusual heat buildup
- No rattling or screeching
- Even cutting without lines
If the blade still drags after cleaning, sharpening, oiling, and reassembly, stop there. The issue may be deeper than dullness. Worn blade tension, damaged parts, or poor alignment can all mimic a dull blade. At that point, replacement or professional service is usually the smarter choice.
Common Mistakes That Ruin Dog Clipper Blades
- Sharpening a dirty blade: Grit acts like sandpaper in all the wrong ways.
- Using too much pressure: Heavy grinding removes too much metal and changes blade geometry.
- Ignoring broken teeth: No amount of optimism will sharpen missing metal.
- Skipping oil: Dry blades heat up, squeal, and wear faster.
- Testing on the dog first: Your poodle is not quality control.
- Clipping dirty coats: Dust, grit, and tangles dull sharp blades fast.
When to Sharpen, When to Replace, and When to Send It Out
Sharpen at home if:
- The blade is detachable steel
- It is dull but not damaged
- You only need a light edge refresh
- You are comfortable disassembling and reassembling it
Replace the blade if:
- Teeth are chipped or broken
- The blade is badly rusted
- The cutter or comb is warped
- The blade still performs poorly after proper maintenance
Use a professional sharpening service if:
- You have an expensive blade worth preserving
- You need factory-level sharpening
- You are working with ceramic, specialty, or 5-in-1 blades
- You want consistent results without guesswork
For many groomers, professional sharpening is not admitting defeat. It is simply good tool management. Think of it like getting your kitchen knives professionally honed, except the customer has four legs and a very strong opinion about being tugged.
How to Keep Dog Clippers Sharp Longer
Sharpening is only half the story. Maintenance is what stretches blade life and protects your investment.
- Brush out and bathe dogs before clipping when appropriate
- Never clip through dirt, sand, or heavy matting unless you accept faster blade wear
- Clean hair from the blade after every use
- Oil regularly, especially during longer grooming sessions
- Use blade coolant or dip products correctly when the blade gets hot
- Store blades dry and protected from moisture
- Rotate between blades during long grooms so one blade does not overheat
A sharp blade is not just about grooming speed. It is also about comfort. Dogs feel pulling, snagging, and excess heat long before they can file a formal complaint. Their review arrives in the form of squirming, pawing, and side-eye strong enough to wilt houseplants.
Quick FAQ About Dog Clipper Sharpening
Can you sharpen dog clipper blades at home?
Yes, some detachable steel blades can be lightly sharpened at home. But many blades are better professionally sharpened or replaced, especially if they are damaged, ceramic, adjustable, or 5-in-1 styles.
How do you know a dog clipper blade is dull?
Common signs include pulling, snagging, needing multiple passes, uneven lines in the coat, and faster heat buildup.
Does oiling a blade make it sharp again?
No, but it can make a neglected blade perform much better. A dry blade often acts dull even when the edge still has life left.
How often should dog clipper blades be sharpened?
That depends on coat type, grooming frequency, maintenance habits, and whether you clip dirty or matted coats. For heavy-use groomers, sharpening may be routine. For pet owners, regular cleaning and oiling can stretch the time between sharpenings substantially.
Experience-Based Lessons: What People Learn the Hard Way About Sharpening Dog Clippers
Here is the part nobody tells you when you first search for how to sharpen dog clippers: the sharpening itself is only a fraction of the job. The real skill is learning to tell the difference between a blade that is truly dull and a blade that is simply dirty, dry, clogged, hot, or badly reassembled.
A lot of people have the same first experience. The clipper starts dragging halfway through a groom, the dog begins dancing around like the floor is lava, and the human immediately blames the blade. Then comes the panic search, the sharpening attempt, and the realization that the blade just needed a good cleaning and two drops of oil instead of an emergency spa treatment on a stone.
Another common lesson is that coat condition matters more than beginners expect. A clean, brushed coat feels almost magical under a decent blade. A dirty coat full of grit, loose undercoat, and tiny tangles can make a high-quality blade seem ancient in minutes. This is why experienced groomers get almost evangelical about prep work. Bathing, drying, brushing, and combing are not “extra.” They are what protect both the blade and the dog’s skin.
Then there is the pressure problem. New sharpeners often think, “If a little sharpening is good, a lot must be better.” That is how nice blades get overground. In practice, the best results usually come from a light hand, even passes, and knowing when to stop. Dog clipper blades are precision parts, not cast-iron skillets. You are refining them, not sanding down a deck.
People also learn, sometimes with colorful language, that reassembly matters just as much as sharpening. A blade can be freshly touched up and still cut terribly if the cutter is not seated correctly or the alignment is off. That moment when a sharpened blade still refuses to cut is frustrating, but it is also educational. It teaches you that blade performance is a system: edge, cleanliness, oil, tension, alignment, and coat prep all work together.
And finally, experienced users learn when to stop trying to be a hero. There is wisdom in recognizing that a damaged blade needs replacement or professional service, not another round of wishful polishing. Sending a good blade out for proper sharpening can save money, improve results, and spare your dog an uncomfortable grooming session. In other words, sometimes the smartest DIY move is knowing when not to DIY.
That is really the biggest takeaway from real-world dog clipper maintenance: sharp blades matter, but smart habits matter more. Clean them. Oil them. Store them properly. Prep the coat. Rotate hot blades. And when sharpening is needed, do it carefully, gently, and with enough humility to admit when the professionals should take over. Your clippers will last longer, your grooms will go smoother, and your dog will be far less likely to look at you like you have personally betrayed the grooming treaty.
Conclusion
If you want smoother grooming sessions, less tugging, and fewer moments where your clipper sounds like it is chewing gravel, learning how to sharpen dog clippers is absolutely worth your time. The trick is doing it the right way. Start with inspection and cleaning, refresh the edge carefully, oil properly, and always test before using the blade on your dog.
Most importantly, remember that sharpening is not a magic trick. Sometimes the real fix is maintenance. Sometimes it is replacement. And sometimes the wisest move is mailing that blade to a professional sharpener and letting modern civilization do its thing.






