
Table of Contents >> Show >> Hide
- What a Water Wheel Actually Does
- Choose the Right Type of Water Wheel First
- Best Simple Design for Beginners
- Materials You Will Need
- How to Make a Water Wheel Step by Step
- Design Tips That Make a Big Difference
- Common Mistakes to Avoid
- How to Make Your Water Wheel More Powerful
- Can You Use a Water Wheel to Generate Electricity?
- Safety and Setup Advice
- Why This Project Is Worth Building
- Final Thoughts
- Experience Section: What Building a Water Wheel Feels Like in Real Life
- SEO Tags
There are few DIY projects more satisfying than a water wheel. It spins, it splashes, it looks faintly like something a cheerful inventor would build in a barn, and it teaches a surprising amount of real engineering. Better yet, you do not need a medieval mill, a mountain stream, or a beard worthy of a frontier blacksmith to make one. A smart homemade version can be built with simple materials, tested in a sink, a basin, or a backyard setup, and tweaked until it spins like it has a point to prove.
If you are wondering how to make a water wheel that actually works instead of just posing for photos, the secret is simple: build for balance, match the wheel to the water source, and keep the design straightforward on your first try. Once the wheel runs smoothly, you can always get fancy later. That is the golden rule of DIY engineering, right after “do not glue your fingers together.”
What a Water Wheel Actually Does
A water wheel is a machine that turns the energy of moving water into rotational motion. Historically, that spinning motion powered mills, saws, pumps, and other machinery. Today, a simple homemade water wheel is often used for STEM projects, backyard features, classroom demonstrations, or as the first step toward understanding hydropower.
The basic idea is beautifully old-school. Water pushes or fills paddles or buckets attached to a wheel. That force causes the wheel to rotate around an axle. Once the axle turns, you can simply enjoy the motion, or connect it to a lightweight mechanical task such as lifting a small string weight or spinning a decorative element.
Choose the Right Type of Water Wheel First
Before you build, decide how the water will hit the wheel. This is not just technical trivia for people who collect engineering diagrams for fun. It affects whether your project works well or becomes a wet sculpture with self-esteem issues.
Overshot Water Wheel
An overshot wheel is powered by water dropping from above onto the top portion of the wheel. This design works very well when you can pour water from a pitcher, funnel, hose, or elevated container. For most home and classroom projects, an overshot-style wheel is the easiest design to test because gravity does a lot of the work.
Undershot Water Wheel
An undershot wheel sits in moving water and spins because the current pushes the paddles from below. This style is great if you have a shallow stream setup or want to demonstrate flow rather than falling water. It is simple in concept, but it often needs a steadier current to perform well.
Breastshot Water Wheel
A breastshot wheel is hit around the middle of the wheel rather than at the very top or bottom. Historically, this design was common in mills because it used both the force and weight of water efficiently. For a beginner DIY build, though, overshot usually wins because it is easier to control with household materials.
Best Simple Design for Beginners
If your goal is a first successful build, make a small overshot-style water wheel using two circular side pieces, an axle, and several evenly spaced paddles or cups. This design is stable, easy to troubleshoot, and works well with water poured from above. It also scales nicely. You can build a tiny tabletop version or a larger decorative yard model using the same basic geometry.
The beginner-friendly version described below uses inexpensive materials and common tools. It is practical, customizable, and much less likely to trigger a dramatic DIY identity crisis halfway through the build.
Materials You Will Need
- Two sturdy circular side pieces such as plastic lids, round wood discs, thick cardboard circles, or paper plates reinforced with waterproof tape
- Six to twelve small paddles or cups such as plastic spoons, bottle caps, trimmed plastic cups, or cut index cards folded into scoops
- One axle, such as a wooden dowel, skewer, metal rod, or straight pencil
- Two supports to hold the axle, such as wood blocks, cardboard stands, rulers, or a simple frame
- Waterproof glue, hot glue, or strong tape
- Scissors or a craft knife
- Ruler and marker
- A basin, sink, bucket, or tray for testing
- A pitcher, bottle, hose, or funnel to direct water onto the wheel
If you want a sturdier decorative version, swap cardboard for thin plywood or weather-resistant plastic. If you are making a classroom model, plastic and lightweight craft materials are usually easiest to cut and adjust.
How to Make a Water Wheel Step by Step
Step 1: Make the Two Side Discs
Start by cutting or selecting two circles of the same size. For a simple model, something between 6 and 12 inches in diameter works well. The larger the disc, the more torque you may get, but only if the wheel stays balanced. If one circle is larger than the other, the wheel will wobble and your elegant machine will spin like it heard bad news.
Mark the exact center of each disc. This matters more than people think. A poorly centered axle is one of the fastest ways to turn a water wheel into a lesson on disappointment.
Step 2: Attach the Paddles or Cups
Place your paddles evenly around the edge of one disc. Six to eight paddles are enough for a small model, while ten to twelve can work for a larger wheel. The spacing should be as even as possible. Think of slicing a pizza, but with less cheese and more hydropower.
Each paddle should stick out far enough to catch water but not so far that it makes the wheel heavy or unstable. If you are using spoons, bottle caps, or small cups, angle them slightly so the water can push into them rather than just bounce off. If you are using flat paddles, tilt them enough to catch flow efficiently.
Once the paddles are attached to the first disc, glue the second disc on the opposite side so the paddles are sandwiched between the two circles. Let everything dry completely. Rushing this step is a classic DIY move, usually followed by surprise detachment under active splash conditions.
Step 3: Insert the Axle
Push the dowel or rod through the center of the wheel. Make sure the wheel can rotate smoothly around the axle, or that the axle and wheel rotate together as one unit, depending on your design. Both can work, but the easiest model usually has the wheel fixed to the axle so the whole assembly turns together.
Keep the axle straight and centered. Test the wheel in your hands. If one side droops consistently, the wheel is unbalanced. Trim material, reposition a paddle, or add a small counterweight to correct it.
Step 4: Build the Support Frame
You need a support that holds the axle above a basin while allowing it to spin freely. A simple frame can be made from two blocks, stacked cardboard towers, or a pair of sturdy supports with notches cut near the top. Rest the axle in the notches so the wheel hangs freely between them.
Do not clamp the axle too tightly. The wheel needs room to rotate. If friction is high, even a well-designed wheel will act like it is too tired to participate.
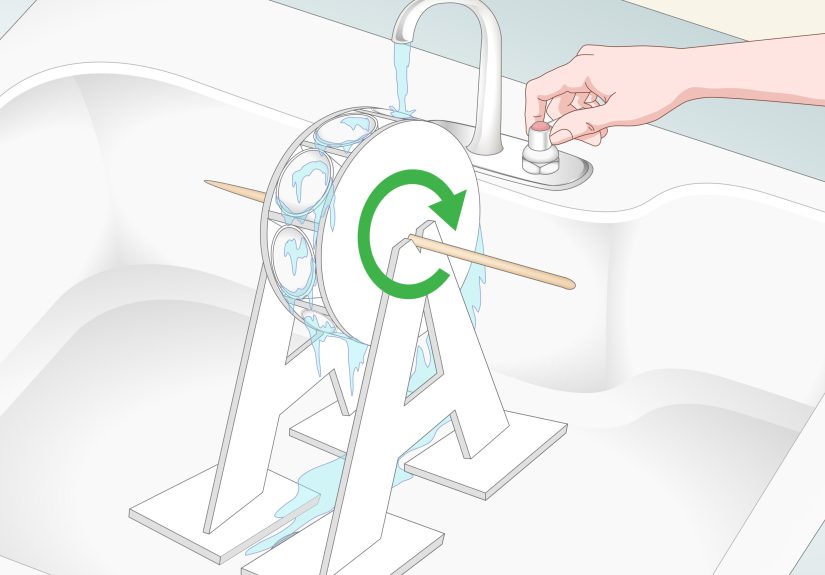
Step 5: Test the Water Flow
Set the wheel over a basin or sink. Pour water slowly from above onto the top paddles if you are making an overshot wheel. Start with a steady stream, not a dramatic waterfall reenactment. Too much water too fast can overwhelm a lightweight model and knock it sideways.
Watch how the wheel responds. Does it turn smoothly? Does it hesitate? Does one paddle seem heavier? Is water missing the cups entirely? Make one change at a time. Good builders test, observe, adjust, and test again.
Step 6: Fine-Tune the Design
This is where the project gets interesting. A working water wheel rarely comes from blind luck. It comes from small improvements. Try raising the water source a little higher. Adjust the angle of the paddles. Reduce drag by widening the support gap. Make sure the axle is level. If the wheel splashes dramatically but barely turns, your water is probably hitting the wrong spot or escaping too quickly.
In many cases, the best-performing version is not the prettiest one at first. That is engineering in a nutshell: the universe does not care whether your prototype looks charming if the axle is crooked.
Design Tips That Make a Big Difference
Keep the Wheel Balanced
Balance is the number one rule. Evenly spaced paddles and a centered axle matter more than decorative details. An unbalanced wheel wastes force, wobbles, and creates extra friction at the supports.
Match Paddle Shape to Water Flow
If water is falling from above, cup-like paddles usually perform better because they briefly hold water and use its weight. If water is moving across the bottom, broader flat paddles can catch current more effectively.
Use a Steady Flow
Water wheels love consistency. A controlled pour from a pitcher, bottle, or funnel often works better than an erratic spray. A steady flow makes it easier to compare changes and figure out what is actually improving the design.
Reduce Friction
If the axle rubs too hard against the frame, the wheel will lose efficiency fast. Smooth supports, a straight axle, and just enough clearance can dramatically improve performance.
Common Mistakes to Avoid
- Making the wheel too heavy for the water source
- Spacing paddles unevenly
- Missing the center point when installing the axle
- Using flimsy supports that flex under movement
- Pouring water at the wrong angle
- Testing too aggressively before glue or tape is fully set
Also, do not assume bigger automatically means better. A giant homemade wheel with weak water flow may look impressive, but a smaller balanced wheel often spins faster and more reliably.
How to Make Your Water Wheel More Powerful
Once your basic model works, you can improve it. Increase the height of the water source to give the water more useful energy before impact. Adjust the paddle depth so cups hold water briefly without becoming dead weight. Change the number of paddles and compare results. Try different diameters. Add a string around the axle or wheel hub and see whether it can lift a small weight.
This is where the project becomes more than a craft. It turns into a real engineering challenge. You can compare designs, record rotation counts, test how long the wheel spins, or measure how much weight it can lift over a short distance.
Can You Use a Water Wheel to Generate Electricity?
Technically, yes, but that is a separate project. A simple DIY water wheel mainly demonstrates mechanical energy. To generate electricity, you need a system that connects rotational motion to a small generator or motor used in reverse. That requires extra parts, a more efficient drive system, and a more consistent water source.
So if your first goal is to learn how to make a water wheel, focus on smooth rotation first. Build the reliable wheel before you try to power the future.
Safety and Setup Advice
Use caution with cutting tools, hot glue, and slippery surfaces. If children are involved, adult supervision is a very good idea. Test the wheel where spilled water is not a disaster. A sink, storage tub, or outdoor basin works far better than a wooden floor that would prefer to remain wooden.
If you build a larger garden version, use water-safe materials and protect the axle area from swelling or rust. Outdoor builds look magical, but nature is not known for respecting craft glue.
Why This Project Is Worth Building
A homemade water wheel teaches force, motion, energy transfer, design iteration, and practical troubleshooting in one project. It also connects modern makers to a much older tradition of using water for useful work. In that way, it is both a craft and a tiny history lesson that happens to splash.
And unlike some DIY projects, a water wheel gives immediate feedback. Either it spins or it sulks. That clarity is helpful. It pushes you to observe what is happening, change the design, and learn by doing. That is why this project remains popular in classrooms, workshops, and backyard experiments.
Final Thoughts
If you want to know how to make a water wheel, the best answer is not “buy fancy parts” or “memorize complicated engineering formulas.” It is this: build a balanced wheel, choose the right style for your water source, keep the axle centered, and test patiently. Start simple, then improve the design. That is how good water wheels are made, and honestly, it is how most good DIY projects survive long enough to become stories worth telling.
Build one that spins well, and you will not just have a cool homemade machine. You will have a working example of renewable-energy thinking, mechanical design, and the timeless joy of making something useful out of simple parts. Also, you will have an excellent excuse to say, “Behold, my hydropower device,” which is never a wasted opportunity.
Experience Section: What Building a Water Wheel Feels Like in Real Life
The first real experience most people have when building a water wheel is surprise. On paper, the project looks almost ridiculously simple. You make a round wheel, add paddles, run water over it, and enjoy your tiny masterpiece. Then real life arrives carrying a crooked axle, uneven paddle spacing, and water that absolutely refuses to land where you imagined it would. That is not failure. That is the project finally becoming real.
One of the most common experiences is discovering that balance matters more than decoration. Many first-time builders spend extra energy making the wheel look beautiful, only to learn that one paddle glued a half-inch too high can turn the whole thing into a wobbling mess. The good news is that this lesson sticks. After one test run, people start measuring more carefully, checking symmetry, and thinking like builders instead of hopeful guessers.
Another familiar moment comes during the first successful spin. It is oddly satisfying. Even a small tabletop wheel can feel like an engineering triumph when water hits the paddles correctly and the axle turns without fighting the frame. There is usually a pause, a grin, and then an immediate urge to improve the design. People start asking better questions right away. What if the cups were deeper? What if the water hit higher? What if the support frame had less friction? The project naturally pulls people into experimentation.
Many builders also notice that water is both helpful and chaotic. It is the power source, but it is also the troublemaker. Too much flow and the wheel jerks or floods. Too little and it barely moves. A stream that looks steady can actually hit one side harder than the other. A pitcher pour that seems straight can scatter off a paddle and miss the next three. These experiences teach patience. You stop assuming and start observing.
There is also a practical joy in using everyday materials. A pair of plastic lids, a dowel, some spoons, a tray, and a bottle of water can become a working machine. That transformation feels rewarding because it makes engineering approachable. You do not need a fancy lab to understand motion, force, and energy transfer. You just need a build that gives you permission to test, adjust, and try again.
For families and classrooms, the experience often becomes collaborative in the best way. One person holds the frame, another pours the water, someone else counts rotations, and a fourth person loudly declares that the wheel would work better “if we rebuilt the whole thing,” which is dramatic but not always wrong. That teamwork becomes part of the memory. People remember the splash, the redesign, and the moment the improved version finally works.
By the end, most builders walk away with more than a water wheel. They gain a hands-on understanding of why historic mills were engineered so carefully and why modern renewable energy systems depend on design details. They also gain respect for trial and error. Building a water wheel teaches that good results usually come from observation, revision, and a willingness to laugh when version one behaves like a confused salad spinner. And honestly, that is a pretty useful experience to have.





