Table of Contents >> Show >> Hide
- What You’ll Make (and Why It Works)
- Materials and Tools
- Before You Start: Quick Pro Tips
- How to Make a Plush Pawprint Keychain: 14 Steps
- Step 1: Sketch a simple pawprint pattern
- Step 2: Add seam allowance to the paw outline
- Step 3: Cut the plush pieces (front and back)
- Step 4: Cut the felt paw pads
- Step 5: Arrange the pads on the front paw piece
- Step 6: Attach the pads (appliqué your way)
- Step 7: Prepare the keychain loop
- Step 8: Baste the loop to the front paw piece
- Step 9: Sew the front and back pieces together
- Step 10: Clip curves and reduce bulk (carefully)
- Step 11: Turn the paw right-side out
- Step 12: Stuff it smoothly
- Step 13: Close the opening with an invisible stitch
- Step 14: Add hardware and do a durability check
- Troubleshooting: Common “Why Is It Doing That?” Moments
- Variations That Make This Keychain Even Better
- Care Tips (Because Keys Are Grimy Little Goblins)
- Extra: Real-World Experiences and Lessons Makers Learn
- Wrap-Up
If your keys are currently living their best life at the bottom of your bag (with old receipts and a mysterious mint),
it’s time to give them a cozy upgrade. A plush pawprint keychain is small, squishy, and ridiculously cute
plus it’s a great beginner sewing project because it’s basically a tiny stuffed “pillow” with toe beans.
In this tutorial, you’ll make a soft pawprint charm with plush fabric on the outside and felt paw pads on the front.
You can hand sew it, machine sew it, or do the classic “machine for the big seams, hand for the tiny drama” combo.
Either way, you’ll end up with a durable DIY plush keychain that’s easy to gift and hard to stop squeezing.
What You’ll Make (and Why It Works)
A pawprint keychain looks simple, but it’s a smart little project for practicing core plushie skills:
consistent seam allowance, sewing curves, basic appliqué, clean turning, smooth stuffing, and a neat invisible close.
It also teaches a key lesson: the hardware is not an afterthought. A cute keychain that pops off your keys is just
a tiny plush tragedy.
Materials and Tools
Fabric and stuffing
- Plush fabric (minky, fleece, faux fur, or velour): a 6″ x 6″ piece is plenty
- Felt for paw pads (wool-blend felt looks crisp; craft felt works fine)
- Polyester fiberfill (or your preferred plush stuffing)
- Optional: fusible web (to keep pads from shifting while you sew)
Notions
- Keychain hardware: split ring + jump ring, or a swivel clip, or a short keychain chain
- Ribbon/webbing loop (3–4″ of 3/8″–1/2″ grosgrain or sturdy twill tape)
- Thread matching your plush (plus embroidery floss if you want decorative stitching)
- Hand sewing needle (sharp or embroidery needle) + pins/clips
Tools
- Paper + pencil (pattern)
- Fabric scissors (and small snips for detail work)
- Fabric marker or chalk
- Optional: sewing machine
- Optional but helpful: turning tool (chopstick, blunt pencil, hemostats)
Before You Start: Quick Pro Tips
-
Mind the nap: Plush fabrics have a “direction” (the fibers lie one way). Cut both paw pieces with the nap running the same direction
so the front and back match instead of looking like they’re from two different dogs. - Choose your size: A finished paw around 2.5″–3″ tall is great for keys. Bigger looks adorable, but it can feel bulky in pockets.
-
Use strong attachment: A fabric loop sewn into the seam is sturdier than gluing hardware on the outside.
(Glue is fine for crafts; keys, however, live a rough life.)
How to Make a Plush Pawprint Keychain: 14 Steps
Step 1: Sketch a simple pawprint pattern
On paper, draw one large “main pad” (rounded triangle/bean shape) and four smaller toe pads (ovals or rounded teardrops).
Then draw the paw outlinea rounded mitten-like shape that’s big enough to hold the pads with a comfy border.
Easy sizing guideline: make the overall paw about 3″ tall and 2.5″ wide. Keep the pads about 1/4″ away from the outline so your seam won’t eat them.
Step 2: Add seam allowance to the paw outline
If you’re drawing freehand, you can treat your outline as the cut line and sew about 1/4″ inside it.
If you prefer precision, draw two lines: inner sewing line and outer cutting line.
Plush is forgiving, but your future self will appreciate consistency.
Step 3: Cut the plush pieces (front and back)
Trace the paw outline onto the back of your plush fabric twice, making sure the nap goes the same direction for both pieces.
Cut carefully. If you’re using faux fur, try snipping only the backing so you don’t turn your workspace into a tiny fur blizzard.
Step 4: Cut the felt paw pads
Trace and cut one set of pads from felt: four toes + one main pad. If you want contrast, pick a felt color that “pops” against your plush.
For extra cute points, use two-tone pads (for example, a lighter inner pad layered on a darker base). Tiny details, huge payoff.
Step 5: Arrange the pads on the front paw piece
Place one plush paw piece right-side up (this is your front). Arrange the felt pads in a classic pawprint layout:
toes in an arc, big pad centered below. Take a moment to balance spacingthis is the “face symmetry” moment of your paw.
Optional: use fusible web to lightly tack pads in place, or pin/clip carefully.
If you’re pinning, pin from the edges so you don’t permanently dent plush pile.
Step 6: Attach the pads (appliqué your way)
You have three great options. Choose based on time, tools, and vibe:
-
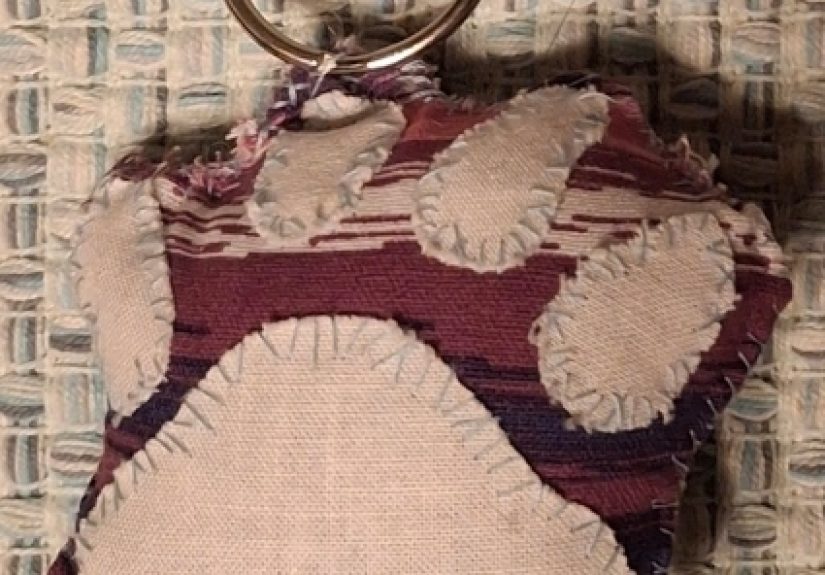
Hand blanket stitch (cute + classic): Use embroidery floss or thicker thread around each pad edge.
It looks intentional and hides minor wobbles. - Machine zigzag/blanket stitch (fast + tidy): Great if your machine likes going around curves.
- Straight stitch (minimalist): Sew close to the pad edge, then do a second line for a “stitched patch” look.
Tip: If felt edges fuzz or lift, slow down and pivot often. Curves behave better when you treat them like a series of tiny straight lines.
Step 7: Prepare the keychain loop
Cut a 3″–4″ piece of ribbon or webbing. Fold it into a loop and overlap the raw ends by about 1/2″.
If your ribbon frays, lightly seal the ends (carefully, and only if the ribbon is synthetic).
This loop will get sewn into the top seam of the paw. It’s the keychain’s “spine,” so don’t make it out of something flimsy.
Step 8: Baste the loop to the front paw piece
Place the loop at the top center of the front paw piece, with the loop pointing inward (toward the center of the paw),
and the raw ends aligned with the top edge. Baste it in place with a few stitches (or a short machine stitch) inside the seam allowance.
Why baste? Because nothing ruins a crafting mood faster than sewing your loop sideways and realizing it only after you’ve turned the paw right-side out.
Step 9: Sew the front and back pieces together
Place the back paw piece on top, right sides together, sandwiching the loop inside. Clip or pin around the edges.
Sew around the paw with a 1/4″ seam allowance, leaving a 1″–1.5″ opening along one side or the bottom for turning.
If hand sewing, use a small backstitch for strength. If machine sewing, go slow around curves and reinforce the area near the loop with a few extra stitches.
Step 10: Clip curves and reduce bulk (carefully)
Curves need breathing room. Clip small notches into the seam allowance around rounded areas (don’t cut the stitches!),
and trim bulky seam allowance slightlyespecially if your plush is thick.
This helps the paw turn smoothly and prevents “lumpy edges.”
Step 11: Turn the paw right-side out
Turn through the opening and use a turning tool to gently push out rounded edges.
Take your timeplush fabric is forgiving, but aggressive poking can create pointy corners where you wanted soft curves.
Once turned, use your fingers to “massage” the seams so the stitching sits right on the edge.
(Yes, your pawprint gets a spa day. It’s earned it.)
Step 12: Stuff it smoothly
Use small pieces of fiberfill and pack them gradually, especially into the toe area.
Start with the top and edges, then fill the center last. You want it firm enough to keep its shape,
but not so overstuffed that the seams look stressed.
If you see lumps, pull stuffing back out and replace with smaller tufts. Smooth stuffing is mostly about patience,
not magical talent bestowed by the Crafting Council.
Step 13: Close the opening with an invisible stitch
Fold the raw edges of the opening inward along the seam line. Then use a ladder stitch (also called an invisible stitch/slip stitch)
to close it neatly. Pull the thread gently as you go so the seam “zips” closed.
Finish with a few small securing stitches and hide the thread tail inside the plush.
Your goal: the closing seam should be the paw’s best-kept secret.
Step 14: Add hardware and do a durability check
Attach a jump ring or split ring through the fabric loop. If you’re using a chain or swivel clip, connect it now.
Give the keychain a gentle tug testpull on the hardware, then on the plush, and make sure the loop feels locked in.
Optional finishing touches:
- Brush plush pile away from seams with a clean toothbrush for a fluffier look.
- Add a tiny embroidered initial on the back for personalization.
- Lightly trim any long fibers caught in stitches (tiny grooming, big glow-up).
Troubleshooting: Common “Why Is It Doing That?” Moments
My plush fabric keeps slipping
Use clips instead of pins, sew slowly, and consider basting by hand first.
If you machine sew a lot of plush, a walking foot can help keep layers feeding evenly.
The paw pads look crooked
Before stitching, snap a quick photo of the layout. Photos show asymmetry more honestly than our excited crafting brains.
Also: a slightly goofy paw is still adorable. Real paws aren’t perfectly symmetrical either.
My stuffing is lumpy
Use smaller tufts, fill edges first, then the center, and “massage” the plush after stuffing.
If lumps persist, remove stuffing and refill gradually rather than trying to force-smooth a packed clump.
Variations That Make This Keychain Even Better
- Mini version: Make a 2″ paw for zipper pulls and backpack charms.
- Double-sided pads: Add felt pads on the back too for a fully “beaned” look.
- Shaker paw: Add a few weighted pellets inside (securely) for a gentle, satisfying heft.
- Memorial paw colors: Match your pet’s fur/paw pad tones for a sentimental keepsake.
- Glow paw: Use glow-in-the-dark thread for the pad outlinesbecause why not.
Care Tips (Because Keys Are Grimy Little Goblins)
Spot clean with mild soap and a damp cloth. Let it air dry fully.
Avoid tossing it in the washer unless your fabric and stuffing are specifically wash-friendlyand even then,
hardware can clank around like it’s auditioning for a percussion section.
Extra: Real-World Experiences and Lessons Makers Learn
When people try a plush pawprint keychain for the first time, the biggest surprise is usually how “small” small feels.
A paw that looks perfect on paper can suddenly seem tiny once it’s stuffed and attached to keys. That’s why many crafters
end up making two: the first is the practice paw, the second is the “this is going on my bag immediately” paw.
Another common experience: choosing plush fabric is basically choosing your adventure difficulty. Smooth minky can be wonderfully soft,
but it has opinionsespecially around curves. Many makers notice that if they cut without paying attention to nap direction, the front and back
reflect light differently, and the paw looks like it’s two different shades. The fix is simple (cut both pieces with the nap aligned),
but it’s one of those lessons you remember forever after you’ve made the “two-tone mystery paw.”
The appliqué step can also be a confidence builder. At first, sewing tiny toe beans feels like doing embroidery on a moving trampoline.
Felt helps because it doesn’t fray and it holds its shape, but the trick is to slow down and treat curves like short segments.
A lot of makers find that blanket stitch (or a similar decorative edge stitch) is forgiving: it hides micro-wobbles and makes the pads look intentional,
like a boutique patch instead of a panicked last-minute attachment.
Stuffing is where the “experience” factor really shows up. Beginners often grab one big handful of fiberfill and push it in,
then wonder why the paw looks like it swallowed a golf ball. More experienced plush makers tend to use many small tufts,
filling edges and corners first. The difference is dramatic: small tufts give you a smooth, pillowy shape, and you can control firmness.
A common tip shared among crafters is to pause halfway and massage the pawsqueeze and roll it gently so the stuffing redistributes.
It feels a little silly, but it turns “lumpy homemade” into “squishy polished.”
Hardware attachment is the part that experienced makers never skip. Plenty of people try a quick solutionlike sewing a small loop on the outside
and then discover that keys tug sideways all day. The loop can twist, stitches can strain, and suddenly the paw is doing gymnastics you didn’t approve.
Sewing the loop into the seam (and reinforcing that area) is the boring step that prevents heartbreak.
It’s also why so many keychains sold at craft fairs have a sturdy internal loop: it’s tested by real-life key chaos.
Finally, the ladder stitch moment is a rite of passage. The first time you do it, you might pull too hard and pucker the seam,
or pull too softly and leave a visible gap. But once it clicks, it feels like a superpower: you close an opening and the stitches basically disappear.
Many makers end up using the same stitch to repair plush toys, close pillows, and finish little projects neatly.
In other words, this “tiny paw” project often teaches a skill you’ll use everywhere.
Wrap-Up
That’s ityou’ve made a plush pawprint keychain with secure hardware, smooth stuffing, and toe beans that deserve their own fan club.
Once you finish one, you’ll start noticing how many shapes can become mini plush charms: hearts, stars, little fruits, tiny animals,
and (dangerously) “just one more paw in a different color.”