Table of Contents >> Show >> Hide
- Why Stones Sink in the First Place
- Signs Your Walkway Needs More Than a Quick Cosmetic Fix
- Tools and Materials That Make the Job Easier
- How to Fix a Walkway With Sinking Stones, Step by Step
- 1. Mark the Problem Area
- 2. Take Photos Before You Remove Anything
- 3. Lift the Stones Carefully
- 4. Inspect the Base and the Soil Beneath It
- 5. Rebuild the Base, Not Just the Surface
- 6. Add Bedding Sand or Stone Dust and Screed It Level
- 7. Reset the Stones
- 8. Refill the Joints and Lock the Surface
- 9. Check the Edges
- Drainage Fixes That Prevent Repeat Repairs
- When Tree Roots Are the Real Problem
- Mistakes to Avoid
- How to Keep the Walkway From Sinking Again
- Extra Experiences: What Homeowners Usually Learn the Hard Way
- Conclusion
A sinking stone walkway has a special talent: it can make a perfectly nice yard look tired, slightly haunted, and oddly determined to trip your guests. The good news is that most sunken stones are not a sign of doom. They are usually a sign that the support underneath the stones has shifted, washed out, compressed, or never had a fair chance in the first place. Once you understand why the walkway is settling, the repair becomes much less mysterious and much more manageable.
Whether your path is made of flagstone, concrete pavers, stepping stones, or a mix of materials, the basic repair logic is the same: remove the stones, inspect the base, rebuild what failed, improve drainage, then reset everything so the surface is level, stable, and comfortable to walk on. In other words, you are not just putting the stones back where they belong. You are fixing the reason they left.
Why Stones Sink in the First Place
Stones do not usually settle because they are old. They settle because the layers beneath them lose strength. In many walkways, the visible stone is only the top layer of a small system. Under that surface there may be bedding sand, stone dust, crushed gravel, compacted soil, edging, and the natural subgrade below. If one of those layers gets soft, erodes, shifts, or stays too wet, the stones above it begin to dip.
The most common culprit is poor base preparation. If the original installer laid stone over loose soil, thin gravel, or an uneven bed of sand, the walkway may have looked great on day one and started sagging later. Rainwater also causes trouble. Water can wash fine material out from underneath the stones, saturate the soil, or create repeated wet-dry cycles that weaken support over time. Freeze-and-thaw weather makes the situation worse because water expands as it freezes, then leaves behind movement and gaps when it melts.
Other causes are more specific. A path may sink where people step most often, where a downspout empties, where edging failed and the base spread outward, or where burrowing animals created voids below the surface. Tree roots can also shift a walkway, although in those cases the path may lift in one area and sink in another. That is why the repair should begin with diagnosis, not wishful thinking and a heroic amount of extra sand.
Signs Your Walkway Needs More Than a Quick Cosmetic Fix
If one isolated stone rocks slightly, a simple reset may solve the problem. But some symptoms suggest the repair needs to go deeper. Watch for a cluster of low stones rather than a single dip. Check for puddles after rain, gaps between stones, edging that has pulled away, weeds thriving in the joints, or stones that move when you step on them. If you see several of those at once, the issue is probably in the base, not just at the surface.
You should also pay attention to what is happening around the walkway. Soil erosion along one side, mulch washing onto the path, a downspout dumping water nearby, or a soggy area that never fully dries all point to drainage problems. If roots are visibly lifting neighboring stones or cracking adjacent hardscape, the repair may need a design change rather than just a reset.
Tools and Materials That Make the Job Easier
You do not need a contractor’s trailer full of gear for a basic repair, but a few tools will save your back and your patience. Helpful items include a flat pry tool or small screwdriver, rubber mallet, shovel, hand tamper, rake, level, straight board for screeding, broom, utility knife, work gloves, and a wheelbarrow. For larger sections, a plate compactor can make a major difference in the quality of the finished repair.
Materials depend on the type of path, but they often include crushed stone or gravel for base repair, bedding sand or stone dust for leveling, joint sand or polymeric sand for locking stones in place, and replacement edging if the original restraint has failed. If you need to dig deeper than a simple surface adjustment, mark utilities first and work carefully.
How to Fix a Walkway With Sinking Stones, Step by Step
1. Mark the Problem Area
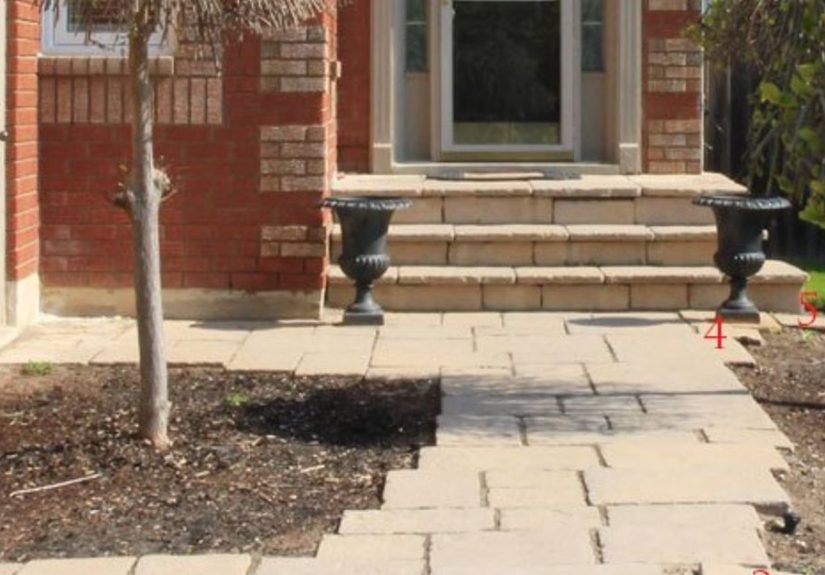
Start by identifying every low or unstable stone, not just the one that catches your eye first. Walk the path slowly. Wiggle the stones with your foot. Use a long straight board or level across the surrounding surface to see how far the low section has dropped. Mark a repair zone that extends beyond the obvious dip. This matters because the problem often spreads farther than the single stone that finally gave away the secret.
2. Take Photos Before You Remove Anything
If the walkway has a pattern, photograph it before you start lifting stones. This is especially useful for pavers, irregular flagstone pieces, or any path where the stones fit together like a jigsaw puzzle designed by a very stubborn artist. A few quick photos can save a surprising amount of guesswork later.
3. Lift the Stones Carefully
Remove the affected stones plus a small border around them. Work gently so you do not chip edges or disturb stable areas more than necessary. Set the stones aside in order if possible. Brush off loose joint material and debris. If you find weeds, washout, ant tunnels, or hollow pockets, that is useful evidence. The walkway is telling you what went wrong.
4. Inspect the Base and the Soil Beneath It
Now comes the important part. Scrape away loose bedding material and inspect what is underneath. If the gravel base is thin, muddy, or uneven, rebuild it. If the soil beneath is soft or wet, remove the weak material until you reach firmer ground. If you find animal tunnels or voids, fill them and compact the area before rebuilding. If roots are pushing through, pause and rethink the repair so you do not create a bigger tree problem by hacking away at large structural roots.
5. Rebuild the Base, Not Just the Surface
This is the step many rushed repairs skip, and it is the reason some “fixed” walkways sink again after the next rainy season. Add crushed stone or paver base in thin lifts and compact each layer well. For many residential walkways, a base depth of roughly 4 to 6 inches is common, though the exact depth depends on soil conditions, climate, and traffic. The goal is a firm, even, well-compacted layer that matches the surrounding base and does not feel spongy underfoot.
If the walkway sits in a chronically wet area, consider whether the base needs to be slightly raised or the drainage improved before you continue. A repair that ignores standing water is often just a delay dressed up as progress.
6. Add Bedding Sand or Stone Dust and Screed It Level
Once the base is solid, add a thin leveling layer. Many paver systems use about 1 inch of bedding sand. Some stone walkways use stone dust or similar fines that match the original construction. Use a straight board to screed the material so it is even and flush with the surrounding area. The surface should be smooth, level, and slightly proud if you expect the stones to settle into it when tamped.
This is not the moment to dump in a mountain of sand and hope gravity becomes your quality control manager. Too much bedding material can create a soft layer that leads to more movement later.
7. Reset the Stones
Place the stones back in their original pattern. Check each one with a level and with your eye from several angles. Tap high stones down gently with a rubber mallet. Lift and adjust low stones rather than pounding neighboring stones to match them. The repaired section should sit even with the surrounding path and feel stable when stepped on.
For stepping stones in grass or groundcover, make sure the finished height suits the setting. Stones that are too high become trip points. Stones that are too low collect soil and disappear under turf. A good stepping stone feels intentional, not like a fossil reemerging from the lawn.
8. Refill the Joints and Lock the Surface
Sweep joint sand, stone dust, or polymeric sand into the gaps, depending on the walkway type and what matches the original installation. This helps lock the stones together and reduces movement. If you use polymeric sand, follow the product directions carefully and remove excess from the surface before activating it with water. The goal is tight joints and a clean finish, not a gritty film that turns your nice stone path into a chalkboard.
9. Check the Edges
Edge restraints matter more than they get credit for. If the outer edges of the walkway are loose, spread apart, or missing support, even a well-rebuilt center section can shift again. Replace damaged edging, pin it securely, and make sure the base is contained. A walkway without edge restraint is like a pie without a pan: everything gradually heads in the wrong direction.
Drainage Fixes That Prevent Repeat Repairs
If your walkway keeps sinking, water is often the repeat offender. The path should not trap runoff from the roof, lawn, or neighboring beds. Ideally, the walkway sheds water rather than collecting it. A slight slope away from structures or toward a safe drainage area can help. In some yards, the real fix may involve redirecting a downspout, correcting the grade, adding a drain, raising a low section of the path, or using more permeable materials nearby.
For informal garden paths, wider joints, stepping-stone spacing, and permeable shoulder materials can help water move through instead of pooling on the surface. In areas that stay soggy, it may be smarter to elevate the walkway slightly than to keep reinstalling the same stones at the same failing elevation.
When Tree Roots Are the Real Problem
Roots near walkways are tricky because the obvious repair is not always the smart repair. If roots are causing displacement, avoid casually cutting major roots close to the trunk. Large roots often play an important structural role for the tree. In those situations, the better solution may be to reroute the path, bridge over the root zone, raise the walkway slightly, or switch to a more flexible path system. The goal is to protect both the walkway and the tree, not to start a chain reaction that turns a small path repair into an arborist bill.
Mistakes to Avoid
- Only adding surface sand: If the base is weak, the stones will sink again.
- Skipping compaction: Loose base material almost guarantees future settling.
- Ignoring drainage: Water wins arguments with hardscape.
- Resetting too small an area: The dip often extends beyond the worst-looking stone.
- Forgetting edge restraint: Sideways spread can undo the whole repair.
- Overfilling joints carelessly: Excess material on the stone surface can stain or harden.
- Cutting major roots without a plan: That can damage the tree and create new hazards.
How to Keep the Walkway From Sinking Again
Once the repair is done, maintenance is simple but important. Inspect the path after heavy rain and after winter weather. Refill joints when material washes out. Sweep away debris so moisture does not sit on the surface. Watch for early movement and fix one loose stone before it becomes six. Keep edging secure. Redirect downspouts that empty onto the walkway area. If the path crosses a problem zone in the yard, consider improving the drainage around the entire area rather than repeatedly patching one symptom.
It also helps to remember that different walkways age differently. Formal paver paths like tight joints and consistent maintenance. Rustic stepping-stone paths can tolerate a softer, more natural look, but they still need a stable footing. A path should feel reliable underfoot, even if the style is casual.
Extra Experiences: What Homeowners Usually Learn the Hard Way
One of the most common experiences with a sinking stone walkway is realizing that the problem looked tiny from the porch and much larger once the repair began. A homeowner may start the day thinking, “I’ll level one stone before lunch,” and by midafternoon discover a shallow bowl-shaped area, a washed-out base near the edge, and a downspout that has been quietly undermining the path for two years. That experience is frustrating, but it is also useful because it changes the repair from cosmetic to lasting.
Another common lesson is that stones rarely sink in isolation. People often notice the worst stone first because it wobbles or catches a toe, but the surrounding stones may already be slightly off. Once they are lifted, the pattern becomes clear: the low area usually extends outward, and the base failure often follows the way water moved through the site. Homeowners who repair a wider section the first time are usually happier than those who patch one stone, admire their work, and then repeat the same project a month later two feet away.
There is also a very relatable experience involving confidence. At the start, many people assume the visible stone is the hard part. In reality, the most important work happens in the layers nobody sees. The project turns a corner when the homeowner stops obsessing over the top surface and starts caring about compaction, drainage, slope, and edge support. That is the moment the repair becomes durable. It is not glamorous, but neither is tripping over the same stone every spring.
People also tend to remember how much difference a straight board and a level can make. Before using them, a repair may look fine from one angle and strangely lumpy from another. After screeding the bedding layer and checking heights carefully, the path suddenly looks intentional again. Even irregular flagstone can look neat and grounded when the stones are seated properly and the joints are consistent.
In yards with mature trees, the biggest experience is often learning restraint. A lifted or shifted walkway beside a beautiful tree tempts people to go after the visible root with a shovel and a sense of destiny. Then they learn that big roots near the trunk are not decorative inconveniences; they help support the tree. The smarter experience is usually to adapt the path design, soften the transition, or raise a section slightly instead of forcing the tree and the walkway into a fight.
Finally, many homeowners come away from the project with a new appreciation for drainage. After one repair, they begin to notice everything: where puddles form, where mulch washes, where roof water lands, where the lawn stays spongy, and where frost seems to move the ground most. In a funny way, fixing a sinking walkway can make someone much better at reading the yard as a whole. And that may be the most valuable experience of all, because once you can see how water and soil are behaving, future repairs become easier, smarter, and far less annoying.
Conclusion
Fixing a walkway with sinking stones is not just a matter of lifting low pieces and sprinkling fresh sand underneath. The real repair starts below the surface. When you identify the cause, rebuild the base properly, restore drainage, and reset the stones with care, the walkway stops feeling like a hazard and starts doing what it was meant to do: guide people comfortably through the landscape.
A well-repaired path should feel solid, look natural, and handle weather without immediately falling back into old bad habits. So yes, you can absolutely fix that sinking stone walkway. Just remember the golden rule of hardscape repair: the visible problem is usually only the top layer of the story.