
Table of Contents >> Show >> Hide
- Why Make Over Your Bathroom Countertop Instead of Replacing It?
- Choosing the Right Counter-top Makeover Method
- Step-by-Step Paint Makeover (Hometalk-Style Faux Granite)
- Epoxy and Contact Paper: Quick Overviews
- Common Mistakes to Avoid
- Care and Maintenance After Your Makeover
- Real-Life Experiences: What a Bathroom Counter-top Make Over Is Really Like
If your bathroom countertop is giving strong “builder-grade 1998” energy, you don’t have to rip the whole vanity out to fix it.
A bathroom counter-top make over can turn yellowed laminate or dated cultured marble into something that looks like custom stone
without designer prices or a construction crew taking over your house.
Inspired by Hometalk-style makeovers, this guide walks you through the most popular DIY options: painting a faux stone finish,
pouring glossy epoxy, or wrapping the surface in peel-and-stick contact paper. We’ll cover prep, products, step-by-step techniques,
and real-life tips so you can pull off a weekend transformation that holds up to splashes, toothpaste, and everyday life.
Why Make Over Your Bathroom Countertop Instead of Replacing It?
Replacing a bathroom vanity top sounds simple until you start pricing new countertops, plumbing, and disposal.
A new top plus installation can easily run a few hundred dollars, and that’s before you fall in love with the “fancy” quartz sample.
Painting or resurfacing the countertop, on the other hand, usually costs under $150 in materials and can dramatically change how the whole room feels.
A bathroom counter-top makeover also:
- Saves money: You keep the existing vanity and focus on cosmetics instead of full replacement.
- Cuts down on mess: No demo, no hauling heavy tops through doorways, less dust and debris.
- Lets you test-drive a look: Try faux marble, concrete, or speckled “granite” without a lifetime commitment.
- Is landlord-friendly (sometimes): Peel-and-stick options can be removable, making them great for rentersif your lease allows cosmetic changes.
Many Hometalk DIYers start exactly where you might be right now: with a solid but ugly countertop.
With some prep, paint, and patience, they end up with a faux granite or marble finish that looks surprisingly high-end,
especially once the walls, hardware, and faucet get a refresh to match.
Choosing the Right Counter-top Makeover Method
Before you start buying supplies, decide how you want your “after” to look and what your bathroom can handle in terms of moisture and wear.
Most DIY makeovers fall into three big buckets.
1. Painting for a Faux Stone Finish
Painting is the classic budget option for a bathroom counter-top make over. You scuff the surface, apply primer,
then layer paint to mimic stonethink speckled granite, soft concrete, or light marble veiningand seal it with a clear topcoat.
Painting works especially well on:
- Laminate countertops (Formica-style surfaces)
- Cultured marble that has lost its shine
- Older tops in good structural shape but terrible colors
With the right primer and topcoat, painted laminate can handle everyday bathroom use surprisingly well,
as long as you avoid harsh cleaners and give the finish time to fully cure before heavy use.
2. Epoxy Resin for a Glossy, High-End Look
If you love the look of real stone, epoxy countertop kits are another favorite Hometalk-style solution.
These two-part resins self-level into a thick, glassy surface that can be tinted, swirled, and veined to look like marble or granite.
Epoxy is especially popular when you want a dramatic pattern and ultra-smooth finish.
Epoxy is:
- Durable: When properly cured, it resists water, everyday splashes, and typical bathroom use.
- Seamless: The self-leveling resin hides minor imperfections and fills shallow dips.
- Bold: You can create high-contrast veining and movement that paint alone can’t quite match.
The trade-off: epoxy projects are a bit messier and require careful measuring, mixing, and ventilation.
If you’re patient and follow a tutorial closely, though, the results can look very custom.
3. Peel-and-Stick Contact Paper for Fast Makeovers
Peel-and-stick countertop film or “marble” contact paper is the quickest way to hide a dated counter.
You clean the surface, cut the film to size, smooth it in place, and trim the edges. It’s a great short-term fix,
especially in rentals or guest baths that don’t see heavy daily use.
Contact paper is:
- Inexpensive: Usually under $40 for a full vanity.
- Low-commitment: It can often be peeled off later with minimal damage to the original surface.
- Endlessly decorative: Available in faux marble, concrete, wood, and solid colors.
The downside is durability: seams and edges around sinks are more vulnerable to water, and heavy scrubbing can damage the film.
Still, with careful installation and a bit of caulk around the sink edge, it can look surprisingly polished.
Step-by-Step Paint Makeover (Hometalk-Style Faux Granite)
Let’s walk through a detailed bathroom counter-top make over using paint to get that granite-style finish, similar to many Hometalk projects.
Adjust the colors to match your own bathroom.
Step 1: Assess and Prep the Countertop
Start by taking stock of what you’re working with. If the countertop is cracked, swollen from water damage,
or separating from the vanity, no amount of paint will fix structural problems. In those cases, replacement may be the better long-term option.
If the surface is solid, prep is everything:
- Remove everything from the countertop and vanity.
- Take off the faucet if you’re comfortable with basic plumbing, or at least loosen it so you can paint cleanly around it.
- Scrub the top thoroughly with a degreasing cleaner or dish soap solution to remove soap scum, oils, and residue.
- Rinse well and let it dry completely.
- Lightly sand the entire surface with 120–180 grit sandpaper until the gloss is dulled.
- Vacuum the dust and wipe down with a tack cloth or microfiber towel.
Don’t rush this part. Poor cleaning and sanding are the number one reason paint projects chip or peel early.
Step 2: Tape, Protect, and Prime
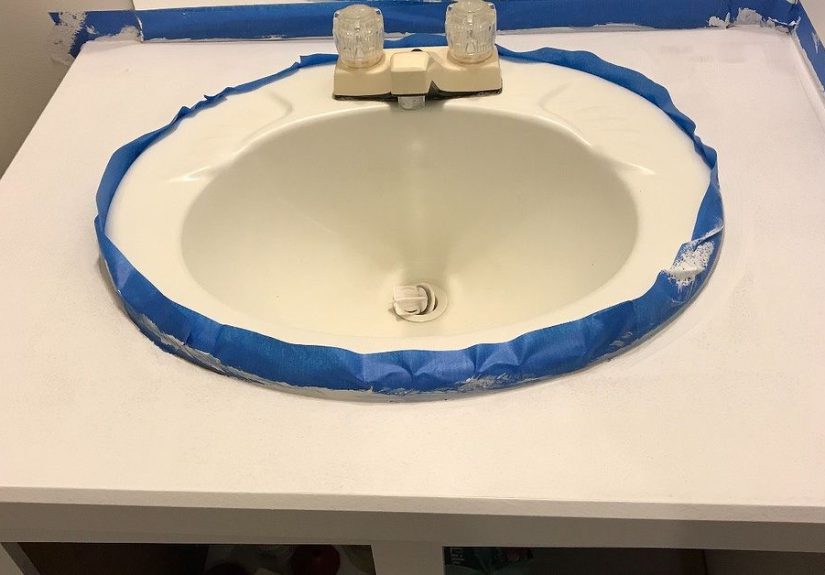
Once the surface is clean and dull, protect everything you don’t want painted:
- Use painter’s tape along the wall, sink edge, and edge of the vanity cabinet.
- Cover the floor and cabinet fronts with drop cloths or plastic.
Next, brush on a high-adhesion bonding primer designed for slick surfaces like laminate or cultured marble.
Use a brush around the sink and backsplash line, then a small foam roller on the flat areas for a smooth finish.
One to two thin coats are usually better than one thick coat; let each coat dry according to the manufacturer’s directions.
Step 3: Roll on the Base Color
For a faux granite look, most DIYers use a medium or dark base colorlike charcoal, warm taupe, or deep greige.
Choose a high-quality acrylic or enamel paint that’s compatible with your primer and topcoat.
Pour some paint into a tray and:
- Cut in around the sink and edges with a brush.
- Use a dense foam roller to roll the flat areas in overlapping passes.
- Avoid overworking the paint; lay it on and let it level as it dries.
Let the base coat dry fully before adding texture or speckles. If you’re covering a very light or very patterned original top,
you may want a second base coat for full coverage.
Step 4: Add Speckles and Stone Texture
This is where the magic happens. To mimic granite, you’ll layer lighter and darker specks over the base color using:
- A small sea sponge
- An old toothbrush (for fine speckles)
- A stiff artist’s brush for dabbing and blending
Choose two to three accent colorsa lighter shade, a darker shade, and maybe a soft white or cream.
Dip the sponge lightly in paint, dab most of it off onto a paper plate, then tap the surface in random clusters.
Rotate your wrist and overlap colors so it looks natural, not polka-dotted.
Step back often to check the overall look. Real stone isn’t perfectly symmetrical; you’re aiming for a balanced yet organic pattern.
Step 5: Seal with a Clear Topcoat
Once you’re happy with the faux stone effect and everything is fully dry, it’s time to seal.
For bathrooms, use a durable, water-resistant clear coat like a water-based polycrylic or a countertop-safe protective coating.
Apply the topcoat in thin, even layers with a foam roller:
- Roll in one direction for each coat to minimize lap marks.
- Lightly sand with very fine grit between coats if the surface feels rough.
- Apply two to three coats for better protection.
Then comes the hardest step: waiting. Most coatings feel dry to the touch within hours,
but they need several daysor even a couple of weeksto fully cure.
Use the sink lightly at first, avoid standing water, and don’t set heavy objects or organizers on the surface too soon.
Step 6: Finish the Look
A bathroom counter-top make over really shines when you finish the rest of the details:
- Re-caulk along the backsplash and sink edge with fresh, neat caulk.
- Swap in a new faucet if the old one screams “before photo.”
- Update hardware, mirror, and lighting to match your new countertop style.
- Bring in a few accessoriesa tray, a plant, or a pretty soap dispenserto keep the surface organized and stylish.
This is exactly how many Hometalk projects go from “my counters are painted” to “my whole bathroom looks renovated.”
Epoxy and Contact Paper: Quick Overviews
Epoxy Countertop Basics
If you decide to go the epoxy route rather than just paint and poly, the basic flow looks like this:
- Prep and prime the countertop just as carefully as you would for paint.
- Roll on a tinted undercoat that matches your final color scheme.
- Mix the two-part epoxy exactly according to instructions.
- Pour and spread the resin, letting it self-level over the surface.
- Add veining or accents with tinted epoxy or metallic powders while it’s still wet.
- Babysit the surface for a while, popping bubbles with a heat gun or torch as directed.
Epoxy needs more curing time and ventilation than paint, but the result is a thick, glossy surface that can make a small bathroom feel more upscale.
Contact Paper & Countertop Film Tips
For peel-and-stick countertop film or contact paper, the devil is in the details:
- Clean and dry the surface thoroughly so the adhesive sticks well.
- Cut the film slightly oversize and trim once it’s applied.
- Work slowly, peeling the backing and smoothing with a squeegee to avoid bubbles.
- Wrap edges and corners like a present for a more realistic look.
- Use clear caulk around the sink to keep water from sneaking under the seams.
While it’s not as long-lasting as paint or epoxy, contact paper is an amazing “for now” fixespecially in guest baths or rentals.
Common Mistakes to Avoid
Even the prettiest inspiration photos don’t show the outtakes. Here are common bathroom counter-top make over mistakes and how to sidestep them:
- Skipping sanding: Shiny surfaces need to be dulled so primer and paint can grip.
- Using the wrong primer: Regular wall primer may not adhere well to laminate; use a bonding or adhesion primer.
- Rushing dry time: “Dry to touch” is not the same as “fully cured.” Give products the full recommended time.
- Ignoring ventilation: Epoxy, oil-based paints, and some primers have strong fumescrack a window and wear a mask as needed.
- Forgetting about the sink edge: This is where water loves to sit; seal seams well and avoid leaving puddles.
Being picky about prep and patient with drying are the two biggest predictors of a makeover that still looks great a year later.
Care and Maintenance After Your Makeover
Once your bathroom counter-top make over is complete, treat it like the upgraded surface it is:
- Wipe spills promptly, especially colored products like hair dye or nail polish remover.
- Use mild, non-abrasive cleaners instead of harsh chemicals or scouring powders.
- Set heavy or sharp objects on trays or soft pads rather than directly on the surface.
- Avoid standing water around the faucet and sink cutout.
A little care goes a long way toward keeping your DIY finish smooth and glossy instead of dull and chipped.
Real-Life Experiences: What a Bathroom Counter-top Make Over Is Really Like
Reading tutorials is helpful, but hearing how a makeover actually feels in real life can prepare you for the “oh wow,
this is a process” moments. Here are some experience-based insights that mirror what many Hometalk-style DIYers report.
First, expect your bathroom to be out of commission longer than the label suggests.
On paper, paint might be dry in a few hours, but in reality you’ll probably want to keep heavy use to a minimum for several days.
That means brushing your teeth at the kitchen sink, stacking toiletries in laundry baskets, and storing makeup in a tote bag.
It’s mildly inconvenientbut when you walk in later to a “new” vanity for under $150, it usually feels worth it.
Second, don’t panic during the awkward stages. Almost every DIY bathroom counter-top make over has a point where it looks terrible:
primer streaks, patchy base color, or speckling that seems way too busy. Many people share that they wanted to give up halfway through,
only to fall in love with the result after the clear coat went on and everything leveled out.
Trust the process, keep your hand light with the sponge, and keep stepping back to look at the whole counter, not just a six-inch square.
You’ll also discover how much the surrounding elements matter.
A freshly painted countertop next to old, yellowed caulk and a dated faucet can feel like putting new shoes on with your oldest jeans.
Little upgradesnew caulk, a modern faucet, a framed mirror, or a coat of paint on the vanity cabinetamplify the makeover.
Many DIYers say that once the counter looked great, they felt motivated to finish those lingering projects they’d been ignoring.
Another real-world lesson: choose colors that suit your actual lighting.
Bathrooms often have zero natural light and rely on warm or cool bulbs, which can dramatically shift how paint and faux stone finishes appear.
What looks like soft gray in daylight might read almost beige under warm vanity lights.
Painting a few sample boards or foam pieces and viewing them in your bathroom lighting can save you from repainting later.
Finally, expect your skills to grow during the project. If this is your first attempt at a faux finish, your hand might feel clumsy at the start.
By the time you reach the second half of the counter, you’ll usually be more confident in how much paint to load,
where to place highlights, and how to soften harsh spots. That’s why it’s smart to start in the least noticeable corner and work toward the most visible area.
The section you do last will typically be your best workexactly where everyone’s eyes land when they walk into the bathroom.
In short, a bathroom counter-top make over isn’t just a cosmetic upgrade; it’s a crash course in prep work, patience, and problem-solving.
You’ll probably end up far more comfortable with sanding, taping, painting, and caulking than you were at the beginning.
And every time you wash your hands on that “new” surface, you get a little jolt of satisfaction knowing your own effortnot a contractor’s invoicemade it happen.






