
Table of Contents >> Show >> Hide
- Before You Fold: The Tiny Prep That Makes Your Box Look 10x Better
- Way 1: The Classic Origami Masu Box (Beginner-Friendly and Weirdly Satisfying)
- Way 2: The Rectangular Origami Box (Made From Regular Letter Paper)
- Way 3: The Origami Envelope Box (Slim, Secure, and Great for Flat Stuff)
- Way 4: The Score-and-Fold Paper Box (Sturdy, Customizable, and Gift-Ready)
- Make Any Paper Box Stronger (Without Turning It Into a Cardboard Fort)
- Common Paper Box Problems (and the Not-So-Dramatic Fixes)
- Paper Box Experiences: Lessons From Real Craft Tables (The Fun Part)
- Conclusion
You know that moment when you need a box right nowfor a tiny gift, a pile of paper clips, or the
mysterious “little things” that multiply on every countertop like they pay rent? Good news: one sheet of paper can
become a surprisingly legit container with nothing but folds (and, okay, sometimes a sneaky cut).
In this guide, you’ll learn four easy, beginner-friendly ways to make a paper box: a classic origami bowl-style box,
a rectangular desk organizer from regular letter paper, a slim envelope box for flat items, and a sturdy scored box
that looks store-bought enough to make your scissors feel proud.
Before You Fold: The Tiny Prep That Makes Your Box Look 10x Better
Choose the right paper (your box will thank you)
- Printer paper is fine for practice, but it makes “light snack” boxes, not “hold-my-life-together” boxes.
- Cardstock or scrapbook paper creates sharper corners and sturdier wallsgreat for gift boxes and keepsakes.
- Wrapping paper works, but it can be slippery and thin. Pair it with a slightly thicker inner layer if you want strength.
- Recycled paper (like old flyers or calendar pages) makes adorable, budget-friendly boxes that look intentionally artsy.
Make a perfect square from a rectangle (no fancy tools)
Many origami boxes start with a square. If you only have letter-size paper, fold one corner diagonally so the short
edge aligns with the long edge. Crease hard, then trim off the extra strip. Unfold and you’ve got a square ready for
business.
Pro-level crisp folds without pro-level equipment
- Score first (lightly crease before the “real” fold) for cleaner linesespecially on cardstock.
- Burnish your creases with a ruler edge, a spoon, or a clean fingernail. Your corners will look sharper instantly.
- Work on a flat surface so the paper doesn’t “drift” while you fold.
Way 1: The Classic Origami Masu Box (Beginner-Friendly and Weirdly Satisfying)
The Masu box is the classic “open-top” origami boxperfect for candy, dice, jewelry, desk doodads, or that one
lonely button that’s been rolling around since 2019. It’s simple, clean, and teaches you the core folding logic used
in many paper box patterns.
Best for
- Small gifts and treats (wrap food in wax paper first)
- Paper clips, coins, LEGO pieces, earrings
- Party favors and classroom crafts
What you’ll need
- 1 square sheet of paper (6×6 inches is a great starter size)
- Optional: ruler/spoon for crisp creases
Steps (simple version)
- Make guide creases: Fold in half one way, unfold. Fold in half the other way, unfold. (You’re building “maps” for your paper.)
- Fold corners to the center: Bring each corner into the center point. Crease firmly.
- Fold edges inward: Fold the top edge to the center line, then the bottom edge to the center line. Unfold both.
- Repeat on the other direction: Fold left edge to center, then right edge to center. Unfold.
- Open two opposite corners: Keep two corners folded and open the other two (diagonal from each other).
- Form the walls: Lift the paper along existing creases so the sides rise up. Tuck flaps inward to lock the corners.
- Square it up: Pinch corners and flatten the bottom so the box sits nicely without wobbling like a baby deer.
Make a lid (optional, but very “gift-ready”)
To add a lid, make a second Masu box using paper that’s slightly larger (for a looser lid) or slightly smaller (for a
tighter lid). A simple rule: change the paper size by about 1/4 inch to 1/2 inch depending on paper thickness.
Thicker paper needs a little more wiggle room.
Way 2: The Rectangular Origami Box (Made From Regular Letter Paper)
No square paper? No problem. This rectangular origami box is a lifesaver for last-minute organization: pens,
pencils, sticky notes, charging cables, makeup, or tiny “where did this come from” hardware.
Best for
- Desk organizers
- Drawer dividers (make several and line them up)
- Long skinny items like markers, paintbrushes, or cables
What you’ll need
- 1 sheet of letter-size paper (8.5×11 inches)
- Optional: thicker paper for sturdiness
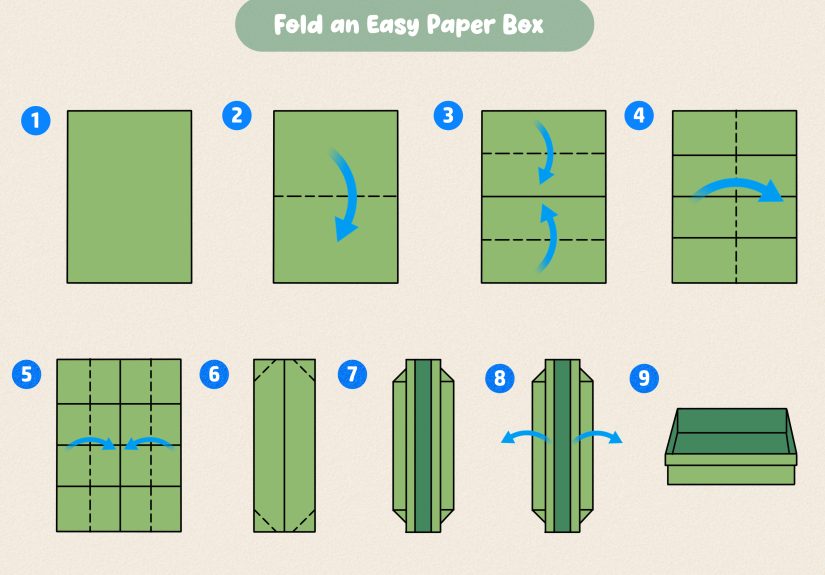
Steps (easy-to-follow overview)
- Start landscape: Place the paper horizontally.
- Fold in half: Fold left-to-right, crease, then unfold.
- Bring edges to the center: Fold left edge to the center crease; repeat with the right edge.
- Flip and repeat: Turn the paper over and repeat the “edges to center” idea so the folds stack neatly.
- Create corner supports: Fold corners inward along existing lines to form triangular “braces.”
- Open the sides and shape: Gently open the structure, push pointed bits inward, and pinch corners until the box looks crisp and rectangular.
Quick sizing tip
Want a longer, skinnier box? Keep the paper more rectangular (don’t trim to a square). Want a less “skinny” box?
Use a shorter rectangle (or trim a bit off the long side) so the proportions shift.
Way 3: The Origami Envelope Box (Slim, Secure, and Great for Flat Stuff)
This one is part envelope, part boxan elegant little folded container that works beautifully for flat items. It’s
the paper-craft equivalent of a minimalist wallet: slim, functional, and weirdly classy for something you made on
your kitchen table.
Best for
- Gift cards, notes, and small invitations
- Tea bags, stamps, stickers
- Flat jewelry like hoop earrings or thin necklaces
What you’ll need
- 1 square sheet of paper (thin origami paper or thin textured paper works great)
Steps (friendly overview)
- Make diagonal creases: Fold diagonally both ways, then unfold.
- Fold corners to center: Bring all four corners into the middle point. Crease sharply.
- Crease the “grid”: Fold top and bottom toward the center, unfold; fold left and right toward the center, unfold.
- Build the pocket shape: Open side flaps and use the existing creases to “squash” corners into neat triangular pockets.
- Lock it up: Fold flaps over one another until the envelope-box structure holds its shape without tape.
Make it feel expensive
Use patterned paper on the outside and a solid color on the inside. If you’re making an invitation holder, slip a
smaller square note inside so the recipient gets a tidy “reveal” moment.
Way 4: The Score-and-Fold Paper Box (Sturdy, Customizable, and Gift-Ready)
If origami feels like doing geometry while holding your breath, this method is the calm, practical cousin.
You score, cut, fold, and assembleresulting in a sturdy paper box that can look wonderfully polished.
Best for
- Small gift boxes (especially if you want clean edges)
- Party favors and treat boxes
- Craft fairs, product packaging for lightweight items
What you’ll need
- 1 sheet of cardstock (12×12 inches is ideal)
- Ruler
- Scissors (or craft knife with supervision and a cutting mat)
- Optional: double-sided tape or glue stick for extra strength
A simple example layout (12×12 sheet)
One beginner-friendly pattern scores the paper at key inch marks to create a box base and lid shape. Here’s an
easy scoring approach that yields a compact gift box:
- Score at 3 inches and 9 inches on one direction.
- Rotate the paper, then score at 1 inch, 3.5 inches, 6.5 inches, and 9 inches.
- Cut away corner sections (following the score grid), then fold and burnish all scored lines.
- Lift side flaps and assemble; secure with tape or glue if you want it extra sturdy.
How to customize the size (the “math,” but make it friendly)
Think of a scored box like a plus sign: the center becomes the bottom, and the arms become the sides. Pick:
- Bottom size (for example: 3×3 inches for a tiny box)
- Wall height (for example: 1 inch)
Your score lines generally sit one wall-height away from each edge of the bottom panel. If you keep the bottom
panel square, your box stays symmetrical and easier to assemble. For a lid, repeat the pattern slightly larger so
it slides on without crushing your masterpiece.
Make Any Paper Box Stronger (Without Turning It Into a Cardboard Fort)
Strength upgrades that actually work
- Use thicker paper: Light paper folds easily, but thicker paper holds shape and corners better.
- Double-layer the base: Add a second square of paper inside the bottom for reinforcement.
- Reinforce stress points: A tiny dot of glue or a strip of double-sided tape inside corners makes boxes last longer.
- Don’t overfill: Paper boxes are brave, not magical. Keep heavy items small and centered.
Decoration ideas that don’t scream “I panicked at the last minute”
- Wrap a thin ribbon around the box and tie a bow.
- Add a label tag (bonus points for hand-lettering).
- Use a hole punch and thread twine through for a simple closure.
- Stamp patterns along the edges for a clean, boutique feel.
Common Paper Box Problems (and the Not-So-Dramatic Fixes)
“My box won’t stay closed.”
Your folds may be a little soft. Re-crease the locking folds firmly and burnish them. If it’s a gift box holding
anything heavier than a feather, add a touch of glue inside the flaps.
“The lid doesn’t fit.”
If you’re folding a lid-and-base set, adjust paper size. Thicker paper needs a slightly bigger lid; thinner paper
can use smaller size differences. When in doubt, test with scrap paper firstyour future self will applaud you.
“My corners look wrinkly.”
That’s usually from rushing or misaligning edges. Slow down on the first few folds (they control the whole
structure). Also, make sure you’re folding exactly to the crease intersections, not “close enough in spirit.”
Paper Box Experiences: Lessons From Real Craft Tables (The Fun Part)
Paper boxes seem simpleuntil you actually start making them and realize they’re basically tiny, polite engineering
projects. One of the most common “aha” moments people have is that the paper is doing two jobs at once: it’s
creating the shape and creating the structure that holds that shape. The difference between a box that stands
proudly and a box that collapses like a tired accordion usually comes down to one thing: crisp folds.
In classrooms, paper boxes are a secret weapon. Teachers love them because the supplies are cheap and the skills
stack: following directions, measuring, spatial reasoning, fine motor control. Kids love them because they can put
stuff in them immediately (and “stuff” is a universal language). The funniest part is watching how quickly the
project evolves. First, everyone makes one box. Then someone makes a lid. Then someone makes a “box apartment”
where smaller boxes live inside bigger boxes like nesting dolls. Ten minutes later, the room is basically a
miniature storage facility run by very enthusiastic paper engineers.
At home, paper boxes tend to become the unsung heroes of everyday organization. A rectangular origami box on a desk
can stop pens from migrating to the floor. A small Masu box can become a safe parking spot for rings while doing
dishes. An envelope box is perfect for stamps, spare keys, or the tiny SIM-eject tool that disappears the instant
you actually need it. And because paper boxes are fast to make, they’re low-pressure: if one gets messy or bent,
you just make another and pretend the first one was a “prototype.”
Gift-giving is where paper boxes really show off. A plain gift can feel instantly more thoughtful when it’s placed
in a neatly folded box with patterned paper. People remember the presentationespecially when it looks handmade in
a deliberate way, not in a “this was assembled during a commercial break” way. The trick is choosing paper with
enough body to hold edges. Even simple cardstock transforms the final result from “cute” to “wait, you made this?”
Add a bow or a paper label, and suddenly your box is giving boutique vibes on a thrift-store budget.
And yes, mistakes happen. Lids that don’t fit. Corners that puff out. Boxes that look like they’ve been through
emotional turmoil. But those moments are oddly useful: they teach you how tiny size changes matter, how paper
thickness affects fit, and why slow, accurate creases are worth it. The best “experience-based” tip is also the
simplest: make your first version from scrap paper, then make your final version from the pretty paper. It’s the
crafting equivalent of a rehearsal dinnerless stressful, more successful, and nobody cries into the ribbon.
Conclusion
Paper boxes are one of those skills that pay off forever: fast to learn, endlessly adaptable, and surprisingly
useful in real life. Whether you’re folding a classic Masu box, turning letter paper into a desk organizer,
creating a sleek envelope box for flat goodies, or scoring cardstock into a sturdy gift box, you now have four
reliable ways to make an easy paper boxand look like the kind of person who always has it together (even if your
junk drawer says otherwise).





