
Table of Contents >> Show >> Hide
- What Are Rainbow Roses?
- Why White Roses Work Best
- The Science Behind Rainbow Roses (Without the Textbook Headache)
- Supplies You’ll Need
- How to Make Rainbow Roses Step by Step
- How Long Does It Take to Make Rainbow Roses?
- Tips for Better Results (a.k.a. How to Avoid Sad Beige Rainbow Roses)
- Common Problems and How to Fix Them
- How to Make Rainbow Roses Last Longer
- Creative Ways to Use Rainbow Roses
- Final Thoughts
- Experience-Based Notes and Real-Life Tips (Extended Section)
If regular roses are elegant, rainbow roses are the floral equivalent of showing up to brunch in sequins. They’re bright, dramatic, and surprisingly fun to make at homewithout needing a florist’s secret lab or a degree in wizardry.
The good news: you can create a beautiful DIY version using white roses, water, and food coloring. The even better news: the process also doubles as a mini science experiment, because you’ll actually watch color travel through the stem and into the petals. If you’ve ever wanted a craft that is part bouquet, part conversation starter, and part “wait… how is this working?”you’re in the right place.
In this guide, you’ll learn exactly how to make rainbow roses, what supplies to use, how to avoid muddy colors, how long the process takes, and how to keep your dyed roses looking fresh as long as possible.
What Are Rainbow Roses?
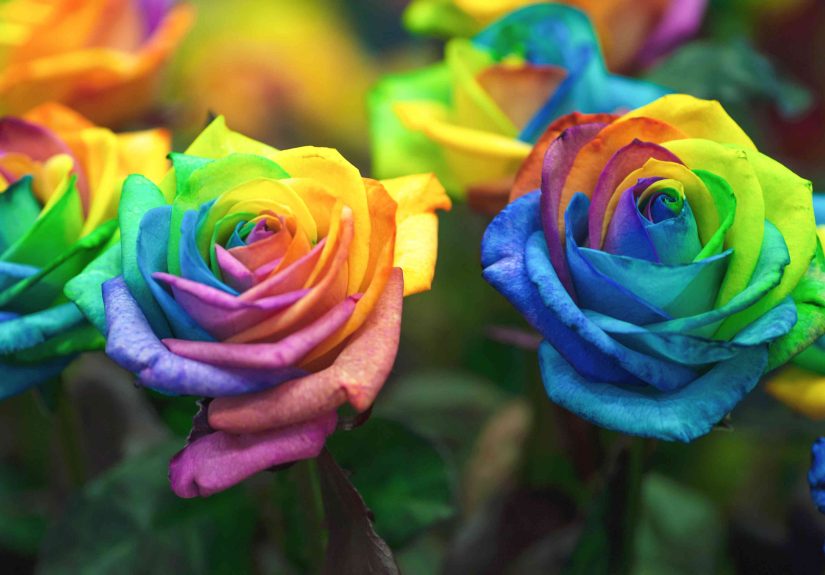
Rainbow roses are not a naturally grown rose variety. They are created by dyeing cut white roses so different petals absorb different colors. In other words, they’re madenot bred. That’s why the most common method uses a split stem placed into multiple containers of colored water.
This technique works because the rose continues to pull water upward through tiny transport tubes in the stem. When that water contains dye, the color moves with it and stains the petals over time. It’s a little botany, a little craft, and a lot of “wow.”
Why White Roses Work Best
White roses are the best choice because their petals act like a blank canvas. Pale cream roses can work too, but the final colors may look softer or slightly altered. Dark roses (red, pink, orange) usually overpower the dye, which means your “rainbow” may end up looking like a moody bruise. Pretty? Maybe. Rainbow? Not exactly.
For the best results, choose fresh roses with buds that are just starting to open. Flowers that are too tight may not open fully, and roses that are already fully open may fade before they develop strong color.
The Science Behind Rainbow Roses (Without the Textbook Headache)
Here’s the simple version: the stem acts like a straw. Water moves upward through xylem tissue, helped by capillary action and transpiration. As the petals and leaves release water, more dyed water gets pulled up from the containers.
Because the dye stays behind when the water evaporates, the petals gradually become colored. That’s why you’ll often notice the edges of petals tint first, then deeper color developing over time. If you’re making rainbow roses with kids (with adult knife handling), this is a fantastic hands-on demonstration of how plants move water.
Supplies You’ll Need
- Fresh white roses (start with 3–6 for practice)
- Food coloring (red, blue, and yellow are great starters)
- Water
- 3–4 narrow containers per rose (small glasses, bud vases, jars, or cups)
- A sharp knife or razor blade (disinfected)
- Pruning shears or a sharp floral cutter
- Rubber bands (optional)
- Plastic bags (optional, for holding dye around split stems)
- Paper towels (for inevitable dripsbecause gravity always wins)
- A clean vase for the finished roses
Optional but Helpful
- Floral preservative (flower food)
- Gloves to avoid stained fingertips
- A tray or cutting board to protect your surface
How to Make Rainbow Roses Step by Step
1) Prep Your Work Area
Set up your containers before cutting the roses. Fill each one with water and add food coloring. You want the dyed water ready to go so the stems don’t sit exposed to air for too long after splitting.
A good starting mix is a generous amount of food coloring in each container (enough that the water looks clearly tinted). If the solution is too pale, the petals will be pale too.
2) Choose and Trim Fresh White Roses
Pick roses with strong stems and healthy petals. Recut each stem at an angle using a sharp tool (not dull scissors, which can crush the stem and reduce water uptake). If your roses are long-stemmed, shorten them to about 8–12 inches so the dye has less distance to travel.
Remove any leaves that would sit below the waterline. Leaves in water decay quickly and encourage bacterial growth, which shortens vase life and can sabotage your experiment.
3) Split the Stem Vertically
Using a disinfected sharp blade, carefully split the bottom of each stem vertically into 2–4 sections. Cut up a few inches from the bottom (about 3 inches is a common sweet spot).
Important: don’t go overboard. More sections do not always equal better results. If you split the stem too much, it becomes fragile and more likely to break before the rose can drink enough dye.
4) Prepare Multiple Dye Colors
Place different colors in separate containers. Classic rainbow roses usually use red, blue, and yellow. As the colors move through the petals, they can blend naturally into secondary shades like green, purple, and orangeso you don’t necessarily need six separate cups.
Want a more controlled palette? Try:
- Pastel rainbow: lighter dye concentration
- Bold rainbow: deeper color concentration + longer soak time
- Party theme: two or three colors only (school colors, baby shower colors, holiday colors)
5) Place Each Stem Section Into a Different Color
Gently bend the split stem sections apart and place each section into a separate container of colored water. Move slowlyrose stems can crack if forced.
If your containers are awkwardly spaced, you can use small bags filled with dye and secure them around each split stem section with rubber bands. This helps reduce bending and keeps your setup more stable.
6) Keep the Roses Out of Direct Sunlight
Place the roses in a cool area away from direct sunlight, heat vents, and drafts while they absorb the dye. Freshly cut flowers are already stressed, and extra heat speeds wilting.
Also keep them away from ripening fruit. Fruit releases ethylene gas, which can age flowers faster. Your bananas may be innocent, but they are not helping.
7) Wait and Watch the Color Develop
You may see early color changes in a few hours, especially on petal edges. More noticeable color often develops over 24–48 hours, and deeper effects can continue building for several days.
If you want intense color, be patient. Rainbow roses reward people who can wait longer than a microwave cycle.
8) Finish and Arrange the Roses
Once you like the look, trim off the split portion of the stem and place the roses in a clean vase with fresh room-temperature or lukewarm water and flower food. Recut stems every couple of days and change the water regularly to help them last.
How Long Does It Take to Make Rainbow Roses?
- Setup time: 10–20 minutes
- Early tinting: a few hours
- Good color payoff: 24–48 hours
- Most dramatic color: several days (sometimes up to a week)
Timing varies based on rose freshness, stem length, dye concentration, room temperature, and how thirsty the flowers are when you start.
Tips for Better Results (a.k.a. How to Avoid Sad Beige Rainbow Roses)
Use Fresh Flowers
Fresh roses drink better than older roses. If the flowers are already tired, color development may be weak, uneven, or too slow.
Cut With Sharp Tools
Crushing stems damages the water pathways. Use a clean, sharp knife or floral cutters and make angled cuts.
Shorter Stems Often Work Better
The shorter the path, the easier it is for dyed water to reach the petals. This is one reason trimmed stems usually color faster.
Keep Water Clean
Bacteria can clog stems and reduce water uptake. Use clean containers, remove leaves below the waterline, and switch to a clean vase once the dyeing phase is done.
Don’t Expect Identical Roses
Each rose absorbs dye a little differently. That’s normaland honestly, it’s part of the charm. Handmade rainbow roses look more interesting when they’re not copy-paste twins.
Common Problems and How to Fix Them
Problem: Colors Look Weak
- Use more food coloring or leave the roses in dye longer.
- Trim stems shorter and recut at an angle.
- Start with fresher roses.
Problem: Colors Look Muddy
- Use fewer colors (2–3 instead of 4).
- Avoid oversaturating with too many dark dyes.
- Make sure each split section stays in its own container.
Problem: Stem Breaks While Splitting
- Split fewer sections next time.
- Use a sharper blade and slower pressure.
- Start with thicker, healthier stems.
Problem: Rose Wilts Before Coloring
- Keep the flower cool and out of direct sunlight.
- Minimize time with stems exposed to air.
- Recut the stem and place in fresh water if needed before restarting.
How to Make Rainbow Roses Last Longer
After the dyeing process, treat your rainbow roses like premium cut flowers (because they absolutely are). Here’s how to extend vase life:
- Use a thoroughly clean vase.
- Add flower food to fresh water.
- Remove leaves below the waterline.
- Place flowers in a cool spot away from sun, vents, and drafts.
- Keep them away from ripening fruit (ethylene gas speeds aging).
- Change water every 2–3 days and recut stems.
- Remove fading petals or damaged blooms promptly.
Most DIY rainbow roses will look best for about a week, though exact vase life depends on flower freshness and care.
Creative Ways to Use Rainbow Roses
- Birthday centerpieces: Bright and playful for kids or adults.
- Pride celebrations: A meaningful handmade floral accent.
- DIY gifts: Pair with a handwritten note for a memorable surprise.
- Science-meets-craft projects: Great for classrooms or homeschool activities (with adult supervision).
- Photo props: They look incredible in party tablescapes and product photos.
Final Thoughts
Learning how to make rainbow roses is one of those rare DIY projects that checks every box: affordable, eye-catching, beginner-friendly, and genuinely fun. You get a custom bouquet and a mini lesson in plant scienceall in one go.
Start with a few white roses, be gentle with the split stems, and give the dye time to travel. Your first batch might not look like florist perfection, but it will look handmade, vibrant, and uniquely yours. And if one rose turns into abstract watercolor chaos? Congratulations. You’ve made floral art.
Experience-Based Notes and Real-Life Tips (Extended Section)
One of the most interesting things about making rainbow roses is how different the experience feels from what people expect. Most first-timers assume it’s an instant transformationdip stem, get rainbow, cue applause. In reality, it’s more like slow magic. You set everything up, stare at the flowers for ten minutes, see nothing, walk away, come back later, and suddenly the petals have tiny colored edges. That “it’s working!” moment is a huge part of the fun.
Many people also discover that the setup matters more than they thought. For example, using tall, wobbly cups can turn the project into a balancing act. Narrow, stable containers make the process much less stressful. Another common experience: the first rose often becomes the “practice rose.” You learn how much pressure the stem can handle, how far to split it, and how to position the cups without making your countertop look like a crime scene for food coloring.
A lot of DIY crafters report the same surprise: even when they follow the same steps, no two roses come out identical. One flower may pull more blue, another may show strong red streaks, and another may blend into soft purples and greens. Instead of seeing that as a mistake, experienced makers usually lean into it. The bouquet looks more natural and artistic when each bloom has its own personality.
There’s also a practical lesson that comes up almost every time: fresh flowers are everything. People who buy roses that have already been sitting around for days often end up with weak color and droopy petals. People who start with fresher roses usually get brighter results and better vase life. The difference can be dramatic. If you’ve ever done one batch that looked “okay” and another batch that looked amazing, freshness was probably the deciding factor.
Another common real-world tip is to make rainbow roses a day or two before an event, not the morning of. Since color develops gradually, advance prep gives you time to adjust. If the shades are too light, you can leave them longer. If they’re perfect, you can trim and move them to a clean vase. This makes the process much less rushed and much more enjoyableespecially if you’re preparing centerpieces for a party, shower, or holiday table.
Parents and teachers often say this project works beautifully as a “craft plus science” activity because kids can make predictions (“Which color will show first?”) and then observe changes over time. The roses become a visual timeline. Just make sure an adult handles the blade and stem splitting.
Finally, one of the best parts of the experience is the reaction you get when someone sees the finished bouquet and asks, “Where did you buy those?” Saying, “I made them,” is deeply satisfying. It’s the kind of DIY project that feels a little fancy but is still very doable at homewhich is exactly the sweet spot most of us want.






