Table of Contents >> Show >> Hide
- What “Money Tree” Means Here (And Why People Love It)
- Before You Fold: A Quick Setup Checklist
- Way #1: The Classic One-Bill Money Leaf (Your Money Tree MVP)
- Way #2: A Money Flower Bloom (Looks Fancy, Still Beginner-Friendly)
- Way #3: The Two-Bill Money Butterfly (Perfect for Graduations and Celebrations)
- How to Assemble the Money Tree (So It Looks Polished)
- Pro Tips for a Money Tree That Looks “Expensive”
- Common Mistakes (And How to Fix Them)
- FAQ: Practical Questions People Actually Ask
- Real-World Money-Tree Lessons (About of Experience)
- Conclusion
Cash gifts are practical. Cash gifts are also… kinda boring. A money tree fixes that by turning “here’s money” into “here’s money with personality.” It’s a little craft, a little flex, and 100% more fun than sliding bills into a card like you’re paying a parking ticket.
In this guide, you’ll learn three crowd-pleasing folds (a leaf, a flower, and a butterfly) that look great on a money treeplus how to assemble the whole thing so it looks intentional, not like a bank exploded in your living room.
What “Money Tree” Means Here (And Why People Love It)
A “money tree” in gifting usually means a small branch or tabletop topiary decorated with folded bills like leaves, petals, or little shapesso the recipient can pluck the cash off when they’re ready. You can build it on a foam topiary form, a decorative branch, or even a hardy houseplant if you want the gift to keep living after the money is spent.
It works for graduations, weddings, birthdays, baby showers, retirementsbasically any moment when you want to say, “I love you, and I support your future snacks/rent/textbooks/honeymoon fund.”
Before You Fold: A Quick Setup Checklist
Money origami is a lot like cooking: the same recipe turns out better when your ingredients aren’t wrinkled and your tools aren’t chaotic. Here’s what helps:
- Crisp bills: Newer bills hold creases better and look cleaner in display pieces.
- A flat surface: A table beats your lap. Your lap is for naps.
- Optional “bill spa day”: Lightly iron bills on low heat between two sheets of printer paper (no steam).
- Attachment supplies: florist wire, thin ribbon, thread, mini clothespins, or removable tape.
- Tree base: a small pot + floral foam, a foam ball, or a branch in a weighted container.
Pro note: The goal is to make the money easy to remove. If the recipient needs a tool kit and a prayer to get their cash off the tree, you’ve accidentally created a very festive hostage situation.
Way #1: The Classic One-Bill Money Leaf (Your Money Tree MVP)
If you only learn one fold, make it this one. A money leaf reads instantly as “money tree,” fills space well, and looks great repeated across branches. It’s also easy enough to crank out a bunch while you binge-watch something.
What you’ll need
- 1 bill per leaf (any denomination)
- Optional: thin florist wire or a paperclip to attach
Step-by-step: a simple leaf fold that displays beautifully
- Start lengthwise. Lay the bill face-down. Fold it in half lengthwise (hot-dog style) and crease firmly, then unfold. This center crease is your “leaf vein” guide.
- Create a tapered tip. With the bill still face-down, fold the two top corners inward toward the center crease so the top edge forms a point. Don’t worry about perfectionleaves in nature aren’t symmetrical either, and they seem to be doing fine.
- Refine the point. Fold the new angled edges inward again slightly, tightening the point. You’re basically “sharpening” the leaf tip.
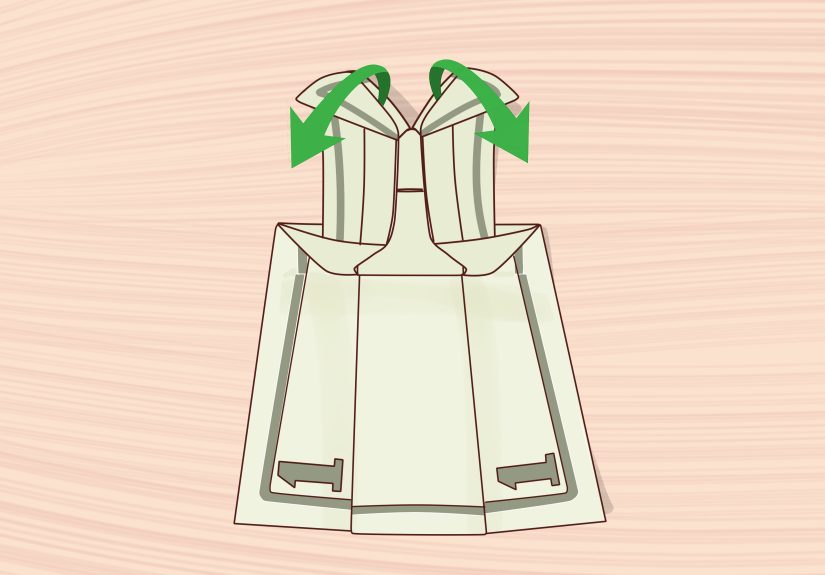
- Start the leaf texture (accordion). Flip the bill over. Beginning at the bottom, fold up about 1/4–1/3 inch. Flip and fold back the same width, continuing an accordion fold upward.
- Lock the shape. When you reach the pointed top, pinch the accordion stack in the center and fold it gently in half so the point sits at the top. This makes the leaf look fuller, like it has a midrib and two sides.
- Fluff. Fan out the folds slightly so the leaf has volume. If it looks flat, it won’t read as a “leaf” from across the room.
- Add a “stem” (optional but helpful). Wrap florist wire around the pinched center, leaving a few inches as a stem. If you don’t have wire, a small paperclip can pinch the center and double as an attachment point.
Best way to use it on a money tree
Make these your “filler greens.” Put leaves deeper inside the branches to create fullness, then use the showier folds (flower, butterfly) on the outer tips as accents.
Way #2: A Money Flower Bloom (Looks Fancy, Still Beginner-Friendly)
Flowers make the money tree look like a gift arrangement, not just a clever prank on botany. Many popular money flowers use multiple bills per bloom because it creates fuller petals and a rounder silhouette. The result: instant wow factor.
What you’ll need
- 3 bills per flower (same denomination looks cohesive; mixed denominations look playful)
- Floral wire, twist ties, or strong thread
- Optional: a small bead or faux pearl for a “flower center”
Step-by-step: make three “petal fans,” then bind
- Make Petal #1 (fan fold). Lay one bill flat. Starting on a short end, accordion fold the entire bill in even pleats (about 1/3 inch). You’ll end up with a long folded strip.
- Shape the petal edge. Fold one end of the strip into a soft triangle (two diagonal folds) to create a tapered “petal tip.” Repeat on the other end if you want a more symmetrical bloom.
- Repeat for Petal #2 and #3. Make two more identical fan-fold strips. Try to keep pleat width consistent so the petals match when you assemble.
- Stack and bind. Align the centers of all three petal fans, stack them like a bow, and bind tightly at the center with wire/thread. Twist securely so the flower doesn’t loosen when you fluff it.
- Fan the petals. Spread each “petal fan” into a rounded arc. Rotate the three sections so the bloom looks balanced from the front.
- Add a center (optional). If you’re using a bead, slip it onto the wire before twisting the final time and seat it at the center. It gives the flower a finished looklike you meant to do this and weren’t just experimenting with currency.
- Create a stem. Twist the binding wire downward into a single stem so you can insert it into foam or wrap it onto a branch.
How to style flowers on the tree
Place blooms near the top and outer edgeslike blossoms on a real plant. Use leaves behind them to frame the petals. For a fuller “topiary” look, do one big flower for every 5–7 leaves.
Way #3: The Two-Bill Money Butterfly (Perfect for Graduations and Celebrations)
Butterflies add movement. Even though they’re made of money (which is famously stationary), the fan folds create a fluttery effect that looks great in photosespecially on graduation money trees or bouquet-style displays.
What you’ll need
- 2 bills per butterfly
- Florist wire, string, or thread
Step-by-step: wings + body + a simple wrap
- Bill A = wings. Fold each short end inward about 1/4 inch to create neat borders, then unfold. This helps the butterfly look crisp at the edges.
- Create a center guide. Fold Bill A in half (short end to short end), crease, then unfold. You now have a center line to keep the folds symmetrical.
- Form two wing points. Fold the short edges into triangular points using the center crease as your guide. It should resemble a long shape with angled corners at one end.
- Accordion the wings. Starting from the bottom edge, fold up about the width of the border and continue accordion folding until the whole bill becomes a pleated strip. Set aside.
- Bill B = body. Accordion fold the entire second bill from short end to short end using the same pleat width as the wings.
- Find the centers. Fold each pleated strip in half to locate the midpoint, then reopen.
- Bind them together. Place the Bill B “body” across the center of Bill A “wings” like a cross, then wrap wire/thread tightly around the center several times. Twist or knot to secure.
- Fluff and shape. Fan out the wings on both sides. Slightly pinch the wing tips so they curve upward. Leave a wire tail if you want to attach it to the tree like it’s “landing” on a branch.
Optional: If you’re adding butterflies to a money tree, angle a few so they face different directions. Repeating the same orientation can look stifflike a butterfly board from a museum, but with tax implications.
How to Assemble the Money Tree (So It Looks Polished)
The assembly is what separates a “Pinterest-worthy” money tree from “I taped cash to a stick and called it art.” Here are three reliable build methods:
Method A: Foam topiary (most stable)
- Put floral foam or a foam block in a decorative pot (add stones or rice underneath for weight).
- Insert a branch or dowel as the trunk.
- Attach folded bills to wire stems or skewers, then push them into the foam in a rounded shape.
Method B: Decorative branch (fastest)
- Place a branch in a vase with stones for stability.
- Use thin wire or ribbon to tie leaves/flowers/butterflies to smaller offshoots.
- Vary heights and spacing to avoid a “money lollipop” silhouette.
Method C: Living plant (bonus gift value)
- Choose a sturdy plant with thicker stems (so you don’t snap it while attaching money).
- Use removable ties or clipsavoid anything sticky that could harm leaves or leave residue.
- Keep bills away from wet soil and misting water. Money is many things, but it is not waterproof.
A simple design formula that always works
- Base layer: 60–70% leaves
- Accent layer: 20–30% flowers
- “Pop” layer: 10–15% butterflies
Translation: leaves make it look full, flowers make it look fancy, butterflies make it look fun.
Pro Tips for a Money Tree That Looks “Expensive”
- Mix denominations thoughtfully. Use $1s for volume, then add a few larger bills as “featured” pieces. It creates visual contrast without turning your gift into a single, terrifying leaf made of $100s.
- Keep removal easy. Tie or clip bills so the recipient can remove them without tearing or peeling tape.
- Avoid moisture and heat. Bills wrinkle if they get damp and can discolor if pressed too hot. Keep displays dry and away from candles.
- Make it photo-friendly. Aim for a rounded silhouette and fill gaps. If you can see “trunk” through the leaves, add more leaves.
- Add a card with intent. A money tree is cute, but a short note that says what the money is “for” makes it feel personal.
Common Mistakes (And How to Fix Them)
- Problem: Your folds won’t hold.
Fix: Use crisper bills, crease firmly, and keep pleats consistent. A flat surface helps more than you think. - Problem: The tree looks sparse.
Fix: Add more leaves toward the interior. “Fullness” comes from the base layer, not just the showy pieces. - Problem: Everything points the same direction.
Fix: Rotate stems and angles. Nature is chaotic; copy that. - Problem: Bills tear when removing.
Fix: Switch to wire, ribbon loops, or mini clips. If you must use tape, use a removable option and touch it lightly.
FAQ: Practical Questions People Actually Ask
Is it okay (legally) to fold money into shapes?
Folding money for gifting is generally fine. The legal trouble comes from intentionally damaging currency to render it unfit for circulation or doing it with fraudulent intent (think altering or defacing for deception). If you want to stay on the safe-and-sane side, don’t cut bills, don’t glue layers permanently, and don’t laminate them “for protection.”
What bills work best?
Crisp bills are easier to fold neatly. Smaller denominations are great for making lots of leaves; larger denominations work as statement flowers or a few “featured” leaves on the front.
How much money should I put on a money tree?
Enough to match your budget and the occasion. A money tree can look impressive at almost any total because the display adds value. If you’re on a tighter budget, use more $1 leaf fillers and add a few larger bills as accents.
How do I transport it without turning it into confetti?
Use a stable pot, keep stems short, and place the whole tree in a box with tissue paper “bracing” the branches. If you can gently shake the box and nothing moves, you’ve basically achieved gift engineering.
Real-World Money-Tree Lessons (About of Experience)
The first time I made a money tree, I had a very optimistic vision: a graceful little branch, a few crisp bills folded into leaves, and a recipient who would gasp, tear up, and whisper, “This is the most thoughtful thing anyone has ever done.” What I actually created looked like a shrub that got caught in a cash tornado. The recipient still loved itbecause cash is undefeated but I learned a few things the “why didn’t anyone tell me?” way.
Lesson one: volume is everything. If your tree base is visible, your money shapes won’t read as “foliage.” They’ll read as “attachments.” The fix is simple: make more leaves than you think you need, and tuck them deeper inside the branches. Leaves are your foundation. Flowers and butterflies are your highlights. When you build it like a haircutbase shape first, styling secondit suddenly looks intentional.
Lesson two: don’t fight wrinkly bills. Old bills can fold, sure, but they also love to spring open at the worst possible moment. If you’re using circulated bills, give them a quick flattening session: press them under a heavy book overnight, or lightly iron them between paper on low heat. The difference is huge. A crisp fold looks like a craft. A wrinkly fold looks like a craft emergency.
Lesson three: attachment should be “removable with dignity.” Early on, I used tape because it was fast. Then the recipient tried to peel off a bill and ended up tugging on a whole cluster like they were harvesting grapes. Now I favor thin wire stems or mini clips. Wire is especially great because it lets you pose piecestilt a leaf forward, angle a butterfly like it’s mid-flight, or cluster three leaves together so the branch looks fuller.
Lesson four: add a theme and the gift feels bigger. A graduation money tree can use butterflies (new beginnings), a wedding tree can lean into flowers (obvious, but effective), and a new-house tree can mix leaves and a few tiny tags like “paint fund,” “tool fund,” or “pizza for moving day.” A theme takes the same amount of money and makes it feel more personalbecause it tells a story beyond the dollar amount.
Finally, the sneaky secret: the money tree isn’t just about money. It’s about effort. People remember that you took a practical gift and made it playful. They remember the moment of pulling a butterfly off a branch. They remember laughing at the idea that money “grew” for them. And if you can give someone cash and a memory at the same time? That’s a pretty solid return on investment.