
Table of Contents >> Show >> Hide
- What Is Pavlova?
- Why Pavlova Is Different From Regular Meringue
- Classic Pavlova Recipe (Easy, Reliable, and Party-Proof)
- Step-by-Step: How to Make Pavlova
- Flavor Variations That Still Count as “Classic”
- Make-Ahead Tips (Because Hosting Is a Sport)
- Troubleshooting: When Pavlova Gets Weird
- How to Serve Pavlova Like You’ve Done This Before
- Conclusion
- Kitchen Experiences: The Real-Life Pavlova Stories (and What They Teach You)
Pavlova is the dessert equivalent of showing up to a party in crisp sneakers and a perfectly tailored blazer:
it looks fancy, but it’s secretly pretty low-effort once you know the routine. At its core, pavlova is a
baked meringue “nest” (egg whites + sugar) that turns crisp on the outside and softalmost marshmallowyon
the inside, then gets topped with whipped cream and fruit. The result is a high-contrast, high-drama dessert:
crunchy, creamy, juicy, and sweet-tart all at once.
If you’ve ever wanted a showstopper that’s naturally gluten-free, built for summer berries, and basically
begs to be photographed, this is it. Below, we’ll break down what pavlova is, why it behaves the way it does,
and exactly how to make a classic pavlova at homeplus variations, troubleshooting, and the real-life kitchen
experiences that nobody tells you about until your meringue decides to freestyle.
What Is Pavlova?
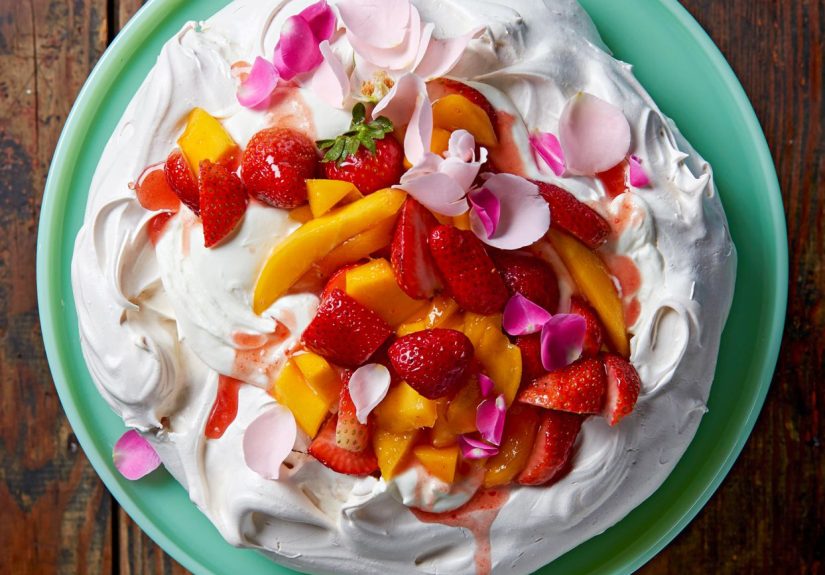
Pavlova is a meringue-based dessert typically shaped into a round or oval with a shallow crater in the center,
like a dessert bowl made of sweet, airy crunch. After baking low and slow, it’s cooled (often in the oven),
then topped right before serving with whipped cream and fruitthink strawberries, raspberries, blueberries,
kiwi, passion fruit, mango, or whatever looks best at the market.
It’s named after the Russian ballerina Anna Pavlova, and it’s famously claimed as a national treasure by both
Australia and New Zealand. Fortunately, you don’t have to pick a side to enjoy it. Your fork is Switzerland.
Why Pavlova Is Different From Regular Meringue
Regular meringues can bake up dry and crisp all the way through. Pavlova aims for a crisp shell with a tender,
chewy-soft interior. That signature texture usually comes from two small-but-mighty additions:
an acid (like vinegar, lemon juice, or cream of tartar) and starch (often cornstarch).
The sciencewithout the lab coat
-
Egg whites are mostly water + proteins. When you whip them, those proteins unfold and trap air,
creating a foam. -
Sugar stabilizes that foam, helps it hold shape, and creates that glossy, thick meringue that looks
like it belongs in a shampoo commercial. - Acid (vinegar/lemon/cream of tartar) helps the foam stay stable so it’s less likely to collapse.
- Cornstarch helps manage moisture and encourages that marshmallow-ish center instead of a fully dry interior.
Translation: pavlova is a controlled texture situation. Crisp outside, cloud-ish inside, and topped with creamy + juicy
things so every bite feels like a tiny parade.
Classic Pavlova Recipe (Easy, Reliable, and Party-Proof)
This method makes one 8–9 inch pavlova: a single big centerpiece you can slice like a cake (if your cake were
made of sweet crunch and good decisions).
Ingredients
- 4 large egg whites, room temperature
- 1 cup (200g) superfine sugar (or pulse regular granulated sugar in a blender/food processor for a few seconds)
- 1 teaspoon cornstarch
- 1 teaspoon white vinegar (or 1 teaspoon lemon juice, or 1/2 teaspoon cream of tartar)
- 1 teaspoon vanilla extract
- Pinch of salt (optional, but helpful)
Topping
- 1 1/2 cups heavy whipping cream, very cold
- 1–2 tablespoons sugar (to taste)
- 1 teaspoon vanilla (optional)
- 2–3 cups fresh fruit (berries, sliced kiwi, mango, passion fruit, etc.)
- Optional extras: lemon curd, berry sauce, toasted nuts, shaved chocolate, fresh mint
Equipment
- Stand mixer or hand mixer
- Large mixing bowl (bone-dry and grease-free)
- Baking sheet + parchment paper
- Spatula
Step-by-Step: How to Make Pavlova
1) Prep the pan and oven
- Preheat oven to 250°F.
- Line a baking sheet with parchment paper.
- Trace an 8–9 inch circle on the parchment, then flip it over (so you don’t bake pencil into your dessert).
2) Whip the egg whites to soft peaks
Put egg whites (and a pinch of salt, if using) in a completely clean bowl. Any grease or yolk can sabotage the foam.
Beat on medium speed until foamy, then continue until soft peaks form (the peak gently flops over).
3) Add sugar slowly (this is where pavlovas are won)
Increase speed to medium-high. Add sugar 1 tablespoon at a time, letting it dissolve between additions.
Don’t dump it in like you’re feeding a hungry squirrel. Slow sugar = glossy stability.
Keep beating until you have stiff, shiny peaks. Rub a little meringue between your fingers:
it should feel smooth, not gritty. (If gritty, beat a little longer.)
4) Fold in cornstarch and acid
Sprinkle cornstarch over the meringue, add vinegar (or your chosen acid), and vanilla. Gently fold just until combined.
You’re aiming to keep the air you worked so hard to whip in.
5) Shape the “nest”
Spoon meringue onto the parchment within your traced circle. Use a spatula to build it up and create a shallow crater
in the center for toppings. Make swoops and swirls if you want it to look artisanal (and slightly dramatic).
6) Bake low and slow
- Bake at 250°F for 75–90 minutes.
- The outside should look dry and feel firm. It may develop small cracksthis is normal pavlova behavior.
7) Cool gradually (don’t shock the diva)
Turn off the oven and crack the door slightly. Let the pavlova cool inside for at least 1 hour
(longer is fine). This gradual cooling helps reduce dramatic collapses and major cracking.
8) Whip the cream and assemble right before serving
Whip cold cream with sugar (and vanilla if using) to soft or medium peakspillowy, not butter. Transfer pavlova
to a serving plate. Fill the center with whipped cream and pile fruit on top.
Serve immediately, because pavlova is basically a crisp shell negotiating with moisture. Delicious negotiations,
but negotiations nonetheless.
Flavor Variations That Still Count as “Classic”
1) Citrus + berries (the crowd-pleaser)
Spread a layer of lemon curd under the whipped cream, then add strawberries and blueberries. The tartness keeps
the sweetness in check, like a friend who gently takes your phone away at 1 a.m.
2) Tropical pavlova (vacation energy)
Top with whipped cream, sliced mango, kiwi, pineapple, and passion fruit pulp. This one tastes like sunshine
and irresponsibly good decisions.
3) Chocolate pavlova (for the “I’m not a fruit dessert person” person)
Add a touch of cocoa to the topping situation: whipped cream + shaved dark chocolate + cherries or raspberries.
You can also drizzle ganache lightly, but keep it balancedpavlova’s texture is the main character.
4) Mini pavlovas (the easiest way to look like a genius)
Portion meringue into individual nests. They bake faster and are easier to serveno slicing, no sharing disputes,
no “my piece has less fruit” negotiations.
Make-Ahead Tips (Because Hosting Is a Sport)
- Make the shell ahead: Bake and cool completely, then store airtight at room temperature for 1–2 days (best within 24 hours).
- Don’t refrigerate the plain shell: The fridge is humid, and humidity is pavlova’s arch-nemesis.
- Prep toppings ahead: Slice fruit and chill it; whip cream a few hours ahead if you must, but fresh is best.
- Assemble last-minute: Cream + fruit go on right before serving to keep the shell crisp.
Troubleshooting: When Pavlova Gets Weird
Problem: It weeps syrup (little sticky droplets)
Usually from undissolved sugar or humidity. Add sugar slowly, beat until not gritty, and avoid making pavlova on a
super humid day if possible.
Problem: It collapses
Under-whipped meringue, sudden temperature changes, or opening the oven door too much can do it. Beat to stiff peaks,
bake low, and cool gradually in the oven.
Problem: It’s chewy all over (not crisp outside)
It may need more drying time. Bake a bit longer or let it cool longer in the turned-off oven.
Problem: It’s brown
Oven temp may be too high, or hot spots are doing their thing. Pavlova should be pale and elegant, not toasted like
it’s auditioning for a campfire skit.
Problem: Lots of cracks
Small cracks are normal and often get covered with whipped cream anyway (pavlova’s best concealer). Big cracks can
come from temperature shock or over-baking. Cool slowly and check oven calibration if it keeps happening.
How to Serve Pavlova Like You’ve Done This Before
- Use a serrated knife for cleaner slicing.
- Serve with extra fruit on the side for backup sparkle.
- Add a tiny pinch of flaky salt to the whipped cream if you like sweet-salty contrast.
- Lean into the rustic lookpavlova is supposed to look airy and imperfect, like a cloud that got dressed up.
Conclusion
Pavlova is a crisp meringue dessert with a soft center, topped with whipped cream and fruitand it’s one of the most
rewarding “looks fancy, actually manageable” recipes you can learn. If you can separate eggs, beat egg whites to stiff
peaks, and resist the urge to assemble it hours early, you can make pavlova.
Start with the classic, then riff with seasonal fruit, lemon curd, chocolate, herbs, or mini pavlovas for stress-free
serving. Once you nail the base, pavlova becomes less of a recipe and more of a hosting superpower.
Kitchen Experiences: The Real-Life Pavlova Stories (and What They Teach You)
The first time most people make pavlova, there’s a momentusually around minute five of whipping egg whiteswhen you
think, “This is either going to be incredible or I’m about to eat sweet scrambled foam.” That tiny panic is normal.
Pavlova has a reputation for being fussy, mostly because meringue looks like a science project. But the lived reality?
It’s surprisingly forgiving as long as you respect three things: clean equipment, slow sugar, and patience during cooling.
One classic pavlova experience: you crack an egg, separate it like a pro, and thenplot twista speck of yolk dives into
your whites like it owns the place. People will tell you this ruins everything. In practice, it might. The common move
in real kitchens is to separate whites one-by-one into a small bowl first, then transfer each clean white to the mixer
bowl. It feels a little extra… until it saves you from tossing four eggs’ worth of effort because one yolk wanted chaos.
Another pavlova rite of passage is learning what “stiff peaks” actually means. At some point, you lift the whisk and the
meringue stands tall and glossy, like it’s proud of you. That’s the sweet spot. Under-whip and the pavlova can spread
or slump; over-whip and the foam can get grainy. The experienced-home-baker trick is to stop and check often toward the
end: shiny, smooth, and holding its shape without looking dry. If it looks like it could star in a hair commercial, you’re
probably there.
Then there’s the “I opened the oven door to peek” moment. It’s relatable. You want to see the magic. But pavlova loves a
stable environment. When you open the door repeatedly, you invite temperature swings that can cause bigger cracks or a
collapse. Seasoned pavlova-makers learn to trust the timer and use the oven light. It’s basically teaching you emotional
maturity: you don’t need to check on it every three minutes. Let it become its best self.
The most universal experience, though, happens at assembly. You’ve waited. You’ve cooled. You’ve got a crisp shell. You top
it with whipped cream and fruit and it looks like a magazine cover. And then you discover a simple truth: pavlova is not
a “decorate it at noon for a 7 p.m. dinner” dessert. The moisture from cream and fruit starts softening the shell pretty
quickly. The good news is that slightly softened pavlova is still deliciousit becomes more like a chewy meringue cake.
The better news is you can win this game by assembling right before serving and setting up a DIY bar for guests: shells,
cream, fruit, curds, and toppings laid out so everyone builds their own. It turns dessert into an activity, and it
disguises your host-level strategy as “fun.”
Finally, pavlova teaches you that perfection isn’t the point. Small cracks? Normal. A slightly lopsided nest? Charming.
A dramatic fissure across the top? Congratulations, you just created a canyon for extra whipped cream. The best pavlova
experiences end the same way: people take a bite, pause, and then immediately go back for another because the contrast of
crisp meringue, pillowy cream, and bright fruit is ridiculously satisfying. If you’re looking for a dessert that feels
special without requiring you to become a pastry monk, pavlova is the sweet spotliterally.






