
Table of Contents >> Show >> Hide
- What You Can Realistically See at Home
- Simple Ways to Look Into Your Own Ear: 12 Steps
- Step 1: Know when not to do a home ear check
- Step 2: Gather safe tools only
- Step 3: Wash your hands and clean the device
- Step 4: Set up good lighting and a stable position
- Step 5: Inspect the outer ear first
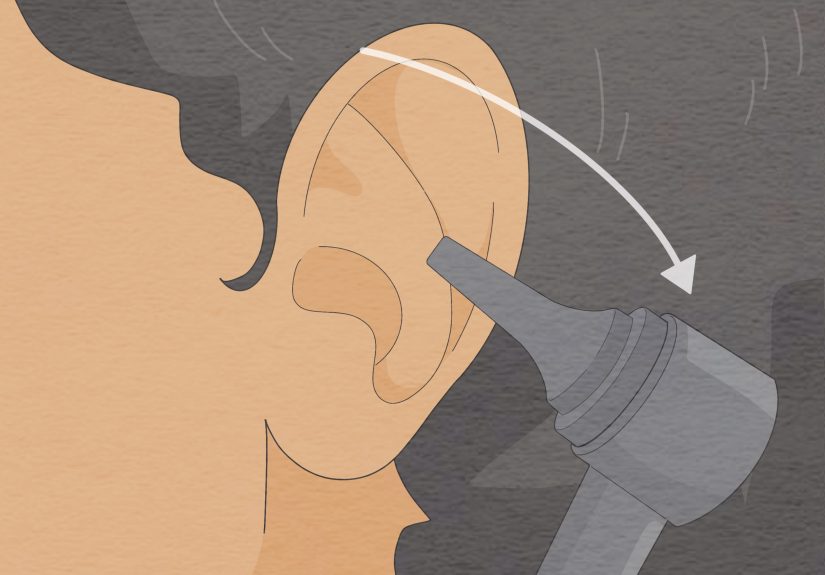
- Step 6: Gently pull the ear to straighten the canal
- Step 7: Insert the otoscope tip only a little
- Step 8: Aim slightly toward your nose, not straight in
- Step 9: Look for common, non-emergency findings
- Step 10: Notice warning signs, but do not self-diagnose too hard
- Step 11: Compare both ears and write down what you notice
- Step 12: Resist the urge to fix everything immediately
- What Your Symptoms May Suggest
- Common Mistakes to Avoid
- When to See a Doctor
- Real-Life Experiences and Practical Lessons
- Conclusion
- SEO Tags
Trying to look into your own ear sounds simple until you realize the human ear was apparently designed by someone who really loved curves, shadows, and bad camera angles. Still, with the right setup, a little patience, and a strict no-poking policy, you can safely check the outside of your ear and get a limited look into the ear canal at home.
The key word here is safely. Looking is one thing. Digging, scraping, swabbing, candling, or launching a full DIY archaeology project into your ear canal is another. This guide walks you through 12 practical steps for checking your own ear, what you might notice, what you should never do, and when it is smarter to let a clinician take over with better tools and much steadier hands.
Important note: This article is for general education. It can help you inspect your ear, but it cannot diagnose an ear infection, a ruptured eardrum, or a hearing disorder.
What You Can Realistically See at Home
Before you begin, set expectations. A mirror alone can help you inspect the outer ear, including the rim, the lobe, and the skin around the ear opening. If you want to see into the ear canal, you will usually need a consumer otoscope or ear camera with a light.
Even then, your view may be limited. Earwax, the natural curve of the canal, and shaky hands can block the view. In many cases, the most useful result is not “Aha, I have solved medicine,” but rather “I see enough to know whether this looks like wax, irritation, or something I should stop messing with and have checked.” Honestly, that is a win.
Simple Ways to Look Into Your Own Ear: 12 Steps
-
Step 1: Know when not to do a home ear check
Skip the DIY exam and contact a healthcare professional if you have severe ear pain, drainage, bleeding, sudden hearing loss, spinning dizziness, recent ear surgery, ear tubes, a known hole in the eardrum, or recent head or ear trauma. Home inspection is also a bad idea if inserting even a tiny speculum causes sharp pain. Your ear is giving you feedback. Listen to it.
-
Step 2: Gather safe tools only
You need a bright light, a mirror, and, if you want to see into the canal, a consumer otoscope or ear camera with a clean tip. A chair, tissues, and your phone for photos or notes can help too.
What you do not need: cotton swabs, tweezers, bobby pins, paper clips, ear candles, pen caps, heroic optimism, or anything pointy. If a tool looks like it belongs in a desk drawer or sewing kit, it does not belong in your ear.
-
Step 3: Wash your hands and clean the device
Wash your hands thoroughly. If you are using an otoscope or ear camera, place a clean disposable tip on it or disinfect the reusable part according to the product instructions. A dirty device can irritate the ear canal and defeat the entire purpose of checking for problems in a hygienic way.
-
Step 4: Set up good lighting and a stable position
Sit in a chair with back support. Stand-by-the-sink balancing acts are overrated. Position a mirror at eye level and use bright, direct light. If you are using a smartphone-connected otoscope, open the app first and make sure the image is clear before you go near your ear.
The goal is stability. A calm hand and a steady seat matter more than fancy equipment.
-
Step 5: Inspect the outer ear first
Before looking inside, examine the outside of the ear in the mirror. Check for redness, swelling, rash, peeling skin, cuts, crusting, or a pimple-like bump near the opening. Gently compare one ear with the other.
If the outer ear looks irritated after wearing earbuds, hearing aids, helmets, or glasses, that may explain discomfort without anything dramatic happening deeper in the canal.
-
Step 6: Gently pull the ear to straighten the canal
For adults, gently pull the outer ear up and back. This helps straighten the ear canal and improves the view. Do not yank. You are trying to help the anatomy cooperate, not negotiate with it under duress.
If that motion causes real pain, stop the exam.
-
Step 7: Insert the otoscope tip only a little
If you are using an otoscope, place the tip just at the opening and insert it only slightly. The device should never be pushed deeply. A shallow, careful angle is safer and usually gives a better view than trying to tunnel inward.
If you feel pressure, pain, or the urge to flinch, pull it out and reset. The ear canal is delicate. More force does not create more information.
-
Step 8: Aim slightly toward your nose, not straight in
The ear canal is not a straight hallway. It angles forward, so point the device slightly toward the nose, then move slowly. Small adjustments often work better than big ones. Rotate the otoscope gently instead of jabbing around.
If you are using a phone otoscope, pause frequently. It is easy to chase the image and accidentally move too far. Let the image come to you, not the other way around.
-
Step 9: Look for common, non-emergency findings
A few things you might see are surprisingly ordinary:
Earwax: yellow, orange, tan, or brown wax near the canal entrance is common. A wax plug can look darker and block most of the tunnel-like view.
Dry skin: a little flaking near the opening can happen with irritation, eczema-prone skin, or over-cleaning.
Mild redness: this can occur after scratching, overuse of earbuds, or rubbing the area too much.
If all you see is wax, that does not mean disaster. It may simply mean your ear is doing its job a bit too enthusiastically.
-
Step 10: Notice warning signs, but do not self-diagnose too hard
Certain findings should make you stop the home exam and arrange medical care rather than keep investigating:
Thick drainage, pus, blood, or clear fluid; marked swelling that narrows the canal; a very red or angry-looking canal; a bad smell; severe tenderness; or a sudden drop in hearing.
If you happen to see what looks like the eardrum, it is usually better to think, “Interesting,” than to decide you have diagnosed yourself from one blurry frame. A normal eardrum often looks light gray and smooth, but home views are imperfect and easy to misread.
-
Step 11: Compare both ears and write down what you notice
Check the other ear the same way. Even if one ear feels normal, comparison helps. Maybe both ears have a little wax. Maybe one side is clearly more irritated. Maybe the “problem ear” actually looks identical and the real clue is your symptom, not the image.
Take a photo if your device allows it, and note details like muffled hearing, fullness, itching, pain when touching the ear, ringing, or drainage. Those notes can be useful if you end up seeing a clinician.
-
Step 12: Resist the urge to fix everything immediately
This is the hardest step for many people. You looked, you saw something, and now your brain wants a solution by lunchtime. But not every finding needs a home remedy.
If you suspect earwax buildup, do not dig at it. If you are considering wax-softening drops, be cautious and avoid them if you have pain, drainage, dizziness, recent ear surgery, ear tubes, or any suspicion of a damaged eardrum. If symptoms are significant, professional removal is usually the smarter move.
If you suspect infection, swelling, or injury, skip the DIY treatment phase and get checked. Sometimes the most impressive home skill is knowing when to stop.
What Your Symptoms May Suggest
Looking into your own ear is only half the story. Symptoms matter just as much as what you see.
If your ear feels full or muffled
You may be dealing with earwax buildup, fluid, pressure changes, or irritation. Wax is a common cause, but it is not the only one. If the problem appeared suddenly or your hearing dropped fast, do not assume it is “just wax.”
If it hurts when you touch the ear or wiggle the earlobe
That can happen with outer ear canal irritation, including swimmer’s ear. Itching, redness, swelling, and drainage can go along with it. A home look may show irritation, but it cannot tell you exactly which treatment is appropriate.
If there is drainage
Yellow fluid, cloudy discharge, blood, or clear fluid means it is time to call a clinician. Drainage is one of those symptoms that should not be shrugged off with a “Maybe it’ll vibe itself out.”
If hearing suddenly changed
Sudden hearing loss is urgent. Yes, wax can block sound. But sudden hearing changes can also have causes that need prompt evaluation. If your hearing drops quickly, especially in one ear, seek care rather than spending hours trying to get the perfect ear selfie.
Common Mistakes to Avoid
Using cotton swabs: These often push wax deeper and can scratch the canal.
Trying ear candles: They are not a safe or evidence-based way to remove wax.
Using sharp tools: The ear canal and eardrum are easy to injure.
Over-cleaning: Earwax has a purpose. Removing all of it can leave the canal dry, itchy, and more vulnerable to irritation.
Ignoring symptoms because the image looks “mostly okay”: A home view can miss important problems.
When to See a Doctor
Schedule medical care if you have:
Persistent pain, itching, drainage, bad odor, hearing loss, dizziness, recurrent wax blockage, or a blocked view you cannot safely sort out. You should also get help if you wear hearing aids and keep having wax issues, or if the ear canal looks swollen shut.
Seek prompt or urgent care if you have sudden hearing loss, severe vertigo, bleeding, facial weakness, or symptoms after trauma. In those moments, a home ear exam should end immediately.
Real-Life Experiences and Practical Lessons
Many people first try to look into their own ear after a very specific kind of moment: one ear suddenly feels clogged, their hearing seems a little muffled, and their brain immediately decides the problem must be solved before dinner. That instinct is understandable. The tricky part is that ears are famous for making a small issue feel dramatic and a serious issue feel deceptively ordinary.
One common experience is the earbud surprise. Someone wears earbuds for hours, notices soreness or itchiness, and assumes there must be a huge wax blockage. When they finally check with a mirror and a safe ear camera, they may find only mild redness near the opening and a perfectly average amount of wax. The lesson is simple: irritation from friction can mimic a deeper problem.
Another classic scenario is the post-shower panic. Water gets trapped, the ear feels full, and suddenly every sound seems to arrive wrapped in a blanket. People often go searching for wax when the real issue is moisture or temporary pressure. In those moments, patience matters more than gadgets. A careful look can help, but the smartest move may be to dry the outer ear, leave the canal alone, and monitor symptoms.
Then there is the cotton-swab regret story, which is practically a genre of its own. Someone feels a little itchy, reaches for a swab, and somehow ends up with more blockage, more discomfort, and less hearing than before. A home inspection afterward often shows what they could not feel happening in real time: wax pushed deeper, irritated skin, or a canal that now looks angrier than it did at the start. The big takeaway is that “clean” and “better” are not always the same thing.
People who use hearing aids or earbuds regularly also report a repeating pattern. They notice gradual fullness, reduced sound quality, or the sensation that one side is just not performing normally. Looking into the ear can be helpful here because it turns a vague complaint into a practical observation. Maybe there is visible wax near the entrance. Maybe the canal looks dry and flaky. Maybe nothing obvious appears, which is also useful because it suggests the device, hearing itself, or a deeper ear issue may deserve attention.
Perhaps the most valuable experience people describe is not the moment they see something, but the moment they decide to stop. The canal looks swollen. The image is unclear. The ear hurts. There is fluid. That is not failure. That is good judgment. A safe self-check is less about proving you can examine your ear like a specialist and more about gathering just enough information to make a smarter next decision.
In other words, the best home ear exam is not the one that turns you into your own ENT. It is the one that helps you stay calm, avoid harmful habits, and recognize when your ear needs a professional instead of a plot twist.
Conclusion
If you want to look into your own ear, keep the process simple: use good light, use the right tool, move slowly, and stop at the first sign of pain. A home ear check can help you notice wax, mild irritation, or obvious changes near the opening of the canal. What it should not do is tempt you into digging, scraping, or diagnosing every blurry image like you are starring in a medical detective show.
The safest rule is easy to remember: look gently, interpret cautiously, and treat aggressively only with professional help. Your ears are small, delicate, and annoyingly easy to offend. Respect that, and your home check is far more likely to be useful than regrettable.






