
Table of Contents >> Show >> Hide
- Before You Start: Your “No-Mess Corn Zone” Setup
- Optional (But Life-Changing): Quick Shuck & Silk Removal Without the Drama
- Method 1: The Bundt Pan Method (A Kernel-Catching Classic)
- Method 2: The Inverted Bowl Method (The Two-Bowl Trick)
- Method 3: The Chef-Style Horizontal Slice (The Low-Fly Zone)
- Method 4: The Sheet-Pan Workstation (For Big Batches & Meal Prep)
- Method 5: The Corn Stripper Tool (Gadgets That Actually Help)
- Bonus Flavor: Don’t Waste the Cob
- Troubleshooting: Why Is My Corn Exploding Everywhere?
- What to Make with Fresh Corn Kernels
- FAQ
- Real-World “Experience” Section: What It’s Actually Like in a Busy Kitchen (Plus What I’d Do Differently)
- Conclusion: Pick the Method That Fits Your Kitchen (Not Someone Else’s)
Cutting corn off the cob should be a simple summer joy. And yetsomehowit often turns into a tiny agricultural disaster where kernels ricochet off your backsplash like they’re trying to escape the dinner plan.
The good news: you don’t need culinary superpowers (or a hazmat suit) to remove corn kernels cleanly. With a few smart setupsand the right technique for your kitchenyou can strip an ear of corn with minimal mess, maximum yield, and zero regrets.
Below are the best mess-minimizing methods (bundt pan, bowl tricks, chef-style slicing, sheet-pan workstations, and the occasional helpful gadget), plus tips for safety, storage, and what to do with those bare cobs once you’re done.
Before You Start: Your “No-Mess Corn Zone” Setup
Mess-free corn cutting is 80% technique and 20% making your workspace stop behaving like a trampoline.
What you’ll want nearby
- A sharp chef’s knife (a dull knife makes you push harder, which makes mess and danger)
- A stable cutting board (bonus points for a damp paper towel underneath to prevent slipping)
- A large bowl, rimmed baking sheet, or bundt pan to catch kernels
- A clean kitchen towel (for grip, and for wrangling hot corn if needed)
Pro safety note (because corn is innocent, knives are not)
Keep your “holding hand” above the blade path. If you’re slicing downward, your hand should be gripping the top of the cob, not hovering beside the knife like it’s auditioning for a cooking show blooper reel.
Optional (But Life-Changing): Quick Shuck & Silk Removal Without the Drama
If you’re starting with corn still in the husk, here’s a popular shortcut for clean shucking: microwave the ear in its husk, then cut a bit off the stem end and squeeze the corn out. The husk and silk tend to stay behind while the cob slides out hot and tidy.
Two key tips: (1) use a towel because the corn will be hot, and (2) adjust microwave time based on your oven’s power and the size of the ear. This method is about easy handlingand the less time you spend fighting silk, the more patience you’ll have left for cutting neatly.
Method 1: The Bundt Pan Method (A Kernel-Catching Classic)
If you have a bundt pan, you have a built-in corn “catch basin.” The center tube helps stabilize the cob, while the pan’s high sides keep kernels from launching themselves into unrelated areas of your kitchen.
How to do it
- Place your bundt pan on a sturdy surface (or even inside the sink for extra splash control).
- Stand the shucked cob upright, tip-down in the center hole.
- Using a sharp knife, slice downward in long strokes, removing one “panel” of kernels at a time.
- Rotate the cob and repeat until it’s bare.
Why it’s clean
Gravity is doing the work. Kernels and corn “milk” drop into the pan instead of skittering across your counter like tiny yellow marbles.
Best for
- Small to medium batches (2–6 ears)
- People who love a tidy workstation
- Anyone who already owns a bundt pan and wants to feel smug about it
Method 2: The Inverted Bowl Method (The Two-Bowl Trick)
No bundt pan? No problem. The inverted bowl method gives you the same “kernels fall neatly down” effect using equipment almost everyone has: two bowls.
How to do it
- Set a small bowl upside down inside a larger bowl.
- Rest the wide end of the cob on the flat bottom of the inverted bowl.
- Hold the cob steady at the top and cut downward, letting kernels drop into the larger bowl.
- Rotate and repeat.
Why it’s clean
The cob is elevated over the “collection bowl,” so kernels don’t bounce off the cutting board. They fall into the big bowl and stay therelike they’re finally respecting your boundaries.
Best for
- Apartment kitchens (or anyone short on specialty pans)
- Making corn salad, salsa, or esquites where you want clean kernels in a bowl fast
- People who prefer “use what you have” kitchen hacks
Method 3: The Chef-Style Horizontal Slice (The Low-Fly Zone)
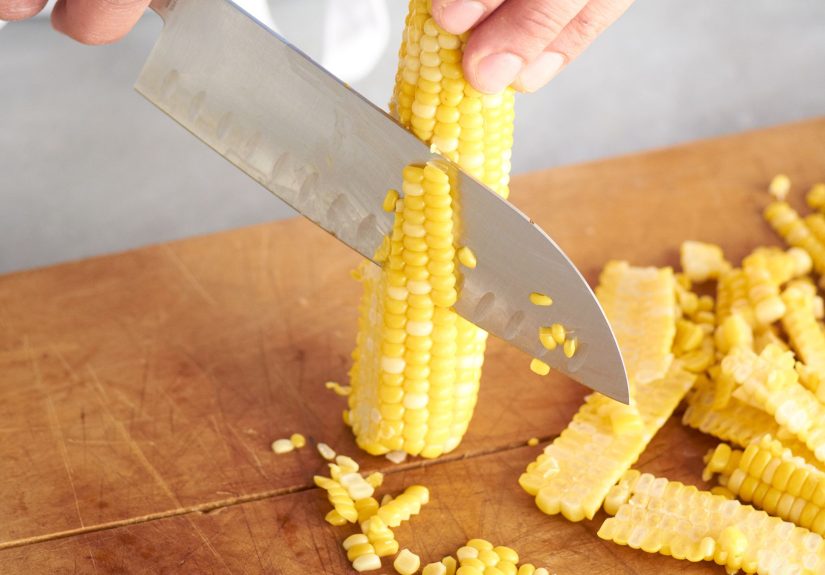
Some cooks skip the vertical setup entirely: they lay the cob flat and slice one side at a time. This reduces bounce and scatter because kernels aren’t dropping from a height.
How to do it
- Lay the shucked cob horizontally on a cutting board.
- Slice off a thin “strip” of kernels from the top side, keeping your knife just deep enough to remove kernelsnot gouge the cob.
- Rotate the cob so the cut side becomes a stable flat base.
- Continue slicing, rotating as you go.
Two details that make this method work
- Go shallow: Aim to remove about two-thirds of the kernel depth. If you cut too deep, you’ll get tough cob bits mixed in.
- Let the first cut create stability: Once one side is flat, the cob stops rolling, and the rest gets easier.
Best for
- People who feel uneasy standing food upright near a blade
- Those without big bowls or pans (you can still place a rimmed tray nearby to catch strays)
- Anyone who wants a simple, fast approach
Method 4: The Sheet-Pan Workstation (For Big Batches & Meal Prep)
If you’re cutting corn for freezing, chowder, or a cookout-sized salad, your biggest enemy isn’t the cobit’s scale. A rimmed sheet pan turns your whole setup into a contained work zone.
How to do it
- Place a cutting board inside a rimmed baking sheet (or roasting pan).
- Cut the corn using either the vertical or horizontal method.
- Any kernels that jump ship will land in the sheet pan instead of under your toaster.
Best for
- Freezing corn kernels for later
- Batch cooking
- People who would like to clean one big surface instead of twelve tiny ones
Method 5: The Corn Stripper Tool (Gadgets That Actually Help)
There are plenty of “as seen in kitchen drawers” corn tools out there, but a few are genuinely usefulespecially if you cut corn often or want near-zero scatter.
Common types
- Ring-style strippers: You push or twist them down the cob to shave kernels off. They’re fast, but you’ll still want a bowl underneath.
- Tube or container strippers: The cob goes through a tool that strips kernels into an enclosed chambergreat for mess control and for capturing corn juice.
Pros
- Consistent results
- Less flying corn
- Good for repetitive tasks (freezing corn, big gatherings)
Cons
- Some require a little elbow grease
- Cleaning can be annoying if kernels get trapped in corners
- If you only cut corn twice a year, your bowls are probably enough
Bonus Flavor: Don’t Waste the Cob
Once you remove kernels, you’re holding a corn cob that still has a lot to offerkind of like a paperback book after you’ve finished the last chapter.
1) Make corn stock (“liquid summer”)
Simmer stripped cobs with onion and water to make a subtly sweet stock. Use it in corn chowder, risotto, soups, or to cook grains when you want extra flavor without extra effort.
2) Scrape for “corn milk” (the secret weapon for creamed corn)
After slicing off kernels, run the back of your knife along the cob to scrape out the starchy, sweet liquid left behind. Stir it into creamed corn, corn pudding, or sauces for a natural boost in corn flavor and body.
Troubleshooting: Why Is My Corn Exploding Everywhere?
- Your cob is sliding: Use a towel under the cutting board, and choose a method that stabilizes the cob (bundt pan, inverted bowl, or the first-flat-cut approach).
- Your knife is dull: Dull knives force pressure. Pressure causes sudden slips. Sudden slips cause mess (and sometimes bandages). Sharpen or switch knives.
- You’re cutting too deep: Aim for kernels, not cob. If you see pale, fibrous bits mixing in, back off.
- You’re cutting too fast: Corn rewards confidence, not speed. Smooth downward strokes beat frantic sawing every time.
- Your bowl is too small: A wider opening catches more. Use a big mixing bowl or a sheet pan as backup.
What to Make with Fresh Corn Kernels
Once your kernels are neatly corralled, you’re basically five minutes away from something delicious:
- Mexican-style corn salad (esquites-inspired): mayo, lime, chili powder, cotija, cilantro
- Corn salsa: corn + tomatoes + onion + jalapeño + lime
- Chowder: add kernels late so they stay sweet and poppy
- Succotash: corn + lima beans + peppers + butter
- Skillet corn: quick sauté with butter, scallions, and a pinch of salt
FAQ
Should I cut corn raw or cooked?
Either works. Raw corn is crisp and sweet (great for salads). Cooked corn is softer and can be easier to slice cleanly. If you cooked corn on the cob first, let it cool a few minutes for safer handling.
How do I get the most kernels off the cob?
Cut close enough that you remove full kernels, but not so close that you shave off cob. If you want maximum corn flavor, scrape the cob afterward for that starchy “corn milk.”
How do I store fresh-cut corn kernels?
Refrigerate in an airtight container and use within a few days for best sweetness. For longer storage, freeze kernels in a single layer first, then transfer to freezer bags.
What’s the cleanest method overall?
For most kitchens: the inverted bowl method or the bundt pan method. For big batches: the sheet-pan workstation. For frequent corn cutters: a container-style corn stripper tool can be the cleanest of all.
Real-World “Experience” Section: What It’s Actually Like in a Busy Kitchen (Plus What I’d Do Differently)
Let’s talk about the part recipes rarely mention: the lived reality of cutting corn when your kitchen is hot, your counter is crowded, and someone keeps asking, “Is it done yet?”
Scenario one: the weeknight dinner sprint. You’re making tacos, you want fresh corn in the filling, and you have exactly twelve minutes before hunger turns into drama. This is where the inverted bowl method shines. It’s fast to set up (two bowls, done), and you can cut directly into the bowl that will later hold your taco mixture. The biggest “aha” moment for most people is realizing you don’t need to stand the cob in the exact center like a statuejust stable enough that each downward stroke lands kernels neatly where you want them. If you’re rushing, keep your strokes steady and shallow. Speed comes naturally after the first cob; forcing speed on cob number one is how you end up vacuuming dinner.
Scenario two: the summer cookout batch prep. You have eight ears of corn, a big salad bowl, and the faint suspicion that your kitchen will never be clean again. This is when you graduate to the sheet-pan workstation. Putting your cutting board inside a rimmed sheet pan feels almost sillyuntil you realize that every kernel that “bounces” lands harmlessly in the pan. It’s the difference between a quick wipe-down and finding corn behind the coffee maker the next day. When doing big batches, try a simple rhythm: cut two sides, rotate, cut two sides, rotate. Then dump kernels into your storage container and keep going. Bonus: the sheet pan also catches the corn juice, which you can pour right into your recipe for extra flavor.
Scenario three: the tiny-kitchen, no-extra-tools reality. Maybe you don’t own a bundt pan. Maybe you do, but it’s buried behind three appliances you swear you use “all the time.” That’s when the horizontal chef-style method becomes your best friend. It’s surprisingly calm: you lay the cob down, take a thin strip off the top, and suddenly the cob has a flat base and stops rolling. The “experience” lesson here is that the first cut matters mostmake it clean, and the rest is easy. If your cob is rolling around like it’s on a mission, it’s telling you to slow down and create that flat surface.
Scenario four: the “I hate corn silk” phase. If you’ve ever shucked corn and ended up wearing silk like a festive accessory, you’ll appreciate the microwave-in-husk trick. The experience tip: use a towel, and don’t skip the cooling moment. Hot corn + bare hands + urgency is not a great combination. Once it’s out, you’ll notice your cutting step gets cleaner because you’re not also dealing with sticky strands clinging to everything.
Scenario five: the gadget debate. If you cut corn oftensay you freeze it every summer or cook corn-heavy dishes regularlya corn stripper tool can feel like a revelation. The experience tradeoff is usually this: you’ll gain speed and reduce mess, but you’ll pay for it in cleanup (especially with ring tools where kernels can lodge in crevices). Container-style tools tend to be tidier because they capture kernels and juice inside a chamber. If your goal is “no mess,” those enclosed designs are the closest thing to a cheat code.
Finally, the most underrated experience tip: batch your tasks. Shuck all the corn first, remove silk, then cut. It sounds obvious, but it prevents the stop-and-start chaos that makes kitchens messy in the first place. When your workflow is smooth, your cutting is smootherand smooth cutting is the real secret to fewer flying kernels.
Conclusion: Pick the Method That Fits Your Kitchen (Not Someone Else’s)
The cleanest way to remove corn from the cob is the one you’ll actually do consistently. If you want easy and low-mess, start with the inverted bowl method. If you love clever kitchen physics, the bundt pan method is a classic. If you prefer simple knife work, go horizontal. If you’re processing corn like it’s a seasonal sport, build a sheet-pan workstationor consider a corn stripper tool that contains the chaos.
Whatever method you choose, keep your knife sharp, your cob stable, and your kernels corralled. Your counter will stay cleaner, your recipes will taste sweeter, and your future self won’t have to discover dried corn in strange places.





