
Table of Contents >> Show >> Hide
- What Is a Rainbow Shiplap Wall?
- Why a Rainbow Shiplap Accent Wall Works So Well
- Tools and Materials You Will Need
- Step 1: Choose Your Rainbow Color Palette
- Step 2: Decide the Direction of Your Shiplap
- Step 3: Prepare the Wall and Boards
- Step 4: Paint the Wall Behind the Shiplap
- Step 5: Prime the Shiplap
- Step 6: Map Out Your Rainbow Pattern
- Step 7: Paint the Grooves and Edges First
- Step 8: Roll the Board Faces
- Step 9: Touch Up Like a Perfectionist, Not a Panic Button
- Best Paint Finish for a Rainbow Shiplap Wall
- Common Mistakes to Avoid
- Design Ideas for a Rainbow Shiplap Wall
- How to Maintain a Painted Rainbow Shiplap Wall
- Experience Notes: What Painting a Rainbow Shiplap Wall Teaches You
- Conclusion
A rainbow shiplap wall is what happens when classic farmhouse texture meets a box of crayons that finally got promoted to interior designer. It is cheerful, bold, cozy, and surprisingly doableeven if your previous painting experience includes “accidentally painted the ainted rainbow shiplap accent wall can turn the space into a joyful focal point.
The secret is not just slapping seven colors on wooden boards and hoping the rainbow gods approve. Shiplap has grooves, seams, wood grain, nail holes, and edges that need attention. Rainbow painting also requires planning because colors that look charming on tiny swatches can start wrestling each other once they cover an entire wall. This guide walks you through how to paint a rainbow shiplap wall from prep to final touch-up, with practical tips for clean lines, smooth coverage, color balance, and a finish that looks intentional rather than “craft project after three cups of coffee.”
What Is a Rainbow Shiplap Wall?
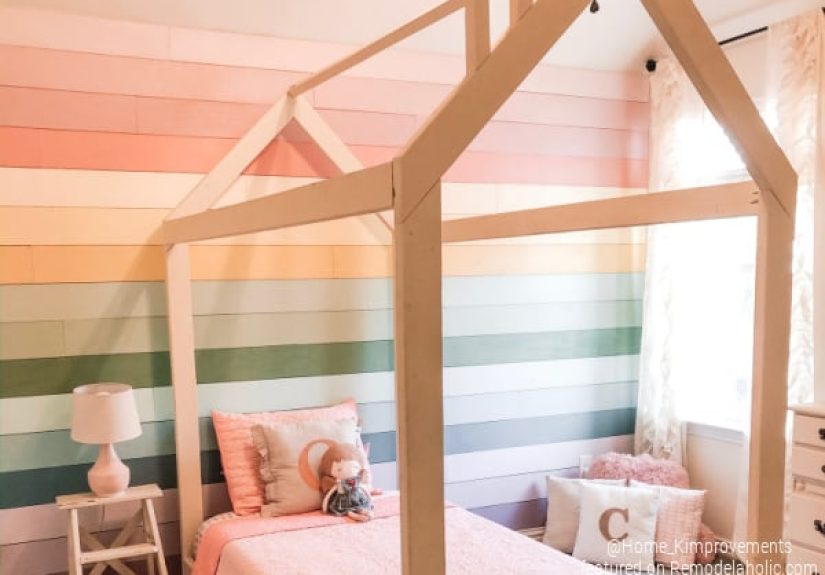
A rainbow shiplap wall is an accent wall made from horizontal or vertical shiplap boards painted in multiple rainbow-inspired colors. The design can be bright and playful, soft and pastel, muted and earthy, or modern and moody. Unlike flat painted stripes, shiplap adds dimension. The thin shadow lines between boards create natural separation, which makes each color feel crisp without needing complicated taping for every stripe.
Traditional shiplap is made of boards with overlapping rabbeted edges, but many DIY versions use MDF planks, plywood strips, tongue-and-groove boards, or pre-primed shiplap panels. All can work for a rainbow wall. The most important thing is that the boards are straight, securely installed, properly prepped, and painted in a way that keeps the grooves clean instead of clogged with paint.
Why a Rainbow Shiplap Accent Wall Works So Well
Rainbow walls are naturally eye-catching, but shiplap gives the design structure. Instead of one giant block of color chaos, each board becomes its own stripe. That makes the wall easier to plan and easier to paint. It also gives the room a handmade, custom feel without requiring advanced artistic skills.
This project works especially well in spaces that need warmth and energy. A pastel rainbow shiplap wall can make a nursery feel sweet without being too sugary. A bright rainbow wall can turn a playroom into the happiest room in the house. A muted rainbow palettethink terracotta, mustard, sage, dusty blue, and mauvecan make a bedroom feel creative but still calm. Basically, rainbow shiplap is flexible. It can shout, whisper, or politely sing backup vocals depending on your color choices.
Tools and Materials You Will Need
Before you begin, gather your supplies. Nothing drains DIY enthusiasm faster than realizing halfway through that your roller tray is missing and your only backup is a paper plate from last year’s barbecue.
Basic Supplies
- Interior paint in your chosen rainbow colors
- Primer suitable for wood, MDF, or previously painted surfaces
- Paintable caulk
- Wood filler or spackling compound
- Fine-grit sanding sponge or sandpaper
- Painter’s tape
- Drop cloths or plastic sheeting
- Angled paintbrushes
- Small foam rollers or microfiber mini rollers
- Paint trays or disposable paint cups
- Clean cloths or tack cloth
- Level and pencil
- Utility knife for scoring tape edges if needed
Helpful Extras
- Sample-size paint containers for each color
- Painter’s pyramids if painting boards before installation
- A small artist brush for grooves and touch-ups
- A color wheel or paint-store palette card
- Labels or sticky notes to mark color order
Step 1: Choose Your Rainbow Color Palette
The phrase “rainbow wall” does not mean you must use fire-engine red, traffic-cone orange, banana yellow, cartoon green, pool blue, royal purple, and hot pink. You can, of course. Your wall, your parade. But the most polished rainbow shiplap walls usually start with a clear color mood.
Classic Rainbow
A classic rainbow uses red, orange, yellow, green, blue, indigo, and violet. This version is bright, cheerful, and energetic. It works beautifully in playrooms, classrooms, creative studios, or kids’ bedrooms. To keep it from becoming too intense, consider softening each shade slightly. Instead of primary red, choose coral. Instead of neon green, choose leafy green. Instead of electric purple, choose lavender.
Pastel Rainbow
A pastel rainbow shiplap wall is softer and dreamier. Try blush pink, peach, buttercream yellow, mint, powder blue, periwinkle, and lilac. This palette is popular for nurseries and bedrooms because it brings color without making the room feel like a birthday party exploded.
Earthy Rainbow
An earthy rainbow uses warm, grounded shades such as clay, rust, ochre, olive, sage, slate blue, dusty rose, and mushroom beige. It is a great choice for grown-up spaces where you want color with a little sophistication. Think “rainbow, but it pays taxes and owns linen curtains.”
Ombre Rainbow
An ombre rainbow moves gradually from one color family to another. For example, you might start with soft pink at the top, move into peach, then yellow, then green, then blue, and finish with lavender. This creates a soothing flow and helps colors transition naturally.
Before buying full cans, test samples on spare shiplap pieces or poster board. View them in morning, afternoon, and evening light. Paint colors are sneaky little actors; they perform differently depending on lighting.
Step 2: Decide the Direction of Your Shiplap
Most shiplap walls are horizontal, which makes a rainbow design easy because each board becomes one color stripe. Horizontal rainbow shiplap can make a room feel wider and more relaxed. It is also easier to paint because the grooves naturally separate the colors.
Vertical shiplap creates a taller, more modern look. With vertical boards, you can paint each plank a different color, create a gradient from left to right, or use color blocks. This style feels more contemporary and can make ceilings appear higher. However, it may require more careful layout because the color rhythm is more visible across the room.
If you already have shiplap installed, work with its direction. If you are installing new shiplap, choose the direction based on the room’s shape. Horizontal boards are forgiving and classic. Vertical boards are fresh and dramatic. Diagonal boards are possible, but they require more cutting, more planning, and a calm personality. Proceed only if you and your miter saw are on speaking terms.
Step 3: Prepare the Wall and Boards
Great paint jobs are mostly prep work wearing a colorful hat. Before painting, remove wall decor, outlet covers, switch plates, and anything else in the way. Cover the floor with drop cloths and protect nearby trim with painter’s tape.
If your shiplap is already installed, inspect the boards for nail holes, dents, rough edges, and gaps at the corners. Fill nail holes with wood filler or spackle. Let it dry, then sand smooth. Wipe away dust with a clean cloth. Paint does not enjoy sticking to dust; it treats dust like a bad first date and leaves as soon as possible.
If you are painting raw wood or MDF, apply primer first. Primer helps seal porous surfaces, improves paint adhesion, and creates a more even base for your colors. This is especially important for rainbow designs because different colors may have different coverage levels. Yellow and red, for example, often need more help than deeper blues or greens.
Step 4: Paint the Wall Behind the Shiplap
If you are installing new shiplap with small gaps between the boards, paint the wall behind it before installation. Use a color that matches the overall background or the darkest tone in your palette. This prevents the old wall color from peeking through the grooves like an unwanted guest at brunch.
For a rainbow wall, you can paint the backing wall white, black, or a neutral shade. White keeps the grooves light and clean. Black or charcoal creates more dramatic shadow lines. If your shiplap boards will be painted individually before installation, painting the backing wall is still a smart move because it hides tiny imperfections between boards.
Step 5: Prime the Shiplap
Priming is not the glamorous part of painting, but it is the part that makes the glamorous part behave. Use a primer recommended for your shiplap material. Raw wood, MDF, glossy previously painted surfaces, and stained wood may each need a different approach.
Brush primer into grooves and edges first, then roll the flat face of each board. Avoid loading too much primer into the gaps. Shiplap’s charm comes from those shadow lines. If you fill them with heavy paint, the wall can start looking like regular paneling that lost its personality.
Let the primer dry completely according to the product instructions. Then lightly sand any raised grain or rough spots. Wipe clean before painting. This step helps the final rainbow colors look smooth and professional.
Step 6: Map Out Your Rainbow Pattern
Before opening paint cans, decide exactly where each color will go. Count your boards. Then decide whether each board gets one color, whether colors repeat, or whether some colors take up multiple boards.
For example, if you have 14 horizontal boards and want a pastel rainbow, you could use seven colors and give each color two boards. If you have 10 boards, you might use five colors and create a softer simplified rainbow. If you have many narrow boards, you can create a gradient with more shades.
Write the color name lightly on painter’s tape and place it on each board. Step back and look at the order. Does the color flow feel balanced? Is one color too dominant? Does the darkest color land at the bottom where it can visually ground the wall? There are no strict rules, but many designs feel best when darker or stronger colors are lower and lighter colors are higher.
Step 7: Paint the Grooves and Edges First
Shiplap grooves are where many paint jobs go from “beautiful DIY” to “tiny haunted valleys of missed spots.” Start by using a small angled brush to paint the top and bottom edges of each board, along with the groove areas. Work carefully and avoid leaving thick blobs.
If you are painting each board a different color, keep a damp cloth nearby for quick cleanup. If one color sneaks into the next board’s groove, wipe it before it dries. Paint has a talent for going exactly where you told it not to go.
For pre-installed shiplap, use painter’s tape where needed, but do not rely on tape alone. Press tape firmly, paint with light coats, and remove it carefully. For the cleanest separation, paint the edge with the existing color first to seal the tape line, then apply the new color after it dries. This trick helps reduce bleeding.
Step 8: Roll the Board Faces
Once the grooves and edges are painted, use a small roller to paint the flat face of each board. A mini roller gives better control than a full-size roller, especially when switching between multiple colors. Roll in thin, even coats. Heavy coats may drip into grooves, collect along seams, or dry unevenly.
Work one color at a time if the colors are separated by unpainted boards. If adjacent boards are different colors, paint carefully and allow one color to dry before painting the next. This may take longer, but patience is cheaper than repainting a smeared rainbow.
Most rainbow shiplap walls need two coats for strong, even color. Some lighter shades may need a third coat, especially yellow, peach, or pale pink. Let each coat dry fully before recoating. Rushing dry time can cause peeling, streaking, or tacky paint.
Step 9: Touch Up Like a Perfectionist, Not a Panic Button
After the final coat dries, step back and inspect the wall in natural light. Then inspect it again with the room lights on. Look for thin spots, drips, fuzzy edges, and missed grooves. Use a small artist brush for detail touch-ups.
If paint has bridged across a shiplap gap, gently score the seam with a utility knife before it hardens too much. Be careful not to gouge the wood. The goal is to restore the crisp shadow line, not carve your initials into the wall like a dramatic pirate.
Remove painter’s tape slowly at an angle. If the paint starts lifting, score along the tape edge first. Replace outlet covers and switch plates only after the paint is dry to the touch. For a polished look, consider painting outlet covers to match nearby board colors, or replace them with clean white covers if they sit across multiple colors.
Best Paint Finish for a Rainbow Shiplap Wall
For most interior rainbow shiplap walls, eggshell or satin finish is a good choice. Eggshell has a soft, low-sheen look that hides minor imperfections better than glossy paint. Satin is slightly more washable, which makes it useful in kids’ rooms, playrooms, mudrooms, and busy hallways.
Flat paint can look beautiful but may be harder to clean. Semi-gloss can be durable, but it may highlight every seam, brush mark, and surface flaw. Unless you want your wall to sparkle like it has stage lights, avoid high-gloss finishes for large rainbow shiplap areas.
Common Mistakes to Avoid
Skipping Primer
Skipping primer can lead to uneven color, poor adhesion, and extra coats. Rainbow walls already involve several paint colors, so do not make the project harder by starting with a weak foundation.
Using Too Much Paint in the Grooves
Paint buildup in shiplap grooves can blur the crisp lines that make shiplap attractive. Use light coats and brush out drips immediately.
Choosing Colors Without Testing
Paint chips are helpful, but they are tiny. Always test colors in the actual room. A charming lavender in the store may turn gray in low light, while a cheerful yellow may become “highlighter with ambition.”
Painting Adjacent Colors Too Quickly
If one stripe is still wet, the next color may smear or bleed. Give each section enough drying time, especially when taping over a painted area.
Forgetting the Room Around the Wall
A rainbow shiplap wall is a statement. Keep nearby decor balanced. Neutral bedding, simple curtains, natural wood furniture, and solid rugs can help the wall shine without making the whole room feel overloaded.
Design Ideas for a Rainbow Shiplap Wall
Soft Nursery Rainbow
Use blush, peach, butter yellow, mint, sky blue, lavender, and warm white. Keep furniture light and simple. Add woven baskets, soft textiles, and gentle lighting.
Bold Playroom Rainbow
Choose cheerful mid-tone colors like coral, orange, golden yellow, grass green, aqua, cobalt, and violet. Pair with white storage units and colorful toys. In a playroom, the wall can handle more energy because the room already has a tiny-chaos theme.
Modern Muted Rainbow
Try dusty rose, terracotta, caramel, olive, sage, slate blue, and plum. This palette feels grown-up and works well in bedrooms, reading nooks, or creative offices.
Sunset Rainbow
Paint the boards in a warm ombre: deep coral, rose, peach, apricot, golden yellow, cream, and pale blush. This creates a cozy glow and pairs beautifully with rattan, brass, and natural linen.
How to Maintain a Painted Rainbow Shiplap Wall
After the paint cures, clean the wall gently with a soft cloth. Avoid harsh scrubbing, especially on flat or matte finishes. Dust can collect in shiplap grooves, so use a microfiber duster or vacuum brush attachment occasionally.
Keep leftover paint in labeled containers for touch-ups. Label each color with the board number or location. Future you will be grateful, especially when a chair, toy, backpack, or mysterious household object creates a scuff. Mysterious household objects are very active when no one is watching.
Experience Notes: What Painting a Rainbow Shiplap Wall Teaches You
The first thing you learn from painting a rainbow shiplap wall is that color confidence grows slowly. At the beginning, all those sample containers may look like a risky dessert menu. You wonder if the peach is too orange, if the green is too minty, and if the purple is quietly planning to ruin everything. But once the colors start going up in order, the design begins to make sense. The wall stops looking like random paint and starts looking like a story.
One practical lesson is to label everything. Label the paint cups, label the boards, label the sample swatches, and label your plan. Rainbow projects involve more decisions than a single-color wall, and it is surprisingly easy to forget whether “Soft Apricot” goes above “Golden Hour” or below it. A simple strip of painter’s tape with the color name can save you from repainting an entire board because your orange and coral switched places like mischievous twins.
Another experience worth sharing is that the grooves matter more than you expect. From across the room, the wall reads as wide bands of color. Up close, however, the shiplap seams decide whether the project looks crisp or messy. Painting the grooves first feels slow, but it makes a huge difference. A small brush, light pressure, and patience will give you cleaner shadow lines. If you rush this part, the grooves may collect thick paint and look lumpy. Nobody wants lumpy rainbow seams. That sounds like a rejected cereal flavor.
You also learn that not all colors cover equally. Dark blue may look rich after two coats, while pale yellow may act like it has commitment issues. Plan for extra coats on lighter colors. Do not judge the wall after the first coat, because first coats are often rude. They show streaks, uneven patches, and all your doubts. The second coat is usually when the wall starts behaving like the picture in your head.
Lighting is another big lesson. A rainbow shiplap wall can look different at breakfast, lunch, and bedtime. Natural light may brighten the warm colors, while artificial light may deepen the blues and purples. If possible, test your palette on scrap boards and move them around the room. This simple step prevents surprises and helps you choose colors that look good in real life, not just under the heroic lighting of the paint aisle.
Finally, a rainbow shiplap wall teaches you that DIY perfection is overrated, but thoughtful workmanship is not. There may be a tiny brush mark near the corner. One board may need an extra touch-up. A groove may not be flawless. That is fine. The goal is not a factory-made wall with no personality. The goal is a joyful, durable, beautiful accent wall that makes the room feel more alive. When the final tape comes off and the colors line up across the boards, the whole space changes. It feels warmer, brighter, and more personal. And yes, you may stare at it proudly for several minutes while holding a paintbrush like a trophy. That is not weird. That is called finishing a project.
Conclusion
Painting a rainbow shiplap wall is one of those DIY projects that looks impressive but becomes manageable when you break it into clear steps: choose a palette, prepare the surface, prime properly, map the color order, paint the grooves carefully, roll thin coats, and touch up with patience. The shiplap provides built-in structure, while the rainbow colors bring joy, personality, and visual movement.
Whether you choose a bold classic rainbow, a soft pastel palette, or a muted modern gradient, the best results come from planning and restraint. Test your colors, protect the grooves, avoid heavy coats, and let each layer dry before moving on. In the end, you will have more than an accent wall. You will have a custom feature that makes the room feel intentionally designed, delightfully cheerful, and just a little bit magical.
Note: This article is written as original, publication-ready web content based on widely accepted interior painting, shiplap preparation, and DIY accent wall practices.






