
Table of Contents >> Show >> Hide
- What Are Polymer Clay Beads?
- Tools and Materials You Will Need
- How to Make Polymer Clay Beads: 15 Steps
- Step 1: Choose the Right Polymer Clay
- Step 2: Prepare a Clean Work Area
- Step 3: Condition the Clay Until Soft and Pliable
- Step 4: Plan Your Bead Design
- Step 5: Create Equal Portions of Clay
- Step 6: Roll Basic Round Beads
- Step 7: Try Other Bead Shapes
- Step 8: Add Patterns, Color Effects, and Texture
- Step 9: Chill the Beads Before Piercing
- Step 10: Make the Bead Holes
- Step 11: Smooth Fingerprints and Imperfections
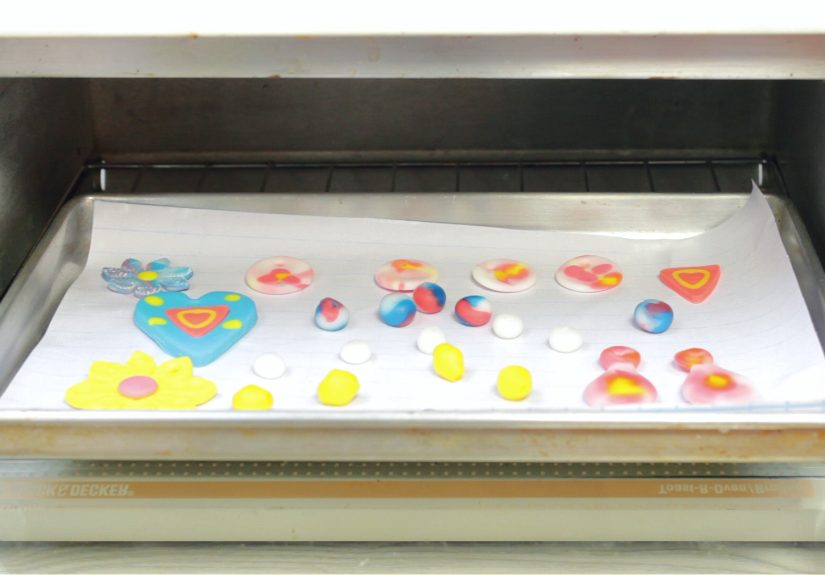
- Step 12: Arrange Beads for Baking
- Step 13: Bake According to the Clay Package
- Step 14: Let the Beads Cool Completely
- Step 15: Sand, Buff, Seal, and String Your Beads
- Safety Tips for Making Polymer Clay Beads
- Common Mistakes and How to Avoid Them
- Creative Polymer Clay Bead Ideas
- of Real-World Experience: What Actually Helps When Making Polymer Clay Beads
- Conclusion
Polymer clay beads are tiny pieces of wearable happiness. They can be round, square, marbled, speckled, striped, stamped, painted, glossy, matte, or proudly weird in a “yes, I made this during a midnight craft storm” kind of way. The best part? You do not need a pottery wheel, a kiln, or a studio with dramatic north-facing windows. You need oven-bake polymer clay, a few simple tools, patience, and the ability to resist poking every bead every three seconds while it bakes.
This guide explains how to make polymer clay beads in 15 clear steps, from choosing clay and conditioning it to baking, sanding, sealing, and turning your beads into jewelry. Whether you want to make a cheerful bracelet, custom earrings, a boho necklace, or handmade gifts that look far more expensive than they actually are, these steps will help you create beads that are smooth, strong, and string-ready.
What Are Polymer Clay Beads?
Polymer clay beads are handmade beads formed from a PVC-based modeling clay that hardens when cured in a home oven according to the clay brand’s directions. Unlike air-dry clay, polymer clay stays workable until baked, which makes it forgiving for beginners. You can roll it, slice it, mix colors, press textures into it, add glitter, create faux stone effects, or shape it into tiny fruit beads if your bracelet needs a miniature strawberry with main-character energy.
Because polymer clay is lightweight after baking, it works beautifully for jewelry. A full strand of large polymer clay beads is usually much easier to wear than a strand of heavy glass or stone beads. That makes it especially popular for bracelets, earrings, keychains, bag charms, and colorful statement necklaces.
Tools and Materials You Will Need
Before you begin, gather your supplies. A smooth setup makes the process easier, and it also prevents the classic beginner situation where one hand is covered in red clay and the toothpicks are somehow in another room.
Basic supplies
- Oven-bake polymer clay in your chosen colors
- Clean work surface such as glass, ceramic tile, acrylic sheet, or parchment paper
- Acrylic roller, clay roller, or smooth glass jar
- Craft blade or tissue blade
- Toothpicks, needle tool, or bead piercing tool
- Ruler or clay cutter for measuring equal portions
- Parchment paper, ceramic tile, bead baking rack, or cornstarch baking bed
- Oven thermometer
- Wet/dry sandpaper in fine grits, such as 400, 800, and 1000
- Optional glaze, varnish, or clay-safe finish
- Elastic cord, beading wire, jump rings, earring findings, or necklace chain
How to Make Polymer Clay Beads: 15 Steps
Step 1: Choose the Right Polymer Clay
Start with an oven-bake polymer clay that fits your project. For jewelry, look for a clay known for strength and flexibility after curing. Soft, lightweight formulas are nice for big beads and earrings, while firmer clays can hold crisp details and patterns. Avoid very brittle craft clays for thin or delicate beads, especially if the finished jewelry will be worn often.
Check the package instructions before buying or baking. Different brands cure at different temperatures and times. For example, many Sculpey clays bake around 275°F, while FIMO commonly cures at 230°F. The clay package is the boss here. Not the internet, not your cousin, not the oven that “runs hot but has personality.”
Step 2: Prepare a Clean Work Area
Polymer clay loves to pick up dust, lint, pet hair, glitter from unrelated projects, and mysterious crumbs from the universe. Wipe your work surface before you begin. Wash and dry your hands, especially when switching from dark colors to light colors.
A smooth surface such as ceramic tile, glass, or acrylic works best because it does not leave unwanted texture on the clay. If you use paper, avoid printed paper because ink can transfer. Keep baby wipes or rubbing alcohol nearby for cleaning tools and fingertips.
Step 3: Condition the Clay Until Soft and Pliable
Conditioning means warming and kneading the clay until it becomes smooth, flexible, and easy to shape. Cut off a small piece and roll it between your hands. Fold it, press it, roll it again, and repeat until it no longer cracks at the edges.
If the clay is firm, slice it into thin pieces and knead gradually. You can also run it through a clay conditioning machine or pasta machine dedicated only to craft use. Proper conditioning helps prevent cracks, weak spots, and lumpy beads. Think of it as stretching before exercise, except the clay does the workout and you get jewelry at the end.
Step 4: Plan Your Bead Design
Before rolling, decide what kind of beads you want. Simple round beads are perfect for beginners. Tube beads look modern and clean. Lentil beads are great for earrings. Cube beads feel playful and graphic. Marbled beads are ideal when you want something beautiful without needing perfect symmetry.
Choose a color palette. For a soft look, try ivory, blush, sage, and tan. For bold jewelry, combine turquoise, coral, yellow, and white. For faux stone beads, use translucent clay, white clay, tiny bits of black or gray, and a touch of metallic clay. The goal is not to copy nature exactly; it is to make nature say, “Honestly, nice job.”
Step 5: Create Equal Portions of Clay
Uniform beads begin with equal amounts of clay. Roll your conditioned clay into a log, then use a ruler to mark equal sections. Cut each section with a craft blade. Another method is to roll clay into a sheet of even thickness and use the same small cutter for every bead portion.
This step matters because beads that begin with different amounts of clay will end up different sizes. A little variation can look handmade and charming, but a wildly uneven bracelet may sit awkwardly on the wrist. Equal portions are the quiet secret behind professional-looking polymer clay bead jewelry.
Step 6: Roll Basic Round Beads
Take one portion of clay and roll it between your palms using gentle circular motions. Do not crush it. Let your hands guide it into a sphere. If you press too hard, you may create flat spots or cracks. If the bead looks lopsided, slow down and roll with lighter pressure.
For extra-smooth round beads, place the clay ball on your work surface and cup your palm over it. Move your hand in small circles until the bead becomes even. This method gives you more control and can reduce fingerprints.
Step 7: Try Other Bead Shapes
Once you can make round beads, experiment with shapes. For tube beads, roll clay into a short cylinder and flatten the ends gently. For oval beads, roll a sphere slightly longer in one direction. For cube beads, start with a ball and press six sides lightly against a smooth tile. For disc beads, flatten a ball evenly between two tiles or acrylic sheets.
You can also use a bead roller if you want consistent shapes. Bead rollers work best when you use the correct amount of clay and roll slowly. Too much clay can distort the bead; too little clay can leave the shape incomplete.
Step 8: Add Patterns, Color Effects, and Texture
Now comes the fun part: making the beads look like something you would happily wear instead of tiny potatoes. For marbled beads, twist two or three clay colors together, fold the rope, twist again, then roll into a bead. Stop before the colors blend completely, or you will get one muddy color with trust issues.
For speckled beads, mix tiny crumbs of contrasting clay into a base color. For striped beads, wrap thin strips around a clay core. For stamped beads, press a texture sheet, lace, rubber stamp, or rough fabric into the surface. For metallic shimmer, blend mica powder lightly onto the surface before baking, using a soft brush.
Step 9: Chill the Beads Before Piercing
Soft beads can distort when you pierce them. To help them hold their shape, place them in the refrigerator for 10 to 15 minutes. Chilling firms the clay slightly, making it easier to create clean holes.
This is especially helpful for round beads, oval beads, and detailed patterned beads. Do not freeze them until rock hard; just cool them enough so they behave. Polymer clay is cooperative, but sometimes it needs a tiny spa break.
Step 10: Make the Bead Holes
Use a toothpick, needle tool, or bead piercing tool to make a hole through each bead. Insert the tool halfway through one side with a gentle twisting motion. Then insert it from the opposite side to meet the first hole. This helps prevent the exit side from bulging or tearing.
Make the hole large enough for your stringing material. Elastic cord needs more room than thin beading wire. If you plan to use leather cord or thick hemp, test the hole size before baking. You can also bake beads first and drill holes afterward with a small hand drill, but beginners often find pre-piercing easier.
Step 11: Smooth Fingerprints and Imperfections
Before baking, inspect each bead. Light fingerprints can often be smoothed with a fingertip, a soft brush, or a cotton swab lightly dampened with rubbing alcohol. Do not soak the clay. A tiny amount is enough.
If you see cracks, press them closed gently and roll the bead again. If lint is stuck on the surface, lift it with the tip of a blade or toothpick. The more care you take before baking, the less sanding you will need later. Future you will be grateful, and future you has sandpaper.
Step 12: Arrange Beads for Baking
Round beads can develop flat spots if baked directly on a hard surface. To avoid this, bake them on a bead baking rack, suspend them on bead pins, or nestle them on a small bed of cornstarch. Flat-backed beads, discs, and charms can bake on parchment paper or ceramic tile.
Keep beads separated so they do not touch. If they rest against each other while curing, they may bake together in an awkward friendship bracelet you did not request.
Step 13: Bake According to the Clay Package
Preheat your oven and use an oven thermometer. Many home ovens run hotter or cooler than the dial says, and toaster ovens can spike in temperature. Bake according to your clay brand’s instructions. As a general example, many Sculpey clays cure at 275°F for 15 to 30 minutes per 1/4 inch of thickness, while FIMO instructions often call for 230°F for 30 minutes.
Do not microwave polymer clay. Do not guess the temperature. Do not crank up the heat to “save time.” Polymer clay needs proper curing, not a dramatic speedrun. Underbaked clay can be weak, while overheated clay can discolor or smell unpleasant.
Step 14: Let the Beads Cool Completely
After baking, let the beads cool before handling. Freshly baked polymer clay can feel slightly flexible while warm, especially in thinner areas. It becomes firmer as it cools.
Check the beads for strength once they are fully cool. A properly cured bead should feel solid, not crumbly. If a thick bead seems underbaked, you may be able to bake it again according to the package directions. Polymer clay can usually tolerate additional baking when the temperature is correct.
Step 15: Sand, Buff, Seal, and String Your Beads
For a smoother finish, wet-sand the cooled beads with fine-grit wet/dry sandpaper. Start around 400 grit for noticeable roughness, then move to 800 or 1000 grit for polish. Sand gently under water to reduce dust and keep the surface clean.
Buff with a soft cloth for a natural satin sheen. If you want a glossy finish, use a polymer-clay-safe glaze or varnish. Not every clear coat works well with polymer clay, so avoid random nail polish or solvent-based finishes that may become sticky over time. Once dry, string your beads onto elastic cord, beading wire, head pins, or jewelry findings.
Safety Tips for Making Polymer Clay Beads
Polymer clay is widely used for home crafting, but good habits matter. Use tools dedicated to crafting, not food preparation. Wash your hands after working. Keep clay away from small children and pets. Bake in a well-ventilated area, follow the temperature instructions, and avoid burning the clay.
An oven thermometer is one of the best investments you can make. It is not glamorous, but neither is opening the oven and discovering that your pastel beads have become toasted craft nuggets. If you bake often, consider using a dedicated toaster oven for clay projects, especially if you make large batches.
Common Mistakes and How to Avoid Them
Using unconditioned clay
If your beads crack, crumble, or refuse to roll smoothly, the clay may not be conditioned enough. Knead longer, warm it in your hands, or use a clay machine.
Making holes too small
A bead hole that looks big enough before baking may feel tiny when you start stringing. Test with the actual cord or wire before curing.
Baking without checking oven temperature
Oven dials are not always accurate. Use an oven thermometer and adjust as needed. Correct temperature helps your beads cure properly and keeps colors from scorching.
Sealing everything automatically
Polymer clay does not always need sealing. If the bead is plain clay and has been sanded and buffed, it may be finished already. Use glaze when you want shine, added surface protection, or to protect paint, mica powder, or surface decoration.
Creative Polymer Clay Bead Ideas
Once you understand the basic steps, the design possibilities open up quickly. Try terrazzo beads by pressing tiny colored clay chips into a neutral base. Make faux turquoise with blue clay, translucent clay, and thin black veining. Create rainbow spacer beads for cheerful bracelets. Roll black and white clay together for modern marble beads. Add gold leaf for a luxe effect that looks boutique-level without requiring boutique-level money.
You can also create themed sets. For beach jewelry, use sand, ivory, aqua, and shell pink colors. For fall, combine rust, mustard, olive, and cream. For holiday gifts, make red-and-white peppermint beads or deep green beads with metallic accents. Handmade beads are easy to personalize, which is why they make excellent gifts.
of Real-World Experience: What Actually Helps When Making Polymer Clay Beads
After making polymer clay beads for a while, you learn that the small habits matter more than fancy tools. A bead roller is nice, a clay machine is helpful, and specialty cutters are fun, but the real magic comes from consistency. The first practical lesson is to measure your clay. When I first started, I rolled beads by instinct, which sounds artistic until you try to make a bracelet and discover that three beads are grape-sized, four are pea-sized, and one looks like it has been emotionally through something. Cutting equal portions from a clay log changed everything.
The second lesson is to slow down when piercing holes. Beginners often push a toothpick straight through the bead in one heroic motion. That usually creates a stretched exit hole, a distorted bead, or a shape that was round five seconds ago and now resembles a sleepy dumpling. The better method is to twist from one side, stop halfway, then twist from the other side. Chilling the beads first makes this even easier. It feels like an extra step, but it saves the shape.
Another experience-based tip: keep white clay covered when you are not using it. White polymer clay attracts dust like it has a subscription service. Even clean hands can transfer tiny color marks after working with red, black, blue, or metallic clay. Wipe your hands between colors, clean the blade, and use separate scrap piles for light and dark clay. “Scrap clay” is not trash; it can become marbled beads, bead cores, test pieces, or color experiments.
Baking is where many beginners get nervous, and that is understandable. Nobody wants to spend an hour making beads only to accidentally roast them into sadness. The solution is simple: use an oven thermometer and test one bead first. A tester bead tells you whether the temperature is stable, whether the color shifts, and whether the bead feels strong after cooling. It is better to sacrifice one bead than an entire batch.
Sanding is optional, but it is the difference between “cute handmade” and “wait, you made that?” Wet-sanding removes fingerprints, tiny bumps, and rough edges around holes. It can feel slow, so put on music or a podcast and treat it as the quiet finishing stage. After sanding, buffing with denim or a soft cloth can bring out a gentle shine without glaze.
Finally, do not judge the project too early. Polymer clay beads often look slightly unimpressive before baking, sanding, and stringing. A pile of loose beads may look random on the table, but once arranged with spacer beads, metal accents, or a thoughtful color pattern, the whole piece comes together. Handmade beads have personality. They do not need machine-perfect sameness to be beautiful. They need good curing, clean holes, comfortable stringing, and a design that makes you want to wear them immediately.
Conclusion
Learning how to make polymer clay beads is a satisfying craft because the process is simple, creative, and endlessly customizable. Start with quality oven-bake clay, condition it well, measure equal portions, shape carefully, pierce clean holes, bake at the correct temperature, and finish with sanding or glaze if needed. Once you master the basics, you can create beads that look like stone, candy, ceramic, terrazzo, marble, or anything your imagination decides to throw into the group chat.
The best beginner advice is this: make a small batch first. Test your clay, test your oven, test your hole size, and test your stringing material. Then make more. Polymer clay rewards practice, and even imperfect beads can become charming jewelry, keychains, bookmarks, zipper pulls, or gifts. Your first bracelet may not look like it belongs in a museum, but it will look like you made something with your own handsand that is already a win.






