
Table of Contents >> Show >> Hide
- What Is a Rim Joist and Why Does It Matter?
- Best Materials for Insulating Rim Joists
- Planning Your Rim Joist Insulation Project
- Step-by-Step: How to Insulate and Seal Rim Joists
- Spray Foam Option: When to Consider It
- Moisture and Condensation: Getting It Right
- Benefits You’ll Notice After Sealing Rim Joists
- Extra : Real-World Experiences with Rim Joist Insulation
- Conclusion
If your basement feels like a walk-in refrigerator and your first-floor floors are icy cold, there’s a good chance your rim joists are to blame. Those narrow cavities where the floor framing sits on the foundation look harmless, but they’re basically a row of little open windows for air leaks, moisture, and pests. The good news? With a weekend, a few tools, and the right materials, you can insulate and seal rim joists like a pro and enjoy a warmer, more efficient home.
What Is a Rim Joist and Why Does It Matter?
The rim joist (also called the band joist) is the horizontal framing member that caps the ends of your floor joists and rests on the foundation wall. It runs around the perimeter of the house and ties the floor framing together. Because it sits right at the edge of the structure and often has plumbing and electrical penetrations, it’s a favorite path for outside air, critters, and moisture to sneak in.
Building science experts consider rim joists one of the most important “critical seals” in the home’s thermal and air barrier. When this area isn’t air sealed and insulated, warm indoor air can rush out in winter and hot humid air can creep in during summer, causing:
- Cold, drafty floors above the basement or crawl space
- Higher heating and cooling bills
- Condensation on cold wood in winter, leading to mold and rot risk
- Easy access for spiders, insects, and even mice to enter your home
Insulating without air sealing is only half a job. The goal is to create a continuous air and thermal barrier that blocks drafts, keeps surfaces warmer, and manages moisture safely.
Best Materials for Insulating Rim Joists
If you’ve ever seen fiberglass stuffed into rim joist cavities, you’ve also seen a common mistake. Fiberglass is air-permeable, so indoor air still flows through it, hits the cold rim joist, and condenses. Over time that can lead to moldy insulation and damaged wood. Many energy programs and building science guides now recommend rigid foam or spray foam instead of fiberglass or mineral wool for rim joists.
Closed-Cell Spray Foam
Closed-cell spray foam checks almost every box in one step: it insulates, air seals, and acts as a vapor retarder. Applied at about 2 to 3 inches thick, it delivers roughly R-6 to R-7 per inch, clings to the wood, and expands into cracks and gaps. That makes it a top choice for complicated or tight cavities, or for very cold climates where condensation control is critical.
Downside? It’s pricier than rigid foam, and DIY kits can be messy and require good safety practices (respirator, goggles, and protective clothing). Professional installers often do this work in whole-house projects, but it’s still an option for ambitious homeowners.
Rigid Foam Board
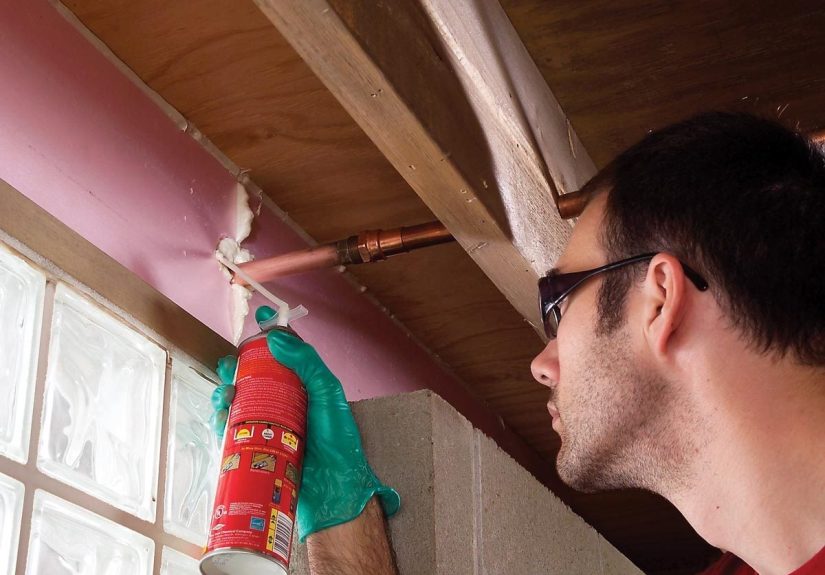
Rigid foam insulation is a budget-friendly and DIY-friendly option that Family Handyman and many energy guides recommend. You cut rectangles of foam to fit each rim joist bay, press them into place, and then seal around the edges with canned spray foam or caulk.
Common choices include:
- Extruded polystyrene (XPS) – Typically around R-5 per inch. Often pink or blue.
- Polyisocyanurate (polyiso) – Higher R-value per inch, often foil-faced, great where space is tight.
- Expanded polystyrene (EPS) – More affordable, slightly lower R-value per inch.
Rigid foam plus canned foam around the perimeter gives you an effective combination of insulation and air sealing, especially in mild to moderate climates.
Why Fiberglass and Mineral Wool Are Poor Choices Here
Fiberglass batts or loose mineral wool at the rim joist are no longer recommended in most building science resources. Because they don’t stop air movement, they let humid indoor air reach the cold rim joist and condense in winter, which can encourage mold and decay. Once the insulation becomes damp, its R-value drops, and the rim joist stays cold and wet.
Planning Your Rim Joist Insulation Project
Safety and Code Considerations
Before you start, keep these safety and building code points in mind:
- Wear safety glasses, a dust mask, and gloves when working around old insulation, dust, and foam.
- If using a spray foam kit, add a respirator and protective clothing. Fresh spray foam is very sticky and difficult to remove.
- Many codes require rigid foam exposed in basements to be covered with a thermal barrier such as 1/2-inch drywall, unless the foam product is specifically rated to be left exposed.
- Check local rules about minimum R-value for basement and crawl-space perimeter insulation.
Tools and Materials
Here’s a typical DIY shopping list for insulating rim joists with rigid foam:
- 1- or 2-inch thick rigid foam board (XPS or polyiso)
- Canned expanding spray foam suitable for gaps and cracks
- High-quality acrylic or polyurethane caulk
- Utility knife or insulation saw
- Measuring tape and marker
- Caulk gun
- Work light and step ladder
- Optional: construction adhesive, drywall and screws for fire protection
Step-by-Step: How to Insulate and Seal Rim Joists
Step 1: Inspect and Prep the Area
Start by clearing storage away from the perimeter of the basement or crawl space so you can see all the rim joists. Use a flashlight to inspect the wood, looking for signs of water stains, mold, or insect damage.
If you find active water leaks, foundation cracks, or heavy mold growth, address those issues before you insulate. Insulation should never trap bulk water or hide ongoing damage. Small surface mold can often be cleaned following appropriate safety guidance, but serious fungal growth or structural issues may need a pro.
Remove any old fiberglass batts or loose insulation so you’re working directly against the wood. This also allows spray foam or caulk to adhere properly.
Step 2: Seal Gaps and Cracks
Air sealing comes first. Look for:
- Gaps where the sill plate meets the top of the foundation wall
- Cracks between rim joists and floor joists
- Holes for plumbing, electrical, or dryer vents
- Any visible daylight (never a good sign!)
Use caulk for small cracks and seams and canned spray foam for larger gaps, especially around pipes and wires. If there are big exterior holes (larger than about 1/4 inch), some guides suggest backing with steel wool or a pest-blocking material before foaming to keep rodents from gnawing their way back in.
Think of this step as turning your leaky rim joist into a continuous air barrier. Take your time; the more thoroughly you seal, the more comfortable and efficient your home will be.
Step 3: Cut and Fit Rigid Foam Panels
Measure each rim joist cavity between neighboring floor joists, then cut a piece of rigid foam slightly smallerusually about 1/4 inch less in both directions. That little bit of wiggle room makes it easier to slide the foam in place and leave space for spray foam around the edges.
Press the foam panel against the rim joist, making sure it sits flush to the wood with no large gaps behind it. If your foundation wall projects into the cavity, you can either notch the foam to fit around it or use two layers of foam to step around the obstruction.
Some DIYers like to add a bead of adhesive on the back of the foam to help hold it in place, but once the canned foam is applied around the perimeter, the panel is typically locked tight.
Step 4: Seal Around the Foam
With the panels in place, use canned spray foam or caulk to seal all four edges of each foam rectangle to the surrounding framing. This creates a continuous air and thermal barrier from foundation to subfloor.
Run a slow, steady bead so you don’t overfill the joint. Canned foam expands as it cures, so a modest bead usually does the job. If you end up with drips or bulges, you can trim them flush with a utility knife once the foam has hardened.
Don’t forget to seal around any remaining penetrations in the foam itselfsuch as where a pipe or wire passes through. Every small opening is another potential air leak.
Step 5: Address Fire Protection if Required
Depending on your local code and the foam product you used, you may need to cover the insulation with a fire-resistant material such as 1/2-inch drywall. Some specialty rigid boards have facings that may be approved to remain exposed; always verify this with the manufacturer and your local building department.
If you’re already planning to finish the basement, the rim joist area can usually be incorporated into the wall framing and drywall, giving a clean, code-compliant finish.
Spray Foam Option: When to Consider It
Rigid foam works great in most basements, but there are situations where closed-cell spray foam shines:
- The rim joist bays are oddly shaped, cramped, or cluttered with ductwork and wiring.
- You live in a very cold climate where interior condensation is a major concern.
- You want maximum R-value in minimal space.
Spray foam is sprayed directly onto the rim joist and surrounding framing, expanding to fill every crack, crevice, and gap. Because it’s both an insulator and an air barrier, it minimizes condensation risk and stops drafts simultaneously.
Professional installers often complete this work quickly, but DIY kits are available at home centers. Whichever way you go, follow the safety instructions carefully and protect nearby surfaces, because overspray is extremely difficult to remove.
Moisture and Condensation: Getting It Right
Rim joists are especially vulnerable to moisture problems because they sit at the intersection of cold exterior air, relatively warm interior air, and often a damp foundation. When warm, moist indoor air sneaks into the cavity and touches a cold surface, condensation forms. Over time that can push the wood moisture content high enough for mold and decay.
Closed-cell spray foam or rigid foam sealed at the edges helps in two ways:
- It warms the interior surface of the rim joist by adding R-value.
- It blocks interior air from reaching the cold wood.
That combo dramatically reduces the risk of wintertime condensation. It’s also wise to keep basement humidity under control with good drainage, gutters, andif neededa dehumidifier, especially in humid climates or if your HVAC ducts run through the basement.
Benefits You’ll Notice After Sealing Rim Joists
Once your rim joists are properly insulated and air sealed, you’ll likely notice several upgrades to daily life at home:
- Toastier floors on the main level, especially along exterior walls
- Fewer drafts creeping up from the basement or crawl space
- Lower energy bills as your heating and cooling system doesn’t have to work as hard
- Less condensation on cold surfaces and better protection against mold
- Fewer bugs and critters making surprise appearances in the basement
It’s not the flashiest weekend project, but for the money, insulating and sealing rim joists is one of the highest-impact upgrades you can make to an older home’s comfort and efficiency.
Extra : Real-World Experiences with Rim Joist Insulation
Homeowners who tackle rim joist insulation quickly become evangelists for the project, because the payoff is so noticeable. One common story goes like this: someone has lived in their house for years, constantly complaining about chilly floors and a “mysterious basement draft.” They add area rugs, crank the thermostat, and even blame the windows. Only when they do a thorough air-leak inspectionor bring in an energy auditor with a blower door testdo they discover that the rim joists are basically Swiss cheese.
Once those leaky cavities are sealed with rigid foam or spray foam, they’re often shocked at how different the house feels. The once-icy kitchen floor above the foundation suddenly feels reasonable in socks, and the furnace cycles less frequently. The improvement is especially dramatic in older homes with balloon framing or minimal original air sealing, where rim joists may have been bare wood for decades.
From a DIY perspective, many people say the most time-consuming part isn’t actually cutting foam or spraying sealantit’s prep and patience. Clearing out storage, moving shelving units, and vacuuming cobwebs take longer than expected. Measuring each rim joist bay individually is another “slow is fast” moment. Very few houses have perfectly uniform framing, so copying one panel measurement 20 times often leads to sloppy gaps. The people who are happiest with the results are usually the ones who took the time to measure and cut carefully, then sealed every edge, no matter how small.
Another real-world lesson is about moisture awareness. Some homeowners report that when they pulled old fiberglass batts out of the rim joist cavities, they found damp, musty material with dark stains on the wood behind it. That discovery can be unsettling, but it’s also a valuable wake-up call. The new insulation system, using foam products and proper air sealing, dramatically reduces the chance of repeating that problem. Many also invest in basic moisture management upgrades at the same timeimproving grading and gutters outside, adding an interior drain or sump where needed, or simply running a dehumidifier during the most humid months.
DIYers who chose spray foam kits often mention a short learning curve. The first bay might come out a little lumpy or overfilled, but by the third or fourth cavity, application becomes more controlled and efficient. A common piece of advice is to protect everything nearby with plastic sheeting, from the water heater to the kids’ stored art projects. Overspray is legendary for sticking to anything it touches, and nobody wants “modern foam sculpture” on their furnace.
On the other hand, those who used rigid foam panels emphasize how satisfying it is to see tidy, well-sealed rectangles around the basement perimeter. Many say the project is a great entry point into building science: they start with rim joists, then move on to air sealing top plates in the attic, upgrading attic insulation, and weatherstripping doors. It’s a small but important step toward treating the house as a complete system.
Some homeowners also notice side benefits. By sealing gaps and cracks in the rim joist area, they dramatically cut down on insects and spiders in the basement. A fully sealed rim joist zone is much less inviting to pests that used to sneak in around hose bibs, meter penetrations, and cable lines. That’s a win not only for energy efficiency, but also for peace of mindno one misses the cobwebs in the laundry corner.
Finally, people who’ve done the project often encourage others not to be intimidated. Yes, you’re working around structural elements and insulation materials, but the basic tasksmeasuring, cutting foam, applying caulk and spray foamare well within most DIYers’ skill set. With good ventilation and safety gear, a careful approach, and maybe a podcast playing in the background, transforming those leaky rim joists into a tight, insulated perimeter can be oddly satisfying. And every time you walk across a noticeably warmer floor in January, you’ll get a quiet reminder that a few hours in the basement were absolutely worth it.
Conclusion
Insulating and sealing rim joists doesn’t come with dramatic before-and-after photos like a new kitchen, but it can transform how your home feels and performs. By focusing on airtight, moisture-aware insulationusing rigid foam or closed-cell spray foam instead of fiberglassyou can warm up cold floors, slash drafts, and protect your structure from condensation and mold.
Treat this project as part of a larger strategy for air sealing and insulating your home. Once the rim joists are buttoned up, your furnace and air conditioner finally get a break, your basement becomes more comfortable, and those mysterious winter chills start to disappear. It’s a very “Family Handyman” kind of upgrade: simple materials, smart building science, and a big payoff in everyday comfort.






