
Table of Contents >> Show >> Hide
- Why Cover a Ball with Fabric?
- Before You Start: Pick the Right Ball and Fabric
- 3 Best Ways to Cover a Ball with Fabric
- How to Avoid Wrinkles, Gaps, and Other Tiny Craft Tragedies
- Best Craft Project Ideas for Fabric-Covered Balls
- Common Mistakes to Avoid
- Which Method Is Best?
- Extra Experience and Lessons from Real Fabric Ball Crafting
- Conclusion
If you have ever looked at a plain foam ball, plastic ornament, or paper-mache sphere and thought, “You could be cuter,” congratulations: you already understand the soul of crafting. Covering a ball with fabric is one of those deceptively simple DIY skills that can make holiday ornaments, nursery decor, party props, pincushions, topiary accents, bowl fillers, and handmade gifts look far more polished than their humble supply list suggests.
The trick is not just getting fabric on the ball. The real magic is getting it to sit smoothly on a curved surface without wrinkling, bunching, gapping, or looking like your project lost a wrestling match with a scrap bin. That is why experienced crafters usually rely on a few tried-and-true methods instead of brute force and optimism.
In this guide, you will learn the smartest ways to cover a ball with fabric for craft projects, which fabrics behave best, when to glue versus sew, how to deal with curves, and how to finish the project so it looks intentional instead of “Pinterest-adjacent.” Whether you are making a no-sew ornament or a more tailored fabric-covered sphere, this tutorial will help you get there with fewer wrinkles and less muttering.
Why Cover a Ball with Fabric?
Fabric instantly changes the look and feel of a basic craft ball. Instead of plain foam or shiny plastic, you get color, texture, pattern, softness, and personality. A floral print can turn a simple sphere into spring decor. Velvet makes it look elegant. Plaid says “holiday cheer” with the confidence of a Hallmark movie. Felt creates a cozy, handmade finish, while cotton prints are perfect for themed party decor, children’s crafts, or quilt-inspired ornaments.
Fabric also gives you more creative control than paint alone. You can coordinate with a room, match a party theme, use leftover quilting cotton, or create one-of-a-kind gift toppers. It is also a sneaky-good way to use up scrap fabric that is too pretty to toss and too small to become anything respectable on its own.
Before You Start: Pick the Right Ball and Fabric
Best Ball Bases for Fabric Covering
Not every ball behaves the same way. Foam balls are the easiest for beginners because they are lightweight, easy to pin into, and friendly to both glue and embellishments. Paper-mache balls work well for decoupage-style methods and have a sturdy surface. Plastic ornament balls are great for lightweight fabric applications, especially when you want a holiday look. Solid wooden balls are less common for full coverage, but they can work for smaller decorative pieces if you use a strong adhesive.
If this is your first attempt, start with a medium-size foam ball. Tiny balls can be fiddly, and very large ones make every wrinkle feel emotionally louder.
Best Fabrics to Use
Light- to medium-weight fabrics are usually the easiest to manage. Quilting cotton, broadcloth, lightweight linen blends, flannel, satin, and some lightweight velvet options can all work well. If you want smooth coverage, choose fabric that bends easily around curves. Thick upholstery fabric, stiff canvas, or bulky denim can fight the shape and create ridges unless you are using a pieced or tailored pattern.
Small prints are often the safest choice because they disguise seams and minor puckers better than giant motifs. Solids look elegant but can reveal every bump. In other words, floral cotton is forgiving; plain white satin is the drama queen of the craft table.
Should You Prewash the Fabric?
Yes, especially if the fabric is new, dyed, or likely to be handled a lot. Prewashing helps remove finishes and reduces the chance of future shrinking, stiffness, or color transfer. It is a small step, but it can save your project from turning into an accidental “before and after” demonstration later.
3 Best Ways to Cover a Ball with Fabric
Method 1: Wrap the Ball with Fabric Strips
This is one of the easiest and most forgiving methods, especially for ornaments and decorative balls. Instead of trying to force one flat piece of fabric around a sphere, you use narrow strips and wrap them gradually around the surface.
Bias-cut strips work especially well because fabric cut on the bias has more give. That stretch helps the strip bend more smoothly around curves. This method is ideal if you want a rustic, layered, or cozy handmade look.
What you need:
- Foam ball or ornament ball
- Fabric strips, about 1/2 inch to 1 inch wide
- Hot glue gun or fabric glue
- Scissors or rotary cutter
- Ribbon or trim for hanging, if needed
How to do it:
- Cut your fabric into long, narrow strips. If possible, cut on the bias for better flexibility.
- Glue one end of a strip to the ball.
- Wrap the strip around the ball, changing direction as needed to cover the surface evenly.
- Add a dab of glue every so often to keep the strip secure.
- When one strip ends, tuck the raw end neatly and begin another strip.
- Continue until the ball is fully covered.
- Finish with ribbon, trim, beads, or a hanging loop.
Why it works: narrow strips conform to curves more easily than one large flat piece. The slight overlap also hides gaps and creates a nice layered texture.
Best for: holiday ornaments, bowl fillers, tree decor, gift toppers, farmhouse-style crafts, and scrap-busting projects.
Method 2: Decoupage Fabric Pieces Onto the Ball
If sewing is not your thing and hot glue strings make you question your life choices, decoupage is a great alternative. This method uses small pieces of fabric and a brush-on adhesive or decoupage medium to smooth the fabric over the surface in sections.
Because the fabric is cut into smaller shapes, it is easier to work around a sphere without major bunching. The final look can be smooth, artistic, and surprisingly polished. It also works beautifully with patterned fabric scraps.
What you need:
- Paper-mache, foam, or lightweight ornament ball
- Fabric cut into small squares, petals, or irregular shapes
- Decoupage medium or fabric-safe adhesive
- Soft paintbrush or foam brush
- Scissors
How to do it:
- Cut fabric into manageable small pieces.
- Brush adhesive onto a section of the ball.
- Lay one fabric piece down and smooth it with your fingers or brush.
- Brush more adhesive over the top to flatten the edges.
- Overlap pieces slightly as you continue around the ball.
- Let one side dry before flipping and covering the other side.
- Add embellishments after the ball is fully dry.
Why it works: smaller fabric pieces behave better on curved surfaces than one large cut. Overlapping the pieces creates continuous coverage and reduces visible puckering.
Best for: decorative ornaments, kids’ crafts with supervision, themed decor, and mixed-media craft projects.
Method 3: Sew Fabric Pieces Into a Fitted Cover
If you want the cleanest and most tailored result, make a fitted fabric cover using multiple curved pieces, often called gores or panels. This method takes more time, but it produces a beautiful fabric-covered ball with a soft, intentional finish.
Think of it like making a tiny fabric globe. A sphere is a three-dimensional shape, so the smoothest sewn covers usually come from several pieces rather than one big circle trying its best.
What you need:
- Ball base
- Fabric
- Paper for a simple pattern
- Pins or clips
- Needle and thread or sewing machine
- Scissors
- Stuffing, if the ball is soft rather than a hard core
How to do it:
- Measure the circumference of the ball and divide it into equal sections.
- Create a petal-shaped panel pattern, narrow at both ends and wider in the middle.
- Cut 4, 6, or 8 panels depending on the ball size and the look you want.
- Sew the panels right sides together, one seam at a time.
- Clip or notch the seam allowances carefully so the curved seams can relax.
- Turn the cover right side out and test it over the ball.
- Slip it onto the ball and close the final opening by hand.
Why it works: pieced panels follow the natural geometry of a sphere better than a flat sheet of fabric. It takes longer, but the finish is neater and more custom.
Best for: keepsake ornaments, soft fabric balls, heirloom-style decor, baby room accents, and projects where you want a more professional look.
How to Avoid Wrinkles, Gaps, and Other Tiny Craft Tragedies
Use Smaller Pieces on Curves
The rounder the surface, the more likely a large flat piece of fabric is to wrinkle. When in doubt, go smaller. Strips, petals, squares, and panel pieces all work better than trying to wrap one giant circle over a ball and hoping the laws of geometry take the day off.
Clip or Notch Seam Allowances
If you are sewing a fitted cover, clipping and notching matter. Curved seams need some help relaxing and turning smoothly. Otherwise, the seam allowance can bunch underneath and create lumps. A few careful cuts can make a dramatic difference in how polished the final ball looks.
Test the Glue First
Not all adhesives behave the same way. Some dry stiff, some dry clear, and some soak through thin fabric and leave dark marks. Always test glue on a scrap first. That little five-minute test can prevent a lot of colorful language later.
Press Fabric Before You Start
Wrinkled fabric does not become magically smooth because it touched a foam ball. Iron it first. Your future self will be grateful, and your project will look far more finished.
Keep Embellishments for the End
Add trim, ribbon, buttons, bows, beads, or hanging loops after the fabric is fully attached and dry. Decorating too soon is how perfectly nice projects end up with crooked trim and regret.
Best Craft Project Ideas for Fabric-Covered Balls
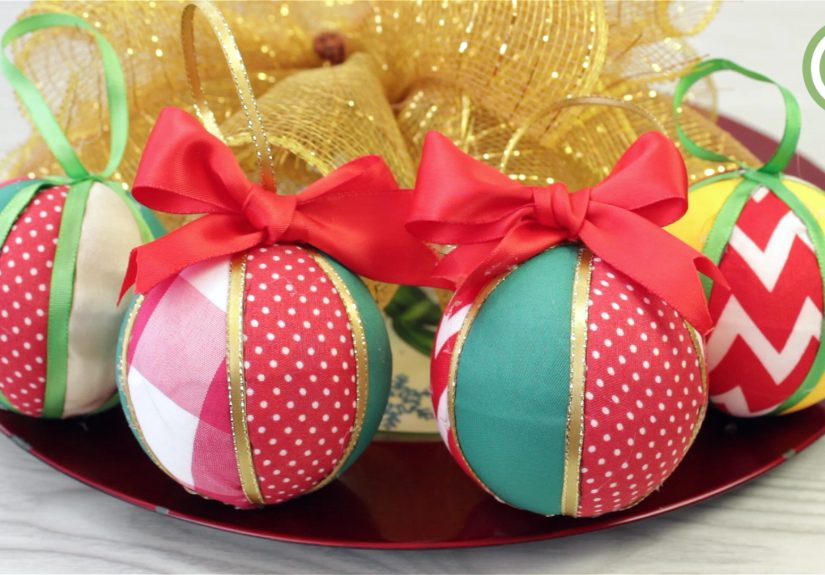
Once you know how to cover a ball with fabric, the project ideas multiply fast. You can make:
- Christmas tree ornaments in plaid, velvet, or vintage florals
- Nursery decor in soft cotton prints
- Wedding or baby shower table decor
- Topiary balls for seasonal centerpieces
- Sports-themed party decorations
- Fabric-covered cat toys using safe stitching and approved fillings
- Gift toppers and bowl fillers for holiday displays
- Soft learning balls for children, if sewn securely and made with age-appropriate materials
The same skill can look rustic, elegant, playful, or modern depending on the fabric. That is part of the charm. One bag of foam balls and a pile of scraps can suddenly become your whole weekend personality.
Common Mistakes to Avoid
- Using fabric that is too thick: bulky material creates ridges and fights the curve.
- Skipping prep: unpressed or unwashed fabric can make the finished project look sloppy.
- Using too much glue: more glue does not always equal more control. Sometimes it just means sticky fingers and visible seep-through.
- Trying to use one giant piece of fabric: spheres are not flat, and they do not negotiate.
- Ignoring finishing details: a clean seam, tidy edge, or centered bow can elevate the whole project.
Which Method Is Best?
If you want the simplest beginner-friendly option, use wrapped strips. If you want a no-sew craft with lots of pattern possibilities, choose decoupage. If you want the most elegant and tailored look, sew a fitted cover with multiple panels.
There is no single “best” method for every project. The right choice depends on the base ball, your fabric, your skill level, and the final style you want. Sometimes the fanciest answer is not necessary. Sometimes you just need a cute plaid ornament and a good glue gun. That is valid.
Extra Experience and Lessons from Real Fabric Ball Crafting
After making fabric-covered balls for ornaments, classroom decor, gift toppers, and a few centerpieces that got way more compliments than they deserved, a few practical truths stand out. First, small projects reveal mistakes faster than big ones. On a pillow, a tiny wrinkle might disappear into the overall design. On a round ornament the size of an orange, that same wrinkle suddenly becomes the headline. So patience matters more than speed.
Another lesson is that fabric choice affects mood more than most beginners expect. The same exact ball can look farmhouse, vintage, modern, whimsical, or formal just by swapping the fabric. I once covered one set in ticking stripes and they looked like they belonged on a charming country mantel. Then I covered another set in jewel-toned velvet, and suddenly the project had dinner-party energy. Craft supplies are funny like that. One minute you are gluing scraps, the next minute you are apparently an interior stylist.
I also learned that no-sew methods are not “cheating.” In fact, glue-based methods can be smarter when the fabric frays easily or when the ball is too firm to work with a sewn sleeve. For fast seasonal decor, wrapped strips are hard to beat. They are forgiving, they use up scraps beautifully, and they create texture that hides small imperfections. If your goal is to make a dozen ornaments without losing your will to craft, wrapped strips are the hero.
That said, sewn covers win on polish. A carefully pieced fabric cover has a tidy, custom look that feels more like a keepsake and less like a quick afternoon project. It is worth the extra effort when you are making nursery decor, special holiday ornaments, or gifts that need a more finished appearance. The first time you sew curved panels, it can feel awkward. The second time, it starts making sense. By the third time, you start acting like you invented spheres.
One of the best practical habits is making a test version with scrap fabric before cutting into anything precious. This is especially important if you are using directional prints, stripes, or fabric you have been hoarding for years because it was “too nice to use.” A mock-up lets you check fit, seam allowance, and coverage before the emotional stakes rise.
Finally, finishing touches matter more than people think. A neat hanging loop, a tiny bow, a row of hand stitches, a bead cap, or a bit of trim can take a project from homemade to handmade. There is a difference, and it usually lives in the last five minutes of the craft. So once the ball is covered, pause before declaring victory. Smooth the edges. Trim the threads. Adjust the ribbon. Then step back and admire your work like the wildly capable person who just taught flat fabric how to behave on a curve.
Conclusion
Learning how to cover a ball with fabric for craft projects is one of those useful DIY skills that opens the door to all kinds of creative ideas. With the right fabric, the right method, and a little respect for curves, you can turn the plainest craft base into something charming, giftable, and genuinely custom. Start simple, work neatly, and do not be afraid to experiment. The ball may be round, but your options are gloriously wide open.





