
Table of Contents >> Show >> Hide
- Why Silver Tarnishes in the First Place
- Before You Start: Identify What You Are Cleaning
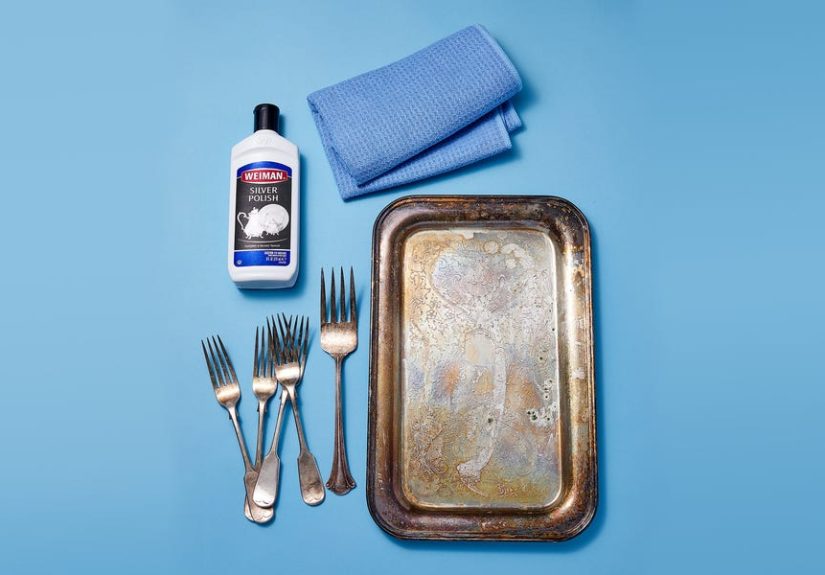
- Supplies You Need to Clean Tarnished Silver
- Method 1: Clean Lightly Tarnished Silver With Dish Soap
- Method 2: Use a Silver Polishing Cloth for Regular Shine
- Method 3: Remove Heavier Tarnish With a Baking Soda Paste
- Method 4: The Aluminum Foil Method for Tarnished Silver
- Method 5: Clean Silver Jewelry Safely
- Common Silver Cleaning Mistakes to Avoid
- How to Prevent Silver From Tarnishing Again
- How Often Should You Clean Silver?
- Expert Troubleshooting: What If the Tarnish Will Not Come Off?
- Experience-Based Tips: What Real Silver Cleaning Teaches You
- Conclusion
- SEO Tags
Silver is the drama queen of the dining room: gorgeous, reflective, elegant, and somehow offended by the mere existence of air. One day your favorite necklace, tea spoon, picture frame, or holiday serving tray looks bright enough to signal aircraft. A few months later, it has turned yellow, brown, gray, or almost black, as if it joined a tiny gothic metal band while you were not looking.
The good news is that tarnish is normal. It does not mean your silver is ruined, dirty, or cursed by a great-aunt who took her gravy boat too seriously. Most tarnished silver can be cleaned at home with gentle methods, patience, and the right tools. The trick is knowing when to use mild soap, when to polish, when to try the aluminum foil method, and when to stop before “sparkling clean” becomes “oops, where did the plating go?”
This guide explains how to clean tarnished silver safely, how to choose the right silver cleaning method for different items, and how to prevent tarnish from coming back too quickly. Whether you are restoring sterling silver jewelry, silverware, silver-plated serving pieces, or decorative heirlooms, these expert tips will help you bring back shine without bullying the metal.
Why Silver Tarnishes in the First Place
Silver tarnish is a surface reaction, not a moral failure. Silver reacts with sulfur-containing compounds in the air, forming a dark layer called silver sulfide. Moisture, pollution, rubber, wool, certain papers, some foods, cosmetics, perfumes, chlorine, and even storage materials can speed up the process. That is why silver stored in a kitchen drawer near rubber bands may look worse than silver tucked away in anti-tarnish cloth.
Sterling silver, which is usually 92.5% silver mixed with other metals for strength, can tarnish faster than very pure silver because the alloyed metals also react with the environment. Silver plate can be even trickier because the silver layer is thin. Scrub too aggressively and you may remove not only tarnish, but also the silver itself. That is not cleaning; that is accidental archaeology.
Before You Start: Identify What You Are Cleaning
Before grabbing baking soda like a cleaning superhero, take a minute to inspect the piece. The safest method depends on what kind of silver you have and what else is attached to it.
Sterling Silver
Sterling silver is often stamped with marks such as “925,” “Sterling,” or “Ster.” It can usually tolerate gentle polishing, mild soap cleaning, and careful tarnish removal. However, ornate sterling pieces may have intentional dark patina in crevices, which gives detail and depth. Removing every shadow can make antique pieces look flat and over-cleaned.
Silver Plate
Silver-plated items have a thin layer of silver over another metal. These pieces require a lighter touch. Avoid repeated heavy polishing, rough pastes, stiff brushes, and long chemical soaks. If you see yellowish metal showing through high spots, the plating may already be worn.
Antique or Valuable Silver
If the item is valuable, rare, museum-quality, or emotionally priceless, clean less, not more. When in doubt, dust gently and consult a professional conservator. Patina can be part of the object’s character and value. A shiny antique is not always a better antique.
Silver Jewelry With Stones, Pearls, Enamel, Wood, or Glue
Gemstones, pearls, enamel, ivory, wood, and glued settings may be damaged by water, heat, ammonia, vinegar, dips, or baking soda. For mixed-material jewelry, stick with a damp soft cloth and a silver polishing cloth designed for jewelry, avoiding stones and delicate areas.
Supplies You Need to Clean Tarnished Silver
You do not need a laboratory or a butler named Winston. Most silver cleaning jobs require simple supplies:
- Soft microfiber cloths or cotton flannel
- Mild dish soap
- Warm water
- Soft-bristled toothbrush or small soft brush
- Silver polishing cloth
- Commercial silver polish or cream, if needed
- Baking soda
- Aluminum foil
- Salt, optional for the foil method
- Glass, ceramic, or plastic bowl
- Cotton gloves, optional but helpful
- Anti-tarnish bags, cloth, or strips for storage
Avoid paper towels because they can be surprisingly scratchy. Also skip steel wool, scouring pads, bleach, chlorine cleaners, oven cleaner, and dishwasher detergent. Silver deserves a spa day, not boot camp.
Method 1: Clean Lightly Tarnished Silver With Dish Soap
For silver that looks dull, cloudy, greasy, or only slightly yellow, start with mild dish soap. This removes skin oils, dust, food residue, and grime that may be sitting on top of the tarnish. Sometimes the “tarnish” is mostly everyday film, which is the cleaning equivalent of good news.
Steps
- Mix a few drops of mild dish soap into warm water.
- Dampen a soft microfiber cloth in the solution.
- Gently wipe the silver, following the shape of the piece.
- Use a soft brush for details, but do not scrub aggressively.
- Rinse with cool or lukewarm water if the item has no delicate attachments.
- Dry immediately and completely with a clean, soft cloth.
This method is ideal for silver flatware used regularly, simple sterling jewelry, napkin rings, small trays, and decorative objects without fragile materials. The key is thorough drying. Water left in seams, hollow handles, or crevices can cause spotting and future corrosion.
Method 2: Use a Silver Polishing Cloth for Regular Shine
A silver polishing cloth is one of the safest tools for routine maintenance. It contains polishing agents that lift tarnish while buffing the surface. It is especially useful for jewelry, flatware, and pieces with light to moderate tarnish.
How to Use It
Rub gently in straight motions or small circles, depending on the shape of the item. Turn the cloth often as it becomes gray or black. That dark color is tarnish being removed, not proof that your spoon has a secret life. Do not wash treated polishing cloths unless the manufacturer says you can; washing may remove the polishing compound.
For silver jewelry, polishing cloths are often better than messy pastes because they give you control. They also reduce the chance of residue getting trapped around stones, prongs, clasps, and engraved details.
Method 3: Remove Heavier Tarnish With a Baking Soda Paste
For heavier tarnish on sturdy sterling silver, a baking soda paste can help. This method is mildly abrasive, so use it carefully and avoid it on silver plate, antiques, delicate engravings, and pieces with intentional patina.
Steps
- Mix three parts baking soda with one part water to form a soft paste.
- Wet the silver slightly so the paste spreads more easily.
- Apply the paste with a soft, lint-free cloth.
- Rub gently, turning the cloth as it darkens.
- Use a soft brush only for stubborn crevices.
- Rinse thoroughly and dry immediately.
Do not treat baking soda like sandpaper with a public relations team. It may be common and natural, but it still has grit. Use light pressure and stop as soon as the tarnish lifts. If your cloth keeps turning dark, that does not always mean you should keep polishing forever. At some point, you are removing more metal than necessary.
Method 4: The Aluminum Foil Method for Tarnished Silver
The aluminum foil method is popular because it feels like kitchen-table science, complete with fizzing, steam, and the satisfying sense that you paid attention in chemistry class after all. It uses aluminum, hot water, and baking soda to transfer tarnish away from silver through an electrochemical reaction.
Best For
- Plain sterling silver flatware
- Simple silver pieces without stones or glued parts
- Items with tarnish in detailed areas that are hard to polish by hand
Avoid This Method For
- Antique silver with valuable patina
- Silver plate with worn areas
- Jewelry with pearls, opals, turquoise, enamel, or glued stones
- Items with hollow handles that may trap water
- Anything fragile, valuable, or uncertain
Steps
- Line a glass or ceramic dish with aluminum foil, shiny side up.
- Place the silver so it touches the foil.
- Sprinkle baking soda over the silver. Add a small amount of salt if desired.
- Pour hot water into the dish until the silver is covered.
- Let it sit for one to three minutes, checking frequently.
- Remove the silver with tongs or gloved hands.
- Rinse well and dry completely with a soft cloth.
- Buff gently with a polishing cloth.
This method can work quickly, but faster is not always better. It may remove desirable darkening in decorative recesses and can be too harsh for certain pieces. Use it as a targeted solution, not a weekly hobby.
Method 5: Clean Silver Jewelry Safely
Silver jewelry collects body oils, lotion, sunscreen, perfume, soap, and everyday grime. Start with the gentlest approach: warm water, mild dish soap, and a soft cloth. For plain sterling silver rings, chains, or bracelets, a polishing cloth can restore shine beautifully.
Chains need extra patience. Lay the chain flat on a soft cloth and polish along the length instead of tugging. For small links, use a soft brush lightly. Always dry chains thoroughly before storing because moisture hides in links like it pays rent there.
For silver jewelry with gemstones, avoid soaking unless you know the stone can handle water and mild soap. Pearls are especially sensitive. Opals, turquoise, amber, coral, and some treated stones can also be vulnerable. When jewelry has mixed materials, clean the silver areas with a polishing cloth and avoid touching the stone surface with polish.
Common Silver Cleaning Mistakes to Avoid
Using Toothpaste on Valuable Silver
Toothpaste is often recommended as a home remedy, but many formulas contain abrasives that can scratch silver and dull the finish. It may seem to work because it removes tarnish, but it can also remove shine. Save toothpaste for teeth, where it has the proper job title.
Putting Silver in the Dishwasher
Dishwashers expose silver to high heat, harsh detergent, prolonged moisture, and contact with stainless steel. That combination can cause spotting, discoloration, and damage. Hand wash silver flatware instead.
Scrubbing With Rough Materials
Steel wool, abrasive sponges, gritty powders, and rough paper towels can scratch the surface. Once scratched, silver reflects light unevenly and looks dull even when clean.
Overusing Silver Dip
Commercial silver dips can remove tarnish quickly, but they may be too aggressive for delicate, plated, oxidized, or antique pieces. They can also remove dark detail from engraved or textured designs. Use dips only when appropriate and follow the label exactly.
Leaving Polish Residue Behind
White or gray residue in crevices makes silver look neglected even after cleaning. Use a soft brush, careful rinsing, and thorough drying to remove leftover polish. A wooden toothpick wrapped in soft cloth can help with stubborn residue, but do not scrape.
How to Prevent Silver From Tarnishing Again
You cannot stop tarnish forever, but you can slow it down dramatically. Store clean, dry silver in anti-tarnish cloth, treated silver bags, or airtight containers with anti-tarnish strips. Keep silver away from rubber bands, wool felt, newspaper, cardboard, and damp areas. Add silica gel packets in humid climates, but make sure they do not touch the silver directly.
For silver flatware, regular use is surprisingly helpful. Washing and drying silver after meals removes sulfur-containing food residue from eggs, onions, mayonnaise, mustard, and some vegetables. In other words, your fancy forks are not just for Thanksgiving. Let them live a little.
Always store silver only after it is completely dry. If you polish before a holiday dinner, let the pieces air out for a bit before wrapping them. Trapped moisture is the enemy of shine.
How Often Should You Clean Silver?
Clean silver lightly after use and polish only when tarnish becomes noticeable. For display pieces, dust regularly with a soft cloth and polish sparingly. For jewelry worn often, wipe it after each wear and give it a deeper clean every few weeks or months, depending on exposure to sweat, cosmetics, and humidity.
The best rule is simple: clean as little as needed to achieve the result you want. Every aggressive polishing session removes a tiny amount of surface material. On sterling silver, that matters over decades. On silver plate, it matters much sooner.
Expert Troubleshooting: What If the Tarnish Will Not Come Off?
If tarnish remains after gentle cleaning, first check whether the item is actually silver. Some metals look silver-colored but respond differently to cleaners. If the piece is silver plate, the dark area may be exposed base metal rather than removable tarnish. If the discoloration is purple, green, crusty, or rough, it may involve corrosion or another reaction that needs professional evaluation.
For stubborn tarnish on sturdy sterling silver, try a quality commercial silver polish. Apply a small amount with a soft cloth, work in sections, rinse if directed, and dry thoroughly. If the item has intricate details, avoid packing polish into every crevice. Leaving some shadow can preserve dimension and design.
Experience-Based Tips: What Real Silver Cleaning Teaches You
After cleaning enough tarnished silver, you learn that the job is less about muscle and more about judgment. The first lesson is that silver tells on you. If you rush, it shows. If you use the wrong cloth, it shows. If you leave water hiding under a handle or around a clasp, it absolutely shows, usually right before guests arrive and ask whether the spoons are “supposed to look vintage.”
One practical experience is to sort pieces before cleaning. Put lightly tarnished items in one group, heavily tarnished pieces in another, and delicate or questionable items in a third. This saves time and prevents you from using a heavy-duty method on a piece that only needed a gentle wipe. A lightly yellow spoon may brighten beautifully with soap and a polishing cloth, while a blackened tray may need a careful paste or commercial polish. Treating every piece the same is how people end up with shiny regrets.
Another lesson: always test a small area first. Choose a hidden spot, such as the underside of a handle or the back of a frame. Apply your method, rinse or buff, dry, and inspect it in good light. If the surface looks brighter without scratches or color changes, continue. If it looks patchy, brassy, cloudy, or strangely flat, stop. Silver cleaning rewards caution the way baking rewards measuring cups.
Drying is also more important than beginners expect. Many people clean silver beautifully, then undo half the work by letting it air-dry. Air-drying can leave water spots and moisture in seams. A soft towel, followed by a few minutes in a warm, dry place, makes a noticeable difference. For chains, place them on a dry cloth and gently press another cloth on top. Do not pull them through the towel like you are starting a lawn mower.
Storage habits matter just as much as cleaning technique. A polished necklace tossed into a bathroom dish will tarnish faster than one stored in a small anti-tarnish pouch. Flatware wrapped in the right cloth will stay brighter than flatware left loose in a drawer with rubber bands, receipts, and that mysterious key nobody recognizes. Silver prefers clean, dry, low-sulfur surroundings. It is elegant, but it is also picky.
Finally, experience teaches you not to chase perfection. A little darkness in carved details can make silver look richer and more dimensional. The goal is not to erase every sign of age. The goal is to remove unwanted tarnish, protect the surface, and keep the piece useful and beautiful. When silver looks warm, bright, and cared for, you have done enough. Put down the cloth. Step away from the spoon.
Conclusion
Cleaning tarnished silver is not difficult, but it does require the right level of care. Start with the gentlest method: mild dish soap, warm water, and a soft cloth. Move to a polishing cloth or silver polish when tarnish is more visible. Use baking soda paste or the aluminum foil method only when the item is sturdy enough and the tarnish calls for it. Avoid harsh scrubbing, dishwasher cleaning, chlorine, rough towels, and over-polishing.
The smartest silver cleaning strategy is prevention. Store silver in anti-tarnish materials, keep it dry, wipe jewelry after wearing, and wash flatware soon after use. With a little routine care, your silver can stay bright without turning every cleaning session into a full historical restoration project.
Note: For valuable antiques, museum-quality pieces, fragile silver plate, or jewelry with pearls, enamel, opals, turquoise, glued stones, wood, or ivory, consult a professional before using water, polish, dips, or heat-based cleaning methods.






