Table of Contents >> Show >> Hide
- Why This Is the Best Homemade Graham Cracker Crust Recipe
- The Simple Ingredient List
- How to Make Graham Cracker Crust Step by Step
- Full Recipe Card
- Best Tips for a Perfect Graham Cracker Pie Crust
- Common Graham Cracker Crust Mistakes
- Flavor Variations to Try
- What Desserts Work Best With This Crust?
- How to Store and Make Ahead
- Why Homemade Is Better Than Store-Bought
- Conclusion
- Real-Life Kitchen Experiences With This Graham Cracker Crust
- SEO Tags
If pie had a supporting actor award, the graham cracker crust would already have a shelf full of trophies. It is buttery, toasty, sweet, and just crunchy enough to make creamy fillings feel extra luxurious. It also asks very little of you. No rolling pin theatrics. No chilled dough drama. No flour blizzards on the counter. Just crumbs, butter, sugar, and a few minutes of very satisfying pressing.
This guide will show you exactly how to make the best homemade graham cracker crust recipe from scratch, along with the small details that separate a crust that slices beautifully from one that falls apart like it just got bad news. Whether you are making cheesecake, key lime pie, chocolate cream pie, or a no-bake summer dessert that refuses to turn on the oven for longer than necessary, this crust is your new reliable best friend.
Why This Is the Best Homemade Graham Cracker Crust Recipe
A truly great graham cracker crust does four things well. First, it tastes like an actual part of the dessert instead of an edible cardboard circle. Second, it holds together when sliced. Third, it stays crisp enough to contrast with a creamy filling. Fourth, it works for both baked pies and chilled, no-bake desserts.
The best homemade graham cracker crust recipe balances those goals with a simple formula: very fine graham cracker crumbs, enough melted butter to bind the mixture, just enough sugar to round out the flavor, and a brief bake to help the crust set. Some bakers add a pinch of salt or a little cinnamon, and honestly, that is the kind of extra credit assignment we can all support.
The Simple Ingredient List
What You Need
- 1 1/2 cups finely crushed graham cracker crumbs
- 6 tablespoons unsalted butter, melted
- 1/4 cup granulated sugar
- 1/8 teaspoon fine salt
- Optional: 1/4 teaspoon ground cinnamon
This ratio creates a crust that is sturdy without turning greasy, sweet without tasting like a candy bar, and crisp without needing a chemistry degree. If your graham crackers are especially sweet, the salt helps keep the flavor balanced. If you love a slightly warmer, more bakery-style taste, cinnamon is a smart addition.
Can You Use Store-Bought Crumbs?
Yes, absolutely. Store-bought graham cracker crumbs are convenient and work well. But crushing whole graham crackers yourself usually gives you fresher flavor and better control over the texture. And if you have a food processor, the whole operation takes less time than deciding what to watch while the pie chills.
How to Make Graham Cracker Crust Step by Step
1. Make Very Fine Crumbs
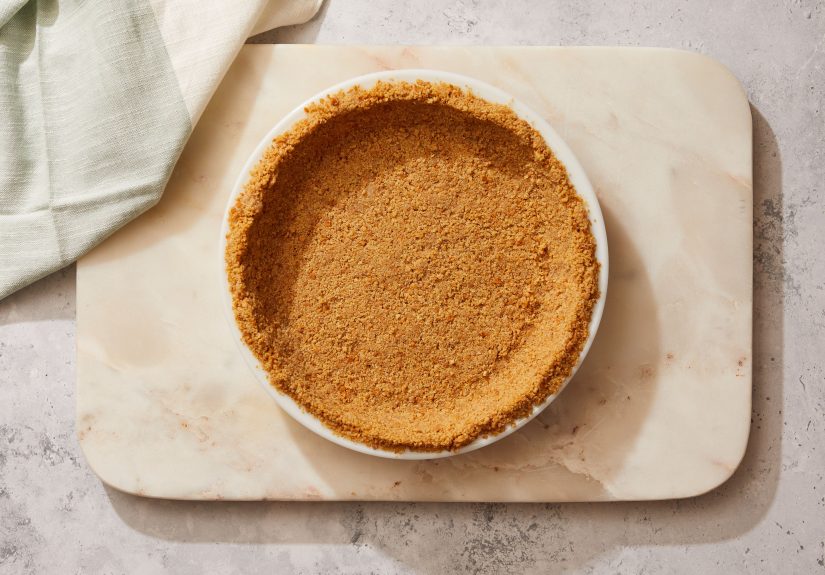
The single biggest secret to a crust that holds together is crumb size. You want the graham crackers processed into fine, sandy crumbs. Big chunks may look rustic, but they also love to crumble the moment you cut the pie. If using a food processor, pulse until the texture resembles beach sand. If using a zip-top bag and rolling pin, keep going until your arm mildly complains.
2. Mix the Dry Ingredients First
Combine the graham cracker crumbs, sugar, salt, and cinnamon if using. Stirring these together before adding the butter helps distribute flavor evenly. This matters more than people think. You do not want one slice tasting perfect and the next tasting like it forgot to clock in.
3. Add Melted Butter
Pour in the melted butter and stir until the mixture looks like wet sand. When you squeeze a bit in your hand, it should hold its shape. If it feels dusty and loose, add a little more butter, one teaspoon at a time. If it looks shiny and oily, back away slowly and add a few more crumbs.
4. Press It Into the Pan
Transfer the crumb mixture to a 9-inch pie plate. Spread it out loosely first, then use the bottom of a measuring cup or drinking glass to press it firmly into the bottom and up the sides. Start with the sides, then finish the bottom. This helps keep the thickness more even. Press firmly, but do not compact it like you are paving a driveway. Too much pressure can make the crust hard instead of tender-crisp.
5. Bake for Better Structure
For most pies, bake the crust at 350°F for 8 to 10 minutes, or until it smells toasty and looks just a shade darker. Let it cool completely before filling. This quick bake helps the butter and sugar set the structure, which is especially useful for cheesecake crust, lemon pie crust, and any dessert that needs clean slices.
For some no-bake pies, you can chill the crust instead of baking it, but baking usually gives you better flavor and a sturdier texture. In other words, the oven does a little free therapy for the crust.
Full Recipe Card
Best Homemade Graham Cracker Crust Recipe
Yield: 1 crust for a 9-inch pie or cheesecake
Prep Time: 10 minutes
Bake Time: 8 to 10 minutes
- Preheat your oven to 350°F.
- In a medium bowl, combine the graham cracker crumbs, sugar, salt, and cinnamon if using.
- Pour in the melted butter and stir until all the crumbs are evenly moistened.
- Pour the mixture into a 9-inch pie plate.
- Use the bottom of a measuring cup to press the crumbs firmly into the bottom and up the sides of the pan.
- Bake for 8 to 10 minutes, until lightly golden and fragrant.
- Cool completely before adding filling.
Best Tips for a Perfect Graham Cracker Pie Crust
Use a Measuring Cup for Pressing
A flat-bottomed measuring cup gives you a much smoother, tighter crust than fingers alone. Fingers are wonderful for many things, but uniform pie crust engineering is not always one of them.
Do Not Overheat the Butter
Melt the butter gently. If it gets too hot and starts losing moisture, the crust can behave differently in the oven and may slump more than expected. Warm and melted is ideal. Butter that seems to be auditioning for a lava scene is not.
Pre-Bake for Wet Fillings
If your pie filling is creamy, custardy, or no-bake, pre-baking the crust is usually the smartest move. It helps keep the texture crisp and prevents the crust from turning soft once the filling is added.
Do Not Press Too Hard
This sounds weird because every graham cracker crust tutorial says to press firmly, and that is true. But there is a difference between firm and overpacked. You want a compact crust, not a brick. Think gentle authority.
Cool Before Filling
If you fill a warm crust, the filling may soften it or melt in ways you did not intend. Let the crust cool completely so the structure stays neat and the texture stays crisp.
Common Graham Cracker Crust Mistakes
The Crust Falls Apart
This usually means the crumbs were too coarse or there was not enough butter to bind them. Fine crumbs matter more than people expect. A crust with pebble-size pieces is basically planning its own collapse.
The Crust Is Too Hard
That can happen if you packed it too tightly or baked it too long. Keep the bake short and use steady pressure rather than brute force.
The Crust Is Greasy
Too much butter is the usual culprit. Start with the standard amount, then adjust only if the mixture feels dry. You want moist crumbs, not a buttery puddle in disguise.
The Sides Slide Down
If the crust slumps while baking, the crumbs may have been too warm, too oily, or not pressed evenly. Chilling the pressed crust for 10 to 15 minutes before baking can help it hold its shape.
Flavor Variations to Try
Cinnamon Graham Cracker Crust
Use cinnamon graham crackers or add 1/2 teaspoon cinnamon to the crumb mixture. This version pairs beautifully with pumpkin pie, apple cheesecake, and fall desserts.
Brown Sugar Graham Cracker Crust
Swap the granulated sugar for light brown sugar for a deeper, slightly caramel-like flavor. It is especially good with banana cream pie or chocolate silk pie.
Salted Graham Cracker Crust
Add a slightly larger pinch of salt if your filling is very sweet. This creates a more balanced crust and gives the flavor a grown-up edge without making the dessert taste salty.
Nutty Version
Replace a small portion of the crumbs with finely ground nuts, such as almonds or pecans, for added richness. Just keep the texture fine so the crust still holds together well.
What Desserts Work Best With This Crust?
- Classic cheesecake
- No-bake cheesecake
- Key lime pie
- Lemon cream pie
- Chocolate cream pie
- Peanut butter pie
- Icebox pie
- Mini tartlets and dessert bars
The beauty of this homemade graham cracker crust is its flexibility. It is sweet, but not too sweet. It is crisp, but not aggressively crunchy. It plays well with fruit, chocolate, citrus, vanilla, and cream cheese. In short, it is the golden retriever of dessert crusts.
How to Store and Make Ahead
Make Ahead
You can make the crust one to two days ahead. Once baked and cooled, cover it tightly and keep it at room temperature if your kitchen is cool and dry, or refrigerate if needed.
Freeze It
A graham cracker crust freezes well. Wrap the cooled crust tightly and freeze for up to one month. Thaw in the refrigerator or at room temperature before filling. This is one of those small kitchen moves that makes you feel absurdly organized.
After Filling
Once filled, store the pie according to the filling requirements. Cheesecakes and cream pies should be refrigerated. If the crust softens a little after a day in the fridge, do not panic. That is normal. It will still taste wonderful.
Why Homemade Is Better Than Store-Bought
Store-bought graham cracker crusts are convenient, and convenience is not the villain. But homemade crust wins on flavor, texture, freshness, and fit. It tastes more buttery, less stale, and far less sweet in a one-note kind of way. You also control the thickness, the sweetness, and the pan size. Plus, there is a small but undeniable joy in saying, “Oh, that crust? I made it,” as if you have casually conquered pastry without breaking a sweat.
Conclusion
The best homemade graham cracker crust recipe is not complicated. In fact, its magic comes from how simple it is. Fine crumbs, melted butter, a bit of sugar, optional salt, and a short bake are all you need to create a crust that tastes better than the boxed version and behaves better under a creamy filling. It is the kind of kitchen staple that instantly makes homemade desserts feel more polished, whether you are baking for a holiday table, a birthday, or a random Tuesday that clearly needed pie.
Once you make this graham cracker pie crust a couple of times, you will stop needing the recipe and start making it on instinct. That is usually the sign of a keeper. And if your dessert disappears quickly, just know the crust deserves some of the applause too.
Real-Life Kitchen Experiences With This Graham Cracker Crust
The first time I made a homemade graham cracker crust, I treated it like an easy side quest. Crush crackers, add butter, press into pan, done. I was wildly confident for someone who had not yet learned that “crumbs” can mean anything from elegant sand to chunky rubble. I used a plastic bag, a rolling pin, and what can only be described as optimistic force. The result looked decent, but once I sliced the finished pie, the crust shattered like it had unresolved issues. It tasted good, but every bite required the strategic use of a fork and a prayer.
The second attempt was better because I started paying attention to the little things. I processed the crumbs until they were fine and even. I mixed the sugar and salt first. I melted the butter gently instead of blasting it in the microwave until it looked suspiciously aggressive. Then I pressed the mixture into the pan with a measuring cup, which turned out to be one of those quiet kitchen revelations. Suddenly the crust looked smooth, neat, and bakery-level respectable.
What really sold me, though, was how dependable this crust became once I used it for different desserts. Under a no-bake cheesecake, it stayed crisp enough to contrast with the creamy filling. Under a lemon pie, it added just the right warm, honeyed flavor. With chocolate cream pie, it did that magical thing where a humble crust somehow makes the filling taste fancier. The crust never tried to steal the spotlight, but it definitely knew how to improve the show.
I also learned that graham cracker crust is incredibly forgiving, which is great news for real-life kitchens that are not always calm, spotless, or operating under ideal conditions. Sometimes I have used store-bought crumbs because I was short on time. Sometimes I added cinnamon because it felt right. Once I swapped in a bit of brown sugar and suddenly the whole dessert tasted cozier. These are the kinds of small changes that make you feel creative without risking total dessert chaos.
One of my favorite experiences with this recipe was making several crusts ahead of a holiday weekend. It felt absurdly efficient. Future me opened the refrigerator, saw those ready-to-fill crusts, and briefly considered writing myself a thank-you note. On busy baking days, that kind of preparation feels luxurious. It also makes homemade desserts more approachable because one major step is already done.
And then there is the universal truth every home baker discovers eventually: people notice crust more than they say. Guests may compliment the filling first, but when the crust is buttery, crisp, and easy to slice, they absolutely remember it. A good graham cracker crust makes a dessert feel complete. A great one makes people think you are much more effortless in the kitchen than you actually were. That, in my opinion, is one of baking’s finest gifts.