
Table of Contents >> Show >> Hide
- Why Up-Cycled Drawers Make Surprisingly Great Shelves
- What You Need Before Turning Drawers Into Shelves
- How to Prep an Old Drawer the Right Way
- Best Design Ideas for DIY Drawer Shelves
- How to Hang Drawer Shelves Without Regret
- Safety Notes You Should Not Skip
- Common Mistakes That Can Ruin the Look
- Where Drawer Shelves Work Best
- Final Thoughts
- What I Learned After Actually Doing It
Some people see an old dresser and think, “That belongs on the curb.” I see a row of wooden boxes and think, “Congratulations, you’re about to become the coolest shelves in the house.” That is the magic of up-cycled drawers to shelves: it turns forgotten furniture into useful, good-looking storage with personality you simply cannot fake with a flat-pack box and an Allen wrench.
If you have a tired dresser, a thrift-store find, or a random drawer that survived the great furniture breakup of last summer, you have the raw material for a smart DIY drawer shelf. Better yet, this project works for almost any style. Rustic? Easy. Modern? Absolutely. Cottagecore? Please. Even “I found this on the side of the road but gave it a glow-up” chic is on the table.
What makes repurposed dresser drawers so appealing is that they already come with structure. They have sides, a back, and built-in depth, so turning them into wall shelves, entryway catchalls, bathroom storage, or book nooks is less about starting from scratch and more about giving old furniture a second act. It is sustainable, budget-friendly, and just rebellious enough to be fun.
Why Up-Cycled Drawers Make Surprisingly Great Shelves
A drawer is basically a pre-made box, which is excellent news for anyone who enjoys DIY results but would rather not perform advanced carpentry before breakfast. Instead of cutting and assembling every piece, you can focus on cleanup, repairs, finish, and mounting.
They already have the right shape
Most drawers are sturdy enough for light to moderate storage when they are properly reinforced and securely mounted. Their built-in sides keep books, baskets, folded towels, and décor from sliding off the edge like they are making a break for freedom.
They bring instant character
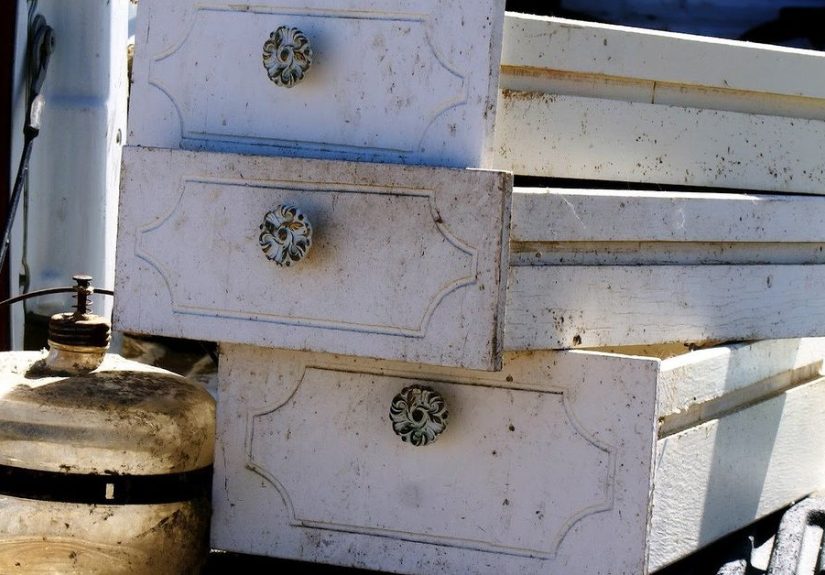
Old drawers often have details new shelves do not: curved fronts, inset panels, dovetail joints, vintage knobs, worn wood grain, or charming imperfections that whisper, “I had a life before this.” That history gives your upcycled furniture project a custom look.
They help you decorate vertically
Whether you hang one statement drawer or create a full gallery wall of mismatched shelves, this idea makes great use of vertical wall space. That is especially helpful in apartments, small homes, craft rooms, laundry rooms, and entryways where storage is always one basket short of a crisis.
What You Need Before Turning Drawers Into Shelves
You do not need a workshop that looks like a cable TV set. You need a reasonably solid drawer, some patience, and a few basic supplies:
- Old wooden drawers
- Screwdriver or drill
- Wood filler
- Sandpaper or sanding sponge
- Cleaner or degreaser
- Primer and paint, or stain and clear finish
- Level and measuring tape
- Mounting hardware such as screws, brackets, cleats, or rated wall anchors
- Optional wallpaper, peel-and-stick liner, trim, hooks, or new hardware
Pick drawers with solid corners and bottoms. If the bottom panel is flimsy, you can still use it, but it is smarter to reserve it for lightweight display storage or reinforce it before hanging. A drawer meant to hold keys and dried flowers has a very different career path than one expected to support cookbooks and a ceramic vase the size of a toddler.
How to Prep an Old Drawer the Right Way
The difference between “wow, what a smart furniture makeover” and “why is that shelf shedding paint flakes” usually comes down to prep. Glamorous? No. Important? Extremely.
1. Clean first, admire later
Old drawers collect dust, wax, grime, mystery residue, and sometimes glitter from a previous decade that refuses to die. Wipe the drawer thoroughly with mild soap and water or a degreasing cleaner. Let it dry fully before moving on.
2. Remove hardware if it gets in the way
Knobs and pulls can stay if you want them as decorative details, but take them off if you plan to paint neatly or use the front edge differently. Some people even reinstall the knobs at the bottom edge and use them as mini hooks for keys, dog leashes, or necklaces. Overachieving drawer, honestly.
3. Fill holes, dents, and rough spots
Use wood filler for old screw holes, dents, chips, or cracks. Let it dry, then sand it smooth. This matters even more if you want a painted finish, because paint has a cruel sense of humor and will highlight every flaw you hoped it would ignore.
4. Sand for a smoother finish
Light sanding helps primer and paint stick better, and it also improves stain absorption if you are taking the piece back to bare wood. For a stain finish, work from medium grit to fine grit and sand with the grain. For paint, a light scuff sanding is often enough unless the finish is peeling or damaged.
5. Prime if you are painting
Primer is not a scam invented by paint companies. It helps with adhesion, blocks stains, and creates a more even finish, especially on previously finished furniture. If the drawer has knots, discoloration, or a slick surface, primer is your best friend.
Best Design Ideas for DIY Drawer Shelves
This is where the fun begins. Your drawer shelf ideas can be simple and clean or gloriously extra.
Painted statement shelves
Paint the outside one color and the inside another for contrast. Navy outside with a pale wood or white interior looks polished. Sage green works beautifully for cottage and farmhouse spaces. Black adds drama. Mustard yellow says, “I have confidence and probably a very good lamp.”
Wallpaper-lined interiors
Line the inside back panel with removable wallpaper, scrapbook paper, or fabric-covered board. This is one of the easiest ways to make a shelf feel custom. Florals soften a bedroom or bathroom. Geometrics bring edge to a hallway or office. Vintage maps? Suddenly your shelf is feeling intellectual.
Open cubby storage
Use deeper drawers as cubbies in mudrooms, entryways, or kids’ rooms. Add small labels, baskets, or hooks under the bottom edge. You get storage plus a little visual structure, which is useful when a household has many people and exactly zero agreement on where things belong.
Book ledges and bedside shelves
Shallow drawers can make charming bedside shelves for books, glasses, and a charging cable. Mounted low, they also work in kids’ rooms as forward-facing book displays that make covers visible and inviting.
Bathroom and vanity storage
Smaller drawers are perfect for rolled hand towels, skincare, candles, and hair tools. Just be mindful of moisture and use a durable paint or protective topcoat if the shelf will live in a bathroom.
How to Hang Drawer Shelves Without Regret
Here comes the part where style meets physics. A beautiful shelf is nice. A shelf that stays on the wall is nicer.
Mount into studs whenever possible
If you are hanging a heavy drawer shelf or planning to store anything weighty, attach into wall studs whenever possible. Use a level, mark carefully, and double-check placement before drilling. Stud mounting gives the strongest support and the fewest future “well, that was dramatic” moments.
Use rated wall anchors if studs do not line up
If your layout does not cooperate with stud locations, use quality wall anchors rated for the shelf and the load you expect it to carry. Follow the packaging closely, because anchor choice depends on wall type and weight. More hardware is not automatically better; correct hardware is better.
Consider brackets or cleats for deeper drawers
For heavier or deeper drawers, hidden brackets, metal L-brackets, or a cleat system can provide better support. A French cleat setup is especially useful when you want a strong mount with a cleaner look. It is a clever option for utility spaces, offices, and anywhere function matters as much as finish.
Mind the wall type
Drywall, plaster, brick, and concrete all require different approaches. Always match the fasteners to the wall. And before drilling, remember that walls may hide wiring, plumbing, or ducts. Surprise shelves are delightful. Surprise electrical issues are not.
Safety Notes You Should Not Skip
If you are working with older furniture or an older home, take the grown-up safety notes seriously.
- If the home or painted furniture may date to before 1978, be cautious about sanding or disturbing old paint.
- Wear eye protection and a dust mask or respirator appropriate for the task.
- Work in a well-ventilated area.
- Vacuum dust and wipe surfaces before painting or bringing the piece indoors.
- Do not overload a shelf just because it looks sturdy. Looks can be very persuasive and very wrong.
Note: If you suspect lead paint, stop treating the project like a casual weekend craft and handle it with the right precautions. Safety may not be glamorous, but neither is hazardous dust.
Common Mistakes That Can Ruin the Look
Skipping prep
Painting over dirt, wax, or glossy finish is a direct flight to peeling paint. Clean and scuff-sand first.
Using weak hardware
Do not trust tiny generic screws for a deep wooden drawer shelf. Use hardware that fits the weight and wall type.
Forgetting proportion
A huge drawer on a narrow wall can feel clunky. Tiny drawers scattered without intention can look accidental. Group pieces thoughtfully and test the arrangement on the floor before hanging.
Decorating every inch
Yes, the shelf is cute. No, it does not need seventeen tiny objects, three fake succulents, and a sign that says “Bless This Mess.” Leave breathing room so the shape of the drawer still stands out.
Where Drawer Shelves Work Best
This project is flexible enough to fit nearly any room:
- Entryway: keys, mail, sunglasses, small baskets
- Kitchen: mugs, spices, linens, recipe books
- Bathroom: towels, candles, toiletries
- Bedroom: books, framed photos, jewelry
- Nursery or kids’ room: books, plush toys, keepsakes
- Craft room: jars, ribbon, tools, paint supplies
- Laundry room: stain sprays, folded cloths, extra supplies
The best part of upcycled dresser drawer shelves is that they can be both practical and playful. They solve storage problems while making the room feel more personal. That is a rare double win in home design, right up there with finding matching socks.
Final Thoughts
Turning up-cycled drawers into shelves is one of those projects that looks creative because it is creative, but it is also deeply practical. You save money, reuse old materials, avoid unnecessary waste, and end up with storage that actually looks interesting. Not “expensive-looking because it is beige.” Interesting.
Whether you paint the drawer, stain it, line it, stack it, or hang it solo like wall art with ambition, the result can feel custom in a way store-bought shelving rarely does. With smart prep, solid mounting, and a little restraint at the decorating stage, an old drawer can become the kind of shelf people ask about the second they walk into the room.
And that is the beauty of upcycling. You are not just making shelves. You are rewriting the ending of a piece of furniture that was one bad afternoon away from becoming landfill. Dramatic? Maybe. Satisfying? Absolutely.
What I Learned After Actually Doing It
Now for the honest part: when I first decided to turn old drawers into shelves, I was operating on equal parts inspiration and audacity. I had three mismatched drawers from a dresser that had clearly lived several lives before it met me. One drawer was solid wood, one had a wobbly bottom panel, and one had the kind of floral liner paper that looked like it had been chosen during a very committed peach-and-mauve era. In other words, it was perfect.
The first lesson I learned was that every drawer has opinions. One wanted to be a bathroom shelf. One clearly belonged in the entryway. One fought me on every step like it had union protections. I started by cleaning them, and that alone changed everything. What looked hopeless under dust and grime suddenly had grain, shape, and detail. That moment is a big part of why I love upcycled furniture ideas. You are not just fixing something. You are discovering what was hiding underneath neglect.
The second lesson was that prep is not optional, even when your inner chaos goblin insists it is. I tried to rush one drawer by sanding “just enough.” Reader, it was not enough. The finish looked uneven, the paint clung in some places and sulked in others, and I had to go back and do the work properly. Once I cleaned, filled, sanded, primed, and repainted, the difference was dramatic. It stopped looking like a desperate craft and started looking like intentional décor.
I also learned that hardware deserves respect. One drawer was deeper and heavier than it looked, and it taught me quickly that “good enough” mounting is not actually good enough. After rethinking the plan, finding the studs, and using sturdier support, the shelf felt secure instead of suspenseful. That changed how I approach every wall project now. Pretty matters, but not more than staying attached to the wall.
My favorite surprise was how versatile the finished shelves became. The smallest drawer ended up in the entryway holding keys, sunglasses, and the mail I swear I am going to sort immediately. The medium one went into a guest room with books and a tiny plant. The deepest drawer became bathroom storage with rolled towels and a candle that makes the room smell far more expensive than it is. None of them matched perfectly, and that was exactly the point. Together they looked collected, not purchased in a panic during a holiday sale.
If I had to sum up the experience, I would say this: turning drawers into shelves is part DIY project, part design experiment, and part personality test. It rewards patience, punishes shortcuts, and gives old furniture a chance to be useful again in a completely new way. I started with leftover parts and a vague plan. I ended with custom wall storage and the very specific satisfaction of pointing at it and saying, “Yes, I did.”
Note: For the best results, match your mounting method to your wall type and expected load, and use extra caution with older painted surfaces.





