
Table of Contents >> Show >> Hide
- Why Leftover Halloween Candy Works So Well in Cookie Bars
- Best Candy to Use for Halloween Candy Cookie Bars
- Ingredients for Leftover Halloween Candy Cookie Bars
- Equipment You’ll Need
- How to Make Leftover Halloween Candy Cookie Bars
- Recipe Card: Leftover Halloween Candy Cookie Bars
- Pro Tips for the Best Candy Cookie Bars
- Flavor Variations
- How to Store Leftover Halloween Candy Cookie Bars
- Food Safety Notes for Halloween Candy Baking
- Serving Ideas
- Common Mistakes to Avoid
- Personal Experience: What Makes This Recipe So Useful After Halloween
- Conclusion
Every year, Halloween leaves behind three things: fake spiderwebs in the bushes, one lonely pumpkin slowly becoming soup on the porch, and a suspiciously large pile of candy that nobody wants to admit they bought “for the trick-or-treaters.” That is exactly where this Leftover Halloween Candy Cookie Bars Recipe becomes your post-Halloween hero.
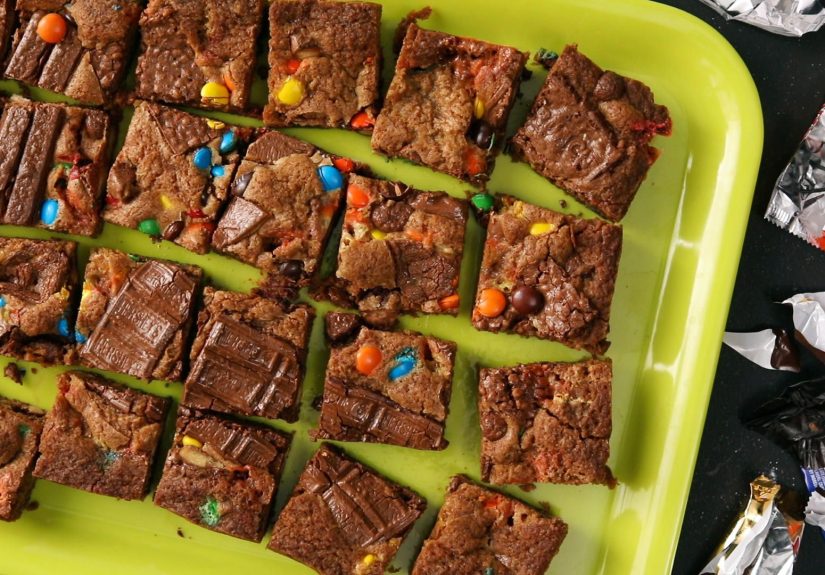
These cookie bars are chewy, buttery, golden at the edges, soft in the center, and packed with chopped candy bars, chocolate pieces, peanut butter cups, caramel bites, and candy-coated chocolates. Think of them as blondies that got invited to a costume party and went a little overboard with the accessories. The best part? They are much easier than individual cookies because there is no scooping, no rotating several trays, and no wondering why one cookie looks like a perfect bakery treat while another looks like it lost a fight with gravity.
This recipe is designed for real kitchens, real candy stashes, and real people who may or may not have hidden the good chocolate from their children. It uses a simple brown sugar cookie bar base that holds up well to mix-ins, balances the sweetness of candy with salt and vanilla, and bakes into neat squares that are perfect for lunch boxes, bake sales, movie nights, office snacks, or emergency “I need a dessert in under an hour” situations.
Why Leftover Halloween Candy Works So Well in Cookie Bars
Leftover Halloween candy is practically made for cookie bars. Mini chocolate bars bring melty pockets, peanut butter candies add richness, caramel candies create chewy ribbons, and candy-coated chocolates add color and crunch. Instead of tasting like one-note sugar, the finished bars have layers: buttery dough, brown sugar warmth, chocolate, salt, crunch, chew, and just enough chaos to keep every bite interesting.
Cookie bars are also more forgiving than regular cookies. When you bake individual cookies with chopped candy, caramel pieces can leak, chocolate can spread, and delicate candies may overbake. In bar form, the dough acts like a soft, sturdy blanket around the candy. The result is a dessert that looks intentional even if your candy selection came from the bottom of a plastic pumpkin bucket.
Best Candy to Use for Halloween Candy Cookie Bars
The beauty of this recipe is flexibility, but not all candy behaves the same in the oven. For the best texture, use a mix of chocolate-based candies, crunchy candies, and a few chewy candies. A balanced blend gives the bars that bakery-style “loaded cookie” effect without turning them into a sugar landslide.
Best Choices
- Chocolate bars: Hershey’s, Milky Way, 3 Musketeers, Kit Kat, Crunch, and similar fun-size bars.
- Peanut butter candies: Reese’s cups, Reese’s Pieces, peanut butter M&M’s, and mini peanut butter bars.
- Caramel candies: Snickers, Twix, Milk Duds, Rolos, and Milky Way pieces.
- Candy-coated chocolates: M&M’s, mini M&M’s, and seasonal candy pieces.
- Crunchy options: Butterfinger, Heath bars, toffee bits, or chopped wafer bars.
Candies to Use Carefully
Gummy candies, sour candies, hard candy, lollipops, taffy, and gum are not ideal for baking into cookie bars. Gummies can melt oddly, hard candy can become dangerously sharp or sticky, and gum iswell, gum. It had one job, and baking was not it. Candy corn can be used in small amounts on top, but too much may become overly sweet and sticky.
Ingredients for Leftover Halloween Candy Cookie Bars
This recipe uses pantry staples and about two cups of chopped Halloween candy. The base is similar to a blondie: melted butter, brown sugar, eggs, vanilla, flour, and a little baking powder. Brown sugar adds moisture and a caramel-like flavor, while melted butter keeps the process simple and gives the bars a dense, chewy bite.
- 1 cup unsalted butter, melted and slightly cooled
- 1 cup packed light brown sugar
- 1/2 cup granulated sugar
- 2 large eggs, room temperature
- 2 teaspoons pure vanilla extract
- 2 1/4 cups all-purpose flour
- 1 teaspoon baking powder
- 1/2 teaspoon baking soda
- 3/4 teaspoon fine salt
- 2 cups chopped leftover Halloween candy, divided
- 1/2 cup semi-sweet chocolate chips, optional but highly recommended
- Flaky sea salt for topping, optional
Equipment You’ll Need
- 9×13-inch baking pan
- Parchment paper
- Large mixing bowl
- Whisk
- Rubber spatula
- Sharp knife for chopping candy
- Wire cooling rack
How to Make Leftover Halloween Candy Cookie Bars
Step 1: Prepare the Pan
Preheat the oven to 350°F. Line a 9×13-inch baking pan with parchment paper, leaving a little overhang on the sides. This makes it easier to lift the bars out after cooling. Lightly grease the parchment paper so nobody has to wrestle dessert out of the pan like it owes them money.
Step 2: Chop the Candy
Unwrap your candy and chop larger pieces into bite-size chunks. Aim for pieces about 1/2 inch wide. Very small candies, such as mini M&M’s or Reese’s Pieces, can stay whole. If you are using caramel-heavy candy, chill it for 10 minutes before chopping to make the job cleaner and less sticky.
Step 3: Mix the Wet Ingredients
In a large bowl, whisk the melted butter, brown sugar, and granulated sugar until glossy and smooth. Add the eggs one at a time, whisking well after each addition. Stir in the vanilla extract. The mixture should look thick, shiny, and slightly lighter in color.
Step 4: Add the Dry Ingredients
In a separate bowl, whisk together the flour, baking powder, baking soda, and salt. Add the dry ingredients to the wet ingredients and fold gently with a spatula until just combined. Do not overmix. Overmixing develops gluten, and gluten is great for bread but not so great when you want soft, chewy cookie bars.
Step 5: Fold in the Candy
Fold in about 1 1/2 cups of the chopped Halloween candy and the chocolate chips, if using. Save the remaining 1/2 cup of candy for the top. This makes the bars look colorful and bakery-worthy instead of like all the good stuff is hiding underground.
Step 6: Press and Top
Spread the dough evenly into the prepared pan. The dough will be thick, so use a spatula or clean hands to press it into the corners. Sprinkle the reserved candy over the top and gently press it into the surface. Add a light pinch of flaky sea salt if you like a sweet-salty finish.
Step 7: Bake
Bake for 24 to 30 minutes, or until the edges are golden and the center looks set but still slightly soft. A toothpick inserted near the center should come out with a few moist crumbs, not wet batter. Avoid overbaking; the bars will continue to set as they cool.
Step 8: Cool Before Slicing
Let the bars cool completely in the pan. This is the hardest step, spiritually speaking. Warm cookie bars smell like happiness with a mortgage, but slicing too soon can make them fall apart. Once cooled, lift them out using the parchment paper and cut into squares or rectangles.
Recipe Card: Leftover Halloween Candy Cookie Bars
Prep Time
15 minutes
Cook Time
24 to 30 minutes
Total Time
About 45 minutes, plus cooling
Yield
24 bars
Ingredients
- 1 cup unsalted butter, melted and slightly cooled
- 1 cup packed light brown sugar
- 1/2 cup granulated sugar
- 2 large eggs
- 2 teaspoons vanilla extract
- 2 1/4 cups all-purpose flour
- 1 teaspoon baking powder
- 1/2 teaspoon baking soda
- 3/4 teaspoon fine salt
- 2 cups chopped leftover Halloween candy, divided
- 1/2 cup semi-sweet chocolate chips, optional
- Flaky sea salt, optional
Instructions
- Preheat oven to 350°F. Line a 9×13-inch pan with parchment paper and lightly grease it.
- Chop leftover Halloween candy into bite-size pieces.
- Whisk melted butter, brown sugar, and granulated sugar in a large bowl until smooth.
- Add eggs one at a time, then whisk in vanilla.
- In a separate bowl, whisk flour, baking powder, baking soda, and salt.
- Fold dry ingredients into wet ingredients until just combined.
- Fold in 1 1/2 cups chopped candy and chocolate chips.
- Press dough into prepared pan. Top with remaining candy and flaky salt.
- Bake 24 to 30 minutes, until edges are golden and center is set.
- Cool completely before slicing into bars.
Pro Tips for the Best Candy Cookie Bars
Use More Chocolate Than Sugar Candy
Chocolate-based candies melt beautifully into the dough. Sugar-heavy candies can become hard, sticky, or too sweet. A good rule is to use at least 70 percent chocolate candies and no more than 30 percent candy-coated, crunchy, or caramel pieces.
Do Not Skip the Salt
Halloween candy is already sweet, so salt is essential. It balances the sugar and makes the butter, vanilla, and chocolate flavors pop. Flaky salt on top is optional, but it gives the bars a grown-up finish that says, “Yes, this contains fun-size candy, but I have range.”
Let the Butter Cool Slightly
Melted butter makes the bars chewy, but if it is piping hot, it can scramble the eggs or melt the candy too early. Let it cool for a few minutes before mixing.
Chill Sticky Candy Before Chopping
Caramel-filled bars like Snickers, Twix, and Milky Way are easier to chop when slightly chilled. A short rest in the refrigerator helps prevent smearing and keeps the pieces tidy.
Underbake Slightly for Chewy Centers
The center should look set but not dry. If the bars are baked until the toothpick comes out completely clean, they may become cakier and less chewy after cooling.
Flavor Variations
Peanut Butter Cup Cookie Bars
Use mostly chopped peanut butter cups and peanut butter candies. Swirl 1/3 cup creamy peanut butter into the dough before baking for extra richness.
Chocolate Caramel Candy Bars
Use Twix, Snickers, Rolos, and Milky Way pieces. Add a sprinkle of flaky salt to balance the caramel sweetness.
Monster Halloween Cookie Bars
Add candy eyes, orange and black sprinkles, and colorful M&M’s on top during the last 5 minutes of baking. This version is especially fun for kids’ parties.
Double Chocolate Candy Bars
Replace 1/4 cup of the flour with unsweetened cocoa powder and use chocolate-heavy candies. This creates a brownie-cookie hybrid with serious midnight snack energy.
Nutty Crunch Cookie Bars
Add 1/2 cup chopped pecans, walnuts, or peanuts. Nuts help cut through the sweetness and add a satisfying crunch.
How to Store Leftover Halloween Candy Cookie Bars
Store cooled cookie bars in an airtight container at room temperature for up to 4 days. Place parchment paper between layers if stacking. For longer storage, freeze the bars in a freezer-safe bag or container for up to 2 months. Thaw at room temperature, or warm individual bars in the microwave for 8 to 12 seconds.
If your kitchen is warm or your bars contain lots of caramel, refrigeration can help keep them firmer. Just bring them back to room temperature before serving for the best texture.
Food Safety Notes for Halloween Candy Baking
Before baking with leftover Halloween candy, inspect each piece. Use only commercially wrapped candy that looks and smells normal. Discard anything with torn wrappers, unusual discoloration, pinholes, or signs of tampering. If allergies are a concern, read labels carefully because mixed candy can contain peanuts, tree nuts, dairy, soy, wheat, or other common allergens.
Also, resist the urge to taste raw dough. This recipe contains raw flour and eggs, and both need proper baking to be safe. The baked bars are worth the wait, and your stomach will appreciate your rare moment of maturity.
Serving Ideas
These leftover Halloween candy cookie bars are rich, so small squares go a long way. Serve them with cold milk, hot coffee, vanilla ice cream, or a mug of cocoa. For a party dessert, cut them into bite-size cubes and arrange them on a platter with fresh strawberries or pretzels to balance the sweetness.
You can also turn them into a sundae base. Warm a square, top it with vanilla ice cream, drizzle with chocolate sauce, and add a few chopped candy pieces. Congratulations: you have transformed leftovers into a dessert that sounds like it came from a restaurant with exposed brick walls.
Common Mistakes to Avoid
Using Too Much Candy
More candy sounds like more fun, but too much can make the bars greasy, overly sweet, or structurally confused. Two cups is plenty for a 9×13-inch pan.
Cutting While Warm
Warm bars are fragile. Let them cool completely for clean slices. If you want extra-neat cuts, chill the cooled bars for 20 minutes before slicing.
Forgetting Parchment Paper
Parchment paper makes removal much easier, especially when melted caramel or chocolate touches the pan.
Overbaking
Cookie bars should be chewy, not crunchy all the way through. Pull them from the oven when the edges are golden and the center is set but still tender.
Personal Experience: What Makes This Recipe So Useful After Halloween
The real magic of this Leftover Halloween Candy Cookie Bars Recipe is that it solves a very specific household problem: candy fatigue. On Halloween night, everyone is thrilled. The candy bowl is exciting. The wrappers are festive. The tiny chocolate bars feel like treasure. Then, three days later, the same candy is sitting on the counter looking less like treasure and more like a long-term commitment.
Cookie bars make the candy feel new again. Instead of eating the same mini candy bar straight from the wrapper, you get a warm, chewy dessert where each piece melts into the dough in a different way. Reese’s cups become soft peanut butter pockets. Twix adds cookie crunch and caramel. Snickers brings peanuts, nougat, and chew. M&M’s add color and a little candy-shell snap. Even the random chocolate bars nobody reached for suddenly become valuable team players.
One of the best experiences with this recipe is making it with kids. They can sort the candy, unwrap pieces, choose flavor combinations, and press the colorful bits on top. It feels like a craft project, except the final result is edible and nobody has to vacuum glitter out of the carpet. For younger children, adults should handle the chopping, especially with sticky or firm candy, but kids can absolutely help mix, sprinkle, and supervise the very important taste discussion after baking.
This recipe is also ideal for casual entertaining. After Halloween, the holiday season starts moving fast. There are school events, office lunches, neighborhood gatherings, football games, and family movie nights. A pan of candy cookie bars is easy to transport and easy to serve. Unlike cupcakes, they do not need frosting. Unlike pie, they do not require plates and forks. Unlike a dramatic layer cake, they do not collapse emotionally if your knife skills are average.
The bars also create a fun conversation starter. People love guessing what candy is inside. Someone will bite into a caramel pocket and immediately ask, “Wait, is that Twix?” Someone else will discover a peanut butter cup piece and act like they found buried treasure. This is the kind of dessert that does not need to be perfect because the whole point is playful abundance.
Another practical advantage is freezer-friendliness. If you do not want a full pan of cookie bars sitting around, freeze half the batch. Wrap individual squares tightly and store them in a freezer-safe container. Later, you can pull out one or two bars whenever a dessert craving appears. A few seconds in the microwave brings back the soft texture and makes the chocolate slightly melty again. This is dangerous knowledge, but useful dangerous knowledge.
From a flavor standpoint, the best batches usually include contrast. A pan made only with sweet milk chocolate can taste flat. A better combination includes something creamy, something crunchy, something salty, and something colorful. For example, chopped peanut butter cups, Snickers, Twix, and M&M’s make an excellent mix. If you prefer less sweetness, use dark chocolate pieces, pretzels, salted peanuts, or a little extra flaky salt on top.
The biggest lesson from making leftover candy cookie bars is that recipes like this are more than a way to avoid waste. They create a second celebration. Halloween does not have to end when the costumes come off and the decorations go back into storage. With one mixing bowl and a pile of candy, you can stretch the fun a little longer and turn a chaotic candy stash into something warm, shareable, and genuinely delicious.
Conclusion
This Leftover Halloween Candy Cookie Bars Recipe is the easiest way to turn post-Halloween candy into a dessert that feels fresh, fun, and completely worth making. The chewy brown sugar base is simple, the candy combinations are flexible, and the finished bars are colorful enough for kids but rich enough for adults who claim they “only want a small piece” before returning for three more small pieces.
Use chocolate-heavy candies for the best texture, add salt to balance the sweetness, avoid gummy or hard candies, and let the bars cool before slicing. Whether you serve them at a party, freeze them for later, or eat one quietly over the sink like a responsible dessert professional, these Halloween candy cookie bars are a smart and delicious way to make sure no good candy gets left behind.






