Table of Contents >> Show >> Hide
- What Is a Gentle Leader, Exactly?
- How to Put a Gentle Leader on a Dog: 11 Steps
- Step 1: Choose the correct size before you do anything else
- Step 2: Let your dog investigate the Gentle Leader first
- Step 3: Build a positive association with the nose loop
- Step 4: Guide the nose through the loop gently
- Step 5: Fasten the neck strap high behind the ears
- Step 6: Adjust the neck strap so it stays put
- Step 7: Adjust the nose loop for comfort and security
- Step 8: Check the side view and overall position
- Step 9: Clip the leash to the O-ring and practice indoors
- Step 10: Move to a quiet outdoor space
- Step 11: Use it correctly on regular walks
- Common Mistakes to Avoid
- When a Gentle Leader May Not Be the Best Choice
- What Dog Owners Commonly Experience When Using a Gentle Leader
- Final Thoughts
- SEO Tags
If walking your dog feels less like a relaxing stroll and more like being towed by a furry speedboat, a Gentle Leader can be a game-changer. This headcollar is designed to give you more control by guiding your dog’s head, which usually helps the rest of the body follow. The trick, though, is using it correctly. Put it on too fast, too loose, or with the same energy you’d use to wrestle a fitted sheet, and your dog may decide this strange face-strap is public enemy number one.
The good news is that learning how to put a Gentle Leader on a dog is not complicated once you know what to look for. The best approach is calm, patient, and treat-powered. In other words, exactly how most good dog decisions are made. Below, you’ll learn the right fit, the right order, and the right way to help your dog accept it without turning your hallway into a dramatic protest scene.
What Is a Gentle Leader, Exactly?
A Gentle Leader is a type of headcollar, not a muzzle. That distinction matters. A properly fitted Gentle Leader still allows a dog to pant, drink, take treats, and move normally. Its purpose is to reduce pulling and help redirect focus during walks. It sits high on the neck, just behind the ears, while another loop rests around the muzzle. Because the leash attaches under the chin, gentle pressure can guide the dog’s head to the side instead of letting them throw their full body weight forward.
That said, this tool is not magic, and it is not the right choice for every dog. Flat-faced breeds may not tolerate it well, and dogs with serious fear, reactivity, or bite risk may need a trainer or veterinarian to guide the process. A Gentle Leader also should not be used like a shortcut to yank a dog into submission. Think “power steering,” not “tow cable.”
How to Put a Gentle Leader on a Dog: 11 Steps
Step 1: Choose the correct size before you do anything else
Before the headcollar ever touches your dog’s face, make sure you have the right size. A Gentle Leader that is too loose can slip off. One that is too tight can rub, annoy, and convince your dog that this whole arrangement is deeply offensive. Follow the manufacturer’s sizing guide, then check both the neck strap and the nose loop before first use.
As a general rule, the neck strap should sit high behind the ears and feel snug. The nose loop should be loose enough for normal mouth movement but secure enough that it cannot slip off over the end of the nose. If your dog looks like they’re wearing a tiny, confused purse strap across their face, pause and readjust.
Step 2: Let your dog investigate the Gentle Leader first
Do not march in and slap the headcollar on like you’re fitting safety gear before a rocket launch. Instead, show it to your dog and let them sniff it. Reward calm curiosity with small, tasty treats. This first step helps the Gentle Leader become “that thing that makes chicken appear” instead of “that weird nylon creature that attacks my snout.”
Keep the mood casual. A few seconds is enough for the first introduction. You want your dog interested, not overwhelmed.
Step 3: Build a positive association with the nose loop
Hold the nose loop open and lure your dog toward it with a treat. The goal is not to force the snout through right away. The goal is to make the loop feel safe and rewarding. Praise any small success, whether your dog sniffs the loop, touches it, or willingly moves their nose toward it.
This is the step many people rush, and then they wonder why their dog starts pawing at their face like they’re trying to remove a sticky note from their soul. Slow introduction matters. Short sessions work better than one long, frustrating one.
Step 4: Guide the nose through the loop gently
Once your dog is comfortable, hold a treat on the far side of the loop so your dog places their nose through it voluntarily. Reward immediately. Then remove the loop. Repeat several times. At this stage, you are teaching your dog that putting their nose through the loop is normal, safe, and worth doing.
Do not clamp it on yet. Let your dog practice the movement first. For many dogs, this is the moment where the whole process either becomes easy or becomes a soap opera.
Step 5: Fasten the neck strap high behind the ears
When your dog is calmly placing their nose through the loop, unclip the buckle, slide the nose loop on, and fasten the neck strap high on the neck, just behind the ears. This position is important. If the neck strap rides too low, the headcollar can rotate, rub, and become much less effective.
The fit should be snug enough that it stays in place and does not twist around, but not so tight that it looks uncomfortable. You are aiming for secure and stable, not “I accidentally shrink-wrapped my dog’s neck.”
Step 6: Adjust the neck strap so it stays put
Now check the neck strap carefully. This is the anchor point of the entire setup. A correct fit should keep the strap high and snug without rotating around the neck. If it slides down or spins easily, tighten it slightly. If your dog looks restricted or distressed, loosen and reassess.
A lot of people focus only on the nose loop, but the neck strap does most of the stabilizing work. A sloppy neck fit often leads to a sloppy walk.
Step 7: Adjust the nose loop for comfort and security
The nose loop should rest loosely enough that it can move down toward the fleshy part of the nose, but it should not slip off the muzzle. Your dog should still be able to open their mouth, pant, and take treats. If the loop is too tight, your dog may resist wearing it. If it is too loose, they may pop their nose out like a magician escaping handcuffs.
Use the adjustment point to fine-tune the fit, and make sure any clamp or slider is securely closed after you adjust it.
Step 8: Check the side view and overall position
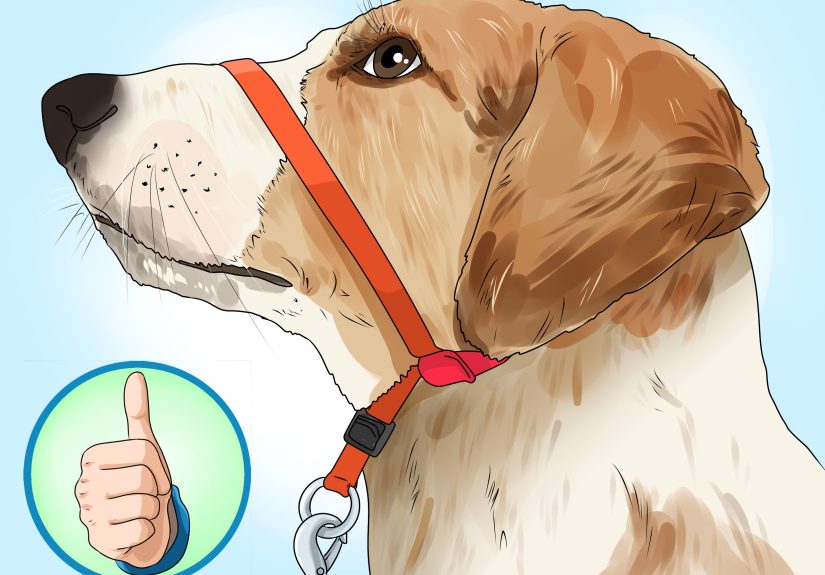
Take a look at your dog from the side. A properly fitted Gentle Leader often creates a neat V-shape when viewed from the side. The neck strap should stay high behind the ears, and the nose loop should sit cleanly around the muzzle without rubbing into the eyes.
Watch your dog stand, turn, and open their mouth. This quick movement test tells you whether the headcollar is fitted well enough for a real walk or whether you need a small adjustment before your dog files an official complaint.
Step 9: Clip the leash to the O-ring and practice indoors
Once the fit looks right, clip the leash to the designated ring under the chin. Then start inside your home, not on the busiest sidewalk in town. Walk a few steps, reward calm behavior, and keep the leash loose. The goal is to let your dog feel how the Gentle Leader moves without outside distractions.
Indoor practice helps your dog learn that wearing the headcollar does not predict chaos. It predicts calm movement, snacks, and your suddenly very cheerful voice.
Step 10: Move to a quiet outdoor space
After a few successful indoor sessions, try a quiet outdoor area such as your yard, driveway, or a calm street. Keep the first walks short. Reward often. If your dog paws at the headcollar or rubs their face, stay calm and redirect with movement, praise, and treats.
Many dogs need an adjustment period. That does not mean the Gentle Leader is failing. It usually means your dog is learning a new sensation. Think of it like wearing glasses for the first time, except with more sniffing and less complaining on social media.
Step 11: Use it correctly on regular walks
Once your dog accepts the Gentle Leader, use it with gentle leash handling. Never jerk, yank, or snap the leash. Avoid using it for jogging, running, bike attachments, or situations where your dog may hit the end of the leash at speed. The snout and neck are sensitive, and rough handling can cause pain or injury.
Also remember that a Gentle Leader is a training aid, not a permanent substitute for teaching leash manners. Reward loose-leash walking, check in with your dog often, and pair the tool with calm, positive training. The best outcome is a dog who walks nicely because they understand the job, not just because the gear says, “Nice try, buddy.”
Common Mistakes to Avoid
- Putting it on too fast: Rushing the introduction often creates resistance.
- Fitting the neck strap too low: It should sit high behind the ears, not like a regular collar.
- Making the nose loop too tight: Your dog should still be able to pant and take treats.
- Using it like a muzzle: It is not designed to prevent biting.
- Skipping training: A Gentle Leader helps with control, but it still needs to be paired with leash training.
- Jerking the leash: Gentle handling is essential for safety.
When a Gentle Leader May Not Be the Best Choice
Some dogs do beautifully in a headcollar, while others strongly prefer a front-clip harness or another training setup. Dogs with short snouts, prominent eyes, or facial folds may not be ideal candidates. If your dog panics, thrashes, or shuts down even after slow conditioning, consider another walking tool and consult a qualified trainer. The goal is better communication, not winning an argument with a terrier.
If your dog has aggression concerns or a bite history, do not assume a Gentle Leader will keep everyone safe. It can help redirect the head, but it is not a muzzle. In those cases, professional behavior guidance is the smart move.
What Dog Owners Commonly Experience When Using a Gentle Leader
One of the most common experiences owners report is surprise at how different the first few minutes can look compared with the first few weeks. On day one, many dogs paw at the strap, rub their nose on the carpet, or suddenly perform an interpretive dance of mild outrage. Owners often assume that means the Gentle Leader is a disaster. Usually, it means the dog is simply adjusting to a new sensation on a very sensitive part of the face.
By the end of the first week, many dogs start showing a much calmer response when the introduction has been done slowly. They see the headcollar, then they see treats, then they think, “Fine, I accept your strange face loop in exchange for cheddar.” That shift is a big deal. It tells you the dog is beginning to build a positive association instead of just trying to negotiate their way out of wearing it.
Another common experience is that owners suddenly realize their own leash habits need work too. A Gentle Leader often makes bad human timing more obvious. If you tend to keep constant tension on the leash, your dog may fuss more. If you learn to soften your hands, reward check-ins, and stop steering your dog like a shopping cart with one broken wheel, walks usually improve quickly.
Many people also notice that their dog becomes easier to redirect around distractions. A squirrel may still be the celebrity of the neighborhood, but the dog is often easier to turn back toward the handler. That can feel like a huge win, especially for owners of large dogs who previously felt like they were one rabbit away from orbit.
Some owners discover that the Gentle Leader works best as part of a bigger training plan rather than as a standalone fix. They use it during the early stages of leash training, while also teaching cues like “let’s go,” “watch me,” or “easy.” Over time, the dog learns the walking routine itself, and the headcollar becomes less of a daily necessity and more of a backup tool for busy environments or vet visits.
There are also owners who learn that the Gentle Leader is simply not their dog’s favorite option. That is useful information, not failure. A good experience with dog training is not about forcing one product to work at all costs. It is about finding a humane, effective setup that helps both you and your dog feel safe and successful. For some teams, that is a Gentle Leader. For others, it may be a front-clip harness and a pocket full of treats that smells suspiciously like hot dog slices.
The biggest shared experience, though, is confidence. Owners who once dreaded walks often say they finally feel like they can focus on teaching, rewarding, and enjoying the outing instead of bracing for a shoulder workout. And dogs, once they understand the routine, often walk more calmly because the communication is clearer. That is the real goal: less chaos, more connection, and a walk that feels like time together instead of a full-contact sport.
Final Thoughts
If you want to know how to put a Gentle Leader on a dog the right way, the answer is simple: fit it carefully, introduce it slowly, and use it kindly. The best results come when you make the headcollar feel predictable, comfortable, and rewarding. Once your dog understands the routine, you may find that walks become smoother, safer, and a lot more enjoyable for both of you.
So yes, you can absolutely learn this in 11 steps. And with a little patience, a few treats, and a sense of humor, your dog may stop acting like you’ve placed an alien device on their face and start walking like a civilized neighborhood legend.