
Table of Contents >> Show >> Hide
- Step Zero: Pick a Kiwi That’s Actually Ready
- Wash First (Yes, Even if You’re Peeling)
- How to Peel a Kiwi (4 Methods, From Classic to Party Trick)
- The 4 Best Ways to Slice Kiwi (Pick the Cut That Fits the Job)
- Keep It Clean: Slip-Proof Cutting and Freshness Tips
- Quick Ways to Use Your Kiwi Slices (So They Don’t Sit There Judging You)
- Extra Notes From Real Kitchens: What I’ve Learned Peeling and Slicing Kiwis
Kiwi is proof that nature has a sense of humor: it looks like a tiny fuzzy potato, but inside it’s neon-green (or golden), sweet-tart, and basically born to level up smoothies, fruit salads, parfaits, and fancy brunch plates. The only “problem” is the peelbecause the moment you pick up a kiwi, your brain goes, How do I get into this thing without losing half of it?
Good news: peeling a kiwi is easy once you know the tricks. Even better: slicing it the right way makes it look intentional, not like you wrestled a small fruit in a hurry (no judgmentwe’ve all been there). Let’s get you clean peels, pretty cuts, and maximum kiwi payoff.
Step Zero: Pick a Kiwi That’s Actually Ready
The best peeling and slicing starts at the store (or the fruit bowl). Here’s the quick ripeness read: a ripe kiwi should give slightly when you press it gentlythink “ripe peach vibes,” not “stress ball” and not “mystery mush.” A light, sweet smell near the stem end is also a good sign. If it’s rock-hard and has zero aroma, it needs time.
Green vs. Gold: Does It Change the Prep?
Both prep the same way, but the experience is different. Green kiwis usually have fuzzier skin and that classic tangy-sweet flavor. Gold kiwis tend to be smoother and sweeter, which can make the skin feel less “fuzzy sweater” and more “soft suede.” Either way, the inside is tenderso the goal is to remove the peel without sacrificing the good stuff.
How to Ripen Kiwi Faster (When You’re Impatient)
Put firm kiwis in a paper bag at room temperature. Want to speed it up? Add a banana or apple. You’re basically creating an ethylene “ripening lounge” for your fruit. Check dailykiwis can go from “not ready” to “ready right now” faster than you can say “where did my snack go?”
Wash First (Yes, Even if You’re Peeling)
Give the kiwi a quick rinse under cool running water and rub it gently with your hands. If you plan to eat the skin, wash it a little more thoroughly. Washing helps remove surface dirt and whatever the kiwi picked up on its journey from orchard to checkout to your counter.
WaitCan You Eat Kiwi Skin?
Yep. Kiwi skin is edible, and some people love the extra texture (and less waste). If the fuzz bothers you, you can rub the kiwi with a clean towel after rinsing to knock down some of itor just peel it and move on with your life. There’s no “wrong” answer, only “what texture do you want today?”
How to Peel a Kiwi (4 Methods, From Classic to Party Trick)
Choose your peeling style based on ripeness and what tools you have. Quick safety note: kiwi flesh gets slippery. Work on a stable cutting board, take your time, and if you’re new to knife work, ask an adult to help.
Method 1: The Spoon Method (Fast, Neat, Minimal Waste)
Best for: ripe kiwis that are slightly soft.
- Slice off about 1/4-inch from both ends to create flat “stands.”
- Hold the kiwi in one hand. Slide the edge of a spoon between the flesh and the peel.
- Rotate the kiwi around the spoon, keeping the spoon pressed against the inside of the peel.
- Pop the kiwi out in one clean piece. Feel like a wizard for five seconds. Deserved.
Method 2: The Paring Knife Peel (Precise Control)
Best for: firmer kiwis when you want clean results.
- Cut off both ends so the kiwi can stand upright.
- Stand it on a flat end and carefully slice downward, following the curve, removing thin strips of peel.
- Rotate and repeat until fully peeled.
Tip: Think “thin jacket,” not “big chunks.” The peel is thin, so if you’re removing a lot of green, you’re peeling too deep.
Method 3: The Vegetable Peeler (Quick and Surprisingly Clean)
Best for: medium-firm kiwis and high-volume prep.
- Trim both ends.
- Hold the kiwi in your palm and run the peeler gently down and around the fruit.
- Rotate and continue until peeled.
If the peeler “smushes” the kiwi, the fruit may be too ripeor your peeler may be dull. (Yes, peelers can get tired too.)
Method 4: The Glass Method (The “How Is This Real?” Trick)
Best for: ripe kiwis and anyone who enjoys harmless kitchen magic.
- Cut off both ends, then slice the kiwi in half lengthwise.
- Take a drinking glass (a small one works best) and place the rim where the peel meets the flesh.
- Push the kiwi downward along the rim so the glass separates the flesh from the skin.
- The peeled kiwi drops into the glass, and the peel stays behind. Minimal mess. Maximum “watch this.”
The 4 Best Ways to Slice Kiwi (Pick the Cut That Fits the Job)
Once peeled (or washed, if keeping the skin), choose a slicing style. The “best” cut depends on where the kiwi is headed: snack plate, fruit salad, smoothie prep, or center-stage garnish.
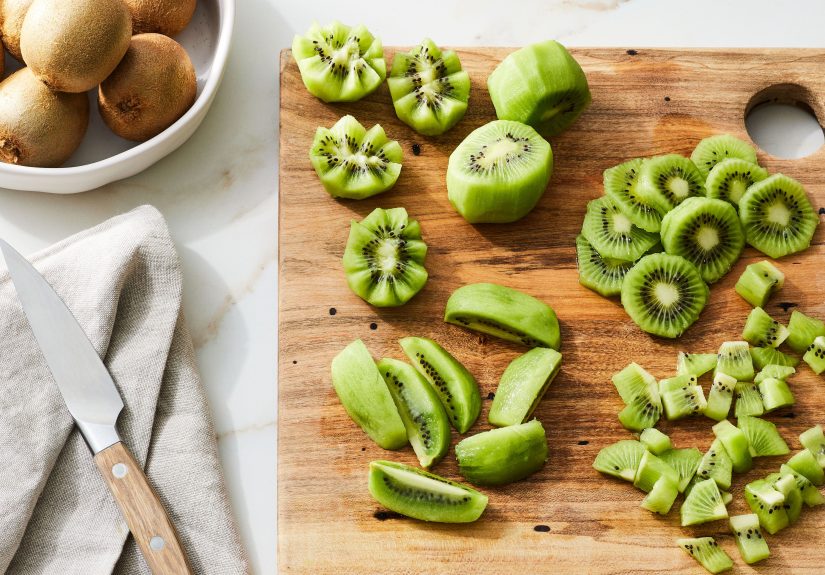
1) Rounds (Kiwi Coins)
Best for: snacking, yogurt bowls, pancakes, and pretty layering.
- Lay the peeled kiwi on its side.
- Slice crosswise into even rounds (about 1/4-inch thick).
Pro move: For a fruit board, keep rounds uniform so they stack and fan neatly. Coins also make the best “edible confetti” on top of oatmeal or chia pudding.
2) Half-Moons
Best for: fruit salads (easier to scoop), lunchboxes, and bite-size topping pieces.
- Cut the kiwi in half lengthwise.
- Place cut-side down and slice crosswise to create half-moons.
This is the “polite” kiwi cut: it mixes well with berries and grapes without hogging the spoon.
3) Chopped or Diced (Kiwi Cubes)
Best for: salsas, smoothies (freeze-ready), fruit cups, and desserts.
- Slice the kiwi into rounds, then stack a few rounds and cut into strips.
- Turn and cut across to make cubes.
Example: Diced kiwi is awesome in a quick salsa with strawberries, a squeeze of lime, and a tiny pinch of salt great over grilled chicken or fish if you’re feeling fancy, or over vanilla ice cream if you’re feeling honest.
4) Kiwi Flowers (Decorative “Wow” Cut)
Best for: party platters, brunch spreads, and making fruit look like it has a stylist.
- Hold the kiwi steady (peeled works best).
- Using a small paring knife, cut a zigzag pattern around the equator, inserting the knife about halfway toward the center.
- Pull the halves apart to reveal two “flower” tops.
This looks impressive, but it’s basically just careful zigzags. If you can doodle lightning bolts, you can make kiwi flowers.
Keep It Clean: Slip-Proof Cutting and Freshness Tips
Stop the Cutting Board From Sliding
Put a damp paper towel or thin kitchen towel under the cutting board. Kiwi juice + a moving board is not a fun sport.
Cut Close to Serving Time
Kiwi holds up fairly well, but like many fruits, cut surfaces can dull and brown at the edges if left exposed to air too long. If you need to prep ahead, store peeled or cut kiwi in an airtight container in the fridge and use it within a couple of days for the freshest color and flavor.
Don’t Waste the “Ugly Bits”
Trimmings, extra-soft pieces, and slightly uneven slices are smoothie gold. Freeze them on a parchment-lined tray, then transfer to a freezer bag so you can grab a handful anytime.
Quick Ways to Use Your Kiwi Slices (So They Don’t Sit There Judging You)
- Parfait upgrade: Layer kiwi rounds with yogurt, granola, and berries.
- Fruit salad that actually tastes bright: Use half-moons so every bite gets kiwi without giant chunks.
- Freezer prep: Dice kiwi for smoothie packs with spinach, pineapple, and banana.
- Fancy toast moment: Kiwi coins on ricotta toast with honey and a pinch of flaky salt.
- Party platter: Kiwi flowers in the center make everything look intentional.
Extra Notes From Real Kitchens: What I’ve Learned Peeling and Slicing Kiwis
The first time I tried peeling a kiwi, I did what many people do: I attacked it with a knife like it owed me money. The result was… let’s call it “abstract.” I removed the peel, sure, but I also removed an impressive amount of fruit, and I ended up holding a slippery green oval that kept trying to launch itself off the cutting board. That was the day I learned kiwi isn’t hardit’s just small, and small foods demand better technique (or at least a calmer attitude).
The spoon method was my turning point. Once you cut off the ends and slide the spoon under the skin, it’s like the kiwi suddenly becomes cooperative. You rotate, you pop it out, and you’re left with a clean, peeled fruit that looks like it came from a café, not a chaotic snack break. It’s also the method I recommend if you’re making kiwi for kids, classmates, or anyone who will absolutely notice if the fruit looks “mushy.” Spoon-peeling keeps the shape intact, which makes rounds and half-moons look crisp and bright.
My other big lesson: match the cut to the job. If I’m topping oatmeal or yogurt, I go with coins because they layer neatly and look great with almost no effort. For fruit salad, half-moons win because they mix better and are easier to scoop. Diced kiwi is the hero when you’re prepping smoothie packsespecially if you freeze the pieces first so they don’t clump together into one giant frozen kiwi boulder. And kiwi flowers? That’s the “I want compliments” cut. It’s the one I use when friends come over, or when the family is doing a holiday breakfast and the fruit platter needs a centerpiece. People always ask how you did it, and you get to act like it was difficult (even though it’s basically just zigzags and confidence).
I’ve also learned that the glass method is the ultimate “no one will believe you” trick. The first time you slide a kiwi half down a glass rim and it drops cleanly into the cup, it feels like you’ve unlocked a secret level of adulthood. It’s especially satisfying when you have a bunch of kiwis to prep for a big bowl of fruit salad or a batch of popsicles. Is it necessary? No. Is it fun? Extremely. Just make sure the kiwi is ripe enoughif it’s too firm, the peel can cling stubbornly and you’ll end up pushing harder than you want. Ripe fruit is where the glass method shines.
Finally, here’s the honest truth: kiwi prep gets easier the more you do it. After a few rounds (pun intended), you’ll know by feel which method to use. If the kiwi is slightly soft, grab a spoon. If it’s firm, use a paring knife or peeler. If you’re feeling dramatic (in a wholesome, fruit-based way), grab a glass. And once you get comfortable, kiwi stops being that “mysterious fuzzy fruit” in the produce aisle and becomes a regular, easy upgrade to snacks and meals. Which is greatbecause kiwi is delicious, and it deserves better than being avoided because the peel looks confusing.





