
Table of Contents >> Show >> Hide
- Why Cereal Boxes Work So Well for Papier-Mâché Pendant Lights
- Safety First (Because Fire Is Not a Decor Style)
- Materials and Tools
- Step-by-Step: Build a Cereal-Box Papier-Mâché Pendant Shade
- Step 1: Choose a Shape That Matches Your Room
- Step 2: Make the Cardboard Form from Cereal Boxes
- Step 3: Add a Safe Support Area for the Pendant Hardware (Shade Ring Zone)
- Step 4: Mix Your Papier-Mâché Paste
- Option A: Cooked Flour Paste (Smooth and Strong)
- Option B: No-Cook Flour Paste (Fast and Easy)
- Option C: Glue Paste (Cleaner Finish)
- Step 5: Papier-Mâché the Form (Inside and Out)
- Step 6: Dry Completely (The Unsexy Step That Makes or Breaks Everything)
- Step 7: Refine the Surface (From “Craft” to “Design”)
- Step 8: Prime and Paint
- Step 9 (Optional but Gorgeous): Copper-Leaf the Inside
- Step 10: Install Using a Certified Pendant Kit (No Sketchy Wiring)
- Design Variations That Look Expensive (But Aren’t)
- Practical Examples: Where These Pendants Shine
- Troubleshooting (AKA The Part Where We Save Your Sanity)
- Care and Longevity
- Maker Experiences (): What It’s Like to Actually Make These
- Conclusion
Your kitchen counter is about to witness a glow-upliterally. Because that empty cereal box you were about to flatten and fling into the recycling bin?
It’s secretly the structural backbone of a sculptural pendant light that looks like it wandered out of a high-end design showroom and said,
“Yes, I am artisanal. No, I don’t discuss my humble breakfast origins.”
Papier-mâché has been having a modern moment in home decor for a while now, especially in pale, plaster-like forms that feel equal parts
wabi-sabi and “I found this in a tiny gallery, don’t ask me where.” The best part: you can get that vibe with basic pantry ingredients,
newspaper, and a box that used to hold frosted flakes.
This guide walks you through building a stylish papier-mâché light pendant using cereal boxes as the form.
We’ll focus on the shade (the decorative part) and keep the electrical side safe and simpleno risky DIY wiring required.
Why Cereal Boxes Work So Well for Papier-Mâché Pendant Lights
Cereal-box cardboard is thin, flexible, and surprisingly cooperative. It curves into cylinders, cones, and soft geometric shapes without fighting you.
It’s also easy to cut cleanly, which matters when you want your finished light shade to look “intentional” rather than “third-grade volcano project.”
Structurally, think of this project like making homemade plywood: the strength comes from layers.
Cardboard sets the shape, newspaper (or paper strips) adds bulk and toughness, and the paste hardens into a shell.
When you alternate directions of paper strips (vertical, then horizontal), you reduce warping and build rigidity.
Safety First (Because Fire Is Not a Decor Style)
A pendant shade made from paper and paste must be treated like what it is: a combustible material.
You can absolutely use it safely, but the safety plan needs to be part of the design.
- Use LED bulbs only (they run far cooler than incandescent or halogen options).
- Never let the shade touch the bulbbuild in generous clearance and ventilation.
- Avoid high-heat bulb types (especially halogen) and avoid exceeding socket/bulb ratings.
- Use a certified pendant cord/socket kit and follow the manufacturer’s instructions.
- If you’re a teen DIYer: ask a qualified adult to handle any fixture installation or ceiling electrical work.
- Don’t apply wet paste near plugged-in lighting, and keep hands/tools dry around electrical components.
Translation: we’re making the shade. The electricity can remain firmly in the “professionals and instructions manuals” department.
Materials and Tools
For the Pendant Shade
- 1–2 empty cereal boxes (thin cardboard)
- Newspaper or brown paper (torn into strips and small pieces)
- Masking tape
- Hot glue gun (optional but handy for quick structure)
- Scissors and/or craft knife (use with care)
- Plastic table cover or trash bags (to protect surfaces)
- Balloon (helpful for maintaining shape while working)
- Cardboard from a shipping box (thicker cardboard for reinforcement rings)
- Bamboo skewers or small wooden sticks (for bracing)
- Paintbrushes and/or a sponge brush
Paste Options (Pick One)
- Cooked flour paste: sturdier, smooth, classic papier-mâché feel
- No-cook flour paste: faster, less “stove time,” great for small batches
- PVA glue + water: dries clear and is popular when you want a cleaner, crisper finish
Finish Options (Pick Your Vibe)
- Primer (helps even out the surface)
- Matte paint or chalk-style paint (great for that soft, modern look)
- Optional: lightweight spackle/joint compound (for smoothing)
- Optional: metal leaf adhesive (“size”) and copper leaf sheets (for a warm reflective interior)
- Optional: clear topcoat (water-based polyurethane or acrylic sealer for durability)
Lighting Hardware (Keep It Simple and Safe)
- A UL-listed pendant cord and socket kit designed to support a shade
- An LED bulb appropriate for the socket and fixture rating
Step-by-Step: Build a Cereal-Box Papier-Mâché Pendant Shade
Step 1: Choose a Shape That Matches Your Room
A cylinder is the easiest and most forgiving (and looks fantastic over a kitchen island).
A slightly tapered form feels more sculptural and “designer.”
If you want organic curves, you can cheat with a balloon inside the structure while you layer.
Quick style picks:
- Modern: clean cylinder, matte off-white, subtle texture
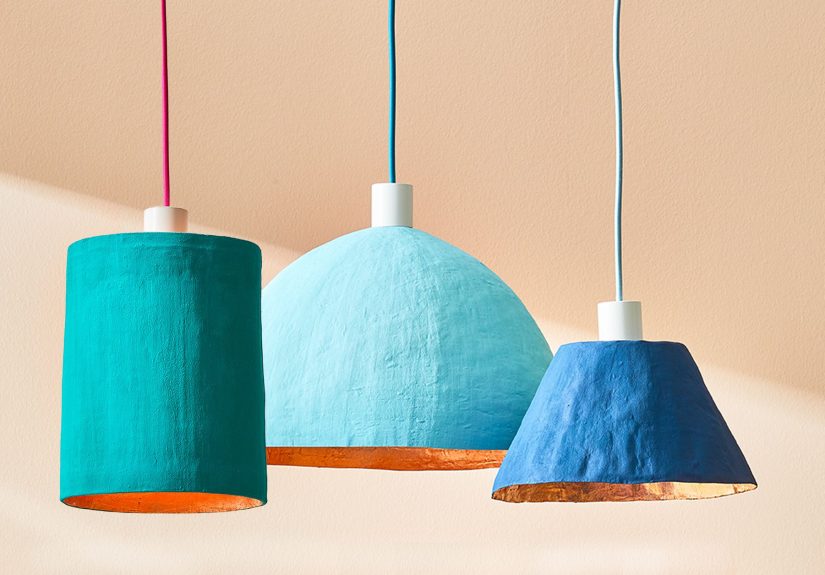
- Warm + dramatic: matte exterior with copper-leaf interior
- Playful: scalloped bottom edge or soft ribbed texture
- Organic plaster look: spackle skim coat + chalky paint
Step 2: Make the Cardboard Form from Cereal Boxes
Open the cereal box along the seams so it lays flat. Decide how tall and wide you want the shade.
Cut a rectangle that will roll into a cylinder (or a slightly tapered shape if you angle the sides).
Overlap the edges and secure the seam with masking tape; add a bit of hot glue if you want extra confidence.
For a cleaner silhouette, tape the seam on the inside and outside. Your goal is a sturdy “blank” form that won’t collapse
the moment it hears the words “wet paste.”
Step 3: Add a Safe Support Area for the Pendant Hardware (Shade Ring Zone)
Your shade needs a stable top opening that can sit properly on a pendant socket kit designed for shades.
A common method is to create a reinforced “collar” using two thick cardboard rings and small braces.
- Cut two circles from thick shipping-box cardboard (slightly smaller than the shade opening).
- Cut a center hole sized to fit loosely around the socket’s shade ring area (follow your kit’s guidance).
- Use short wooden skewers as spacers between the two rings, creating a stiff “sandwich” that won’t warp easily.
- Glue the ring assembly into the top of your cereal-box form so it sits level and stable.
Important: Don’t invent your own electrical mounting system. Use hardware designed to hold shades and follow the kit instructions.
This is the difference between “cute DIY” and “why does my insurance company have me on hold.”
Step 4: Mix Your Papier-Mâché Paste
You’ve got options here. The “right” paste is the one you’ll actually make without getting bored and ordering a pendant light online.
Option A: Cooked Flour Paste (Smooth and Strong)
Heat water with a bit of salt, whisk flour with cold water separately until lump-free, then combine and gently simmer until thickened.
Let it cool before dipping paper. This paste is a favorite for sturdy home-decor projects because it sets up like a thin gel and dries hard.
Option B: No-Cook Flour Paste (Fast and Easy)
Whisk flour and water until it’s smooth and pourableoften described as “pancake batter consistency.”
If you live in a humid area, adding a little salt can help slow mold growth.
Option C: Glue Paste (Cleaner Finish)
Mix PVA glue with a bit of water. This option is popular when you want a more translucent effect or a crisp, sealed feel.
Step 5: Papier-Mâché the Form (Inside and Out)
Cover your workspace with plastic. Tear newspaper into strips (about an inch wide) and smaller pieces for curves.
Dip strips into paste, then run them between your fingers to remove excess. You want “coated,” not “dripping.”
Layering plan that actually works:
- Layer 1 (structure): vertical strips, overlapping slightly
- Layer 2 (strength): horizontal strips
- Layer 3 (smooth): smaller pieces to cover gaps and refine curves
- Extra layers: add until it feels rigidespecially around the top collar and bottom edge
If the cylinder wants to wobble while you work, place a blown-up balloon inside the shade and rest it in a bowl.
The balloon acts like a temporary “internal scaffold” so the shade doesn’t slump mid-project.
Step 6: Dry Completely (The Unsexy Step That Makes or Breaks Everything)
Papier-mâché fails for two main reasons: it didn’t dry fully, or it got rushed with thick, soggy layers.
Give each layer time to dry before adding the next. Use airflow (a fan helps) and avoid stacking on wet layers that trap moisture.
If you’re worried about mold, don’t store leftover paste for long, and don’t leave a wet shade in a closed, humid corner.
Drying thoroughly is your best defense.
Step 7: Refine the Surface (From “Craft” to “Design”)
Once fully dry, you can lightly sand any sharp bumps (gentlythis isn’t drywall).
If you want a more polished, plaster-like look, skim on a very thin layer of lightweight spackle,
let it dry, then sand smooth. This step is optional, but it’s the fastest route to “boutique lighting” energy.
Step 8: Prime and Paint
Primer helps even out newspaper text and creates a consistent base. After priming, paint with a matte or chalk-style paint.
Soft whites, warm putty, pale gray, and muted clay tones are especially popular for that modern sculptural style.
Example finish recipes:
- Modern neutral: warm white matte paint + subtle sanding for texture
- Stone-like: spackle skim coat + taupe chalk paint
- Graphic: matte white base + a hand-painted stripe near the bottom edge
Step 9 (Optional but Gorgeous): Copper-Leaf the Inside
A metallic interior makes the shade glow warmly when lit, and copper leaf is especially flatteringit gives “sunset” instead of “spotlight interrogation.”
- Make sure the inside is dry, dust-free, and lightly smoothed.
- Brush on leafing adhesive (size) in sections.
- Wait until it becomes tacky (follow the adhesive instructions).
- Lay copper leaf gently, press lightly with a soft brush or sponge, and patch gaps with small pieces.
- Seal if recommended for your leafing product (this helps reduce flaking and fingerprints).
Pro tip: metal leaf is famously dramatic about breezes. Work in a calm roomno fans blasting, no windows open, no pets auditioning for chaos.
Step 10: Install Using a Certified Pendant Kit (No Sketchy Wiring)
Use a UL-listed pendant cord and socket kit intended for shade use. Follow the manufacturer’s instructions exactly.
If installation involves ceiling wiring, ask a qualified adult or electrician to handle it.
Choose an LED bulb that stays cool and fits the fixture rating. When you turn it on for the first time, stay nearby for a while:
you’re checking that the shade stays cool, stable, and comfortably far from the bulb.
Design Variations That Look Expensive (But Aren’t)
1) Scalloped “Petal” Edge
Before papier-mâchéing, cut a gentle scallop pattern along the bottom edge of the cereal-box form.
Once layered and painted, it reads as soft and sculptural.
2) Ribbed Texture
Glue thin cardboard strips vertically around the form to create ribs, then papier-mâché over them.
The final shade looks like a high-end ceramic pieceonly lighter (and less likely to shatter).
3) Two-Tone Interior Glow
Keep the outside matte and neutral, then go bold inside: copper, gold, or even a deep terracotta paint.
The interior color subtly warms the light without making the room feel like a nightclub.
Practical Examples: Where These Pendants Shine
Over a Kitchen Island
Make two matching cylinders (same height, same diameter), paint them warm white, and copper-leaf the interiors.
You’ll get cohesive design and a soft, flattering glow that still feels bright enough for cooking.
In an Entryway
Go slightly oversized and sculpturalthink a taller drum shape with a subtle taper.
A textured “plaster” finish helps it look like a design piece, not a craft project.
In a Bedroom Reading Nook
Try a smaller shade with a ribbed texture and a gentle scallop edge.
Keep the bulb warm-white LED for cozy light that doesn’t feel harsh.
Troubleshooting (AKA The Part Where We Save Your Sanity)
My Shade Is Warping
Warping usually happens when moisture hits unevenly or layers go on too wet and too thick.
Use thinner layers, alternate strip directions, and make sure you papier-mâché both inside and outside for balanced drying.
It Smells Weird or Looks Spotty
That can be trapped moisture. Let it dry longer with airflow. Don’t seal paint over damp papier-mâchémoisture needs to escape first.
The Edge Looks Rough
Reinforce the bottom edge with extra strips, then sand lightly once dry. A thin skim of spackle can make the edge look crisp and intentional.
The Copper Leaf Is Flaking
That’s normal if it isn’t sealed. Use a compatible sealer (per your leaf product instructions), and avoid heavy handling on the interior surface.
Care and Longevity
Treat your shade like a decorative object: dust gently with a soft cloth or duster, avoid high humidity,
and don’t hang it in steamy areas where moisture can soften finishes over time.
If you used a clear topcoat, it’ll be easier to wipe lightly (still gentlythis isn’t a kitchen backsplash).
Maker Experiences (): What It’s Like to Actually Make These
The first experience most people have with a cereal-box papier-mâché pendant is emotional whiplash.
Step one feels classy: you’re measuring, cutting clean lines, taping a neat cylinder, imagining your future as a person who owns matching linen napkins.
Step two is where reality arrives wearing paste on its sleeves. The moment you dip paper into gluey flour mixture, the project stops being “minimalist”
and becomes “sticky swamp creature.” This is normal. This is the process. This is why you covered the table.
The second experience is learning the difference between wet and too wet. If you apply dripping strips, the cylinder gets floppy fast,
like it’s auditioning to become modern art titled Gravity Wins. Most makers quickly discover the magic move:
pull the strip through two fingers to remove excess paste. The strip should feel coated, not waterlogged. Suddenly the form holds its shape,
and the work becomes surprisingly satisfyingsmoothing paper like you’re wrapping a present for someone who only appreciates “no wrinkles.”
Drying is the patience test. On day one, you’ll poke it and think, “It’s basically done.” On day two, you’ll poke it again and realize it’s still cool and
slightly soft in places. The experienced move is to stop poking and let airflow do its job. People who rush often end up with a shade that looks fine
until paint goes on, and then mysterious bubbles or a faint musty smell shows up like an uninvited guest. Waiting feels boring, but it’s the difference
between “sturdy sculptural shade” and “why is this bending like a sad taco.”
Finishing is where confidence blooms. Primer instantly quiets the newspaper print and makes the shade look cohesive. Paint makes it look intentional.
And if you add a plaster-like skim coat (even a very thin one), the whole vibe shifts from “craft” to “design object.”
Makers often say this is the moment they start planning a second pendant, because suddenly the project doesn’t just look goodit looks
expensive. That’s the addictive part: you’re holding a lightweight, sculptural lamp shade made from yesterday’s cereal and today’s stubbornness.
The copper leaf interior, if you do it, is equal parts glamorous and chaotic. Leaf sheets have the personality of a dramatic soap opera character:
gorgeous, delicate, and deeply offended by wind. People learn quickly to turn off fans, close windows, and move slowly.
But once it’s on, the payoff is hugewhen the LED light turns on, the inside glows warm and golden-copper, and the shade looks like it belongs in a
fancy boutique that sells candles with names like “Moonlit Clay” and “Architect’s Daydream.”
Finally, there’s the satisfaction of hanging it up and realizing the room feels differentsofter, warmer, more personal.
Makers often describe these pendants as conversation starters because they look handmade in a high-design way, not a “Pinterest fail” way.
And yes, someone will ask where you bought it. That’s when you get to smile and say, “Oh, it’s custom.”
You do not need to mention the cereal box. Let the light keep its mystique.
Conclusion
Stylish lighting doesn’t have to be pricey or precious. With cereal boxes, paper, and a little patience,
you can create a papier-mâché pendant shade that looks sculptural, modern, and genuinely custom.
Keep it safe with an LED bulb and a certified pendant kit, take your time on drying, and lean into finishes that feel intentionalmatte paint,
subtle texture, and (if you’re feeling fancy) a metallic interior glow.






