
Table of Contents >> Show >> Hide
- Quick Snapshot: What You’re Making
- Safety First (Because “Romantic” Shouldn’t Mean “Emergency”)
- Supplies You’ll Want (Choose Your Adventure)
- Project A: Romantic Book Page Candle Holders (Vintage Glow, Minimal Stress)
- Project B: Pour-Your-Own Jar Candle with a Book Page Wrap (The Boutique Look)
- Step 1: Choose the Right Jar + Wick (Tiny Science, Big Difference)
- Step 2: Secure the Wick
- Step 3: Measure Wax (Don’t Eyeball This Part)
- Step 4: Melt the Wax Gently
- Step 5: Add Fragrance at the Right Temperature
- Step 6: Pour (Timing Matters)
- Step 7: Cool + Cure (The Waiting Is the Glow-Up)
- Step 8: Wrap with Book Pages (The Romantic Finish)
- Romantic Scent Pairings That Actually Feel Like a Mood
- Common Mistakes (And How to Avoid the Drama)
- Gift Ideas: Make It Personal Without Making It Complicated
- Frequently Asked Questions
- Final Thoughts: Romance, But Make It Responsible
- Real-Maker Experiences: What You’ll Learn After Making a Few (The Fun, the “Oops,” and the Cozy Wins)
If your idea of “romantic décor” is less big-box plastic heart and more cozy, vintage-library-meets-soft-glow,
book page candles are basically your love language. They’re warm, nostalgic, and they make any room look like you’re about to
write a dramatic letter with a fountain peneven if you’re really just ordering takeout and binge-watching reality TV.
This guide gives you two gorgeous ways to create romantic book page candle vibes:
(1) book page candle holders (the safest optionespecially with LED tea lights),
and (2) a poured jar candle with a book-page wrap for that “antique bookstore date” aesthetic.
Along the way, you’ll get real candle-making basics (wax temps, wicks, curing) and the most important ingredient of all:
not accidentally setting your craft table on fire.
Quick Snapshot: What You’re Making
- Project A: Romantic book page candle holders (perfect for gifting, tablescapes, and low-stress crafting).
- Project B: Homemade jar candles wrapped in book pages (the “I made this” flex, with a clean, boutique look).
Safety First (Because “Romantic” Shouldn’t Mean “Emergency”)
Paper and flame are not besties. The good news is you can still get the look safely if you follow a few non-negotiables:
-
Best practice: use battery-operated LED tea lights inside any holder decorated with paper.
You still get the glow, minus the “tiny bonfire” potential. -
If you use a real flame, keep all paper on the outside of a glass holder, below the rim,
and away from the flame path. Never let paper hang over the top. -
Place candles on a stable, heat-resistant surface, away from anything flammable
(curtains, books, décor, that one scarf draped “artistically” over a chair). - Trim wicks to 1/4 inch before each burn. This helps prevent soot and overly tall flames.
- Never leave candles unattended. If you’re leaving the room, the candle is leaving the party too.
- Keep burning candles at least 12 inches from anything that can burn, and keep kids/pets away.
Supplies You’ll Want (Choose Your Adventure)
For Project A: Book Page Candle Holders
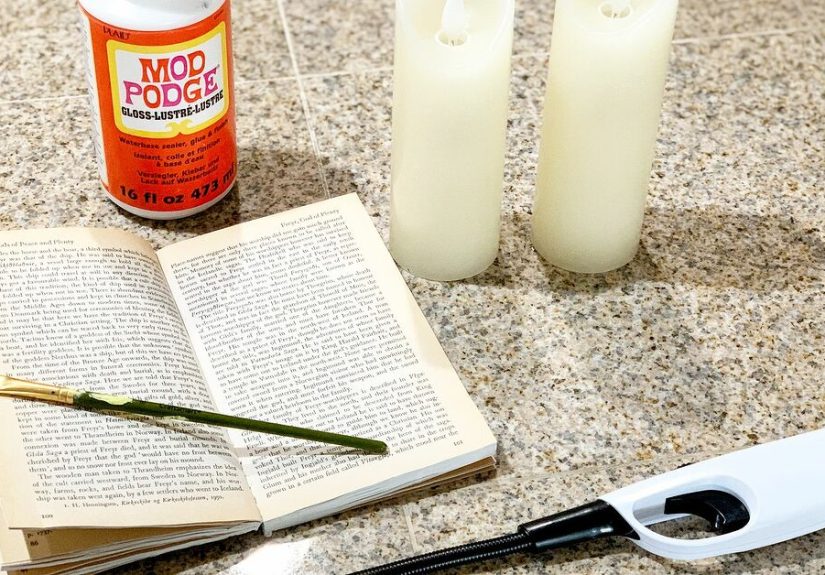
- Clear glass votive holders or small glass jars (thick glass is best)
- Old book pages (damaged books, thrift-store finds, or public-domain printouts)
- Decoupage medium (like Mod Podge) or craft glue
- Foam brush or soft paintbrush
- Scissors or a craft knife + cutting mat
- Optional: twine, lace ribbon, mini wax seal sticker, pressed flower on the outside only
- Recommended: LED tea lights
For Project B: Jar Candles with Book Page Wrap
- Heat-safe candle jars (or clean, thick glass containers made for candles)
- Wax flakes (soy is beginner-friendly)
- Candle wicks (pre-tabbed cotton wicks are easiest)
- Wick stickers or hot glue dots
- Wick centering tool (or two chopsticks + a clothespinimprov is allowed)
- Pouring pitcher (dedicated to wax)
- Kitchen scale (for accurate wax/fragrance measuring)
- Thermometer (digital is easiest)
- Fragrance oil (optional, candle-safe)
- Book pages + decoupage medium for the outer wrap/label
Project A: Romantic Book Page Candle Holders (Vintage Glow, Minimal Stress)
This is the easiest way to get the book-page candle lookand the one I’d choose for weddings,
Valentine’s Day tables, anniversaries, or “I’m trying to make my living room feel like a period drama.”
Step 1: Prep the Glass
- Wash and dry your glass holders thoroughly.
- Wipe with rubbing alcohol to remove oils (fingerprints can mess with adhesion).
- Decide your vibe: neat wrap, collage, torn edges, or a single quote panel.
Step 2: Cut or Tear the Pages
For a clean, romantic “antique label” look, cut a rectangle that wraps around the jar with a small overlap.
For a more whimsical, handmade look, tear the edges. Torn edges look like you found the candle in a magical library.
(Or like you panicked and ripped iteither way, it’s “art.”)
Step 3: Decoupage Like You Mean It
- Brush a thin layer of decoupage medium onto the outside of the glass.
- Lay the page onto the glass and smooth gently from the center outward to remove bubbles.
- Brush another thin layer over the page to seal it.
- Let dry completely (usually 20–40 minutes for a tack-free feel; longer for full cure).
Step 4: Add Romantic Details (Optional, But Highly Enjoyable)
- Wrap twine around the neck and tie a small bow.
- Add a strip of lace ribbon for “Victorian love letter” energy.
- Use a tiny tag: “Chapter One,” “You & Me,” “Once Upon a Time,” or your anniversary date.
-
If you want florals, keep them outside only and away from the top rim.
(Dried botanicals + flame is a hard no.)
Step 5: Light It Safely
Drop in an LED tea light and enjoy the soft, diffused glow through the paper.
If you insist on real flames, use a real votive candle in glass, keep paper well below the rim,
and never leave it unattended. Romantic should be a moodnot a fire drill.
Project B: Pour-Your-Own Jar Candle with a Book Page Wrap (The Boutique Look)
This version gives you a true homemade candle and then dresses it up with book pageslike a candle wearing a vintage novel coat.
The key benefit: the paper is decorative on the outside, while the candle burns inside a proper container.
Step 1: Choose the Right Jar + Wick (Tiny Science, Big Difference)
Jar diameter matters. A wick that’s too small can tunnel (burn straight down like it’s digging for buried treasure),
and a wick that’s too large can burn too hot and sooty.
- Start with a wick recommendation chart from a candle supplier, then test (testing is normal).
-
If your jar is wider than about 3.5 inches, you may need multiple wicks
for an even melt pool.
Step 2: Secure the Wick
- Stick the wick tab to the bottom center of the jar using a wick sticker or glue dot.
- Use a wick centering tool (or chopsticks) to keep the wick upright and centered.
Step 3: Measure Wax (Don’t Eyeball This Part)
Use a kitchen scale. Weigh your wax flakes based on jar volume. Many makers use a simple rule:
measure container capacity, then calculate wax neededyour supplier’s tutorial usually provides a reliable approach.
Step 4: Melt the Wax Gently
- Use a double boiler method (wax and open flame are not a cute couple).
- Melt until fully liquid. Avoid overheatingslow and steady keeps things predictable.
Step 5: Add Fragrance at the Right Temperature
Fragrance oil has a sweet spot. Many soy candle guides recommend adding fragrance in the
175–185°F range (follow your wax/fragrance manufacturer guidance), then stirring gently
for about 1–2 minutes so it binds well with the wax.
Step 6: Pour (Timing Matters)
A common soy technique is to pour when the wax cools to around 160°F for a smoother top.
Pour slowly to reduce air pockets.
Step 7: Cool + Cure (The Waiting Is the Glow-Up)
- Let candles cool undisturbed at room temperature.
- Trim wick to about 1/4 inch once fully set.
-
Cure time varies by wax, but many soy candle makers find the scent improves after
a longer cure (often days to a couple of weeks). If you can wait, your nose will thank you.
Step 8: Wrap with Book Pages (The Romantic Finish)
- Cut a book-page panel that wraps around the jar with a slight overlap.
- Brush decoupage medium onto the outside of the jar and place the page.
- Smooth gently, seal with a thin topcoat, and let dry.
-
Keep paper below the jar rim and away from where heat is strongest.
Think “fashionable label,” not “paper scarf near a campfire.”
Romantic Scent Pairings That Actually Feel Like a Mood
If you’re adding fragrance, pairing the scent with the book-page aesthetic makes the whole thing feel intentional:
- Old library vibe: vanilla + cedar + amber (warm, cozy, slightly mysterious)
- Date night energy: rose + sandalwood (romantic without smelling like a soap aisle)
- Fresh love-letter: bergamot + jasmine + musk (bright at first, soft finish)
- Cottage-core romance: lavender + honey (calm, sweet, not overpowering)
Common Mistakes (And How to Avoid the Drama)
1) Paper Too Close to Heat
Keep book pages outside only, below the rim, and consider LED lights for paper-covered holders.
If you see browning, warping, or curling near the top, retire that setup.
2) Wick Not Trimmed
A long wick can cause a taller flame, soot, and faster burning. Trim to 1/4 inch before each burn.
3) Tunneling
On the first burn, let the candle melt across the surface so it “learns” to burn evenly. If you blow it out too soon,
it can tunnel for the rest of its life like it’s holding a grudge.
4) Adding “Cute” Stuff Inside the Candle
It’s tempting to add dried flowers, herbs, glitter, or little paper hearts into the wax. Don’t.
Anything flammable or not candle-safe can become a fire hazard. Put decorations on the outside instead.
Gift Ideas: Make It Personal Without Making It Complicated
-
Use a page featuring a meaningful word: “always,” “darling,” “home,” “forever,” “yours.”
(Bonus points if it’s from a battered thrift-store romance novel.) - Add a small tag: “Light this when you miss me.” Cheesy? Yes. Effective? Also yes.
- Pair with matches in a tiny envelope, or a mini note: “Read. Relax. Repeat.”
Frequently Asked Questions
Can I use any old glass jar?
It’s safer to use containers designed for candles or thick, heat-safe glass. Thin or unknown glass can crack with heat.
When in doubt, choose proper candle jars or sturdy votive holders.
Is it okay to tear pages from a book?
For personal crafts, many people use damaged books, thrift finds, or print public-domain pages.
If the book is collectible, maybe don’t turn it into décorunless you enjoy being haunted by librarians.
How long should I burn the candle?
Many candle care guides suggest burning long enough to melt the top layer evenly, but not so long that the container overheats.
A common guideline is around a few hours per session (often cited as roughly 3–4 hours) depending on candle size and vessel.
Always follow safety guidance and discontinue use when wax is low.
Final Thoughts: Romance, But Make It Responsible
Romantic book page candles work because they mix two powerful things: warm light and story energy.
Whether you make paper-wrapped candle holders (easy, safe, and charming) or pour your own jar candles
(slightly nerdier, very satisfying), you’ll end up with décor that feels personallike a handwritten note
in a world of push notifications.
If you remember nothing else, remember this: paper décor + open flame requires extra caution.
When you choose LED tea lights, you get the same cozy glow with dramatically less risk.
Your future selfand your smoke detectorwill appreciate it.
Real-Maker Experiences: What You’ll Learn After Making a Few (The Fun, the “Oops,” and the Cozy Wins)
The first time you make book page candle holders, you’ll probably think, “That’s it?” And yessometimes the best crafts
are the ones that don’t require a full engineering degree and three emergency snack breaks. But the real “experience”
starts after you’ve made a few and begin noticing the little details that separate a cute DIY from something that looks
boutique-worthy.
For example: paper choice changes everything. Thin, yellowed pages create a soft, dreamy glow, like your candle is
whispering poetry. Bright white printer paper? Still cute, but it reads more “classroom project.” Many crafters end up
using thrift-store paperbacks because the pages have that warm tone and just enough texture to look authentic. And if you
tear the edges instead of cutting them, the light diffuses in a way that feels more “vintage apothecary” than “perfectly
measured rectangle.” (Perfection is overrated; ambience is not.)
Then there’s the decoupage learning curve: the first jar might have bubbles, wrinkles, or a seam that looks like it’s
trying to escape. The fix is usually simpler than it feelsthinner glue layers, gentler smoothing, and patience while it
dries. After a few tries, you’ll start doing a quick “dry wrap” around the jar first, trimming until the seam overlaps
neatly. Suddenly your candle holder goes from “DIY” to “Did you buy this at a little shop that only sells handmade things
and also somehow plays jazz?”
When people move from holders to poured candles, the biggest “aha” moment is realizing that candle making is half art and
half consistency. Measuring wax with a scale feels extra until you do it oncethen it becomes the easiest way to avoid
leftover wax puddles and guesswork. Another classic experience: picking a wick that’s slightly off and watching the candle
tunnel like it’s determined to become a tiny wax canyon. That’s not failure; it’s data. Most makers eventually embrace
wick testing as part of the process, especially when switching jars, wax blends, dyes, or fragrance levels.
Scent is another place where experience pays off. Many first-timers choose a fragrance that smells amazing in the bottle,
then wonder why it’s subtle when burned. Over time, you learn to keep notes: wax type, fragrance amount, pour temp, cure
time, wick type, jar size, and how it actually performed. You also discover that “romantic” is rarely one-note floral.
A touch of woods (cedar, sandalwood) or warmth (vanilla, amber) makes the whole candle feel grown-up and cozy instead of
like a bouquet wearing too much perfume.
The most important experience-based lesson is also the most unglamorous: heat respect. People who craft these for
romantic dinners quickly learn that paper décor needs smart placementbelow the rim, away from drafts, and preferably
paired with LED tea lights for table settings where sleeves, napkins, and laughter might get a little too close. The vibe
stays romantic when the only thing catching fire is the conversation.
And finally, the best part: once you’ve made a batch, you start spotting where they belong. A trio on a bookshelf (unlit),
two on a bedside table for gentle glow, a cluster on a dining table for anniversaries, or a single jar candle wrapped in a
meaningful page as a gift that feels personal without being overly precious. The craft becomes less about “making a candle”
and more about creating a tiny momentwarm light, soft words, and a space that feels like it’s telling a story.






