
Table of Contents >> Show >> Hide
- Why a DIY Fall Wood Bead Garland Works So Well
- Supplies You Need
- How to Choose the Best Fall Color Palette
- Step-by-Step: How to Make DIY Fall Wood Bead Garland
- Easy Design Variations to Try
- How to Style Your Finished Fall Wood Bead Garland
- Common Mistakes to Avoid
- Why This DIY Is Worth Making Instead of Buying
- Final Thoughts
- Experience and Creative Inspiration for Making a DIY Fall Wood Bead Garland
There are two kinds of fall decorators: the people who casually place one tiny pumpkin on a table and call it a season, and the people who want their home to look like autumn personally signed a lease. If you belong anywhere near the second group, a DIY fall wood bead garland is one of the easiest ways to make your space feel warm, textured, and unmistakably seasonal without turning your living room into a pumpkin patch emergency.
This project is popular for good reason. A wood bead garland has that handmade, collected look that works with farmhouse, modern rustic, Scandi, neutral, vintage, and even slightly “I own too many cozy blankets” decor styles. It can drape across a mantel, wrap around a vase, soften a tray display, hang from a dough bowl, or add texture to a shelf that feels a little too serious. Best of all, it is simple enough for beginners and customizable enough for seasoned crafters who enjoy saying things like, “It just needed a little more mustard and rust.”
In this guide, you will learn how to make a DIY fall wood bead garland from start to finish, what supplies actually matter, how to choose a fall color palette, how to add tassels and seasonal accents, and how to style the finished piece so it looks intentional rather than like a necklace for a giant.
Why a DIY Fall Wood Bead Garland Works So Well
A fall wood bead garland checks three very important decorating boxes: texture, warmth, and flexibility. Wood beads bring natural texture. Fall colors like rust, mustard, olive, cream, cinnamon, deep brown, and muted orange add warmth. And the design is flexible enough to fit almost anywhere in the house. That is a lot of work for one humble strand of beads.
Unlike decor that only works for two weeks in October, this project can carry you from early September through Thanksgiving. Make it neutral, and it can even stay out into winter. Add mini pumpkins, felt leaves, or raffia tassels, and suddenly it looks like you planned your seasonal decor with the confidence of a magazine stylist.
Another reason this project has so much staying power is that it does not require advanced crafting skills. If you can thread beads, tie knots, and resist gluing your fingers together, you are already halfway there.
Supplies You Need
You do not need a giant craft haul to make a beautiful fall bead garland. In fact, one of the reasons this DIY is so appealing is that the supply list is refreshingly manageable.
Basic materials
- Unfinished wood beads in one size or mixed sizes
- Jute twine, cotton cord, or thin rope
- Scissors
- Large-eye needle, beading needle, or a small piece of tape to stiffen the cord end
- Hot glue gun and glue sticks
Optional materials for fall flair
- Acrylic craft paint in fall shades
- Wood stain or antiquing wax
- Matte sealer
- Raffia, yarn, jute, or embroidery floss for tassels
- Felt leaves, mini bells, acorn caps, faux eucalyptus, wheat stems, or tiny pumpkin accents
- Paint pen for stripes, dots, or simple patterns
If you are a beginner, start with unfinished beads, natural jute, and one accent color. That combination almost always looks good and keeps the project from drifting into “I used every craft supply in my house and now it looks confused.”
How to Choose the Best Fall Color Palette
The secret to a beautiful DIY fall wood bead garland is not using every color associated with a leaf pile. It is choosing a palette that fits your home. Think of the garland as a supporting actor, not a diva.
Popular fall palette ideas
- Neutral fall: natural wood, cream, taupe, soft brown
- Classic harvest: burnt orange, mustard, brown, cream
- Moody autumn: olive, rust, black, deep brown
- Soft farmhouse: white, beige, muted terracotta, faded green
- Playful seasonal: orange, cream, sage, muted gold
If your room already has strong colors, go easy on painted beads and let the natural wood do the heavy lifting. If your room is mostly neutral, a few painted beads or mini accents can wake everything up beautifully.
Step-by-Step: How to Make DIY Fall Wood Bead Garland
1. Measure where the garland will go
Before you string a single bead, decide where the garland will live. A mantel garland usually needs more length and a softer drape. A tray or dough bowl garland can be shorter and chunkier. If you are wrapping it around a vase, lantern, or stack of books, a medium-length strand is usually more practical than a dramatic, floor-sweeping creation.
Cut your cord longer than you think you need so you have room for knots, loops, and tassels. Running out of cord near the end of a beading project is a character-building exercise nobody asked for.
2. Plan your bead pattern
Lay your beads out before threading them. This is the easiest way to catch a pattern that looks uneven or too busy. You can alternate sizes, cluster painted beads every few inches, or keep things random for a more organic look.
Here are a few easy pattern ideas:
- All-natural wood beads for a clean and timeless finish
- Every fifth bead painted in a fall color
- Mixed bead sizes for extra texture
- Color blocks in small sections for a more designed look
- Two natural beads followed by one painted bead
3. Paint or stain selected beads
If you want color, paint only some of the beads rather than all of them. That keeps the garland grounded and gives it a more curated look. You can fully paint beads, dry-brush them for a weathered finish, or stain them lightly so the wood grain still shows through.
For a polished result, let each coat dry fully before handling. A matte finish usually looks the most natural for fall decor. Glossy orange beads can work, but they may also start giving candy-corn energy, and that is a very specific design commitment.
4. Thread the beads onto the cord
Start with a firm knot or loop on one end of the cord so the beads do not slide off. Then begin threading according to your planned pattern. If the cord is too floppy, wrap a small piece of tape tightly around the tip to create a makeshift needle. It is a small trick, but it saves a surprising amount of patience.
As you thread, stop every so often to make sure the beads are sitting well and the pattern still looks balanced. This is also the moment to decide whether your garland feels airy and loose or full and substantial.
5. Add fall accents if you want more personality
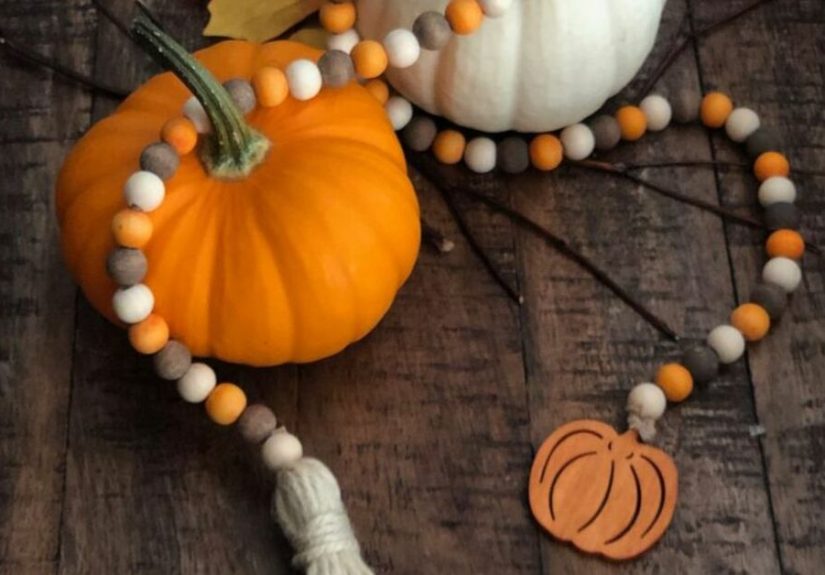
This step is optional, but it is also where the project becomes unmistakably fall. You can thread on small felt leaves, tie in little bits of dried-look faux greenery, add a mini wooden pumpkin shape, or attach tiny tassels in seasonal colors.
The trick is restraint. One or two accent moments per garland usually look intentional. Fifteen accent moments can start to look like the garland lost an argument with the craft store.
6. Finish the ends with tassels or loops
Tassels are classic on a wood bead garland because they soften the look and add movement. To make a simple tassel, wrap jute, yarn, or embroidery floss around your hand or a small piece of cardboard, slide it off, tie the top, then cut the loops at the bottom. Trim until even, then attach the tassel to the garland with a knot or dab of hot glue.
If tassels are not your thing, create loops at each end instead. Loops make it easier to hang the garland or drape it over hooks, drawer pulls, lantern handles, or decorative pegs.
7. Tie off and secure everything
Once you are happy with the length and look, tie a secure knot at the final end. Add a tiny dot of hot glue to the knot if needed. Let everything set, fluff the tassels, and hold the garland up to admire your work like the autumn artisan you now are.
Easy Design Variations to Try
Neutral farmhouse bead garland
Use natural beads, cream-painted accent beads, and jute tassels. This version works beautifully on mantels, coffee tables, and entryway consoles.
Pumpkin-inspired garland
Mix natural beads with rusty orange and warm cream beads. Add a few tiny green leaf accents to nod to pumpkins without turning the whole piece into a themed parade.
Rustic harvest garland
Stain some beads darker and add raffia tassels. Pair with wheat stems, baskets, and wood candlesticks for a cozy, collected look.
Modern fall garland
Stick with natural wood, black, olive, and muted terracotta. Keep the pattern simple and let negative space between accent colors create the style.
How to Style Your Finished Fall Wood Bead Garland
One of the best things about a DIY fall wood bead garland is that it earns its keep in several rooms. You can move it around all season and it still feels fresh.
Best places to use it
- Across a mantel layered with candles and mini pumpkins
- On a coffee table tray with a vase and stacked books
- Wrapped loosely around a lantern
- Draped over a dough bowl or decorative basket
- On open shelving for added texture
- On a dining table as part of a fall centerpiece
- Hanging from a wreath or wall hook
If you love decorating in layers, pair the bead garland with soft textiles, dried stems, ceramic pumpkins, brass candlesticks, or wood risers. The contrast between smooth beads and natural fall textures is what makes the display feel rich rather than flat.
Common Mistakes to Avoid
- Using too many colors: A limited palette almost always looks better.
- Skipping the layout step: Planning first prevents awkward patterns.
- Choosing cord that is too thin: The garland should feel sturdy, not fragile.
- Overloading with embellishments: A few accents create charm. Too many create confusion.
- Making the tassels too skimpy: Full tassels look intentional and balanced.
- Forgetting the room style: The garland should support your decor, not argue with it.
Why This DIY Is Worth Making Instead of Buying
Store-bought bead garlands can be lovely, but making your own gives you control over length, color, bead size, and style. You can tailor it to your exact space, whether you want something minimalist and neutral or something warmer and more playful for autumn. It also makes the finished piece feel personal. A handmade item brings more character to a room than something you grabbed off a shelf while also buying paper towels and dish soap.
There is also something satisfying about creating seasonal decor that you can reuse year after year. A well-made wood bead garland is not trendy in a disposable way. It is the kind of piece that can evolve with your decor, which means it keeps paying you back long after pumpkin spice season has packed up and left town.
Final Thoughts
Learning how to make DIY fall wood bead garland is one of those projects that delivers a lot of style for very little drama. It is affordable, customizable, beginner-friendly, and surprisingly elegant when finished. Whether you keep it simple with raw wood and jute or dress it up with painted beads, tassels, and seasonal accents, the result adds texture and warmth exactly where fall decor needs it most.
So gather your beads, pick your palette, and make a strand that looks right at home with pumpkins, candles, baskets, and all the cozy little touches that make autumn feel like a whole personality. Because frankly, if your decor cannot be charming and a little overenthusiastic in the fall, when can it?
Experience and Creative Inspiration for Making a DIY Fall Wood Bead Garland
One of the most enjoyable things about making a DIY fall wood bead garland is that it feels less like a strict craft project and more like a decorating ritual. You are not just threading beads onto string. You are creating mood. You are setting the tone for the season. You are basically telling your home, “We are cozy people now.” And honestly, that kind of energy matters.
Many crafters discover that the real charm of this project is in the slow, tactile process. The feel of unfinished wood beads, the rough texture of jute, the little pile of painted pieces drying nearby, the quiet satisfaction of seeing a pattern come together bead by bead, all of it taps into the comforting side of fall decorating. It is simple, repetitive, and weirdly calming. There is a reason seasonal crafts become traditions. They give people a chance to make something beautiful with their hands while the world outside starts cooling down.
Another great part of the experience is how easy it is to personalize the project. Some people want a clean, neutral garland that looks expensive and understated on a mantel. Others want something a little more playful, with orange accents, chunky tassels, and tiny wood pumpkins tucked into the design. Neither approach is wrong. That freedom is part of why this craft stays popular. Two people can start with the same basic supplies and end up with completely different results.
This project also tends to spark ideas once you get started. A simple garland can lead to matching napkin rings, a coordinating wreath, a bead strand for a dough bowl, or even mini bead accents tied around candle holders. It is one of those gateway crafts that politely introduces itself and then suddenly has you reorganizing your entire fall centerpiece at 9 p.m. on a Tuesday.
For people who decorate seasonally every year, a handmade wood bead garland can become a staple piece rather than a one-time experiment. It stores easily, does not break like more delicate decor, and mixes well with old and new items. That means it can come back out each autumn and still feel fresh when styled with different pumpkins, leaves, dried stems, or candle colors. In that way, the project becomes more than decor. It becomes part of the rhythm of the season.
And maybe that is the best reason to make one. A DIY fall wood bead garland is not complicated, but it creates the kind of warmth people notice. It adds texture to a room, personality to a shelf, and a little handmade charm that store-bought pieces often cannot match. It invites experimentation without demanding perfection. In other words, it is exactly the kind of fall project that reminds you decorating should be fun, not fussy.





