
Table of Contents >> Show >> Hide
- What Is a Kusudama Flower, Exactly?
- Why Sticky Notes Work So Well for This Project
- Materials You Need
- How to Make a Kusudama Flower With Sticky Notes
- Step 1: Place One Sticky Note Like a Diamond
- Step 2: Fold It Into a Triangle
- Step 3: Fold the Left and Right Corners Up
- Step 4: Fold the Outer Corners Down
- Step 5: Open and Flatten the Flaps
- Step 6: Fold the Top Triangles Down
- Step 7: Fold the Sides Inward
- Step 8: Glue the Petal Closed
- Step 9: Repeat Until You Have 6 Petals
- Step 10: Glue the Petals Together
- Step 11: Add a Decorative Center
- Tips for Better Results
- Common Mistakes Beginners Make
- Creative Ways to Use Your Sticky Note Kusudama Flower
- Is This Project Good for Kids and Beginners?
- What the Experience of Making a Kusudama Flower Really Feels Like
- Final Thoughts
- SEO Tags
Note: This is body-only HTML in standard American English, ready to copy into a webpage.
Some crafts require a trip to a specialty store, a coupon, three tutorials, and a tiny emotional support beverage. This is not one of those crafts. If you have a stack of sticky notes, a little patience, and fingers willing to do a few neat folds, you can make a kusudama flower that looks surprisingly fancy for something born from office supplies.
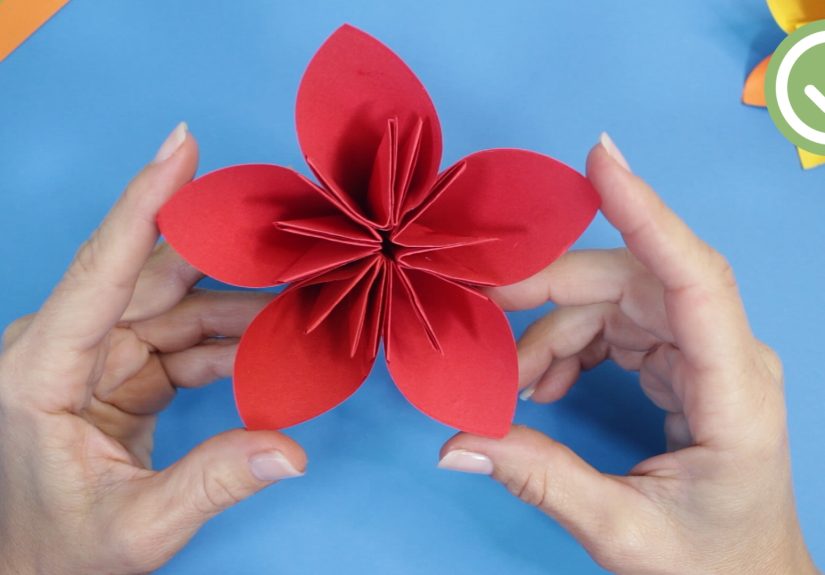
If you have ever wanted to try modular origami without diving into the deep end of paper-folding wizardry, this project is an excellent place to start. A kusudama flower is made from several folded units, or petals, that come together into one bloom. The result is equal parts cute, clever, and “Wait, you made that from sticky notes?” It is perfect for desk decor, handmade gifts, party accents, classroom crafts, or simply proving that your note pad has a destiny beyond grocery lists and passive-aggressive reminders.
What Is a Kusudama Flower, Exactly?
A kusudama flower belongs to the world of modular origami, which means you make several matching folded pieces and assemble them into a final shape. The word kusudama is often translated as “medicine ball,” and the broader kusudama tradition is associated with assembled paper forms rather than a single folded sheet. That is why this project feels a little different from making a crane or a simple tulip. You are building a flower from repeated parts, like a tiny paper architect with better color options.
Traditional origami is usually described as paper folding without scissors, glue, or tape. Kusudama, however, often bends that rule a bit because individual units are commonly glued or sewn together. So if you are a craft purist, do not panic. You are still in very respectable paper-folding territory. You are just taking the scenic route.
There is also a charming history behind the craft. Paper folding has roots that go back centuries, and while its early origins trace to China after the invention of paper, origami became deeply associated with Japan and developed into both ceremonial and recreational forms. Modern origami then evolved into an art form of incredible complexity. Your sticky note flower may not end up in a museum, but it is absolutely part of a long and fascinating creative tradition.
Why Sticky Notes Work So Well for This Project
Sticky notes are basically the overachievers of the paper drawer. They are square, lightweight, easy to find, and usually already hanging around your home or office like they own the place. Standard sticky notes are commonly 3 x 3 inches, which makes them convenient for mini origami projects. That size creates a small, charming flower that looks great on a desk, bulletin board, gift topper, or greeting card.
The best part is accessibility. You do not need specialty origami paper to get started. Sticky notes let you test the folding sequence without spending extra money, and they come in enough colors to make your flower feel cheerful right out of the gate. You can use one shade for a clean, polished bloom or mix colors for a playful, patchwork look.
That said, sticky notes do have opinions. Because they include an adhesive strip, they can feel a little grabby while you work. If you are using a more aggressive sticky variety, the paper may cling to your fingers or catch slightly during precise folds. That does not ruin the project. It just means you should work slowly, keep your edges aligned, and press your creases carefully. Think of it as the paper asking for respect.
Materials You Need
- 6 square sticky notes for one flower
- A glue stick or liquid craft glue
- Paper clips, optional but very helpful
- A flat surface for folding
- A pen, button, rhinestone, or bead for the flower center, optional
If standard 3 x 3 sticky notes feel a little tiny for your first attempt, practice once with larger square paper before switching back. Bigger squares make the folds easier to see and handle. Once your hands understand the pattern, sticky notes become much less intimidating.
How to Make a Kusudama Flower With Sticky Notes
This beginner-friendly version makes one six-petal flower. The beauty of the process is repetition. You only need to learn one petal, then repeat it six times. After the second or third unit, your fingers start to feel weirdly powerful.
Step 1: Place One Sticky Note Like a Diamond
Set one sticky note in front of you with a corner pointing up, like a diamond. If the sticky strip is along one edge, try to keep it positioned so it does not fight your first folds. Exact orientation is less important than keeping your edges even and your creases crisp.
Step 2: Fold It Into a Triangle
Fold the sticky note diagonally in half to create a triangle. Match the corners carefully before pressing the crease. In origami, accuracy matters more than speed. A tiny mismatch early on can turn into a lopsided petal later, and nobody wants a flower that looks like it woke up late.
Step 3: Fold the Left and Right Corners Up
With the long edge at the bottom, bring the left corner up to the top point. Repeat on the right side. You should now have a square-like shape made from the folded triangle. This is where the model starts to look a little more serious, like it has plans.
Step 4: Fold the Outer Corners Down
Take the two flaps you just created and fold their outer corners downward so they meet the edge of the paper. Make these folds clean and sharp. Crisp creases are one of the biggest differences between a petal that looks polished and one that looks like it lost an argument with a stapler.
Step 5: Open and Flatten the Flaps
This part is the trickiest for beginners. Open each small flap and squash it flat, turning it into a neat diamond shape. This move is often called a squash fold. If your sticky note tries to wrinkle or bunch up, slow down and guide the paper with your fingertips instead of forcing it. Origami rewards patience and punishes drama.
Step 6: Fold the Top Triangles Down
Once the flaps are flattened, fold the little top triangles down so the edges sit neatly inside the shape. This cleans up the petal structure and gets it ready for the final roll-in.
Step 7: Fold the Sides Inward
Bring the left side inward so it meets the crease line in the center. Repeat on the right side. At this point, the piece starts to look like one curved petal. If the paper is resisting because of the adhesive strip, just smooth it gently rather than pressing like you are closing a suitcase.
Step 8: Glue the Petal Closed
Add a small amount of glue along one side and bring the petal together to form a cone-like shape. Hold it for a moment so it stays closed. Do not overdo the glue. Too much glue turns elegant paper craft into soggy regret.
Step 9: Repeat Until You Have 6 Petals
Make five more petals using the same folding sequence. Lay them next to each other as you go. This is a great way to catch inconsistencies early. If one petal looks bigger, flatter, or slightly wonky, refold it before assembly. Kusudama flowers look best when the units match closely.
Step 10: Glue the Petals Together
Glue the sides of the petals together one by one. Assemble them in a ring until the flower closes into a full bloom. Use paper clips to hold the petals in place while the glue dries if needed. This small trick can save your sanity, especially with sticky note paper that likes to shift at the worst possible moment.
Step 11: Add a Decorative Center
If you want a more finished look, glue a bead, rhinestone, button, or a tiny rolled paper center inside the flower. This step is optional, but it gives the bloom a polished, gift-ready feel.
Tips for Better Results
Keep Your Folds Crisp
Sharp creases matter. In origami language, a crease is the line left behind when you unfold a move, and clean landmarks help you place later folds more precisely. Translation: sloppy folds now mean messy petals later.
Check Each Unit Before Assembly
Because kusudama is modular, one uneven petal can throw off the whole flower. Compare your finished units before gluing. They do not need to be mathematically perfect, but they should look like close siblings, not distant cousins.
Use Less Glue Than You Think
A tiny amount is enough. The flower should hold together, not swim.
Choose Your Colors on Purpose
Solid colors make the flower look clean and modern. Mixed shades feel fun and playful. Alternating two colors can create a starburst effect, while pastel notes make the whole project look sweet enough to live near a window and judge your houseplants.
Common Mistakes Beginners Make
Rushing the folds: Kusudama flowers are simple, but they are not speed folding. Give each crease a second to settle.
Using too much pressure in the wrong places: Sticky notes are thinner than some origami papers, so rough handling can wrinkle them fast.
Ignoring alignment: If the corners do not match, the petal will not close neatly.
Trying to assemble wet glue immediately: Let connections set a bit. Paper clips are your friends here.
Assuming the first flower has to be perfect: It does not. The first flower teaches you the pattern. The second flower shows off.
Creative Ways to Use Your Sticky Note Kusudama Flower
- Attach one to a wrapped present instead of a bow
- Glue several onto a greeting card for a 3D effect
- Make a small bouquet for desk decor
- String multiple flowers into a garland
- Use them for party decorations, classroom displays, or wedding DIY accents
- Create 12 flowers and assemble them into a larger kusudama ball
This is one of those crafts that scales beautifully. One flower is lovely. A dozen flowers suddenly make you look like the sort of person who says things like “I was just experimenting with paper forms” while everyone else stares in admiration.
Is This Project Good for Kids and Beginners?
Yes, with a small asterisk shaped like patience. The basic petal folds are approachable, and repeated units make the process easier to learn. Kids can absolutely enjoy the project, especially with adult help during gluing and squash folds. For very young crafters, larger square paper may be easier than standard sticky notes. For older kids, teens, and adults, sticky notes are a fun challenge because they are convenient, cheap, and unexpectedly stylish.
It is also a satisfying project for anyone who likes crafts that feel calm and hands-on. You are not just making a flower. You are building it one repeated move at a time, which gives the process a pleasant rhythm. Fold, crease, repeat, and suddenly your desk supplies have become decor.
What the Experience of Making a Kusudama Flower Really Feels Like
The experience of making a kusudama flower from sticky notes is one of those rare craft moments that starts with skepticism and ends with mild self-congratulation. At first, it feels almost too simple. You look at a square sticky note and think, “This is either going to become a flower or a very organized mess.” Then you make the first fold, then the second, and suddenly the paper starts behaving like it has been waiting for this moment all along.
What surprises most people is how quickly the project turns from mechanical to meditative. The first petal demands your full attention. You check every corner, wonder whether you folded the flap the right way, and perhaps mutter something dramatic when the sticky edge clings to your fingertip. By the second or third petal, though, your hands begin to remember. The folding sequence starts to feel rhythmic. Your brain quiets down. You stop overthinking and just follow the pattern. It is oddly relaxing, in the same way organizing a drawer is relaxing when no one is making you do it.
There is also a small thrill in watching ordinary office paper transform into something decorative. Sticky notes are not glamorous. No one looks at a pad of neon squares and sees elegance. But once the petals are shaped and joined, the finished flower looks surprisingly refined. That contrast is part of the fun. The craft has a little magic trick built into it. You start with “meeting notes” and end with “tiny paper bloom that looks gift-shop worthy.”
Another real experience people often have is that the project teaches patience without being punishing. If a fold is off, you notice it. If one petal is puffier than the others, the flower tells on you immediately. But the mistakes are manageable. You can refold a unit, trim your glue use, or simply make another petal. That makes the craft feel encouraging rather than fussy. It nudges you toward precision, but it does not act like a perfectionist gym teacher.
It is also a surprisingly social craft. Make one flower alone on a quiet afternoon, and it feels cozy and almost meditative. Make several with friends, kids, or coworkers, and it becomes a conversation piece. People compare colors, argue gently about the neatest crease, and hold up their flowers like they have just reinvented spring. In classrooms and living rooms, the project creates that lovely kind of shared focus where everyone is doing the same thing, but each flower still ends up with its own personality.
By the time you finish, there is usually a funny little shift in how you see sticky notes. They are no longer just reminders to buy batteries or answer emails. They become potential petals. That may sound dramatic, but crafting does that. It changes the way you look at ordinary materials. And honestly, any project that makes a humble office supply feel artistic deserves a little applause.
Final Thoughts
If you want a paper craft that is inexpensive, beginner-friendly, decorative, and just quirky enough to be memorable, learning how to make a kusudama flower with sticky notes is a fantastic place to begin. It brings together the charm of origami, the structure of modular design, and the delightful surprise of turning something ordinary into something beautiful.
You do not need fancy tools. You do not need to be an origami expert. You just need a few square notes, a little glue, and the willingness to make six matching petals. Once you get the hang of it, you can experiment with colors, make bouquets, build a larger kusudama ball, or add your flowers to gifts and decor. Not bad for a craft supply that usually lives next to the printer.






