
Table of Contents >> Show >> Hide
- Step 1: Pick the Wall, the “Vibe,” and the Boundaries
- Step 2: Lay Out Your Design (On the Floor First, Like a Sane Person)
- Step 3: Make Paper Templates (So Your Wall Doesn’t Become Swiss Cheese)
- Step 4: Choose the Right Hanging Hardware (Because Gravity Is Confident)
- Step 5: Hang the Gallery Wall (One Frame at a Time, With Zero Panic)
- Common Gallery Wall Problems (and the Fixes That Actually Work)
- Conclusion
- Real-World Experiences: What Actually Happens on Hanging Day (and Why It’s Normal)
A gallery wall is basically your home’s “highlight reel”: family photos, thrift-store art, kid drawings you’re emotionally unable to recycle, that one print you bought because the colors matched your throw pillow. The problem? Hanging a gallery wall can turn into a geometry final exam… plus a bonus round of “why do I own six different hammers?”
The good news: you don’t need an art degree, a laser grid, or a contractor named “Chip” to get it right. You just need a plan, a little measuring, and a willingness to step back and squint like a museum curator who forgot their glasses. Follow these five steps and you’ll end up with a gallery wall that looks intentional (even if you were improvising with coffee in one hand).
Step 1: Pick the Wall, the “Vibe,” and the Boundaries
Before you touch a nail, decide what your gallery wall is doing for the room. Is it a clean, modern grid? A collected-over-time “salon” wall? A tidy row above the sofa? Your choices here will make every later step easier (and reduce the urge to “just eyeball it” at 11:47 p.m.).
Choose the location (and what it’s competing with)
- High-impact spots: above a sofa, along a hallway, up a staircase, over a console table, or around a TV.
- Low-drama spots: a bedroom wall, home office, or any wall without three switches, a thermostat, and a rogue vent.
- Light check: avoid harsh direct sun if you’re hanging photos or anything preciousfading is real and it’s rude.
Define your “gallery zone” (so it doesn’t float away)
Gallery walls look best when they read as one composition. That means you need a visible boundaryeven if it’s an invisible one you measured.
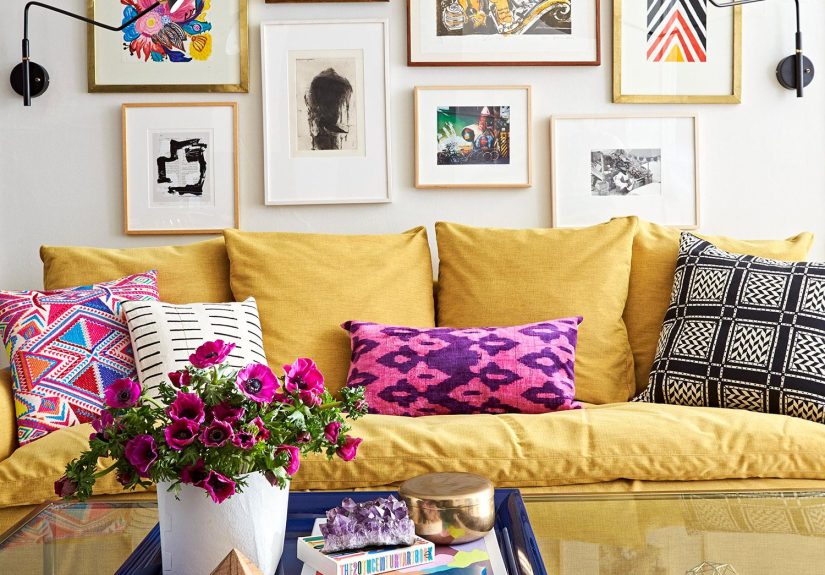
- Above furniture: plan for the bottom of your arrangement to sit roughly 6–12 inches above the top of the sofa/console/bed. (Closer feels connected; higher can look like it escaped.)
- Over a sofa: a classic proportion trick is to make the total gallery width roughly about two-thirds the sofa width so it feels balanced.
- On a blank wall: aim to keep the center of the whole arrangement around eye level typically 57–60 inches from the floor.
Decide what you’re hanging (and what you’re not)
Pull everything together before you start. Yes, even the frame you think is “somewhere in the closet.” Future-you will be grateful.
- Art + photos: mix sizes for energy, or keep them consistent for calm.
- Frames: matching frames = clean and modern; mixed frames = collected and cozy.
- Unframed extras: small objects, textiles, or a mirror can add depthjust keep it purposeful.
- One unifier: a color palette, a theme, similar matting, or a repeated frame finish helps it look intentional.
Step 2: Lay Out Your Design (On the Floor First, Like a Sane Person)
Hanging as you go is how gallery walls turn into “abstract regret.” Instead, build your layout on the floor (or a big table) where you can shuffle pieces around without patching drywall.
Start with a layout style
- Grid: same-size frames, equal spacing, crisp lines. Great for modern spaces and photo series.
- Salon (eclectic): mixed sizes and orientations, slightly organic spacing. Great for personality and collections.
- Linear row: three to five pieces in a clean linesimple, classic, low-stress.
- Staircase climb: frames follow the angle of the stairs; the “center line” tracks the slope.
Use spacing rules that look “designer,” not “random”
Consistency is the secret sauce. For most gallery walls, a gap of about 2–3 inches between frames is a sweet spot. Larger frames can handle a touch more breathing room; tiny frames look better a little closer.
- Pick one gap (like 2.5″) and stick with it for a cohesive look.
- Align something (tops, bottoms, centers, or a vertical line) so the wall has structure.
- Think in “constellations”: cluster pieces so they relate, even if everything isn’t perfectly symmetrical.
A simple “no-panic” formula for an eclectic gallery wall
- Place the biggest piece first (often near the center of your gallery zone, not necessarily centered on the wall).
- Add the second biggest piece diagonally across from it to balance visual weight.
- Fill in with mediums, then use smalls to close awkward gaps.
- Step back often. If it feels heavy on one side, swap a large piece across the layout.
Example layouts you can copy (without copying anyone’s walls)
- Above a 90-inch sofa: aim for a gallery width around 60 inches. Try a 3×2 “loose grid”: six frames (mix 11×14 and 16×20) with consistent 2–3″ spacing.
- Hallway runner wall: do a clean linear row of five frames (all 12×18) centered at eye level.
- Staircase: pick one consistent side alignment (like left edges) and let the grouping climb with the railing.
Step 3: Make Paper Templates (So Your Wall Doesn’t Become Swiss Cheese)
This is the step that separates “effortlessly curated” from “I swear it looked straight five minutes ago.” Templates let you preview the finished gallery wall at full sizebefore you commit to holes.
How to template like a pro
- Trace each frame onto kraft paper, wrapping paper, or even taped-together printer paper.
- Cut it out so each template matches the frame’s outer edge.
- Mark the hanging point on the template: measure from the top of the frame down to the hook/wire when pulled taut, then mark that spot.
- Label the template (frame name/size/orientation) so you don’t play “template roulette” later.
- Tape templates to the wall with painter’s tape and adjust until it looks right.
Two quick template hacks that save your sanity
- Painter’s tape “gallery zone” box: outline the total area first, then arrange templates inside it. This keeps the layout from creeping outward like it’s trying to colonize the whole wall.
- Photo proof: take a picture of the wall from across the room. Your phone will spot imbalance faster than your brain will.
When your layout looks right, leave the templates up and move on. Congratulations: you’re now “planning” instead of “guessing,” and your drywall thanks you.
Step 4: Choose the Right Hanging Hardware (Because Gravity Is Confident)
The most underrated part of hanging a gallery wall is using hardware that actually matches your wall type and frame weight. “It held for a week” is not the vibe. This step keeps your art on the wall and off your toes.
Your basic toolkit
- Measuring tape
- Pencil (and an eraser, because we’re optimistic)
- Painter’s tape
- Level (a small one is fine; a laser level is extra credit)
- Hammer and/or drill
- Stud finder (especially for heavier frames)
- Wall anchors and picture hooks (more on that below)
- Felt bumpers for frame corners (prevents sliding and wall scuffs)
Match the hanger to the job
- Light frames: small nails, basic picture hooks, or removable hanging strips (follow weight limits carefully).
- Medium frames: picture hooks rated above the frame weight; anchors if you can’t hit a stud.
- Heavy frames or mirrors: anchor into studs when possible, or use heavy-duty anchors/french cleats designed for the weight.
- Wire-backed frames: consider two hooks for stability and less tilting.
- D-rings: sturdier than a flimsy sawtooth; great for heavier pieces (and less “why is it leaning?” drama).
Wall-type reality check (aka: what are you drilling into?)
- Drywall: easy to work with, but needs anchors for weight when you’re not in a stud.
- Plaster: can crack; pre-drill carefully and consider specialized anchors.
- Brick/concrete: requires masonry bits and the right anchorsdon’t freestyle this with a sad little nail.
Pro tip: always choose hardware rated higher than the frame’s weight. If your frame weighs 12 pounds, don’t pick something rated for 12 pounds. Pick 20+ and sleep better.
Step 5: Hang the Gallery Wall (One Frame at a Time, With Zero Panic)
You’ve planned. You’ve templated. You’ve gathered hardware like a responsible adult. Now it’s time to hang your gallery walland keep it looking straight long enough for guests to compliment you.
How to hang in the right order
- Start with your anchor piece (usually the largest or most important one). If your wall is above furniture, keep the arrangement visually connected to that piece. If it’s on a blank wall, aim for the overall center around eye level (about 57–60 inches).
- Work outward using your templates as your guidetop row first for grids, or “big to small” for eclectic layouts.
- Use a level for each frame. Yes, each one. Even the “obviously straight” one. Especially that one.
- Add corner bumpers so frames don’t tilt when someone stomps upstairs or a door slams.
- Step back every few frames. Fix small drift early; don’t wait until the final frame is 1.5 inches lower than reality.
Clean hanging tricks (because nobody likes drywall confetti)
- Painter’s tape marks: mark hook points on tape so pencil doesn’t smear and measurements stay visible.
- Dust catcher: stick a folded note under a drill point to catch dust and keep cleanup easy.
- Marking shortcut: for tricky hang points, a tiny dab of thick white toothpaste on the hanger can transfer a mark to the wall.
Final styling touches that make it look “finished”
- Mind the lighting: a nearby lamp, sconce, or picture light can make the wall feel intentional and gallery-like.
- Balance the colors: if one corner feels “loud,” swap in a calmer piece or add a neutral mat.
- Don’t over-pack it: if you’re layering frames, keep it shallowtoo much depth starts to feel cluttered.
Common Gallery Wall Problems (and the Fixes That Actually Work)
“It looks crooked, but my level says it’s fine.”
Welcome to old-house walls and optical illusions. Try leveling against the nearest architectural line (like trim), or adjust slightly until it looks straight from where people actually stand.
“My spacing is consistent… and somehow it still feels off.”
Check visual weight. You might have too many dark frames on one side or all the large pieces clustered together. Move one heavy piece across the layout and watch the whole wall calm down.
“The gallery wall feels disconnected from my sofa/console.”
Bring it closer. Most of the time, lowering the arrangement so the bottom sits in that 6–12 inch zone above the furniture instantly makes it feel integrated.
Conclusion
Hanging a gallery wall is equal parts design and decision-making. The trick isn’t perfectionit’s planning. Pick your wall and boundaries, lay out your frames on the floor, template everything, choose hardware that respects gravity, and hang in a smart order. Do that, and your gallery wall will look collected, cohesive, and “you meant to do that.”
And if you make one tiny mistake? Congratulations: you’re officially a person who decorates their home. Patch it, adjust it, and carry on like the confident curator you are.
Real-World Experiences: What Actually Happens on Hanging Day (and Why It’s Normal)
If you’ve never hung a gallery wall before, here’s the most comforting truth: everyone starts out thinking it’ll take 30 minutes, and many people end up learning new words they probably shouldn’t say around pets or kids. The process feels deceptively simpleuntil you realize your “perfect” layout is one inch too wide because you forgot to account for spacing. That’s not failure. That’s just math doing what math does.
One of the most common real-life scenarios DIYers run into is the “tiny drift” problem. The first frame is level. The second frame is level. The third frame is level. Then suddenly, the whole row looks like it’s gently sliding downhill. What happened? Usually, it’s a measurement shortcut that compounds: you marked one hook point slightly off, then used that frame as the reference for the next one. This is why people who’ve done it a few times tend to pause every couple frames, step back, and “reset” their reference line. It’s not overthinkingit’s quality control.
Another experience people report: the “I love everything… separately” moment. You’ve got beautiful pieces, great photos, and frames you’re proud of. But on the wall, the collection feels chaotic. This is usually when a unifier saves the daysomething as simple as matching mat color, repeating one frame finish, or sticking to a limited color palette in the art. It’s amazing how quickly a wall goes from “yard sale chic” to “curated gallery” with one consistent thread.
Renters (and anyone who fears patching) often talk about the adhesive learning curve. Removable strips can be fantastic for lightweight frames, but real homes have real conditions: humidity, paint types, and walls that may have been painted five times since the last decade ended. The practical takeaway many people learn is to reserve adhesive solutions for truly light pieces (and follow the manufacturer steps like you’re assembling a spacecraft), while using nails/hooks/anchors for anything you’d be sad to see crash at 2 a.m. If you’re mixing methods, it’s totally normal to use strips for small frames and hardware for heavier anchors.
There’s also the classic “staircase intimidation”. People worry the slope will make everything look wrong, so they freeze. In practice, the win comes from picking one guiding lineeither keep the centers tracking the stair angle or align a consistent edge (like left edges) and let the composition climb. The goal isn’t to make every frame identical; it’s to make the overall movement feel intentional. Folks who do stair walls often say the first two frames are the hardest, then the rest becomes a satisfying puzzle.
Finally, the most relatable experience: the “I’m done… wait, no I’m not” finish. You hang the last frame, you’re thrilled, you sit down, and from across the room you spot one frame that’s just a hair off. Here’s the secret: the best-looking gallery walls are usually the ones that got a tiny tweak after the initial hang. Many homeowners take a photo, live with it overnight, and make one small adjustment the next day. That’s not indecisionthat’s letting your eyes settle. Your home isn’t a museum with a grand opening deadline. You’re allowed to refine it.
So if your hanging day includes template shuffling, a couple re-marks, and a dramatic pause where you stare at the wall like it owes you moneycongrats. You’re doing it exactly like people who end up with gallery walls they truly love.






