
Table of Contents >> Show >> Hide
- Why Photoshop Is Still a Great GIF Maker
- What You Need Before You Start
- Method 1: How to Make an Animated GIF in Photoshop From Images or Layers
- Method 2: How to Create an Animated GIF in Photoshop From Video
- Best Export Settings for Animated GIFs in Photoshop
- Common Mistakes to Avoid
- Specific Examples of Animated GIFs You Can Make in Photoshop
- Real-World Experiences and Lessons From Making GIFs in Photoshop
- Conclusion
- SEO Tags
Animated GIFs are the internet’s favorite tiny chaos machines. They can explain a process, show off a product, make a meme land harder, or turn a plain social post into something that actually gets noticed. And while there are dozens of apps that promise one-click magic, Photoshop remains one of the best tools for creating animated GIFs when you want control, quality, and the freedom to tweak every last pixel like the perfectionist you secretly are.
If you have ever opened Photoshop and thought, “This app can do everything except make me coffee,” good news: it can absolutely make a GIF. Whether you are starting with a series of photos, layered artwork, screen captures, or a short video clip, Photoshop gives you multiple ways to build a smooth looping animation and export it for the web.
In this guide, you will learn exactly how to create animated GIFs using Photoshop, which workflow to choose, how to optimize file size without turning your masterpiece into crunchy digital soup, and what common mistakes to avoid. By the end, you will be making GIFs like a calm, highly caffeinated wizard.
Why Photoshop Is Still a Great GIF Maker
Photoshop is especially useful for GIF creation because it combines editing, compositing, text, retouching, and animation tools in one place. You do not have to bounce between multiple apps just to crop a frame, fix a background, add captions, or adjust colors. That alone saves time and spares your patience.
It also supports two main animation approaches. The first is frame animation, which is perfect for simple GIFs made from layered artwork, still images, or short stop-motion sequences. The second is timeline animation, which is better for video-based motion and more detailed control. If your animation is simple and punchy, frame animation is usually the easiest route. If it is more cinematic or needs smoother property changes, timeline mode gives you more flexibility.
Another big advantage is export control. Photoshop lets you adjust color count, dimensions, looping, dithering, and other settings that directly affect file quality and size. Since GIFs are limited by nature, that kind of control matters a lot.
What You Need Before You Start
Before diving into the Timeline panel, gather your assets. This part is less glamorous than exporting the final loop, but it makes the whole process much easier.
For a photo or layered-image GIF
- A series of images in sequence, such as product shots, stop-motion photos, or screenshots
- Consistent image size and orientation
- A clear idea of the order the frames should appear in
For a video-based GIF
- A short video clip, ideally trimmed down before import
- A loop-friendly action, such as a wave, spin, blink, reveal, or repeating motion
- A realistic expectation that a 20-second 4K video is not a GIF, it is a cry for help
It also helps to decide where the GIF will be used. A website banner, email header, tutorial, and social post all have different size and performance needs. Planning that ahead of time will save you from exporting five versions later while muttering at your monitor.
Method 1: How to Make an Animated GIF in Photoshop From Images or Layers
This is the classic workflow for anyone creating a GIF from photos, illustrations, text layers, or screen grabs.
Step 1: Load your files into Photoshop
If you have separate images, open Photoshop and load them as layers in one document. Keeping each frame on its own layer makes the animation setup much easier. If you are already working in a layered PSD, you are one step ahead and legally allowed to feel superior.
Step 2: Open the Timeline panel
Go to Window > Timeline. In the Timeline panel, choose Create Frame Animation. This is where Photoshop turns your layers into actual animation frames.
Step 3: Convert layers into frames
Open the Timeline panel menu and select Make Frames From Layers. Photoshop will convert your layer stack into a sequence of frames. If the order looks backward, reverse the frames and keep moving. No drama required.
Step 4: Set the timing
Under each frame, choose how long it should display. Faster frame delays create a snappier look, while longer delays make the motion easier to follow. For a meme-style reaction GIF, quick timing often works well. For a tutorial or text-based sequence, a slightly longer delay is easier on human eyeballs.
A good starting point is:
- 0.1 seconds for quick motion or humor
- 0.2 to 0.5 seconds for readable step-by-step content
- Longer pauses on the first or last frame when you want the viewer to absorb the message
Step 5: Choose looping options
At the bottom of the Timeline, set the loop to Forever if you want the animation to keep repeating. This is the standard choice for most web GIFs. You can also select Once or a specific number of loops, but most people expect GIFs to repeat automatically.
Step 6: Preview the animation
Hit the play button in the Timeline panel. Watch the loop from beginning to end and look for awkward timing, jumpy transitions, or frames that feel out of place. This preview stage is where you catch tiny annoyances before they become public annoyances.
Step 7: Export the GIF
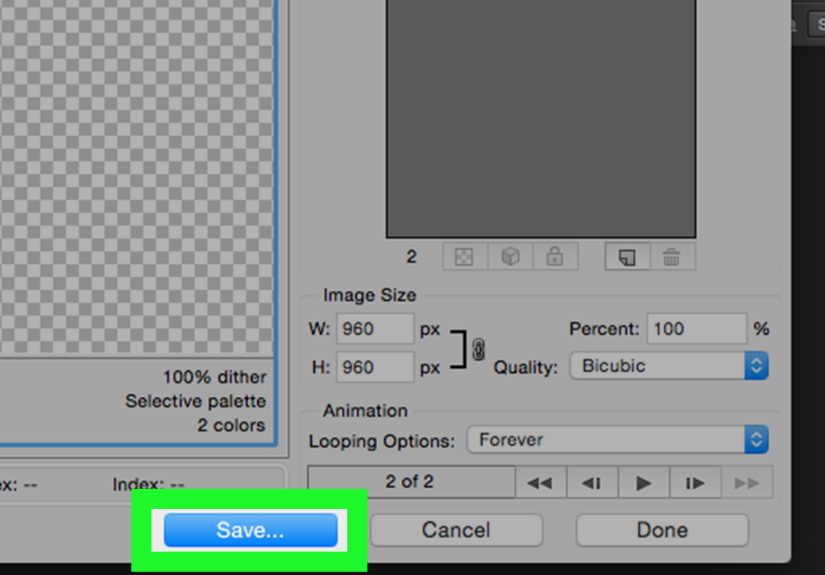
Go to File > Export > Save for Web (Legacy). Choose GIF as the format, set looping to Forever, and adjust the dimensions and color settings as needed. Preview it, then save.
Method 2: How to Create an Animated GIF in Photoshop From Video
If you want to turn a short video clip into a GIF, Photoshop can do that too. This is especially useful for quick product demos, reaction loops, screen recordings, and micro-tutorials.
Step 1: Import the video
Use File > Import and bring the clip into Photoshop, or work with video layers in the Timeline. If your clip is long, trim it first. Shorter is almost always better with GIFs, both for file size and for attention span.
Step 2: Trim to the best moment
Pick the exact section you want. The strongest GIFs usually focus on one action, one emotion, or one clear visual payoff. A concise loop beats a bloated clip every time.
Step 3: Convert or refine the animation
You can work in timeline mode for video-based edits, then convert to frame animation if needed. If you want to add text, overlays, callouts, or retouch a frame, Photoshop gives you room to do all of that without leaving the document.
Step 4: Test the loop
A loop should feel intentional, not like the video tripped over its shoelaces and restarted. Watch the beginning and end carefully. If the motion snaps too obviously, shorten the clip, duplicate a few transitional frames, or choose a different section that loops more naturally.
Step 5: Export for web use
Again, use Save for Web (Legacy) and optimize from there. Reduce width, height, or colors if the file is too large. GIFs are a balancing act, and Photoshop gives you the tightrope.
Best Export Settings for Animated GIFs in Photoshop
This is where a lot of people either create a clean, web-friendly animation or accidentally export a giant glowing brick. The best settings depend on the content, but these guidelines work well in most situations.
Keep the dimensions modest
Large dimensions make file size jump fast. For most web uses, a smaller GIF often performs better and still looks sharp enough on screen. If the GIF will appear inside a blog post, email, or mobile layout, you usually do not need massive dimensions.
Reduce the number of colors
GIFs are limited to 256 colors, which means they are best for simple graphics, flat colors, line art, UI demos, and short loops. Photos and gradients can still work, but they need more careful optimization. If the image looks fine with fewer colors, lowering the color count can meaningfully reduce file size.
Use dithering carefully
Dithering can smooth out banding in gradients and make some GIFs look nicer, but it also increases file size. Try exporting with and without it. If the difference is barely visible, choose the smaller file and walk away like a professional.
Limit the frame count
More frames usually mean a larger file. Not every tiny movement needs to be preserved. If a frame does not add clarity or style, it may just be adding weight.
Keep it short
Short loops generally perform better. They load faster, feel punchier, and are less likely to test the patience of your audience. If you are creating GIFs for platforms like GIPHY or messaging environments, shorter durations and leaner files are especially smart.
Common Mistakes to Avoid
Using GIFs for the wrong kind of image
If your animation is full of photographic detail, soft shadows, and cinematic gradients, a GIF may not be your best final format. GIFs shine with simple motion and limited palettes. For richer video, MP4 or WebM often wins on quality and size.
Ignoring file size until the very end
Many creators build the whole animation at full size, export it, and then stare in horror at a giant file. It is better to think about optimization from the start. Crop tightly, keep the clip short, and avoid unnecessary frames.
Making text too small
A GIF seen on mobile needs readable text, clear contrast, and enough pause time for people to absorb the message. If viewers need detective skills to read your caption, the GIF is not helping.
Forgetting the loop point
The best GIFs feel seamless. If the last frame crashes into the first one like two shopping carts in a parking lot, viewers notice. A clean loop is half the charm.
Specific Examples of Animated GIFs You Can Make in Photoshop
- Product feature demos: Show one feature at a time, such as a zipper opening, lamp dimming, or app button being clicked.
- Before-and-after edits: Alternate between two images to highlight retouching, renovation, or design changes.
- Mini tutorials: Turn a short screen recording into a looping GIF that shows how to complete one task.
- Text animations: Make headlines flash, slide, fade, or bounce for social graphics and promotions.
- Stop-motion style content: Use a series of photos to animate an object moving across the frame.
These are practical, high-performing use cases because they rely on one idea per loop. That simplicity is exactly what makes a GIF effective.
Real-World Experiences and Lessons From Making GIFs in Photoshop
One of the most common real-world experiences people have when learning how to create animated GIFs using Photoshop is assuming the hard part is the animation. Usually, it is not. The hard part is restraint. New creators often try to include too much motion, too much text, too many frames, and too much visual detail all at once. The result is a GIF that technically works, but loads slowly, looks messy, or feels exhausting to watch. The best Photoshop GIFs tend to be the simplest ones: one idea, one loop, one visual payoff.
Another experience that comes up quickly is the battle between quality and file size. The first export often looks gorgeous inside Photoshop and slightly less glamorous once saved. That is not failure. That is the normal reality of the GIF format. Many people learn this lesson when gradients start banding, skin tones lose nuance, or shadows turn chunky. The fix is usually not panic. It is practical adjustment: smaller dimensions, fewer colors, shorter duration, tighter cropping, or a different clip that suits the format better.
People also discover that timing matters more than they expected. A GIF can contain beautiful artwork and still feel off if the frame delay is wrong. If it moves too fast, nobody understands it. If it moves too slowly, it feels like the internet is buffering in 2009. Photoshop makes it easy to adjust frame delay, and that tiny control often has a huge effect. Many creators end up spending more time fine-tuning timing than building the initial sequence, which is honestly a sign they are doing it right.
There is also a very real learning curve around loop points. Beginners often export a GIF, watch it once, and think it is finished. Then they watch it five more times and realize the ending slams back to the beginning like a screen door in a storm. Seamless looping is one of those small details that separates a decent GIF from a polished one. In practice, many Photoshop users get better results by choosing shorter clips, hiding abrupt movement with a pause, or building transitions with duplicated or tweaked frames.
A lot of real-world Photoshop GIF experience also comes from making content for different platforms. A GIF that looks fine on a desktop preview may feel too small on mobile, too heavy for email, or too soft when embedded in a blog post. That is why experienced creators often export multiple versions. One version may be larger and cleaner for a website hero section, while another is leaner for email or messaging. It sounds tedious, but it is actually faster than forcing one file to do everything badly.
Text is another sneaky challenge. In theory, adding text to a GIF sounds easy. In practice, animated text can become blurry, cramped, or unreadable once compressed. People learn to use larger type, stronger contrast, shorter phrases, and longer pauses. They also learn that witty copy helps. A GIF with a clean joke, quick instruction, or sharp callout usually lands better than one stuffed with a paragraph of microscopic ambition.
Over time, creators also learn when not to use a GIF. This may be the most valuable experience of all. Sometimes the smartest Photoshop decision is realizing that a high-motion, photo-heavy clip would work better as a video file instead. That is not giving up on the GIF. That is understanding the format. GIFs are brilliant for loops, reactions, demos, and punchy visual moments. They are not required to carry the emotional weight of a movie trailer.
The most useful lesson from real use is simple: treat GIF creation as editing, not just exporting. Photoshop is powerful because it lets you refine everything before the final save. When creators start thinking like editors, trimming frames, simplifying motion, improving readability, and testing loops, their GIFs improve fast. And once that clicks, Photoshop stops feeling intimidating and starts feeling like the exact right tool for the job.
Conclusion
Learning how to create animated GIFs using Photoshop is one of those skills that pays off again and again. Once you understand the Timeline panel, frame delays, looping options, and export settings, you can build everything from playful memes to polished product demos. Photoshop gives you precise control, which means your GIFs can look cleaner, load faster, and communicate more clearly than quick one-click exports from simpler tools.
The trick is not to overcomplicate it. Start with short clips, simple motion, and a clear purpose. Use frame animation for straightforward sequences, timeline tools for more advanced motion, and Save for Web settings to keep the file lean. Test the loop, trim what is unnecessary, and remember that the best GIFs are usually the ones that make one idea instantly clear.
In other words, keep it short, make it sharp, and do not let the file size bully you.





