
Table of Contents >> Show >> Hide
- Introduction: Why Image Conversion Still Matters
- What Does It Mean to Convert a Picture?
- JPEG, JPG, PNG, WebP, and More: What Is the Difference?
- How to Convert Pictures to JPEG on Windows
- How to Convert Pictures on Mac
- How to Convert Pictures on iPhone and iPad
- How to Convert Pictures on Android
- How to Convert Pictures Online
- How to Convert PNG to JPEG
- How to Convert JPEG to PNG
- How to Convert HEIC to JPEG
- How to Convert WebP to JPEG or PNG
- Best Image Format for Different Needs
- How to Convert Images Without Losing Quality
- Image Conversion and SEO: Why File Format Affects Search Performance
- Common Mistakes When Converting Pictures
- Recommended Workflow for Converting Pictures
- Real-World Experiences With Converting Pictures
- Conclusion
Note: This article is written for web publishing and synthesizes current, real-world guidance from reputable technology, software, browser, and image-format resources.
Introduction: Why Image Conversion Still Matters
At some point, every digital life turns into a file-format guessing game. You download a photo from your phone, and suddenly it is HEIC. Your website asks for JPEG. A designer sends you a transparent PNG. A printer wants TIFF. Your friend says, “Can you just send it as a normal picture?” And there you are, staring at file extensions like they are tiny alphabet soup noodles floating in a bowl of confusion.
The good news is that learning how to convert pictures to JPEG or other file extensions is not difficult. You do not need to be a graphic designer, professional photographer, or the person in the family who “knows computers.” You just need to understand what each format is best for, which tools can safely convert images, and how to avoid common mistakes that make pictures blurry, huge, or impossible to upload.
This guide explains how to convert image files on Windows, Mac, iPhone, Android, and online tools. It also covers when to choose JPEG, PNG, WebP, TIFF, GIF, PDF, HEIC, SVG, or AVIF. By the end, you will know exactly which file extension to use for websites, email, printing, social media, storage, and everyday sharing.
What Does It Mean to Convert a Picture?
Converting a picture means changing it from one image file format to another. For example, you might convert a PNG to JPEG, a HEIC photo to JPG, a TIFF scan to PDF, or a WebP image to PNG. The file extension is the short label at the end of a file name, such as .jpg, .png, .webp, or .tiff.
However, changing the letters at the end of the file name is not enough. Renaming photo.png to photo.jpg does not truly convert the image. It only changes the label. The image data inside the file remains the same, and some apps may refuse to open it correctly. A real conversion rewrites the image into a new format using software, an app, or an online converter.
Common Reasons to Convert Pictures
People convert image files for many practical reasons. You may need a smaller file size for email, a JPEG for a website upload form, a PNG with transparency for a logo, or a TIFF for high-quality printing. Website owners convert images to improve page speed, photographers convert files for editing or sharing, and everyday users convert HEIC phone photos so they can open them on older devices.
JPEG, JPG, PNG, WebP, and More: What Is the Difference?
Before converting images, it helps to know what each format does well. Choosing the wrong extension is like wearing snow boots to the beach. Technically possible? Yes. Comfortable? Not really.
JPEG or JPG
JPEG, also written as JPG, is one of the most widely used image formats in the world. It is excellent for photographs, product images, blog graphics, profile pictures, and social media uploads. JPEG uses lossy compression, which means it reduces file size by removing some image data. When done carefully, the difference is hard to notice. When overdone, the picture can look blocky, muddy, or like it was faxed through a potato.
Use JPEG when you need a small, compatible image for websites, email, digital albums, online forms, or general sharing. Avoid JPEG for graphics that require transparent backgrounds because JPEG does not support transparency.
PNG
PNG is popular for screenshots, logos, icons, diagrams, charts, and images that need sharp edges or transparent backgrounds. Unlike JPEG, PNG uses lossless compression, which preserves image detail. The tradeoff is that PNG files are often larger than JPEG files, especially for photographs.
Use PNG when you need crisp text, transparency, or clean graphics. Avoid PNG for large photo galleries unless file size is not a concern.
WebP
WebP is a modern web image format designed to reduce file size while keeping strong visual quality. It supports both lossy and lossless compression, transparency, and animation. Many websites use WebP because smaller images can improve loading speed, especially on mobile devices.
Use WebP for web performance when your platform supports it. Convert WebP to JPEG or PNG when you need broader compatibility with older software, upload forms, or editing tools.
HEIC or HEIF
HEIC is commonly used by newer iPhones and some modern devices because it can store high-quality photos in smaller files. The downside is compatibility. Some websites, apps, and older computers do not accept HEIC files, so converting HEIC to JPEG is a very common task.
TIFF
TIFF is often used in professional photography, scanning, publishing, and printing. It can preserve high image quality, but TIFF files are usually large. Use TIFF when quality matters more than file size, such as for archival scans or print production.
GIF
GIF is best known for short animations. It supports limited colors, so it is not ideal for detailed photos. Use GIF for simple animations, memes, and small visual loops, not for high-quality photography.
SVG
SVG is a vector format, meaning it stores shapes and lines instead of pixels. It is perfect for logos, icons, and illustrations that must scale without becoming blurry. You can make an SVG huge enough for a billboard or tiny enough for a browser tab icon, and it will still look sharp.
AVIF
AVIF is a newer image format with excellent compression and quality, especially for web use. It can create very small files, but support can vary depending on the software or platform. For broad everyday compatibility, JPEG and PNG are still safer choices.
How to Convert Pictures to JPEG on Windows
Windows makes basic image conversion simple, especially if you only need to convert one or a few files. The easiest built-in option is Microsoft Paint.
Method 1: Convert an Image Using Paint
- Right-click the image file.
- Select Open with, then choose Paint.
- Click File.
- Select Save as.
- Choose JPEG picture, PNG picture, BMP picture, or another available format.
- Name the file and choose where to save it.
- Click Save.
This is perfect for quick conversions such as PNG to JPEG or BMP to JPEG. Paint is not fancy, but it gets the job done. It is the reliable sandwich of image conversion: not glamorous, but useful.
Method 2: Use the Photos App
On many Windows computers, the Photos app can also save or export images in another format. Open the image, look for the menu options, and choose Save as or Export if available. This method works well for casual users who want a clean, simple interface.
Method 3: Use Batch Conversion Software
If you need to convert dozens or hundreds of images, use a batch image converter. Tools such as IrfanView, XnConvert, Adobe Photoshop, or other desktop software can convert many files at once. Batch conversion is useful for website owners, photographers, ecommerce sellers, and anyone who has ever looked at a folder of 347 images and whispered, “Absolutely not one by one.”
How to Convert Pictures on Mac
Mac users can convert images using Preview, which is included with macOS. Preview is more powerful than many people realize. It can open, crop, annotate, resize, and export images into multiple file types.
Convert an Image Using Preview
- Open the image in Preview.
- Click File in the menu bar.
- Select Export.
- Open the Format dropdown menu.
- Choose JPEG, PNG, HEIC, TIFF, PDF, or another available format.
- Adjust quality if the option appears.
- Click Save.
If you do not see the format you want, some versions of Preview reveal additional options when you hold the Option key while opening the format menu. This is one of those hidden Mac tricks that feels like discovering a secret door in a library.
Convert Multiple Images on Mac
To convert several images, select them in Finder, open them together in Preview, select the thumbnails, and choose File > Export Selected Images. This can save a great deal of time when converting a group of screenshots, vacation photos, or product images.
How to Convert Pictures on iPhone and iPad
Many iPhone photos are saved as HEIC by default because the format is efficient. However, some websites and older devices prefer JPEG. You have several options.
Change Camera Settings to Capture JPEG
To make future photos more compatible, go to Settings > Camera > Formats and choose Most Compatible. This usually saves new photos as JPEG instead of HEIC. The advantage is easy sharing. The downside is that files may take up more storage space.
Use the Files App or Shortcuts
The Shortcuts app can convert images to JPEG, PNG, or other formats through an automation. This is especially helpful if you regularly need to prepare images for a website, school project, online marketplace, or email attachment.
Email or Share to Convert
In some cases, sending or sharing an image from an iPhone may automatically create a more compatible version. Still, for predictable results, a dedicated conversion app or shortcut is better.
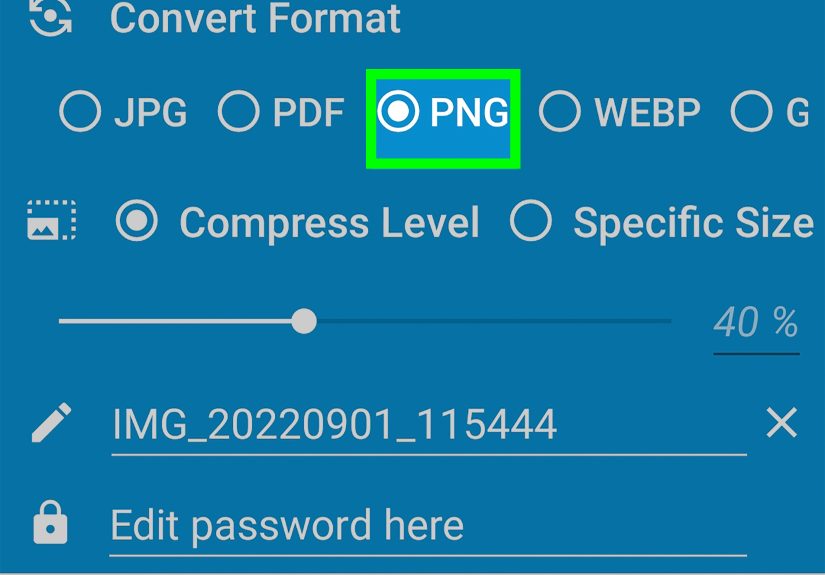
How to Convert Pictures on Android
Android devices vary by brand, but the general process is straightforward. Many gallery apps include editing and export options. You can also use Google Photos, file manager apps, or image converter apps from trusted developers.
Basic Android Conversion Steps
- Open the image in your gallery or photo editor.
- Tap Edit or the menu icon.
- Choose Save copy, Export, or Save as.
- Select the desired format if available.
- Save the new file.
If your built-in gallery does not support file conversion, use a reputable image converter app. Check reviews, permissions, and privacy details before uploading personal photos.
How to Convert Pictures Online
Online image converters are convenient because they work in a browser and do not require installation. They are useful for quick jobs such as converting WebP to JPG, PNG to JPEG, HEIC to JPG, or JPG to PDF.
Typical Online Conversion Steps
- Open a trusted online image converter.
- Upload your picture.
- Select the output format, such as JPEG, PNG, WebP, PDF, or TIFF.
- Adjust quality, size, or compression settings if needed.
- Download the converted file.
Online tools are fast, but be careful with private, sensitive, or confidential images. Avoid uploading documents with personal information, IDs, private family photos, medical records, business contracts, or anything you would not want sitting on someone else’s server. For sensitive files, offline software is safer.
How to Convert PNG to JPEG
Converting PNG to JPEG is one of the most common image conversion tasks. It is useful when you need a smaller file size or when a website does not accept PNG uploads.
Best Use Case
Convert PNG to JPEG when the image is a photograph or a large visual that does not need transparency. If the PNG has a transparent background, converting it to JPEG will remove transparency and replace it with a solid background, often white or black depending on the converter.
Example
Imagine you have a 5 MB PNG product photo for an online store. The image does not need transparency. Converting it to JPEG at 80 percent quality might reduce the file size dramatically while still looking good on the product page.
How to Convert JPEG to PNG
Converting JPEG to PNG can be helpful when you need a format that supports transparency or when you plan to edit the image repeatedly. However, converting a JPEG to PNG does not magically restore quality that was lost during JPEG compression.
Best Use Case
Use PNG for screenshots, graphics with text, logos, interface images, and visual assets that need crisp details. If you are working with a photo, staying with JPEG or converting to WebP may be more practical.
Important Warning
If a JPEG already has compression artifacts, converting it to PNG will preserve those artifacts, not erase them. PNG is not a time machine. It cannot travel back and rescue pixels that were sacrificed in a previous compression battle.
How to Convert HEIC to JPEG
HEIC to JPEG conversion is common for iPhone users. Many modern devices handle HEIC well, but some websites, printers, school portals, and older Windows apps still prefer JPEG.
Best Ways to Convert HEIC
On Mac, open the HEIC file in Preview and export it as JPEG. On Windows, use built-in photo tools, install official extensions if needed, or use trusted conversion software. On iPhone, change the camera setting to Most Compatible for future photos or use the Shortcuts app to convert existing images.
How to Convert WebP to JPEG or PNG
WebP images are common on websites because they can be smaller than traditional formats. But some apps, forms, or older programs may not accept WebP. In that case, convert WebP to JPEG for photos or PNG for graphics with transparency.
Simple WebP Conversion Options
You can open a WebP file in many modern browsers, then use an image editor or converter to save it as another format. Desktop tools, online converters, and advanced editors like Photoshop can also handle WebP in many workflows.
Best Image Format for Different Needs
Not every image should become a JPEG. Choosing the best file extension depends on what you plan to do with the picture.
For Websites and Blogs
Use JPEG for regular photos, PNG for graphics that need transparency, SVG for logos and icons, and WebP or AVIF for performance-focused web images. Always balance image quality with page speed.
For Email Attachments
JPEG is usually the safest choice because it is small and widely supported. If you are sending screenshots with text, PNG may be clearer.
For Printing
Use TIFF, high-quality JPEG, or PDF depending on the printer’s requirements. Avoid over-compressing images before printing because compression can become more visible on paper.
For Logos
Use SVG when possible. Use PNG when you need transparency and your platform does not accept SVG. Avoid JPEG for logos because it can create fuzzy edges and does not support transparent backgrounds.
For Social Media
JPEG and PNG are generally safe. Many platforms compress images automatically, so start with a clean, high-quality file and follow the platform’s recommended dimensions.
How to Convert Images Without Losing Quality
Image conversion can affect quality, especially when converting to a lossy format like JPEG. To keep your pictures looking sharp, follow a few simple rules.
Start With the Best Original File
Always convert from the highest-quality original you have. A large, clean source file gives you more flexibility. A tiny, blurry image downloaded from a chat app will not become a crisp masterpiece just because you save it as PNG.
Do Not Repeatedly Save JPEGs
Every time you edit and resave a JPEG, compression can reduce quality. If you need to make multiple edits, work in PNG, TIFF, PSD, or another editing-friendly format, then export the final version as JPEG.
Use the Right Quality Setting
For most web images, JPEG quality between 75 and 90 percent provides a good balance between file size and appearance. For print or portfolio work, use higher quality. For thumbnails, you can often use more compression.
Resize Before Uploading
If your blog displays images at 1200 pixels wide, uploading a 6000-pixel-wide photo is usually unnecessary. Resize the image first, then compress it. This improves loading speed and saves storage space.
Image Conversion and SEO: Why File Format Affects Search Performance
For website owners, image conversion is not just a technical chore. It can affect SEO, user experience, and page speed. Search engines want pages that load quickly and work well on different devices. Oversized images are one of the easiest ways to slow down a website.
Use Descriptive File Names
Before uploading, rename your image with a descriptive file name. Instead of IMG_8842.jpg, use something like blue-ceramic-coffee-mug.jpg. This helps organization and gives search engines clearer context.
Match the Extension to the Real Format
The file extension should match the actual file type. Do not simply rename a WebP file as JPG. Convert it properly. Mismatched file names can cause display problems and confuse systems that process images automatically.
Compress Images for Faster Loading
Use compression tools to reduce image size without making the picture look poor. For blogs, ecommerce pages, recipe sites, travel galleries, and tutorials, image optimization can make a noticeable difference in loading speed.
Add Useful Alt Text
After converting and uploading your image, write clear alt text that describes the image naturally. Good alt text improves accessibility and helps search engines understand the visual content. Do not stuff keywords into alt text. Search engines are clever enough to notice when your “family hiking photo” mysteriously becomes “best cheap hiking boots waterproof hiking boots hiking boots sale.”
Common Mistakes When Converting Pictures
Mistake 1: Renaming Instead of Converting
Changing .png to .jpg in the file name is not conversion. Use an image editor, export tool, or converter.
Mistake 2: Using JPEG for Transparent Images
JPEG does not support transparency. Use PNG, WebP, or SVG if you need a transparent background.
Mistake 3: Over-Compressing Photos
Smaller is good, but too much compression makes images ugly. Preview the final image before publishing or sending it.
Mistake 4: Uploading Huge Images to Websites
Large images can slow down pages. Resize images to the actual display dimensions before uploading.
Mistake 5: Ignoring Privacy
Online converters are convenient, but sensitive images should be converted offline whenever possible.
Recommended Workflow for Converting Pictures
Here is a simple workflow that works for most users:
- Decide where the image will be used: web, print, email, storage, or editing.
- Choose the best format for that purpose.
- Start with the highest-quality original file.
- Resize the image if needed.
- Convert using a trusted tool.
- Check the final file size and image quality.
- Rename the file clearly before uploading or sharing.
For example, if you are preparing a blog post, you might start with a high-resolution photo, resize it to 1200 pixels wide, export it as WebP for performance, and keep a JPEG backup for compatibility. If you are preparing a logo, you might keep the original SVG and export a PNG version for platforms that do not accept SVG.
Real-World Experiences With Converting Pictures
After years of working with digital images for websites, documents, social posts, and client projects, one lesson becomes very clear: the “best” image format is not always the fanciest one. It is the one that fits the job. A beautifully compressed AVIF file is impressive, but if the platform refuses to upload it, congratulations, you now own a very efficient problem.
One common experience involves iPhone photos. Someone takes a great picture, uploads it to a form, and gets an error message because the file is HEIC. The fastest fix is usually converting the image to JPEG. On a Mac, Preview handles this neatly. On Windows, the process may require built-in support, an extension, or a converter. The important thing is knowing that nothing is “wrong” with the photo. It is simply in a format the receiving system does not understand.
Another everyday situation happens with PNG screenshots. Screenshots often look sharp as PNG files because text, buttons, and interface elements stay crisp. But when those screenshots are uploaded to a website without resizing, the file size can become unnecessarily large. Converting every screenshot to JPEG may reduce size, but it can also blur text. A better approach is to resize the PNG, compress it, and only convert to JPEG if the image is more photo-like than text-heavy.
Website owners often learn image conversion the hard way. A page may look gorgeous but load slowly because it contains massive uncompressed images. The solution is not to delete the visuals. Images are valuable for engagement, tutorials, ecommerce, and storytelling. The solution is to convert and optimize them correctly. Product photos often work well as JPEG or WebP. Logos should usually be SVG or PNG. Decorative images can often be compressed more aggressively than hero images or portfolio pieces.
For print projects, the experience is different. A tiny JPEG that looks fine on a phone may look soft or pixelated on a flyer. Print usually needs higher resolution and less aggressive compression. This is where TIFF, PDF, or high-quality JPEG files become useful. The best habit is to ask the printer what format they prefer before converting. It saves time, avoids awkward rework, and prevents the classic “why does this look crunchy?” moment.
Social media adds another twist. Platforms often compress images after upload, so uploading an already over-compressed file can make the final version look worse. A good strategy is to start with a clean, properly sized JPEG or PNG. Do not upload a giant image if the platform will crush it anyway, but do not upload a tiny image and expect magic either.
Online converters are helpful, especially when you need a quick WebP-to-JPG or HEIC-to-JPEG conversion. Still, privacy matters. I would use online tools for ordinary graphics, blog images, or public-facing visuals. I would avoid them for private IDs, confidential documents, personal records, or sensitive business files. Offline tools may feel less exciting, but they keep your files on your own device.
The most useful habit is keeping an original copy. Before converting, duplicate the file. That way, if the converted version looks bad, has the wrong background, or loses detail, you can return to the source. Image conversion is easy, but it is not always reversible. Once quality is lost through compression, you cannot fully restore it by changing the extension again.
In practice, the simplest rule is this: JPEG for photos, PNG for transparency and screenshots, SVG for logos, WebP for fast websites, TIFF for high-quality print or archiving, GIF for simple animation, and PDF for sharing image-based documents. That rule will not solve every advanced design problem, but it will handle most real-life situations without causing a file-format headache.
Conclusion
Learning how to convert pictures to JPEG or other file extensions gives you more control over image quality, file size, compatibility, and performance. Whether you are uploading photos to a website, sending images by email, preparing files for print, or converting HEIC images from your phone, the right format makes the process smoother.
JPEG is still the everyday champion for photos and broad compatibility. PNG is excellent for transparency and crisp graphics. WebP and AVIF are powerful for web performance. TIFF is strong for professional quality. SVG is ideal for scalable logos and icons. The trick is not memorizing every technical detail; it is choosing the format that matches your goal.
Use trusted tools, keep original files, avoid unnecessary recompression, and remember that renaming a file is not the same as converting it. Once you understand that, image conversion becomes less mysterious and much more useful. The file extensions may still look like tiny computer hieroglyphics, but now you know how to read them.






