
Table of Contents >> Show >> Hide
- Introduction: When Your Mac Speaks the Wrong Keyboard Language
- What Does “Keyboard Language” Mean on a Mac?
- How to Change the Keyboard Language of a Mac in 10 Steps
- Step 1: Open the Apple Menu
- Step 2: Choose System Settings
- Step 3: Click Keyboard in the Sidebar
- Step 4: Find the Text Input Section
- Step 5: Click Edit Next to Input Sources
- Step 6: Click the Plus Button to Add a Language
- Step 7: Search for Your Preferred Keyboard Language
- Step 8: Preview the Keyboard Layout
- Step 9: Select the Layout and Click Add
- Step 10: Switch to the New Keyboard Language
- How to Show the Keyboard Language Menu in the Menu Bar
- Mac Keyboard Language Shortcuts You Should Know
- How to Change the Keyboard Shortcut for Mac Input Sources
- How to Remove a Keyboard Language on Mac
- How to Use Keyboard Viewer to Check a Mac Layout
- Common Problems When Changing Keyboard Language on Mac
- Best Practices for Managing Multiple Keyboard Languages
- Specific Examples: Choosing the Right Mac Keyboard Language
- Extra Experience: What I Learned From Changing Mac Keyboard Languages Often
- Conclusion
- SEO Tags
Note: This article is written from current, real macOS keyboard and input-source guidance, including Apple’s own support documentation and practical Mac-user troubleshooting practices. It is original, web-publishing-ready HTML with no source-link clutter.
Introduction: When Your Mac Speaks the Wrong Keyboard Language
Changing the keyboard language on a Mac sounds like it should be a tiny task. Click one button, choose a language, and boom: your keyboard suddenly understands French accents, Spanish punctuation, Vietnamese tones, Japanese kana, or whichever layout your fingers are trying to produce. In reality, many Mac users discover the setting while typing an email and wondering why the quotation mark has gone on vacation.
The good news is that macOS makes it fairly simple once you know where to look. The feature you want is called an input source. In plain English, an input source is the keyboard layout or typing method your Mac uses to interpret your physical keys. For example, the same key may type one character in a U.S. layout, a different character in a British layout, and something completely different in a Japanese or Korean input method. Your Mac is not being dramatic; it is just following the layout you selected.
In this guide, you will learn how to change the keyboard language of a Mac in 10 steps, how to switch between languages quickly, how to show the language menu in the menu bar, how to use keyboard shortcuts, and how to fix common keyboard language problems. Whether you are writing school notes in English, messaging family in another language, coding with a U.S. layout, or trying to type an accent without summoning a tiny keyboard demon, this guide will walk you through it clearly.
What Does “Keyboard Language” Mean on a Mac?
Before clicking around System Settings, it helps to understand one important difference: your Mac’s system language and your keyboard language are not the same thing.
System Language vs. Keyboard Input Language
The system language controls menus, buttons, alerts, and other interface text. For example, if your Mac system language is English, you will see “System Settings,” “Finder,” and “File.” If you change it to Spanish, many interface items may appear in Spanish.
The keyboard input language, however, controls what appears when you type. You can keep your Mac interface in English while typing in German, French, Vietnamese, Arabic, Japanese, Chinese, Korean, Greek, or many other languages. That is useful because most people do not want their entire computer interface to change just because they need to write one polite email with three accent marks and a heroic amount of punctuation.
What Is an Input Source?
On macOS, Apple calls keyboard languages and keyboard layouts “input sources.” An input source can be a simple keyboard layout, such as U.S., British, German, or French. It can also be a more advanced input method, such as Chinese Pinyin, Japanese Romaji, Korean 2-Set, or handwriting input where available.
Once you add more than one input source, your Mac gives you several ways to switch between them. You can use the menu bar, the Control + Space shortcut, the Globe key or Fn key on supported keyboards, or special options like Caps Lock switching for certain Latin and non-Latin layouts.
How to Change the Keyboard Language of a Mac in 10 Steps
Here is the main tutorial. These steps apply to modern macOS versions that use System Settings. If you are using an older Mac version that says System Preferences instead, the idea is similar: open Keyboard settings, find Input Sources, and add the layout you need.
Step 1: Open the Apple Menu
Click the Apple logo in the top-left corner of your screen. This menu is the starting point for many Mac settings. It is also where Mac users go when they pretend they are calmly troubleshooting instead of whispering, “Why is my keyboard doing this?”
Step 2: Choose System Settings
From the Apple menu, select System Settings. On older macOS versions, you may see System Preferences. Both lead to the control center for your Mac’s behavior, including keyboard language, shortcuts, display settings, trackpad options, and more.
Step 3: Click Keyboard in the Sidebar
In System Settings, scroll down the left sidebar and click Keyboard. This section controls typing behavior, keyboard shortcuts, text input, function keys, dictation, and input sources. If the sidebar feels long, do not panic. Apple placed many settings here, and yes, everyone scrolls past the thing they need at least once.
Step 4: Find the Text Input Section
Inside Keyboard settings, look for the Text Input area. This is where macOS manages the input sources used for typing. You should see an option related to Input Sources, usually with an Edit button next to it.
Step 5: Click Edit Next to Input Sources
Click Edit. A new window or panel will open showing your current keyboard input sources. If you only use one language, you might see something like U.S., ABC, British, or another default layout. This list tells your Mac which keyboard layouts are available for typing.
Step 6: Click the Plus Button to Add a Language
Click the plus (+) button, usually found near the lower-left area of the input source list. This opens a list of languages and keyboard layouts. You can browse manually or use the search field to find the language you want faster.
Step 7: Search for Your Preferred Keyboard Language
Type the language or layout name into the search box. For example, you might search for Spanish, French, German, Vietnamese, Japanese, Korean, Chinese, Arabic, or Hindi. Some languages include multiple input methods, so choose carefully. For instance, Chinese may offer Pinyin, Zhuyin, Stroke, or handwriting options. Japanese may offer Romaji or Kana-based input options.
Step 8: Preview the Keyboard Layout
When available, macOS shows a preview of the keyboard layout. This is very helpful because two layouts for the same language may behave differently. For example, a French keyboard layout is not identical to a U.S. keyboard layout with French accents. German layouts move some punctuation. British and U.S. English layouts look similar until you need symbols such as quotation marks, the at sign, or the pound sign.
Take a moment to inspect the layout. Your future self, typing a password with special characters, will appreciate this tiny act of kindness.
Step 9: Select the Layout and Click Add
Choose the keyboard language or input method you want, then click Add. The new input source will now appear in your list. You can add more than one if you regularly switch between languages. Many bilingual and multilingual Mac users keep two, three, or even more input sources ready.
Step 10: Switch to the New Keyboard Language
After adding the new language, switch to it using the Input menu in the menu bar, the Control + Space keyboard shortcut, or the Globe/Fn key if your keyboard supports it and is configured for input source switching. Open Notes, TextEdit, Pages, Safari, or any text field and test the layout. Type a few sample words, punctuation marks, and special characters to make sure everything works as expected.
How to Show the Keyboard Language Menu in the Menu Bar
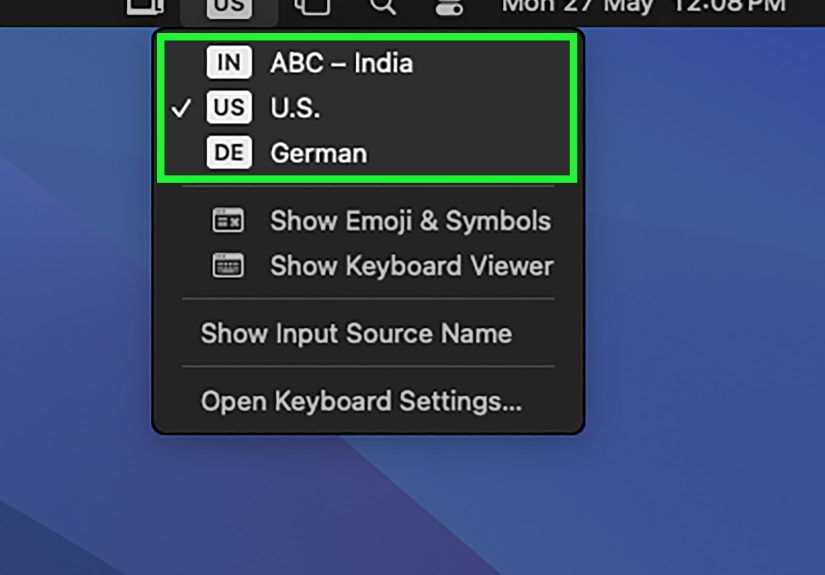
The easiest way to see and change your current Mac keyboard language is to show the Input menu in the menu bar. This menu usually appears near the top-right corner of the screen. Depending on your settings, it may show a language abbreviation, a flag-style icon in older versions, or an input symbol.
Turn On the Input Menu
Go to Apple menu > System Settings > Keyboard > Text Input > Edit. Then turn on Show Input menu in menu bar. Once enabled, you can click the menu bar icon and choose your keyboard language whenever you need to switch.
This is especially useful if you forget which language is active. Without the menu, you may only notice the wrong layout when your sentence turns into a mysterious soup of misplaced symbols.
Use the Menu Bar for Quick Switching
After the Input menu is visible, click it and select the language or layout you want. This method is simple, visual, and beginner-friendly. It is also great for people who do not want to memorize shortcuts. Not every computer task needs to feel like entering a secret code to open a treasure chest.
Mac Keyboard Language Shortcuts You Should Know
Once you have more than one input source, shortcuts can make language switching much faster. This is where your Mac starts to feel smoother, especially if you often move between English and another language.
Control + Space
The common shortcut for switching to the previous input source is Control + Space. If you use two keyboard languages, this shortcut often works like a toggle. Press it once to switch from English to your second language. Press it again to switch back.
Control + Option + Space
If you use several input sources, Control + Option + Space can move through the next available input source in the list. This is helpful if you use three or more languages, although it may take a little practice. Otherwise, you may accidentally cycle from English to French to Japanese while trying to type one sentence. Multilingual? Yes. Efficient? Not always.
Globe Key or Fn Key
Many modern Apple keyboards include a Globe key, sometimes shared with the Fn key. In Keyboard settings, you can set the Globe or Fn key to Change Input Source. Once configured, pressing that key can help you switch keyboard languages quickly.
Caps Lock for Some Non-Latin Input Sources
For certain language combinations, macOS can use Caps Lock to switch between a Latin input source and a non-Latin input source. This is commonly useful for users typing in languages such as Chinese, Korean, or Japanese while also using English. The exact option depends on the input source you add.
How to Change the Keyboard Shortcut for Mac Input Sources
If the default shortcut conflicts with Spotlight, app shortcuts, or your personal muscle memory, you can change it. Go to System Settings > Keyboard > Keyboard Shortcuts, then look for Input Sources. From there, you can enable, disable, or modify shortcuts for switching input sources.
When choosing a custom shortcut, pick something you will not press by accident. For example, do not choose a shortcut already used by your writing app, coding editor, browser, or game. Your keyboard should switch languages when you ask it to, not when it gets bored.
How to Remove a Keyboard Language on Mac
If you added the wrong keyboard language, removing it is simple. Open System Settings > Keyboard > Text Input > Edit. Select the input source you no longer want, then click the minus (-) button. macOS will remove it from your list.
Keep at least one input source installed. Your Mac needs a keyboard layout to type. Removing extra languages can make the Input menu cleaner and reduce accidental switching.
How to Use Keyboard Viewer to Check a Mac Layout
The Keyboard Viewer is one of the most useful tools for anyone changing keyboard language on a Mac. It shows an on-screen keyboard that updates based on your selected input source. This lets you see which physical keys produce which characters.
Open Keyboard Viewer
First, make sure the Input menu is visible in the menu bar. Then click the Input menu and choose Show Keyboard Viewer. If you switch to another input source, the viewer updates to show that layout.
Use Modifier Keys
Hold Shift, Option, or Shift + Option to see alternate characters. This is excellent for finding accented letters, currency symbols, punctuation marks, and special characters. It is also a lifesaver when your keyboard insists that the symbol you want is hiding somewhere like a tiny digital raccoon.
Common Problems When Changing Keyboard Language on Mac
The Input Menu Does Not Appear
If you do not see the Input menu in the menu bar, return to System Settings > Keyboard > Text Input > Edit and enable Show Input menu in menu bar. Also make sure you have added more than one input source. If only one layout is installed, there may be nothing meaningful to switch.
The Shortcut Does Not Work
If Control + Space does not switch languages, check System Settings > Keyboard > Keyboard Shortcuts > Input Sources. The shortcut may be disabled, changed, or conflicting with another macOS shortcut such as Spotlight. Adjust it if necessary.
The Wrong Symbols Appear
If you press one key and get an unexpected character, you may be using the wrong keyboard layout. For example, U.S. and British layouts can differ in symbol placement. French, German, and other layouts may place punctuation in different positions. Open Keyboard Viewer to confirm the active layout.
The Language Changes Unexpectedly
Some users accidentally press the language shortcut while typing. If this happens often, change the shortcut to something less likely to be pressed by mistake. You can also remove input sources you rarely use.
An App Does Not Support the Selected Input Source
In some cases, an app or text field may not fully support a specific input method. Try another app such as Notes or TextEdit to test whether the issue is system-wide or app-specific. If the input source works elsewhere, the problem may be with that app rather than your Mac settings.
Best Practices for Managing Multiple Keyboard Languages
Keep Your Input Source List Simple
Only keep the keyboard languages you actually use. A shorter list makes switching faster and reduces confusion. If you are learning a language, add it while practicing, but remove layouts you no longer need.
Put Your Most Used Languages First
Arrange your input sources in a logical order if macOS allows it in your version. For example, keep English first, your second language next, and specialized layouts after that. This makes shortcut cycling more predictable.
Test Password Symbols Before You Need Them
This is important: keyboard layouts affect symbols. If your password contains characters like @, #, $, %, &, quotes, or brackets, a different input source may place them in unexpected locations. Before logging into something important, make sure the correct keyboard language is active.
Use One Layout for Coding
If you write code, you may prefer a layout where brackets, braces, semicolons, slashes, and quotes are easy to reach. Many developers keep a U.S. layout available even if they write daily messages in another language.
Use Keyboard Viewer for Learning
Keyboard Viewer is not just for troubleshooting. It is also a learning tool. If you are learning to type in a new language, keep it open while practicing. Over time, your fingers will learn where the characters live.
Specific Examples: Choosing the Right Mac Keyboard Language
Example 1: English and Spanish
If you mostly type in English but occasionally need Spanish accents, you may not need a full Spanish keyboard layout. You can use the U.S. layout and long-press letters for accents in many apps, or use Option-key combinations. However, if you write Spanish often, adding a Spanish input source may feel more natural.
Example 2: English and Vietnamese
Vietnamese typing often requires an input method that supports tones and diacritics efficiently. Add a Vietnamese input source and test the available typing method. Once you find the style that matches your habit, switching between English and Vietnamese becomes much faster.
Example 3: English and Japanese
For Japanese, you may add a Japanese input source and use Romaji input if you prefer typing Japanese sounds with Latin letters. You can then convert text into hiragana, katakana, or kanji depending on the input method. This is more than a layout change; it is a full input method.
Example 4: U.S. and British English
U.S. and British English layouts look similar, but symbol placement can differ. If you bought a keyboard from one region but use the layout from another, some characters may not match the printed keys. Choose the layout that matches your physical keyboard if you want the least confusion.
Extra Experience: What I Learned From Changing Mac Keyboard Languages Often
After working with different Mac keyboard languages, one lesson becomes clear very quickly: the best setup is not always the most “complete” setup. It is the setup that matches how you actually type. Many users add five languages because it feels powerful, then spend the next week accidentally switching layouts every time they hit a shortcut. A clean input source list is usually better than a crowded one.
The first practical experience is to always test the layout in a simple app before using it in something important. Notes, TextEdit, or a blank search field works perfectly. Type common words, punctuation, numbers, email symbols, and any special characters you use regularly. This five-minute test can prevent a lot of confusion later, especially when typing passwords. Nothing creates instant keyboard anxiety like pressing the key for “@” and getting something else while a login page stares silently at you.
The second experience is that the menu bar input indicator is worth enabling. Some advanced users hide menu bar icons to keep things minimal, but the input menu is one of those tiny icons that earns its rent. When you can see the active keyboard language at a glance, you immediately know whether your Mac is ready for English, Vietnamese, French, Japanese, or another layout. Without that indicator, you often discover the wrong language only after typing half a sentence that looks like it was assembled by a confused robot.
The third experience is to choose shortcuts carefully. Control + Space is convenient, but it can overlap with habits from other apps or systems. If you use Spotlight, coding tools, writing apps, remote desktops, or virtual machines, shortcut conflicts can happen. When a shortcut feels unreliable, do not assume your Mac is broken. Check Keyboard Shortcuts and see whether another feature is using the same combination. A small shortcut adjustment can make the entire typing experience feel smoother.
The fourth experience is that different tasks may need different layouts. For normal writing, you may prefer your native-language layout. For coding, you might switch to U.S. because brackets, braces, and punctuation are easier to access in many programming contexts. For academic work, you may need accents, phonetic marks, or symbols. Instead of forcing one layout to do everything, let each input source do the job it is best at. Your keyboard is a tool, not a loyalty test.
The fifth experience is to use Keyboard Viewer more often than you think you need to. Many people ignore it because it looks basic, but it solves real problems. It shows where characters are, how the layout changes with Shift and Option, and whether the active input source matches what you expected. For anyone learning a new keyboard language, Keyboard Viewer is like training wheels with a PhD. It quietly teaches your fingers where to go.
The sixth experience is that physical keyboard labels matter. If your MacBook has a U.S. keyboard but you select a French layout, the letters and symbols on the physical keys may not match what appears on screen. This is not an error; it is how layouts work. You can still use the layout, but you will rely more on memory or Keyboard Viewer. For long-term comfort, match the input source to your physical keyboard whenever possible, unless you intentionally need a different language layout.
Finally, remember that changing the keyboard language on a Mac is not permanent or scary. You can add, remove, reorder, test, and adjust input sources whenever your needs change. Today you may need Spanish accents for homework. Tomorrow you may need Japanese input for practice. Next week you may remove a layout because you accidentally triggered it during a chat and typed three lines of punctuation soup. That is normal. The perfect Mac keyboard setup is the one that helps you type faster, make fewer mistakes, and spend less time arguing with punctuation.
Conclusion
Learning how to change the keyboard language of a Mac in 10 steps is mostly about knowing where Apple keeps the setting. Open System Settings, go to Keyboard, edit Text Input, add your preferred input source, and switch using the menu bar, shortcut, Globe key, or Fn key. Once the setup is done, multilingual typing becomes much easier.
The most important tips are simple: enable the Input menu, test your layout before serious typing, use Keyboard Viewer when symbols look strange, and keep your input source list tidy. Your Mac can handle many languages gracefully, but it still needs you to choose the right layout. Think of it like giving your keyboard a passport. Once it has the right one, it travels between languages without making a scene at the punctuation border.






