Table of Contents >> Show >> Hide
- What Does “Hacking” A Pi Camera Mean?
- Why Use A Nikon Lens On A Raspberry Pi Camera?
- The Best Pi Camera For Nikon Lens Experiments
- The Lens Mount Problem: Flange Distance Matters
- Understanding Crop Factor On A Pi Camera
- Parts You Need For The Build
- Step-By-Step: How To Attach A Nikon Lens To A Pi Camera
- Software Tips For Better Results
- Common Problems And How To Fix Them
- Best Use Cases For A Nikon Lens Pi Camera
- Safety And Handling Advice
- Field Experience: What It Feels Like To Hack A Pi Camera With A Nikon Lens
- Conclusion
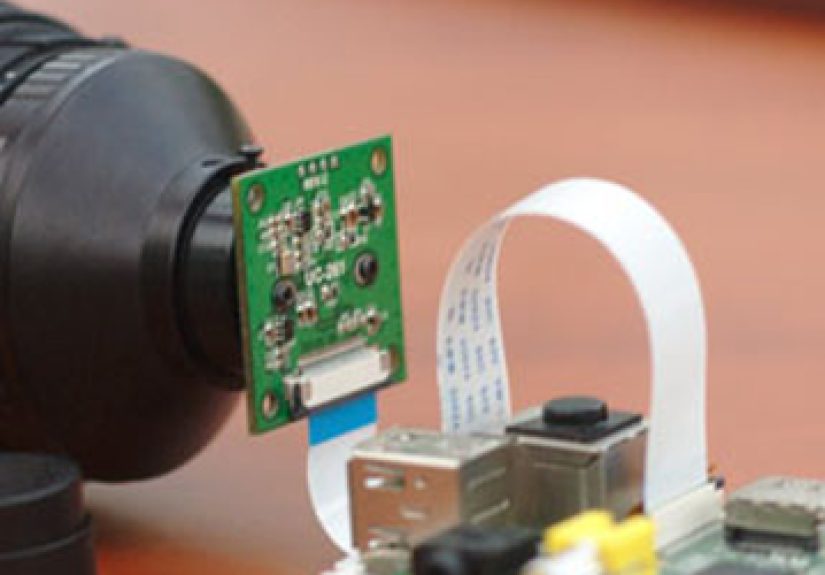
There is a special kind of joy in looking at a tiny Raspberry Pi camera board, then looking at a serious Nikon lens, and thinking, “Yes, these two should absolutely talk to each other.” On paper, it sounds ridiculous: a small single-board computer camera module meeting glass designed for full-size photography. In practice, hacking a Pi camera with a Nikon lens can become a surprisingly capable DIY imaging project for macro photography, time-lapse work, wildlife watching, machine vision experiments, astrophotography tinkering, and the sort of weekend project that starts with one adapter and ends with your desk looking like a camera repair shop.
The idea is simple: use Raspberry Pi as the brain, a Pi camera as the sensor, and a Nikon lens as the optical upgrade. The challenge is that cameras are fussy little machines. Lenses expect the sensor to sit at an exact distance. The Pi camera board expects a much smaller lens. Nikon F-mount lenses were built around a large imaging circle. Raspberry Pi camera sensors are tiny by comparison. Put them together casually and you get blur, weird color, heavy cropping, and possibly a lesson in humility. Put them together carefully and you get a compact, programmable camera system with real photographic character.
What Does “Hacking” A Pi Camera Mean?
In this context, “hacking” does not mean breaking into anything. Nobody is asking your Raspberry Pi to wear a hoodie and type dramatically in the dark. It means modifying, adapting, and creatively combining hardware to do something outside its original use case. A standard Raspberry Pi Camera Module is normally used with its own tiny lens. The Raspberry Pi High Quality Camera, on the other hand, was designed for interchangeable C-mount and CS-mount lenses, making it a much friendlier starting point for lens experiments.
When people talk about attaching a Nikon lens to a Pi camera, they usually mean one of two routes. The older, more DIY-heavy route involves removing or bypassing the small stock lens on a Pi camera module and physically positioning a Nikon lens in front of the sensor. The cleaner and more practical route uses the Raspberry Pi High Quality Camera with a Nikon F-mount to C-mount adapter. The second option is far easier, more stable, and less likely to turn your camera board into modern art.
Why Use A Nikon Lens On A Raspberry Pi Camera?
Nikon lenses are popular because many photographers already own them, used manual lenses are widely available, and F-mount glass has a long history. A vintage Nikon 50mm lens, a macro lens, or a telephoto lens can give a Raspberry Pi project optical reach that a tiny board-camera lens simply cannot match. Better glass can improve sharpness, contrast, manual control, close-up capability, and creative rendering.
The Raspberry Pi side brings something a traditional camera cannot: programmability. You can trigger captures with Python, run time-lapse scripts, stream video, perform computer vision, automate exposure tests, or build a remote camera trap. A Nikon DSLR may take prettier photos out of the box, but it will not usually sit inside a birdhouse, run a custom script, and email you when a squirrel commits crimes against your feeder.
The Best Pi Camera For Nikon Lens Experiments
Raspberry Pi High Quality Camera
The Raspberry Pi High Quality Camera is the most practical choice for this project. It uses a 12.3-megapixel Sony IMX477 sensor, supports RAW output, includes an integrated IR-cut filter, and comes in versions intended for interchangeable lens mounts. The CS-mount version can accept CS-mount lenses directly and C-mount lenses with the included C-CS adapter ring. Because Nikon F lenses can be adapted to C-mount, the HQ Camera gives you a logical mechanical path from Nikon glass to Pi sensor.
This camera is also physically easier to mount. It includes a tripod mount, has a more robust board design than the tiny camera modules, and is widely supported by Raspberry Pi camera software. For a Nikon-lens build, that matters. A heavy lens hanging from a tiny camera board is not a camera; it is a physics demonstration waiting to happen.
Raspberry Pi Camera Module 3
The Camera Module 3 is impressive in its own right. It has a 12-megapixel sensor, autofocus, HDR support, and compact size. However, it is not the easiest choice for Nikon lens hacking because its built-in lens assembly is not meant to accept large interchangeable lenses. You can experiment with lens removal and custom mounts, but the work becomes more delicate and less forgiving. For most builders, the HQ Camera remains the better platform.
The Lens Mount Problem: Flange Distance Matters
The most important technical concept in this project is flange focal distance. This is the distance between the lens mount flange and the camera sensor. If that spacing is wrong, the lens may not focus correctly. It might focus only very close. It might never reach infinity. It might appear almost sharp, which is somehow more annoying than being completely wrong.
Nikon F-mount lenses use a flange focal distance of about 46.5 mm. C-mount cameras use a flange focal distance of about 17.526 mm. That means a Nikon F to C-mount adapter must create the correct extra spacing so the Nikon lens sees the Pi camera sensor where it expects film or a digital sensor to be. In simple terms, the adapter is not just a metal tube; it is a precision spacer with a job.
For a Raspberry Pi HQ Camera, the clean setup usually looks like this: Nikon F lens, Nikon F to C-mount adapter, C-CS adapter ring if required, Raspberry Pi HQ Camera, ribbon cable, Raspberry Pi board. Once assembled, focusing and aperture are typically controlled manually on the lens. Older Nikon lenses with physical aperture rings are especially convenient. Some newer Nikon G-type lenses do not have aperture rings, so controlling aperture can require a special adapter with a mechanical lever.
Understanding Crop Factor On A Pi Camera
A Nikon lens was designed to project an image circle large enough for 35mm film or a DSLR sensor. The Raspberry Pi HQ Camera sensor is much smaller, with a diagonal of about 7.9 mm. This means the Pi sensor captures only the central portion of the lens image. The result is a very strong crop factor.
That crop can be useful or annoying depending on your goal. If you mount a 50mm Nikon lens, it will not look like a normal 50mm lens on a full-frame camera. It behaves more like a narrow telephoto view because the small sensor sees only the middle of the image. For wildlife, moon shots, or distant objects, this can feel like a free telescope coupon. For wide landscapes, it feels like trying to photograph a mountain through a straw.
Parts You Need For The Build
A basic Nikon lens Raspberry Pi camera build does not require a giant parts list, but the parts should be chosen carefully. The foundation is a Raspberry Pi board, such as a Raspberry Pi 4 or Raspberry Pi 5, paired with the Raspberry Pi High Quality Camera. You also need a Nikon F-mount lens, a Nikon F to C-mount adapter, the appropriate C-CS adapter ring when needed, a camera ribbon cable, a stable mounting plate or tripod, and a power supply that will not flinch when the Pi starts working.
For software, modern Raspberry Pi OS uses camera tools based around libcamera and rpicam applications. The typical commands include still capture, video capture, preview, exposure control, white balance settings, and RAW capture. You can also work with Picamera2 in Python if you want to script captures, automate intervals, or integrate the camera into a larger project.
Step-By-Step: How To Attach A Nikon Lens To A Pi Camera
1. Prepare The Raspberry Pi
Start with a current Raspberry Pi OS installation and update your system. Connect the HQ Camera to the camera port using the ribbon cable, making sure the cable orientation is correct. Camera ribbon cables are small, fragile, and emotionally sensitive. Treat them gently. After booting, test the camera with a simple preview or still-capture command before attaching complicated optics. This confirms that the Pi, cable, and camera board are working.
2. Mount The Adapter
Thread the C-mount side of the Nikon adapter onto the HQ Camera. If your setup requires the C-CS adapter ring, install it according to the adapter and camera instructions. Do not force threads. Cross-threading camera hardware is a fast way to turn a fun project into a shopping trip.
3. Attach The Nikon Lens
Attach the Nikon lens to the F-mount side of the adapter. Make sure it locks securely. If the lens is large, support the lens rather than letting the camera board carry the weight. A metal lens can easily overpower a tiny circuit board. Use a tripod collar, rail system, printed bracket, or improvised support that does not put stress on the camera mount.
4. Set Manual Focus And Aperture
Most Nikon lens control will be manual. Set the aperture on the lens if it has an aperture ring. Start with a moderate aperture such as f/5.6 or f/8 for easier focusing and better sharpness. Open wider when you need more light or shallow depth of field. Use the lens focus ring while watching a live preview. Fine focus is easier with a high-contrast subject, digital zoom preview, or a printed focus chart.
5. Capture Test Images
Take several test shots at different focus distances, apertures, exposure times, and ISO settings. Check the images on a larger screen. Do not judge focus only from the small preview window. A shot can look crisp in preview and then reveal itself as pudding when opened at full resolution. That is not failure; that is calibration wearing a tiny hat.
Software Tips For Better Results
Raspberry Pi camera software allows control over exposure, gain, white balance, resolution, and output format. For still photography, capturing RAW files can preserve more image data for editing. For video, 1080p capture is practical and widely supported. If you are building a time-lapse system, script your captures so the camera shoots at fixed intervals and saves files with organized names.
White balance deserves special attention. Pi camera processing is often tuned for the official small lenses and sensor behavior. When you place a Nikon lens in front of the sensor, color response may not look exactly like a normal camera. You may see color casts, contrast changes, or unexpected vignetting. Manual white balance and post-processing can help. For critical work, photograph a gray card under the same light and use it as a correction reference.
Common Problems And How To Fix Them
The Image Is Blurry Everywhere
Check the adapter spacing first. If the lens cannot focus at any distance, the flange distance may be wrong, or the adapter stack may be missing or adding too much spacing. Also confirm that the lens aperture is not stuck closed and that the sensor is not covered by dust, film, or a forgotten cap. Yes, forgotten lens caps happen. They are the banana peels of photography.
The Camera Cannot Focus To Infinity
This usually means the lens is sitting too far from the sensor. Even a small spacing error can prevent infinity focus. Try removing unnecessary rings, checking the adapter type, and confirming that you are using a Nikon F to C-mount adapter rather than a visually similar but incorrect part.
The View Is Too Zoomed In
This is normal. The small Pi sensor crops the lens image dramatically. Use a shorter focal length lens if you need a wider field of view. A 24mm Nikon lens may still look telephoto-like compared with its behavior on a full-frame camera, but it will be wider than a 50mm or 100mm lens.
The Colors Look Strange
Try manual white balance, shoot RAW, and correct colors in editing. The camera’s processing pipeline may not perfectly match the optical characteristics of your adapted lens. Different Nikon lenses can also transmit color slightly differently, especially older glass with aged coatings.
Best Use Cases For A Nikon Lens Pi Camera
A Nikon lens on a Raspberry Pi camera is excellent for experiments where control matters more than convenience. Macro photography is a strong use case because the crop factor and manual focus can produce dramatic close-up views. Add controlled lighting and a stable mount, and the setup can capture circuit boards, insects, coins, plants, or tiny mechanical parts with impressive detail.
Wildlife and bird feeder projects are another natural fit. A telephoto Nikon lens combined with automated capture can create a smart camera trap. With software, the Pi can detect motion, record video clips, or save images only when something enters the frame. The local squirrel population may not appreciate the surveillance, but science demands sacrifice.
Astrophotography is possible, especially for the moon and bright objects, although it requires patience. A stable tripod, careful focus, low vibration, and manual exposure are essential. For deep-sky imaging, sensor size, noise, tracking, and exposure limitations become more challenging, but the project can still be a fantastic learning tool.
Safety And Handling Advice
Always support the lens. Never let a heavy Nikon lens hang from the Raspberry Pi camera board unsupported. Avoid touching the sensor or exposing it to dust. Work in a clean area when changing adapters. Power down the Raspberry Pi before connecting or disconnecting the camera ribbon cable. If you design a 3D-printed mount, make sure it is rigid enough to hold alignment, because even tiny flex can ruin focus.
Also remember that sunlight through a telephoto lens can be intense. Do not point the camera directly at the sun without proper solar filtration. This can damage sensors and eyesight. A DIY camera project should end with cool photos, not with a melted sensor and a dramatic story you repeat at parties.
Field Experience: What It Feels Like To Hack A Pi Camera With A Nikon Lens
The first lesson from building a Pi camera with a Nikon lens is that the project rewards patience more than brute force. The parts may fit together in minutes, but getting a clean image can take much longer. Focus is the first battle. A Nikon manual lens feels smooth and precise on a regular camera, but on a tiny Pi sensor the depth of field and crop make every small movement look dramatic. You turn the focus ring a hair, and the image jumps from “almost sharp” to “abstract painting of a chair.” A live preview helps, but a larger monitor helps even more.
The second lesson is that mounting matters as much as optics. At first, it is tempting to hold the camera in one hand and the lens in the other just to see if the setup works. That experiment usually produces one usable frame, three blurry mysteries, and a deep respect for tripods. A solid rail, bracket, or tabletop rig changes everything. Once the lens and camera stop wobbling, exposure tests become repeatable, focus becomes manageable, and the whole project starts feeling like an instrument instead of a balancing act.
Lighting is the third big surprise. A Raspberry Pi camera with a Nikon lens can produce lovely detail, but it needs thoughtful light. Indoors, small changes in lamp position can create big differences in contrast and color. For macro shots, a cheap LED panel or diffused desk lamp can make the image look dramatically better. Harsh light creates shiny hotspots, especially on electronics, coins, or glossy objects. Diffusion is your friend. A piece of white paper, a small softbox, or even a translucent plastic container can turn a harsh lamp into a usable mini studio.
Another practical experience is that old manual Nikon lenses are often more enjoyable than newer electronic lenses. A lens with a physical aperture ring feels made for this kind of project. You can stop down, open up, and see the effect immediately. With some newer lenses, aperture control depends on camera-body communication or mechanical adapters, which adds complexity. For DIY Raspberry Pi photography, simple glass is often better glass.
Post-processing also becomes part of the workflow. Straight-out-of-camera images may look flat, tinted, or too contrasty. That does not mean the hack failed. It simply means the Pi camera pipeline and the adapted lens need a little help. Shooting RAW, correcting white balance, adjusting contrast, and sharpening carefully can transform a test shot into something surprisingly polished. The best mindset is to treat the Pi as a programmable imaging platform, not as a finished consumer camera.
The most satisfying part is seeing a tiny computer capture an image through a lens that once belonged on a serious camera body. It feels slightly absurd in the best possible way. You get the charm of old optics, the flexibility of code, and the freedom to build a camera for one exact purpose. Whether that purpose is watching plants grow, photographing watch parts, filming a 3D printer, or catching backyard birds in the act, hacking a Pi camera with a Nikon lens turns ordinary components into a custom creative tool.
Conclusion
Hacking a Pi camera with a Nikon lens is a rewarding project for photographers, makers, engineers, and curious tinkerers who enjoy crossing wires between old-school optics and modern tiny computers. The Raspberry Pi High Quality Camera is the smartest starting point because it supports interchangeable lens mounting and works well with adapters. The key is respecting flange distance, supporting the lens properly, managing the crop factor, and using manual controls with patience.
This project will not replace a full-frame Nikon camera for everyday photography, and it is not meant to. Its magic is different. It gives you a programmable, compact, customizable imaging system with access to real photographic glass. That combination opens doors for macro rigs, remote wildlife cameras, machine vision tools, time-lapse systems, astronomy experiments, and wonderfully nerdy weekend builds. In other words, it is exactly the kind of project that reminds you why DIY electronics are fun: because sometimes the best camera is the one you build yourself.
Note: This article is intended for safe, legal DIY photography and hardware experimentation. Always protect the camera sensor, avoid unsupported heavy lenses, and never point optical systems at the sun without proper certified solar filtration.