
Table of Contents >> Show >> Hide
- What “Ablating Metal” Actually Means (And Why It’s Not the Same as Engraving)
- Why Metal Ablation Is Harder Than It Looks
- Why Hackaday’s PCB Angle Is So Interesting
- Wavelength Matters: Why Green Can Beat Infrared on Copper
- The Building Blocks of a DIY Metal-Ablation Laser System
- Process Strategy: How You Get “Clean Removal” Instead of “Melted Regret”
- Safety: The Part Everyone Skims Until Something Smells Like Burning Plastic
- Real-World Use Cases Beyond PCBs
- DIY Reality Check: Cost, Complexity, and What’s Actually “Worth It”
- Field Notes: What It’s Like to Actually Try This ( of “Yep, Been There”)
- Conclusion
If you’ve ever watched a laser engraver “mark” metal and thought, “Cute. Now do something that actually removes the metal,” welcome to the wonderfully
chaotic world of metal laser ablation. This is the part of the laser hobby where the beam stops being a polite highlighter and starts acting
like a tiny, extremely focused demolition crew.
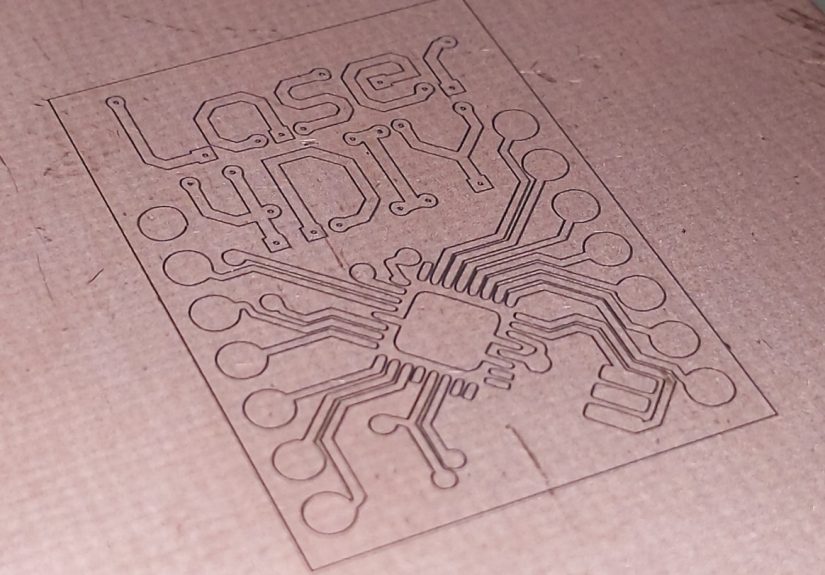
Hackaday’s write-up of a Munich Fab Lab project (Laser4DIY) put a spotlight on an especially spicy use case: using a laser to ablate copper so you can make
PCBs without chemical etching. In other words: trading messy ferric chloride for photons. Which sounds cleaner until you remember photons don’t come with an
“undo” buttonand the “oops” moments can involve eye hazards, fire hazards, and that unmistakable smell of “I should have bought a better fume extractor.”
What “Ablating Metal” Actually Means (And Why It’s Not the Same as Engraving)
In everyday maker-speak, “laser engraving metal” can mean a few different things:
- Marking: changing the surface color/oxidation with minimal material removal.
- Annealing/black marking: altering the surface chemistry for high-contrast marks (often with less depth).
- Layer removal: stripping coatings (paint, anodize, oxide layers) while leaving the base metal mostly alone.
- True ablation/engraving: removing base materialcreating measurable depth, texture, or a cavity.
Industrial laser processing folks split these processes more formally (marking, annealing, engraving, layer removal, etc.), because each one behaves
differently and needs different pulse characteristics, optics, and safety controls. The important takeaway is simple:
ablation is about controlled material removal, not just making a dark logo that looks cool on Instagram.
Why Metal Ablation Is Harder Than It Looks
Metals are reflective, conductive, and generally not impressed by your laser
Many metals reflect a lot of laser energyespecially at certain wavelengths. They also conduct heat efficiently, so energy you deliver to a tiny spot
spreads fast. That’s why “just crank the power” is a strategy that often produces:
- Melted edges (a heat-affected zone that looks like a tiny crater had a bad day)
- Warping or discoloration
- Random redeposited debris (“laser confetti” you didn’t ask for)
- Damage to surrounding features you wanted to keep crisp
The secret sauce: short pulses with high peak power
If you want to remove a thin layer cleanly, the typical approach is to deliver energy quickly enough that material ejects before heat can spread too far.
That’s why pulsed lasersespecially short-pulse systemsare so common in micromachining. Short pulses can reduce thermal damage compared to longer pulses,
helping keep edges sharper and the surrounding area calmer.
That “peak power” detail matters. A laser can have a modest average power but still hit terrifying peak powers in short bursts. Think of it like the
difference between a steady drizzle and a pressure washer: the average water use might not be outrageous, but the instant impact is wildly different.
Why Hackaday’s PCB Angle Is So Interesting
Making printed circuit boards is a rite of passage. You start with perfboard and optimism, then graduate to “I can’t believe I’m aligning this toner
transfer for the fifth time,” and eventually you learn the dark arts of proper PCB fabrication.
Laser4DIY’s idea is bold and practical: ablate copper features directly rather than etching. Hackaday notes the challenge bluntly:
copper can be difficult to process with common infrared laser wavelengths because of reflectivity, so wavelength choice matters a lot.
The project is built around the goal of removing copper cleanly without melting surrounding areas or cutting through the substrate.
The result (in the Hackaday write-up) is compelling: fine trace details on the order of tens of microns, an approach that avoids wet chemicals, and a machine
architecture that looks like “standard CNC fodder” wrapped around a specialized laser head. Translation: the scary part is the laser; the rest is motion
control, alignment, and careful workflow design.
Wavelength Matters: Why Green Can Beat Infrared on Copper
Many hobby laser rigs live in either:
blue diode territory (common desktop engravers) or infrared fiber territory (industrial marking/cleaning).
For copper, however, shorter wavelengths can interact more favorably, which is why green lasers show up in serious copper processing conversations.
In practical terms: a green laser can couple energy into copper more efficiently than some infrared setups, helping you ablate or process copper with
more stability. This is one reason you see green pulsed fiber lasers marketed for micromachining and marking tasks where heat-affected zones must stay small.
None of this means “green = magic.” It means that when you’re fighting reflectivity, wavelength is one of the few levers that can dramatically change your
odds of successbefore you even touch pulse timing, spot size, or scan strategy.
The Building Blocks of a DIY Metal-Ablation Laser System
“DIY” can mean anything from “built the frame myself” to “I made a laser out of hopes, dreams, and questionable eBay listings.” For metal ablation,
the realistic sweet spot is usually:
use a proven laser source and put your DIY energy into integration, motion, safety, and process tuning.
1) Laser source: pulsed, controllable, and appropriate for the material
For ablation-style work, you typically want a pulsed laser where you can control repetition rate, pulse energy (or at least average power), and timing.
Many systems rely on Q-switching or similar techniques to get high peak power pulses for material removal.
2) Beam delivery and optics: where “alignment” becomes a lifestyle
Metal ablation is sensitive to spot size and focus. A slightly off focus can turn crisp removal into fuzzy heat marks. Good optics, stable mounts,
and repeatable focus matterespecially if you’re trying to create PCB features or fine texturing.
3) Scanning or motion: gantry, galvo, or a hybrid
There are two common ways to move a laser spot:
- Move the work (gantry/CNC): slower but mechanically straightforward and familiar to makers.
- Move the beam (galvo scanner): extremely fast for marking/ablation, but requires careful optics and calibration.
Many industrial marking systems use galvos because they can scan patterns at high speed while keeping the part stationary. For DIY, the decision often comes
down to budget, complexity tolerance, and whether you want speed (galvo) or simplicity (gantry).
4) Registration and repeatability: the difference between “neat demo” and “useful tool”
Ablating metal (especially on PCBs) requires the beam to land where you think it’s landing. That means repeatable fixturing, consistent focus, and a reliable
coordinate system. If you’re off by even a small amount, fine traces become fine sadness.
Process Strategy: How You Get “Clean Removal” Instead of “Melted Regret”
Control heat with time, not brute force
The goal is usually to remove material while minimizing heat spread. Practical strategies include:
- Shorter pulses (when available) to reduce thermal diffusion during each hit
- Multiple light passes rather than one heavy pass
- Scan patterns that avoid dwelling in one spot
- Allowing cooling time between passes when the substrate is sensitive
Expect debris: ablation creates a plume
When you ablate metal, you eject materialoften as vapor, plasma, and fine particulate. That plume can redeposit onto the surface, contaminate optics,
and create fumes you do not want in your lungs. Good extraction isn’t a luxury; it’s part of the process.
Know what “good” looks like for your goal
If you’re ablating copper for PCBs, “good” means clean isolation, minimal undercut, and consistent line width. If you’re engraving stainless,
“good” might mean crisp edges with limited discoloration. If you’re doing coating removal, “good” means stopping at the right layer without chewing the base.
Every goal has a different definition of successand a different set of parameters that gets you there.
Safety: The Part Everyone Skims Until Something Smells Like Burning Plastic
Let’s be direct: ablation-capable systems can wander into Class 4 laser territorywhere hazards include eye injury, skin burns, and fire risk
from both direct beams and reflections. Even diffuse reflections can be hazardous at high classes. This is why professional environments require engineered
controls (enclosures, interlocks), procedures (SOPs), and training.
Minimum safety mindset for makers
- Enclosure first: treat open-beam setups as a “nope,” not a rite of passage.
- Interlocks: the laser should not fire if the enclosure is open. Period.
- Proper eyewear: matched to the wavelength and rated appropriately (and yes, counterfeit goggles exist).
- Fire planning: metal can reflect; materials nearby can ignite; keep flammables away.
- Fume extraction: ablation generates plume and particulatesuse filtration and ventilation.
If you’re thinking, “This sounds like a lot,” you’re not wrong. The safety work is not an accessory. It’s the admission price for playing with concentrated
light that can permanently ruin your day in the time it takes to blink.
Real-World Use Cases Beyond PCBs
1) Permanent part marking
Industry loves lasers for traceability: serial numbers, QR codes, logos, and compliance marks. Depending on the material and process (annealing vs engraving),
you can get high-contrast marks that hold up to wear, heat, and cleaning.
2) Coating/oxide removal and surface prep
Carefully tuned pulses can remove coatings or corrosion layers while preserving the base metaluseful for restoration work, surface preparation, and selective
cleaning. (It’s also a fast route to “why is everything dusty?” if your extraction is weak.)
3) Texturing and functional surfaces
Controlled ablation can create micro-textures that change grip, friction, reflectivity, or bonding behavior. This is where “engraving” becomes materials
engineering in a hoodie.
DIY Reality Check: Cost, Complexity, and What’s Actually “Worth It”
Hackaday commenters joked about “who doesn’t have a 9 kW laser lying around,” which is funny because it’s true: nobody does. The trick is that systems can
reach high peak power via pulsing, even when average power is far more ordinary. Still, a capable setup remains a serious buildfinancially and technically.
If your goal is simply “I want PCBs at home,” there are cheaper, safer methods:
photoresist, toner transfer, CNC isolation, or outsourcing boards. Laser ablation becomes compelling when you value:
- Fast iteration without chemicals
- Fine features and repeatability
- A makerspace-friendly workflow (properly enclosed and documented)
- The joy of building an advanced tool because… you’re the kind of person who reads Hackaday for fun
Field Notes: What It’s Like to Actually Try This ( of “Yep, Been There”)
The first “experience” lesson is that laser ablation isn’t one problemit’s a stack of small problems wearing a trench coat. You think you’re tuning “power,”
but you’re really juggling focus, spot size, pulse timing, scan speed, overlap, material finish, and the mood swings of whatever coating the metal picked up
while sitting on your bench for a week. The same stainless steel can behave differently depending on whether it’s mirror-polished, brushed, oily, or freshly
wiped down with the world’s most suspicious shop rag.
The second lesson is that alignment is either your hobby, or your hobby becomes alignment. If you’re using a gantry, you’ll discover how tiny belt tension
changes show up as “why is my line slightly wavy?” If you’re using a beam scanner, you’ll learn that calibration isn’t a one-time ceremonyit’s a relationship.
Things drift. Mounts settle. Temperature changes. And your “perfect square” starts looking like a square that has heard some bad news.
Then there’s the plume. Even when your ablation looks clean, the process is throwing material into the air. Your enclosure window will gradually collect a
film. Your optics will age faster if the airflow is wrong. You’ll also become painfully aware that “fume extraction” is not the same as “a fan pointed
vaguely toward an open window.” Proper filtration and airflow design change everything: the surface looks cleaner, the smell goes down, and your machine
stops decorating itself with microscopic debris.
One unexpectedly satisfying milestone is the first time you dial in a process where the removal looks consistent pass after pass. The job sounds different.
The surface finish becomes predictable. Your test patterns stop looking like an abstract art exhibit titled Heat-Affected Zone No. 7. This is also
when you realize how powerful documentation is. Writing down settings, material prep steps, and “what worked” saves you from re-learning the same lesson every
weekend like a very expensive version of Groundhog Day.
Finally, the biggest experience-based insight is psychological: you’ll be tempted to push the machine harder because success feels close. That’s exactly when
you should slow down. Most “oops” moments happen when you’re tired, rushing, or running “just one more test.” Building a workflow that forces safe behavior
enclosure closed, interlocks working, extraction on, material securedturns a risky experiment into a repeatable tool. The goal isn’t to prove you’re brave.
The goal is to still have normal eyesight when you’re done.
Conclusion
A DIY laser for ablating metal is one of those projects that sits right on the boundary between “maker magic” and “industrial process engineering.”
Hackaday’s featured Laser4DIY concept shows why it’s so appealing: precise copper removal for PCB work, clean workflows that avoid wet chemistry, and the
satisfaction of building a tool that feels like it belongs in a labbecause, frankly, it kind of does.
If you take one thing away, let it be this: metal ablation success comes from controlled energy delivery (often via short, high-peak-power
pulses) and controlled risk (enclosures, interlocks, eyewear, extraction, and disciplined procedures). Do those well, and you’re not just
“engraving metal”you’re shaping it with light.






