
Table of Contents >> Show >> Hide
- Why This Dresser Makeover Style Works So Well
- What Chalk Paint Brings to the Project
- Why Stain Deserves a Spot on the Dresser
- How to Create a Chalk Paint and Stain-Painted Dresser
- 1. Start with a realistic assessment
- 2. Clean like you mean it
- 3. Remove hardware and label everything
- 4. Sand strategically
- 5. Prime only where it makes sense
- 6. Paint the body with chalk paint
- 7. Stain the top or selected wood sections
- 8. Protect both finishes
- 9. Reassemble and upgrade the details
- Best Color and Stain Combinations
- Common Mistakes That Can Ruin the Finish
- How to Make the Finish Look More Professional
- Styling a Chalk Paint and Stain-Painted Dresser
- What It Is Like to Live With One
- Experience: What a Chalk Paint and Stain-Painted Dresser Teaches You Over Time
- Conclusion
A dresser makeover has a funny way of starting innocently. You spot a sad little piece on Facebook Marketplace, in your attic, or under a mountain of “I’ll deal with it later” sweaters. Next thing you know, you are whispering things like, “The bones are good,” while staring at a wobbly drawer and a suspiciously orange top. That is exactly where the beauty of a chalk paint and stain-painted dresser comes in.
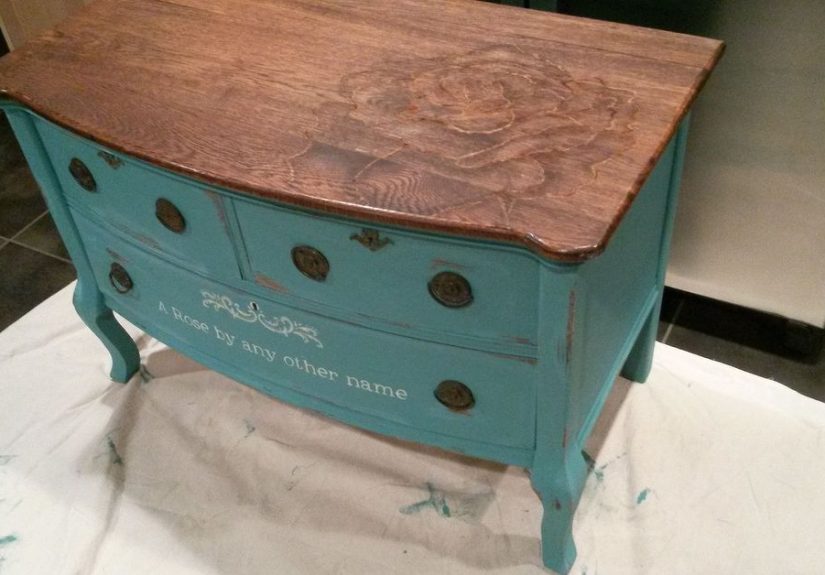
This two-tone approach gives you the best of both worlds: painted character and warm wood grain. Chalk paint softens an outdated dresser with a velvety, lived-in look, while stain highlights the natural beauty of wood where it deserves to shine. Together, they create a finish that feels custom, timeless, and a lot more expensive than it probably was. For DIYers, it is also a smart compromise. You do not have to strip every inch down to bare wood, and you do not have to hide all the wood either. It is the makeover equivalent of having your cake and staining it too.
Why This Dresser Makeover Style Works So Well
A chalk painted dresser with stained wood top works because contrast creates interest. The painted frame gives structure and color. The stained sections bring warmth, texture, and a little visual relief from an all-over painted finish. In practical terms, this combination also helps you work with the dresser instead of against it. If the top has attractive grain, let it show. If the body has scratches, repairs, or mismatched wood species, paint is your best friend.
This finish is especially popular in farmhouse, cottage, vintage, coastal, and modern organic interiors. But it is not limited to one style. Paint the body in soft white and stain the top in walnut, and you get classic cottage charm. Use deep charcoal chalk paint with a medium-brown stain, and suddenly the piece looks tailored and grown-up. Go sage green with a light oak finish, and now your dresser is basically wearing linen pants and drinking iced tea on a screened porch.
What Chalk Paint Brings to the Project
Chalk paint is a favorite for furniture because it is easy to use, forgiving for beginners, and naturally matte. It tends to grip surfaces well and makes it simple to create a casual, lightly textured finish. On a dresser, that means fewer tears over perfect brush technique and more room for personality. It is ideal when you want a slightly vintage look, soft edges, or a finish that does not scream, “I was painted in one panic-filled Saturday.”
That said, chalk paint is not magic fairy dust in a can. Even when brands market it as low-prep, a dresser that is greasy, glossy, or flaky still needs cleaning and light sanding. Hardware should come off. Dust needs to go. Stubborn stains or slick laminate surfaces may need a bonding primer. In other words, chalk paint can save you some prep, but it cannot save you from physics.
Why Stain Deserves a Spot on the Dresser
Stain is what makes the makeover feel elevated. Instead of covering every surface, you are selectively letting wood be wood. A stained top, drawer fronts, or side panels add depth that flat paint alone cannot fake. Stain also helps a dresser feel grounded. It brings in the natural grain pattern, which makes even a thrifted piece feel richer and more intentional.
For the best results, stain should go on bare, properly sanded wood. If an area is already painted or sealed, you usually need to remove that finish first. This is why many two-tone dresser makeovers focus on the top: it is often the easiest section to sand back and showcase. If the grain underneath is beautiful, fantastic. If it is blotchy or uneven, a wood conditioner and thoughtful stain choice can help even things out.
How to Create a Chalk Paint and Stain-Painted Dresser
1. Start with a realistic assessment
Before opening a single can, inspect the dresser closely. Is it solid wood, veneer, laminate, or a mix of all three? Does the top have water rings, gouges, or old finish buildup? Are the drawers smooth or dramatic? A dresser makeover goes much better when you know what you are working with. Solid wood is the easiest to stain. Veneer can be refinished carefully, but it does not tolerate aggressive sanding. Laminate is generally a paint project, not a stain project.
2. Clean like you mean it
Every successful furniture makeover begins with cleaning, and yes, this is the least glamorous part. Decades of furniture polish, body oil, dust, and mystery goo can ruin adhesion. Use a degreasing cleaner or a gentle soap-and-water solution, then let the dresser dry thoroughly. Skipping this step is how people end up blaming the paint, the brush, the weather, and possibly Mercury in retrograde.
3. Remove hardware and label everything
Take off knobs, pulls, and decorative plates. Place screws in labeled bags. This sounds obvious until you are on the floor later with five nearly identical screws and the emotional resilience of a saltine cracker.
4. Sand strategically
Light sanding helps paint stick and smooths rough areas. For the sections you plan to stain, sanding becomes more serious because you need to remove old finish and expose bare wood. Work with the grain, not against it. The goal is not to grind the dresser into another dimension. It is to create a clean, sound surface. After sanding, vacuum and wipe away all dust.
5. Prime only where it makes sense
If the dresser body is glossy, laminate, stained with tannin bleed, or covered in old questionable finish, primer is worth it. Primer improves adhesion, blocks stains, and helps the final paint color look cleaner and more consistent. On raw wood or lightly scuffed painted wood, your chalk paint may do fine without it. This is where common sense beats dogma every time.
6. Paint the body with chalk paint
Apply thin, even coats rather than one thick, impatient slab of paint. Let each coat dry fully before adding the next. Most dressers need two coats for strong coverage, though darker colors or dramatic color changes may need more. Use a quality brush for details and a small roller for broad flat sections if you want a smoother finish. If brush marks bother you, lightly sand between coats once the paint is dry.
7. Stain the top or selected wood sections
Once the wood is bare and smooth, test the stain in an inconspicuous area. This is the moment where many DIY dreams either soar or gently trip over themselves. A stain color that looked perfect on the can may pull red, orange, or muddy depending on the wood species. Apply stain evenly, wipe back excess, and build depth gradually. The prettiest stained tops usually look intentional, not overly dark and dramatic like they are auditioning for a vampire castle.
8. Protect both finishes
Here is where a lot of beautiful dressers get humbled by real life. Chalk paint needs protection, especially on a hardworking piece like a dresser. Wax offers a soft, traditional look and can deepen the paint color, while a durable water-based topcoat is often easier to clean and more practical for daily use. For the stained wood sections, a compatible protective finish helps prevent rings, scratches, and wear. Choose a finish based on how the dresser will be used, not just how romantic the label sounds.
9. Reassemble and upgrade the details
Fresh hardware can make a basic dresser look custom. Matte black pulls feel modern. Aged brass warms things up. Wood knobs keep the look simple and casual. Even if you reuse the original hardware, cleaning or spray-finishing it can make the whole makeover feel more complete.
Best Color and Stain Combinations
Choosing the right pairing is half the fun. A few combinations consistently work well:
White chalk paint + medium walnut stain: classic, bright, and easy to style.
Greige chalk paint + natural oak stain: soft, modern, and designer-friendly.
Black chalk paint + rich brown stain: dramatic without being fussy.
Sage green chalk paint + light wood stain: relaxed, earthy, and very now.
Navy chalk paint + dark espresso stain: tailored and substantial.
Dusty blue chalk paint + weathered oak stain: beach house energy without the seashell overload.
If your room already has a lot of warm wood, use the dresser paint color to balance it. If the room is cool and pale, a stained top can prevent the furniture from feeling flat. The goal is not perfection. The goal is a dresser that looks like it belongs in your home instead of waiting for a yard sale sign.
Common Mistakes That Can Ruin the Finish
The biggest mistake is falling for the phrase “no prep” too literally. Dirt, gloss, and loose finish always matter. Another common problem is staining wood that has not been fully stripped or sanded evenly, which leads to blotches. DIYers also get into trouble by applying thick coats of chalk paint, rushing recoat times, or using the wrong topcoat over the wrong product.
One more issue deserves real attention: old furniture. If a dresser may date from a pre-1978 environment, lead-safe practices matter. Sanding old finishes can create hazardous dust. That is not the fun part of furniture flipping, but it is the part that keeps a weekend project from becoming a serious problem.
How to Make the Finish Look More Professional
Want your DIY dresser makeover to look less “first attempt” and more “small boutique furniture studio”? Focus on restraint. Sand lightly between coats. Keep paint layers thin. Tape off the boundary between stained and painted sections carefully. Wipe stain consistently. Use a topcoat with the right sheen for the look you want. Matte and satin tend to flatter furniture best because they hide flaws better than high gloss.
It also helps to embrace the character of the piece rather than over-correcting everything. Slight age marks on stained wood can add charm. Subtle brush texture in chalk paint can feel handmade in a good way. A dresser does not need to look factory-made to look beautiful. In many homes, the opposite is the whole point.
Styling a Chalk Paint and Stain-Painted Dresser
Once the makeover is done, let the dresser earn its applause. Style the top with a mirror, a ceramic lamp, a tray, and one or two decorative objects instead of ten tiny things fighting for attention. In a bedroom, balance the painted dresser with soft textiles and one natural element like a woven basket or wood frame. In an entryway, use it as a statement piece with art above and practical storage below. The charm of this finish is that it reads warm and approachable, so it plays nicely with both curated and everyday spaces.
What It Is Like to Live With One
A well-finished chalk paint and stain-painted dresser ages gracefully. Small scuffs on chalk paint often blend into the relaxed look rather than screaming for help. A stained top develops character, especially if you chose a finish that protects without making the wood look plastic. The dresser becomes one of those pieces people ask about because it feels personal. Not “Where did you buy that?” personal. More like, “Wait, you made that?” personal. Which, frankly, is the superior category.
Experience: What a Chalk Paint and Stain-Painted Dresser Teaches You Over Time
Living with a chalk paint and stain-painted dresser for months tells you things that a one-day tutorial never will. First, you learn that the finish changes your relationship with furniture. A mass-produced dresser is functional. A refinished dresser has a story. You remember the day you chose the paint color, the moment you realized the wood top had better grain than expected, and the tiny surge of pride when you slid the drawers back in and everything suddenly looked intentional. That emotional payoff is part of why these projects stay popular. They are not just about saving money. They are about making ordinary furniture feel like yours.
You also learn what matters most in the long run: durability beats drama. A dresser top gets used. Things land on it. Jewelry trays slide. Water glasses appear where they absolutely should not. Hair products, perfume, and random clutter test the finish daily. If you sealed the painted body and protected the stained top properly, the dresser becomes a hardworking piece instead of a fragile show pony. If you rushed the topcoat, the dresser will let you know with scratches, rings, and mild emotional damage.
Another thing experience teaches is that color behaves differently in real rooms than it does on sample cards. A chalky white can feel crisp in daylight and creamy at night. A greige that seemed sophisticated in the garage can suddenly lean purple in the bedroom. Stain does the same little trick. On pine, it may warm up dramatically. On oak, it can look more balanced and classic. That is why testing is not optional. It is the furniture makeover equivalent of reading the recipe before you preheat the oven.
Over time, you begin noticing the subtle reasons the painted-and-stained combination works so well. The painted body softens the scale of a bulky dresser. The stained top adds warmth so the whole piece does not feel flat or overly “crafted.” The contrast draws the eye upward and makes the piece feel layered, almost like it evolved over years instead of being redone in a weekend. In a room full of upholstered pieces, rugs, and curtains, that bit of wood tone can make the space feel calmer and more grounded.
Perhaps the best part is that the dresser becomes more forgiving the longer you own it. Tiny nicks on the painted corners start to look like patina. The stained top picks up depth and personality. You stop worrying about whether it looks perfect and start appreciating that it looks real. That is the sweet spot with this kind of project. A chalk paint and stain-painted dresser is polished enough to feel finished, but relaxed enough to live with. It does not ask you to treat it like a museum object. It just asks for basic care, a little respect, and maybe a coaster once in a while.
In the end, the experience is less about paint and stain than it is about transformation. You take a dresser that looked tired, dated, or forgettable and turn it into something useful, stylish, and deeply personal. That is a pretty good trade for a few brushes, some sandpaper, and a weekend of finding sawdust in places sawdust should never be.
Conclusion
A chalk paint and stain-painted dresser is one of the smartest furniture makeovers you can do because it balances ease, beauty, and practicality. Chalk paint gives the piece charm and flexibility. Stain restores warmth and highlights natural wood. Together, they create a dresser that feels layered, custom, and genuinely at home in a lived-in space. Prep matters, patience matters, and the right protective finish matters more than people want to admit. But once the work is done, the payoff is a piece that looks far more expensive, more interesting, and more personal than what you started with.
If you have been staring at an outdated dresser and waiting for a sign, this is it. Clean it, sand it, paint the parts that need grace, stain the parts that deserve glory, and let the makeover do what good DIY always does: turn something overlooked into the thing everyone notices.






