
Table of Contents >> Show >> Hide
- Why This DIY Works So Well
- What You Need for Sand and Seashell Covered Terra Cotta Pots
- Before You Start: Prep Matters More Than People Think
- Step-by-Step: How to Decorate Terra Cotta Pots With Sand and Seashells
- Best Design Ideas for a Beach-Themed Terra Cotta Pot
- How to Keep the Pot Practical for Real Plants
- Common Mistakes to Avoid
- Who Will Love This DIY Project?
- Experience and Extra Tips From Making Sand and Seashell Covered Terra Cotta Pots
- Final Thoughts
If summer had a craft room, it would probably smell like sunscreen, salt air, and slightly suspicious amounts of glue. That is exactly the mood behind this sand and seashell covered terra cotta pots DIY project. It is easy, beachy, budget-friendly, and charming enough to make a plain clay pot look like it just came back from vacation with better stories than you.
Decorating terra cotta pots with sand and seashells is one of those rare DIY ideas that checks all the boxes. It is practical, because terra cotta pots are affordable and easy to find. It is creative, because no two shell arrangements ever look exactly the same. And it is forgiving, which is great news for anyone whose crafting style is somewhere between “coastal artisan” and “I glued my fingers together again.”
In this guide, you will learn how to decorate terra cotta pots with sand and shells in a way that looks polished, lasts longer, and still works for real plants. We will cover materials, prep, adhesive choices, step-by-step instructions, design ideas, common mistakes, and smart ways to use your finished pot indoors or outdoors. Then, because every good DIY deserves some real-life perspective, you will also get an extra section packed with hands-on experiences and practical lessons from actually making beach-themed flower pots.
Why This DIY Works So Well
Terra cotta is the MVP of beginner-friendly planter crafts. The surface has a natural texture that helps coatings and decorative layers grip better than slick plastic. It also has that warm clay color peeking through in all the right places, which pairs beautifully with beige sand, ivory shells, and coastal tones like sea glass blue, weathered white, driftwood gray, and soft coral.
There is also a design advantage here: seashell planter decor adds texture without requiring fancy tools. You do not need a Cricut, a laser cutter, or the emotional resilience to stencil a perfect lobster. You just need a pot, some adhesive, a little patience, and enough shell restraint not to glue the same giant scallop shell onto every available inch.
The best part is versatility. A sand and seashell covered terra cotta pot can work as:
- a small herb planter for a sunny windowsill
- a decorative cachepot that hides a plain nursery container
- a beach-themed centerpiece
- a handmade gift for a coastal decor fan
- a summer porch accent
- a cute holder for faux plants, paintbrushes, or craft tools
What You Need for Sand and Seashell Covered Terra Cotta Pots
Basic Materials
- 1 or more terra cotta pots, with matching saucers if you want the full finished look
- Clean, dry craft sand or fine beach-style decorative sand
- Small seashells such as scallops, cockles, clam shells, or tiny spiral shells
- Strong craft adhesive or outdoor decoupage glue
- Paintbrush or foam brush
- Acrylic primer or gesso if you plan to paint any part of the pot
- Acrylic craft paint, optional
- Clear sealer or outdoor top coat
- Paper plate or tray for sand application
- Tweezers for placing small shells
- Soft cloth
- Drop cloth, kraft paper, or newspaper to protect your table
Optional Extras
- Jute twine for wrapping the rim
- Sea glass pieces or faux sea glass
- Pearl beads for a softer coastal look
- Stencil or painter’s tape for painted borders
- Plastic nursery pot for double-potting inside the decorated terra cotta pot
Before You Start: Prep Matters More Than People Think
Every satisfying DIY has one slightly boring setup step that secretly decides whether the final result looks handmade in a good way or handmade in a “why is that shell sliding off” way. For this project, prep is that step.
Start by cleaning the terra cotta pot thoroughly. If it is new, wipe away dust, sticker residue, and gritty clay particles. If it is used, scrub it well and let it dry completely before decorating. This is especially important if you plan to plant something in it later. Old pots can hold mineral deposits and residue, and nobody wants a gorgeous beach planter with a side of mystery grime.
Next, decide whether your pot will be fully functional as a planter or mostly decorative. That choice changes how you decorate it.
- For a working planter: keep the drainage hole open, avoid heavy shell buildup near the bottom, and leave enough room around the inner rim so soil or a nursery pot can fit comfortably.
- For a decorative outer pot: you can be more generous with shells and texture, then place a smaller plastic nursery pot inside.
If you want painted details, apply primer first and let it dry fully. A primer coat helps create a smoother, more even painted finish and can make your accent colors look brighter and less patchy. Think of it as giving your coastal masterpiece a decent canvas instead of asking beige shells to compete with thirsty clay right out of the gate.
Step-by-Step: How to Decorate Terra Cotta Pots With Sand and Seashells
Step 1: Plan the Design Before the Glue Drama Begins
Lay out your shells on the dry pot first. This is the craft version of measuring twice and gluing once. You can create several looks:
- Full beach texture: cover most of the pot in sand, then add shells as accents
- Shell border: line the rim or base with shells and keep the center simpler
- Mosaic style: arrange shells in repeating bands or patterns
- Organic shoreline look: place shells irregularly for a found-on-the-beach effect
Take a quick photo of your dry layout if you like the arrangement. Future you will be grateful when glue enters the chat and everything suddenly becomes urgent.
Step 2: Add Adhesive in Small Sections
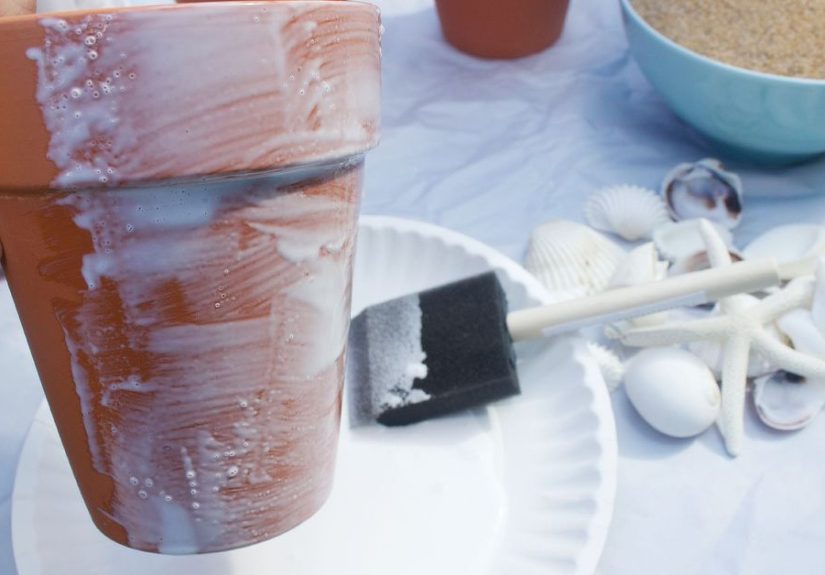
Do not coat the whole pot at once. That sounds efficient, but it usually turns into a sticky race against drying time. Instead, brush adhesive onto one small section at a time. This gives you more control and prevents sand from clumping where you are not ready for it.
If you want a full sandy texture, brush on the adhesive, then hold the pot over a tray and sprinkle sand generously over the glued area. Press lightly with your fingertips so the grains settle into the adhesive. Shake off the extra and move on to the next section.
Step 3: Build the Sand Layer First
The sand acts like a visual base coat and helps the pot look more cohesive. It fills in empty areas and gives your shell arrangement that true beach craft vibe instead of a random-shells-on-a-pot situation.
For the cleanest result, work in bands around the pot. Complete one band, let it tack up slightly, then continue. If patches look thin, add a second light layer of adhesive and more sand after the first coat dries.
Step 4: Attach the Seashells
Once your sand layer is set enough not to slide around, start attaching the shells. Use a slightly thicker dab of adhesive on the back of each shell, then press it into place. Larger shells should go on flatter areas where they can sit securely. Small shells are perfect for filling gaps, especially around the rim or saucer.
Tweezers are handy for tiny shells, especially if you want neat spacing. If you are going for a more natural look, vary the direction and spacing. Beaches are many things, but suspiciously symmetrical is not one of them.
Step 5: Let It Dry Longer Than Your Impatience Wants
Set the pot aside and let the adhesive cure fully. Not “sort of dry.” Not “probably fine.” Actually dry. This matters because moving too soon can shift the shells, flatten the sand texture, or leave fingerprints in places where you definitely do not want your legacy preserved.
Step 6: Seal the Finished Pot
After everything is dry, apply a clear sealer or outdoor top coat. This helps lock down loose grains of sand, strengthens adhesion, and gives your DIY seashell pots a better chance at surviving humidity, handling, and light outdoor use.
If the pot will live outside, choose a finish labeled for outdoor crafts or exterior use. Use thin, even coats rather than one heavy, gloopy coat. Thick sealer can fill the shell texture and make the surface look cloudy. Your goal is “sunny coastal charm,” not “the shells were trapped in amber.”
Best Design Ideas for a Beach-Themed Terra Cotta Pot
1. Classic Sandy Shoreline
Cover the entire pot in fine sand, then place a simple ring of white or beige shells around the rim. This looks timeless and works well with succulents, faux grasses, or small flowering plants.
2. Driftwood Coastal Style
Paint the rim in soft white, weathered gray, or pale blue before adding sand and shells to the body of the pot. The painted top edge gives the project a more finished, designer-style look.
3. Mermaid Treasure Pot
Mix shells with faux pearls, sea glass, and iridescent accents. This version is excellent for a whimsical bedroom, bathroom shelf, or summer party table.
4. Minimalist Shell Accent Pot
Instead of covering the entire pot, add a sandy stripe around the middle and attach just a few well-placed shells. This is a great option if you want coastal decor without going full beach souvenir shop.
5. Shell-Covered Saucer Set
Do not ignore the saucer. Decorating the saucer with a matching sand border or shell accents makes the whole project feel intentional rather than half-dressed.
How to Keep the Pot Practical for Real Plants
A pretty pot still needs to function. Terra cotta is popular because it is breathable and naturally porous, which can help roots get airflow and can also make the soil dry faster than it would in plastic. That is helpful for plants that hate sitting in wet soil, but it also means decorated pots need a little strategy.
- Do not block the drainage hole with glue, sand, or shells.
- If the pot will hold a live plant, avoid thick shell clusters on the inside rim where they interfere with planting.
- Use a saucer underneath to catch excess water indoors.
- Consider double-potting if you want maximum durability: keep the plant in a plain nursery pot and place it inside the decorated terra cotta pot.
- If you use terra cotta for thirsty plants, remember it may dry out faster and need more frequent watering.
Great plant pairings include small succulents, cacti, or other plants that do not mind a pot that dries out more quickly. For moisture-loving plants, a decorated pot can still work beautifully as an outer cover rather than the main planting container.
Common Mistakes to Avoid
Using Dirty or Damp Pots
Dust and moisture make it harder for adhesives and paint to hold. Always start with a clean, dry pot.
Applying Glue to the Whole Pot at Once
This usually leads to uneven texture, wasted adhesive, and the kind of crafting mood that requires snacks. Small sections are the way to go.
Overloading One Side With Heavy Shells
Balance matters. If one side has all the large shells, the design can feel clumsy and the embellishments may be more likely to loosen over time.
Skipping the Sealer
Without a top coat, sand sheds more easily and shell edges may loosen faster, especially outdoors.
Forgetting the Pot’s Actual Job
If the planter is for a live plant, drainage and fit matter just as much as looks. A glamorous pot that turns into a root-swamping puddle is not a successful craft. It is a cautionary tale.
Who Will Love This DIY Project?
This coastal planter craft is especially good for:
- summer home decor lovers
- beach wedding or bridal shower hosts
- gardeners who want a more decorative porch setup
- gift makers looking for a handmade but useful project
- parents crafting with older kids or teens
- anyone who owns a suspicious number of saved shells and would like to justify them
Experience and Extra Tips From Making Sand and Seashell Covered Terra Cotta Pots
The first time you make a sand and seashell covered terra cotta pot, it is tempting to think the whole project will be about shells. In reality, it is about restraint. The shells are the stars, sure, but the pot looks best when the texture, spacing, and empty areas all work together. One of the biggest lessons people learn with this DIY is that leaving some breathing room actually makes the shells stand out more. A pot with every inch crammed full can look heavy, while one with intentional placement feels collected and stylish.
Another real-world experience is discovering that sand behaves a little like glitter’s calmer cousin. It is less dramatic, but it still gets around. Using a tray underneath the pot is not optional unless you want your entire table to feel like a tiny beach rental. Working in sections also keeps the mess manageable. The most successful crafters tend to rotate the pot slowly, almost like icing a cake, rather than jumping from spot to spot.
Texture is another thing that surprises people. Fine sand gives a smoother, more elegant finish. Chunkier sand looks rustic and natural but can be trickier to seal. Tiny shells are easier to blend into a polished design, while oversized shells create a bolder look but need stronger placement and more drying time. Mixing sizes usually gives the best result. It makes the pot look found, layered, and a little more organic.
Color choices matter too. Keeping the palette close to nature almost always looks more expensive. Cream, tan, soft white, muted aqua, weathered blue, and sun-bleached coral tend to work beautifully together. Metallic paint can be fun in small doses, but if the goal is classic coastal decor, subtle shades usually win. A painted rim or saucer can elevate the pot without overwhelming the shell work.
People also learn quickly that these pots make excellent memory crafts. Shells collected from a family vacation, a honeymoon, or a weekend by the coast can turn a simple flower pot into something personal. That emotional layer gives the project more staying power than a random afternoon craft. It becomes decor with a story, and those are usually the pieces people keep the longest.
Functionally, double-potting is one of the smartest upgrades. If you adore the decorated look but do not want to stress about watering, slipping a plain nursery pot inside the finished terra cotta shell pot is incredibly practical. You preserve the craft, make plant care easier, and reduce the risk of moisture gradually wearing down the decorative surface. It is one of those not-glamorous tips that ends up being genuinely useful.
Finally, this DIY teaches patience in the most ordinary way possible. The best pots are rarely rushed. They come from letting each layer dry, stepping back to edit the design, and resisting the urge to add “just one more shell” until the pot starts looking like it lost a fight with a seafood buffet. When you slow down, the finished piece feels intentional. And that is the secret to making handmade decor look less crafty and more curated.
Final Thoughts
If you want a DIY project that feels cheerful, creative, and genuinely usable, decorating sand and seashell covered terra cotta pots is a great place to start. It turns a humble clay planter into coastal home decor with texture, personality, and just enough beach nostalgia to make even an ordinary windowsill feel like a summer escape.
Keep the process simple: clean the pot, plan your layout, apply adhesive in small sections, build the sand texture, place the shells thoughtfully, and seal the finished design. Whether you use the pot for succulents, faux greenery, or as a decorative outer planter, the result can look charmingly handmade without looking chaotic.
In other words, this is the kind of DIY that lets you play with shells, make something beautiful, and call it home decor instead of hoarding. That is a pretty good deal.






