
Table of Contents >> Show >> Hide
- Why Pumpkin Carving Never Goes Out of Style
- Step 1: Choose the Right Pumpkin
- Step 2: Gather Your Pumpkin Carving Tools
- Step 3: Prep the Pumpkin Before You Cut
- Step 4: Scoop Out the Guts Like You Mean It
- Step 5: Draw or Transfer Your Design
- Step 6: Carve Slowly and Smartly
- Easy Pumpkin Carving Ideas for Beginners
- How to Make Your Carved Pumpkin Last Longer
- Common Pumpkin Carving Mistakes to Avoid
- What to Do With the Seeds and Scraps
- Pumpkin Carving Experiences: What It’s Really Like in Real Life
- Conclusion
There are two kinds of people every October: those who calmly place one tasteful pumpkin on the porch, and those who look at a pile of gourds and think, “Yes, tonight I become an artist.” If you fall into the second group, welcome. Pumpkin carving is one of the best Halloween traditions because it is equal parts craft project, seasonal decoration, and slightly chaotic family event. One minute you are sketching a cute ghost face, and the next you are elbow-deep in pumpkin pulp asking serious questions about your life choices.
The good news is that learning how to carve a pumpkin for Halloween is not complicated. The difference between a sad, collapsing jack-o’-lantern and a porch-worthy masterpiece usually comes down to a few smart choices: picking the right pumpkin, using the right tools, thinning the walls correctly, planning the design before cutting, and helping the finished pumpkin last longer. Once you know the basics, you can go from simple triangle eyes to a surprisingly elegant design without needing the hands of a surgeon or the patience of a saint.
This guide walks you through the full process, from choosing a pumpkin to lighting it up safely. You will also get practical carving tips, easy design ideas, common mistakes to avoid, and real-life carving experiences that make the whole tradition more fun and less frustrating. In other words, this is your no-nonsense, no-generic, pumpkin-carving survival guide.
Why Pumpkin Carving Never Goes Out of Style
Before we get to the tools and the goo, it helps to understand why carving pumpkins still matters. Halloween decor changes every year, but the jack-o’-lantern sticks around because it checks every seasonal box. It is festive, inexpensive, customizable, family-friendly, and dramatic in the best possible way. A carved pumpkin can be spooky, funny, classy, goofy, or surprisingly artsy. It can greet trick-or-treaters, anchor a party table, or make your front steps look like you absolutely have your life together in October.
It is also one of the rare holiday projects where imperfection works in your favor. A crooked smile? Charming. Uneven eyes? Haunted. A weird scratch that was not supposed to happen? Congratulations, your pumpkin now has character.
Step 1: Choose the Right Pumpkin
Look for shape, freshness, and stability
If you want easier carving, start with a pumpkin that actually wants to cooperate. The best carving pumpkin is fresh, firm, and stable. Look for one with a flat bottom so it sits without wobbling. Soft spots, moldy patches, and bruising are red flags. A sturdy stem is usually a good sign, but do not carry the pumpkin by the stem unless your Halloween plan includes an accidental smash.
Shape matters too. If you are carving a classic face, a round, medium-sized pumpkin is usually easiest. If you are doing a tall witch face or a long ghost silhouette, a taller pumpkin works better. Smooth skin makes transferring designs easier, while deep ridges can make detailed carving a little trickier. Not impossible, just more “advanced mode.”
Carving pumpkins are not the same as pie pumpkins
Yes, technically you can carve many types of pumpkins. But a carving pumpkin is usually larger, lighter, and easier to hollow out than the smaller varieties sold for cooking. If your goal is a great jack-o’-lantern, choose a pumpkin meant for decorating rather than a sweet little baking pumpkin that would much rather become soup.
Step 2: Gather Your Pumpkin Carving Tools
You do not need a professional carving studio. You just need a few useful tools and a stable setup.
Basic tools for carving a pumpkin
- A pumpkin carving saw or small serrated knife
- A large spoon, scoop, or scraper
- Washable marker or dry-erase marker
- Paper towels or a trash bag
- A bowl for seeds and pulp
- Battery-operated LED candle or LED string lights
Helpful extras if you want cleaner results
- Stencils or printed templates
- An awl, pin tool, or thumbtack for tracing designs
- A small paring knife for detail work
- Cookie cutters for easy shape-based designs
- Petroleum jelly for carved edges
- Old newspaper or a washable table covering
Set up your workspace on a flat, sturdy surface. This is not the moment for balancing a pumpkin on your lap while standing in the kitchen. Sit down, stabilize the pumpkin, and give yourself enough room to work. Your fingers will thank you later.
Step 3: Prep the Pumpkin Before You Cut
Wash the outside first
This step is easy to skip, but it is worth doing. A quick wash removes dirt, grime, and some of the surface stuff that can speed up decay. Dry the pumpkin thoroughly before carving. A clean pumpkin is easier to handle and a little less likely to go funky too fast.
Decide whether to cut from the top, bottom, or back
Classic pumpkin carving usually involves cutting a lid around the stem. That still works, especially if you want the traditional look. But many carvers now prefer cutting a hole in the bottom or back. Why? Because it keeps the stem intact, helps the pumpkin hold its shape better, and can make lighting easier. A bottom or back opening also hides the access panel more neatly once the pumpkin is displayed.
If you cut from the top, angle your blade inward so the lid does not fall through. Think of it as creating a little pumpkin hat with a built-in support edge.
Step 4: Scoop Out the Guts Like You Mean It
Now comes the messy part that children love, adults tolerate, and kitchen counters fear.
Remove seeds and pulp
Cut your opening, reach inside, and pull out the stringy pulp and seeds. Use a big spoon or scraper to clean the interior. Save the seeds if you want to roast them later. That way your pumpkin gives you decor and snacks, which is honestly excellent seasonal teamwork.
Thin the wall where you plan to carve
This is one of the most overlooked pumpkin carving tips. The side you plan to carve should be thinned from the inside so cutting is easier and the glow looks better. If the wall is too thick, detailed designs become harder to carve and small pieces are more likely to break. You want it sturdy, but not like you are carving through orange concrete.
A scraper works better than brute force. Gently shave the inner wall until it feels manageable. Think “firm enough to stand, thin enough to carve,” not “attack it until the pumpkin files a complaint.”
Step 5: Draw or Transfer Your Design
Freehand works just fine
If you are going for a simple jack-o’-lantern, draw your design right on the pumpkin with a washable marker. Start with basic shapes: triangles, half-moons, zigzag mouths, circles, stars, or arched brows. Keep the shapes large enough to carve cleanly. Tiny details may look adorable on paper and infuriating on a pumpkin.
Stencils make detailed carving easier
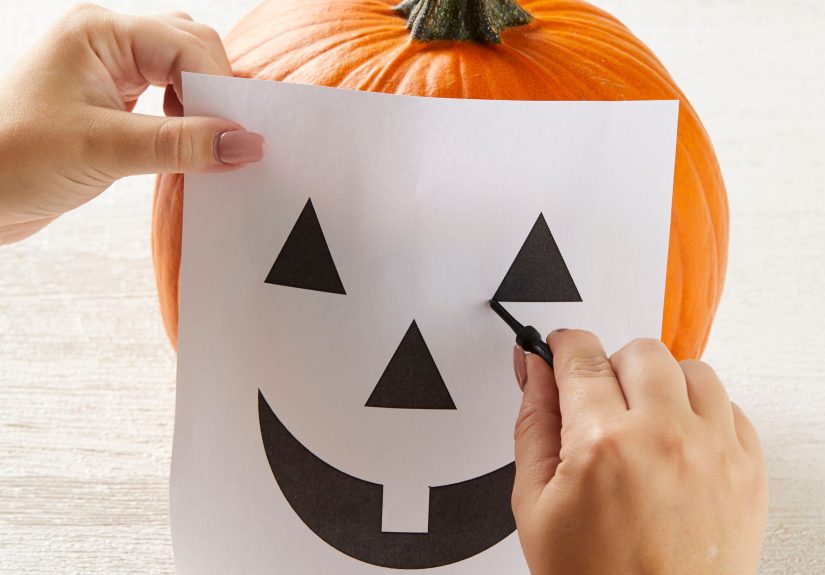
For more advanced designs, tape a stencil onto the pumpkin and poke along the lines with a pin tool or thumbtack. This transfers the pattern so you can carve with more control. Stencils are especially helpful for letters, silhouettes, or layered designs that combine full cutouts with surface etching.
Try half-carving for extra style
Not every design has to go all the way through the pumpkin. You can shave off only the outer skin to create shading and texture. This technique, sometimes called etching or half-carving, gives your jack-o’-lantern a more detailed, dimensional look. It is perfect for eyebrows, hair, moons, swirls, or spooky decorative flourishes.
Step 6: Carve Slowly and Smartly
Here is the golden rule: small saw motions beat giant dramatic stabs every time. You are carving a pumpkin, not starring in an action movie.
Carve from the center outward when possible
If your design has a face, many carvers find it easier to begin with the smaller central features and work outward. This helps preserve support while you cut. Remove pieces gently by pushing them inward or outward, depending on what feels safest and most stable.
Use small cuts for curves and details
Pumpkin skin is tougher than it looks. Short, controlled cuts help you turn corners and follow curved lines more accurately. For tiny sections, a small saw or detail knife is better than a big kitchen knife. The goal is control, not drama.
Keep big pieces connected when needed
If you carve a huge mouth with nothing supporting the center, do not be surprised when your pumpkin ends up looking like it has had a structural failure. Leave enough pumpkin flesh between features so the face stays stable. It is art, yes, but it is also engineering.
Easy Pumpkin Carving Ideas for Beginners
If you are not ready for a haunted mansion skyline carved into a giant heirloom gourd, start here.
Classic jack-o’-lantern face
Still undefeated. Triangle eyes, triangle nose, and a toothy grin work for a reason. This design is easy, readable from a distance, and very forgiving.
Minimalist face
Skip the mouth or make the eyes the star. A pair of arched eyes can create more personality than a complicated design. Sometimes less really is more, especially when “more” means extra chances to slip.
Moon and stars
Use a stencil or freehand simple celestial shapes. This looks especially good with a warm LED inside and a few companion pumpkins nearby.
Dots and drilled patterns
Instead of large cutouts, create rows of small holes or stars. This gives a softer glow and a more polished look.
Cookie-cutter shapes
Press or tap metal cookie cutters gently into the pumpkin for neat shapes like hearts, bats, stars, or circles. It is a fun shortcut when you want a clean look without drawing complex lines.
How to Make Your Carved Pumpkin Last Longer
You worked hard on your masterpiece. Naturally, you would prefer it not to turn into a shriveled science experiment by tomorrow.
Do not carve too early
If you want your pumpkin to look good on Halloween, wait until closer to the holiday. In many climates, carving too far in advance is the fastest route to sagging faces and sad porch energy. The warmer and more humid your weather, the later you should carve.
Keep it cool and dry
Display your pumpkin in a cool, shady place when possible. Heat speeds up drying and decay. Direct sun is basically the enemy of pumpkin longevity.
Use LED lights instead of real candles
Open flame creates heat, and heat is not your friend here. Battery-operated candles or LED string lights give you the Halloween glow without cooking your pumpkin from the inside. They are also a whole lot safer around kids, pets, costumes, and windy porches.
Seal exposed edges
A light coat of petroleum jelly on the cut edges can help slow dehydration. The key word is light. You are sealing the surface, not frosting a cake.
Common Pumpkin Carving Mistakes to Avoid
- Choosing a rotten pumpkin: Soft spots and mold are not “rustic.” They are warnings.
- Skipping the sketch: Going in blind can work, but it can also create a face that looks surprised for all the wrong reasons.
- Making the design too detailed: Tiny cuts are harder to execute and more likely to break.
- Not thinning the wall: Thick walls make carving harder and lighting weaker.
- Using a real candle without thinking: LEDs are easier, cooler, and safer.
- Carving too early: Nothing says Halloween disappointment like a collapsed grin on October 29.
What to Do With the Seeds and Scraps
Do not throw everything away unless you truly enjoy wasting free seasonal snacks. Pumpkin seeds can be rinsed, dried, seasoned, and roasted. Some people also compost the pulp or use the scraps in fall garden beds. Even if your carving pumpkin is not ideal for eating, the seeds are often worth saving. It is a nice little bonus after all that scooping.
Pumpkin Carving Experiences: What It’s Really Like in Real Life
If you have never carved a pumpkin before, let me give you the most honest preview possible: it starts out looking like a cozy autumn craft and quickly becomes a mix of concentration, laughter, and orange stringy chaos. That is part of the charm. Pumpkin carving is not only about the final result. It is also about the experience of making something slightly messy and wonderfully seasonal with your own hands.
For first-timers, the biggest surprise is usually the texture. People imagine a pumpkin as soft and simple to cut, but the shell is firmer than expected. That is why the first five minutes often involve a lot of cautious sawing and a sudden respect for whoever invented pumpkin carving kits. Then comes the inside. The seeds, the fibers, the pulp, the way everything clings to the spoon like it has emotional attachment issues. Kids usually think this part is hilarious. Adults tend to become very interested in paper towels.
One of the best experiences related to carving pumpkins is doing it with other people. A family pumpkin night, a small Halloween party, or even a casual front-porch carving session with friends turns the whole activity into an event. Someone always draws an overconfident design. Someone always picks a tiny pumpkin and immediately regrets it. Someone always says, “I’m just doing a simple face,” and then spends forty minutes trying to create high-end eyebrow drama. These are the traditions that stick.
There is also something surprisingly satisfying about watching a design come to life. At first, it is just marker lines on a pumpkin. Then the eyes are cut. Then the mouth opens up. Then the light goes in, and suddenly your porch decoration has a whole personality. A goofy face becomes funny. A simple cat silhouette becomes elegant. A slightly uneven ghost face becomes weirdly adorable. The transformation is fast, and that payoff feels great.
Experienced carvers often say the same thing: your second pumpkin is always better than your first. The first one teaches you how much pressure to use, how big to make the pieces, how thin to scrape the walls, and how important it is not to carve the mouth so wide that the whole front collapses. By the second round, you are calmer, more strategic, and just confident enough to try something a little fancier. That is when pumpkin carving becomes addictive in the nicest, most autumnal way possible.
Another real-life truth is that imperfect pumpkins are often the most memorable. The jack-o’-lantern with one lopsided eye may get more compliments than the perfectly symmetrical one because it has personality. A tiny crack can make a smile look creepier. A strange tooth can make the whole thing funnier. Pumpkin carving rewards creativity, but it also rewards flexibility. When the design changes mid-project, roll with it. Halloween decor thrives on a little chaos.
And then there is the final moment, which is honestly the best part. The carving is done, the porch is getting dark, and you switch on the light inside. That first glow turns all the cutting and scooping into something magical. The pumpkin looks alive in the best Halloween way. Whether you made a spooky monster, a cheerful grin, or a simple geometric design, it feels personal because you made it. It is one of those rare crafts where the finished object is not just decorative. It creates atmosphere.
That is why people come back to pumpkin carving year after year. It is messy, yes. A little sticky, yes. Occasionally frustrating, absolutely. But it is also funny, creative, nostalgic, and surprisingly satisfying. It gives you an excuse to gather with people, make something by hand, and celebrate the season with a tradition that still feels special. And if your pumpkin ends up looking delightfully weird? Even better. Halloween has room for perfection, but it has a soft spot for lovable oddballs too.
Conclusion
Once you know how to carve a pumpkin for Halloween, the process becomes a lot more fun and a lot less random. Start with a fresh, stable pumpkin. Use the right carving tools. Clean out the inside thoroughly. Sketch your design before cutting. Thin the wall where needed. Carve with slow, controlled motions. Then light your jack-o’-lantern with LEDs and keep it cool so your hard work lasts longer.
Whether you are making a classic grin, a moody silhouette, or a porch display that suggests you secretly belong on a decorating show, pumpkin carving is one of the easiest ways to make Halloween feel real. It is creative without being precious, festive without being expensive, and messy enough to be memorable. In other words, it is the perfect October project.






