Table of Contents >> Show >> Hide
- Quick Table of Contents
- Prep Checklist (Read This First)
- Way 1: System Restore (Undo Changes Without Wiping Files)
- Way 2: Startup Repair & Recovery Options (Fix Boot Problems)
- Way 3: System Image Restore (Complete PC Restore)
- Way 4: Manufacturer Factory Recovery (Back to Original State)
- Way 5: Repair Install or Clean Reinstall (The “Fresh Windows” Route)
- Real-World Experiences (500+ Words of “Here’s What Actually Happens”)
- Conclusion
Windows Vista is the vintage T-shirt of operating systems: nostalgic, occasionally uncomfortable, and somehow still in your closet.
Whether you’re trying to fix a stubborn boot issue, undo a bad driver, or wipe the machine back to “like it was the day you met,”
a “reset” can mean a few different things.
This guide breaks down five practical reset optionsfrom gentle rollbacks to full factory nukesso you can pick the
least dramatic solution that actually works. Along the way, you’ll get real-world tips, common gotchas, and a few “don’t do this at 2 a.m.” warnings.
Before you touch anything: If you care about your files, back them up first. Reset tools can be helpful… and also extremely committed.
Prep Checklist (Read This First)
1) Back up what you can
If Vista still boots, copy your important folders (Documents, Pictures, Desktop, downloads, anything business-critical) to an external drive.
If Vista doesn’t boot, you may still be able to copy files from the recovery environment, a live USB environment, or by removing the drive
and attaching it to another computer.
2) Get your basics together
- Power: Plug in a laptop. A reset that dies mid-flight can leave Windows in an even worse mood.
- Login info: Some recovery menus require an administrator password.
- Installation media (if you have it): A Windows Vista DVD or a recovery disc can unlock repair tools when built-in options are missing.
- Device drivers: If you plan to reinstall, download network and chipset drivers ahead of time if possible.
3) Know what “reset” you actually need
If the computer is slow or unstable after a recent change, try a rollback method first. If you’re preparing to donate/sell the machine,
you probably want a wipe or factory recovery. If Windows won’t boot, aim for Startup Repair or the recovery environment tools.
Way 1: System Restore (Undo Changes Without Wiping Files)
Best for: You installed a driver, update, or program and now things are weirdcrashes, freezes, broken audio, missing network, you name it.
System Restore rolls system files and settings back to an earlier snapshot. Your personal files usually stay put, but recently installed apps/drivers may be removed.
How to run System Restore from inside Vista
- Close your programs (yes, even the 17 browser tabs you swear you’ll read later).
- Open the Start menu and search for System Restore, or use the Run box and type rstrui.exe.
- Select Recommended restore or Choose a different restore point.
- Pick a restore point from a date when things were working.
- Confirm and let the computer restart.
If Vista won’t boot normally
Try launching System Restore from Safe Mode or from the recovery environment (see Way 2). Safe Mode loads fewer drivers, which can make
System Restore more likely to complete successfully.
Reality check
- If there are no restore points, System Restore can’t help. (Vista can’t invent time travel. Yet.)
- If the drive has file-system errors, System Restore may fail. In that case, Startup Repair or disk checks may be the next step.
Way 2: Startup Repair & Recovery Options (Fix Boot Problems)
Best for: Vista won’t boot, loops on startup, or throws scary messages before the desktop appears.
Windows Vista includes a recovery environment with tools like Startup Repair, System Restore,
and a Command Prompt for deeper fixes.
How to reach the recovery environment
Many Vista systems allow access via the Advanced Boot Options menu. During startup, tap F8 repeatedly
before Windows begins loading. If you see an option like Repair your computer, that’s your golden ticket.
If it’s missing, you may need a Windows Vista DVD or a manufacturer recovery disc.
Run Startup Repair
- Boot into the recovery environment.
- Select language/keyboard settings if prompted.
- Log in with an administrator account if required.
- Choose Startup Repair.
- Let it complete, then reboot and test.
When Startup Repair isn’t enough
The recovery environment Command Prompt can run targeted repairsespecially for boot records and boot configuration problems.
If you’re not comfortable with command-line tools, stop here and consider Way 4 or Way 5. But if you’re game:
- Disk checks: can fix file-system errors that block boot.
- Boot repair tools: can rebuild boot components when Windows can’t find itself.
Tip: If you’re mainly trying to “reset Windows to a bootable state,” this is often the least destructive method.
It attempts repairs before you wipe anything.
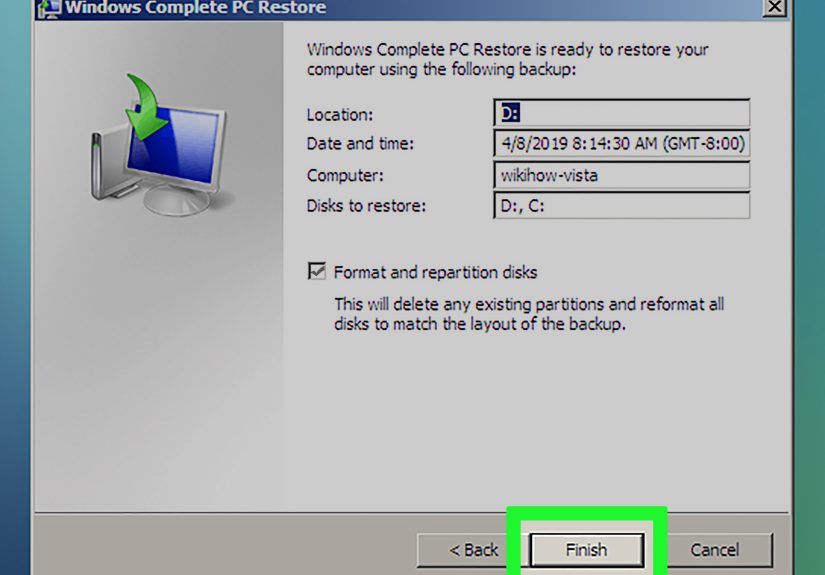
Way 3: System Image Restore (Complete PC Restore)
Best for: You previously created a full-system image backup and want to revert the PC to that exact moment in historyWindows,
programs, settings, and files included. This is the closest thing Vista has to a modern “restore everything exactly” button.
Important limitations
- This option depends on you having created a Complete PC Backup earlier. No backup = no magic.
- Not all Vista editions included the same backup features, and availability can vary by system setup.
- Restoring an image typically overwrites the Windows partitionso newer files may be lost.
How it works (high-level steps)
- Boot into the Windows recovery environment (often via F8 → Repair, or via a Vista DVD).
- Select Windows Complete PC Restore (or similarly named option).
- Choose the backup location (external drive or discs, depending on how you created it).
- Confirm the restore and wait. This can take a while, especially on older drives.
Why this counts as a “reset”: It doesn’t just “repair Windows”it rewinds the entire machine to a known good snapshot,
which is incredibly useful if you’re dealing with layered problems (malware cleanup, driver chaos, registry damage, etc.).
Way 4: Manufacturer Factory Recovery (Back to Original State)
Best for: You want the computer back to “as-shipped” conditionlike the first day it came out of the box.
This is usually the fastest path to a clean system without manually reinstalling Windowsassuming the recovery partition still exists.
How factory recovery is typically launched
Many Vista-era PCs include a hidden recovery partition that launches a recovery manager during startup. The key varies by manufacturer,
but common patterns include F11, F10, Alt + F10, or a dedicated recovery button.
You may also see factory recovery as an option inside “Repair your computer.”
Factory recovery usually does one of these
- Destructive restore: Wipes the Windows partition and reinstalls the original factory image (including bundled software).
- Non-destructive/repair option: Some tools attempt repairs or preserve files, but don’t count on it unless it’s explicitly stated.
What to do before you run it
- Back up your data (factory recovery is often a full wipe in disguise).
- Disconnect unnecessary peripherals (some recovery tools get confused by extra drives).
- Plan time for updates afterwardVista installs are old, and patching can be slow.
Common “why doesn’t it work?” reasons: the recovery partition was deleted, the drive was replaced,
the bootloader changed, or the recovery function was disabled. If factory recovery won’t launch, Way 5 becomes your best bet.
Way 5: Repair Install or Clean Reinstall (The “Fresh Windows” Route)
Best for: You’ve tried the gentler methods and Vista is still acting like it drank three energy drinks and chose violence.
Reinstalling is the most reliable way to reset Windows itself.
Option A: Repair Install (In-Place Upgrade)
A repair install reinstalls Windows system files while attempting to keep your programs, settings, and personal files intact.
It usually must be started from within a working Vista desktop (not by booting from the DVD), because it runs like an “upgrade” over itself.
- Boot into Vista normally.
- Insert the Windows Vista installation DVD (matching your edition and architecture).
- Run Setup and choose the Upgrade path to reinstall over the current installation.
- Follow prompts and let Vista complete the process.
When it’s great: You want a reset of system files without rebuilding everything.
When it’s not: Vista won’t boot, or the install media doesn’t match what’s installed.
Option B: Clean Reinstall (Custom Install)
A clean install wipes the target partition and installs a fresh copy of Windows Vista. This is the closest thing to a “blank slate” reset.
It’s also the most work afterward: drivers, updates, apps, and settings must be rebuilt.
- Back up your files (seriously).
- Boot from the Vista DVD (you may need to select the DVD drive in the boot menu).
- Choose Custom (Advanced) install.
- Select the Windows partition and format/delete it if you truly want a full wipe.
- Install Vista, then install drivers and updates.
Activation and drivers: the two classic post-reinstall headaches
- Product key: Some systems use a sticker key; others use manufacturer activation. Be prepared for phone activation.
- Network drivers: If Vista installs without Wi-Fi/LAN drivers, you may need to transfer drivers via USB from another computer.
Real-World Experiences (500+ Words of “Here’s What Actually Happens”)
Let’s talk about the part most guides skip: what it’s like resetting Vista in the real world, where nothing is perfectly labeled and your keyboard
decides to become shy the moment you need to press F8.
First, the F8 timing window is basically a carnival game. Press too early and you might get nothing. Press too late and Windows starts
loading like it’s sprinting to avoid responsibility. If you’re using a wireless keyboard, your computer may not recognize it in timeespecially on older
systems. The fix is hilariously low-tech: plug in a wired USB keyboard and suddenly you can access every boot menu like you own the place.
Next, the “Repair your computer” option might not appear. People assume it’s always there because it shows up in many tutorials, but it
depends on how the system was configured. Some machines only show Safe Mode options, and the recovery tools live on the installation DVD or a hidden
partition that may be missing. If the hard drive was replaced, repartitioned, or “optimized” by someone who watched exactly one dramatic YouTube tutorial,
that recovery partition could be gone. When that happens, the reset plan changes instantly: you’re either hunting for recovery media or doing a clean
reinstall.
System Restore can feel like the herountil it isn’t. In practice, Vista restore points might exist but still fail to apply if the disk has errors.
That’s why people bounce from System Restore to Startup Repair, then back again, then start bargaining with the computer (“I promise I’ll stop downloading
random toolbars”). A more practical approach is to run the least destructive tool first, and if it fails, assume there’s an underlying disk or boot issue.
Translation: sometimes the problem isn’t the change you madeit’s that the file system is damaged and everything is falling over like dominoes.
Factory recovery has its own personality. It’s often the fastest path to “working Windows,” but it’s also the most emotionally honest: it will remove your
stuff without guilt. In many cases, it restores the original factory image, which may include preinstalled utilities and trial software. You’ll boot back
into a system that feels like a time capsulecomplete with the exact wallpaper and preloaded programs you never asked for. The upside is consistency:
if the recovery environment launches successfully, it usually completes. The downside is the long tail afterward: drivers might be old, updates can take
ages, and modern websites may behave like Vista just arrived wearing a flip phone on a belt clip.
Clean reinstall is the “hard reset” that almost always works, but it’s the most labor-intensive. The real stumbling block is usually drivers.
If Vista installs without a network driver, you can’t download updates or drivers from the machine itself. The smart move is to prepare: download network
and chipset drivers ahead of time on another computer, put them on a USB drive, and install them first. Once the network works, the rest becomes possible.
Not “fun,” exactlybut possible.
Finally, a note about expectations in 2026: even after a successful reset, Vista is still Vista. It’s unsupported and not designed for today’s security
threats or modern software. Many people reset Vista to recover files, run a legacy program, or prepare the machine for offline use. If your goal is a daily
online computer, the best “reset” might be a hardware upgrade or a newer OS on the same machineif the hardware can handle it. But if your goal is simply
to get the system stable again, these five methods give you a practical ladder: climb from gentle to drastic, and stop as soon as you’re back on solid ground.
Conclusion
Resetting Windows Vista doesn’t have to be a one-click leap into the void. Start with the least destructive optionSystem Restorethen move to Startup Repair,
image restore, factory recovery, and finally a repair install or clean reinstall if nothing else works. Most importantly: back up first, because the only thing
more painful than a broken Vista install is realizing your files went down with it.