Table of Contents >> Show >> Hide
- Why Assisted Pull Ups Actually Work
- Before You Start: Form Rules That Make Every Rep Better
- Way #1: Assisted Pull-Up Machine (Counterweight Method)
- Way #2: Resistance Band Assisted Pull-Ups
- Way #3: Foot-Assisted Pull-Ups + Negative Reps (Box/Bench Method)
- Which Assisted Pull-Up Method Should You Choose?
- A Simple 4-Week Assisted Pull-Up Progression
- Programming Tips That Speed Up Results
- Common Assisted Pull-Up Problems (and Quick Fixes)
- Extended Experience Section: What Real Training Journeys Teach About Assisted Pull Ups (500+ Words)
- Conclusion
Let’s be honest: pull-ups are one of the most respected exercises in any gym, right next to deadlifts and “actually returning your shopping cart.” They look simplegrab bar, pull body, done.
But in reality, pull-ups demand serious strength, shoulder control, grip endurance, and core stability. That’s exactly why assisted pull ups are not a “cheat,” not a “baby version,” and definitely not a detour.
They are the bridge between “I can hang for 8 seconds” and “I just hit my first strict rep.”
In this guide, you’ll learn three practical ways to perform assisted pull ups, how to choose the best one for your level, what mistakes to avoid, and how to progress efficiently without frying your elbows or shoulders.
You’ll also get a beginner-friendly plan, real-world training experiences, and practical cues you can use immediately.
Why Assisted Pull Ups Actually Work
The pull-up is a vertical pulling pattern that trains your lats, upper back, biceps, forearms, and core in one move. The issue for most beginners is not effortit’s force production.
If your current pulling strength can’t overcome full body weight yet, assistance lets you train the same pattern with cleaner reps and better control.
What you gain from assisted pull-up training
- Better movement quality: You practice the exact pull-up pattern instead of random “almost like a pull-up” substitutes.
- More useful volume: You can perform enough quality reps to build strength without relying on momentum.
- Joint-friendly progression: Assistance reduces stress while you develop shoulder stability and tendon tolerance.
- Confidence: Consistent reps build rhythm, timing, and grip confidence before full bodyweight reps.
Before You Start: Form Rules That Make Every Rep Better
Good assisted pull-ups are not about getting your chin over the bar at all costs. They are about building repeatable mechanics.
Here are the non-negotiables:
Setup checklist
- Grip: Use a shoulder-width overhand grip for classic pull-ups (or neutral grip if your shoulders prefer it).
- Scapular set: Think “shoulders down and slightly back,” not shrugged into your ears.
- Core tension: Lightly brace abs and glutes so your body stays stable instead of swinging.
- Path: Pull elbows down toward your ribs, not back behind you like a row.
- Range: Controlled hang at bottom; chin clears bar at top without neck craning.
- Tempo: Smooth up, slower down. Your lowering phase is a strength gold mine.
Red flags to avoid
- Using momentum as your main strategy.
- Half reps (quarter-up, quarter-down, repeat).
- Kicking legs wildly like you’re fighting invisible bees.
- Ignoring pain in elbows, front shoulder, or wrists.
Way #1: Assisted Pull-Up Machine (Counterweight Method)
If your gym has an assisted pull-up machine, congratsyou have one of the easiest ways to control progression.
This machine uses a counterweight stack: the more weight you select, the more assistance you get.
How to do machine-assisted pull ups
- Select an assistance weight that allows clean reps (usually 6–10 reps with 1–2 reps in reserve).
- Kneel or stand on the platform (based on machine design) and grab handles with a stable grip.
- Start in a controlled hang with shoulders set down and core braced.
- Pull chest toward bar/handles by driving elbows down.
- Pause briefly at top, then lower slowly until arms are fully extended.
- Repeat for planned reps without bouncing off the platform.
Why this method is great
- Very measurable: easy to track assistance changes week to week.
- Stable setup: less balance demand than bands, so technique is easier to refine.
- Beginner-friendly: perfect when you currently can’t perform full reps safely.
Common machine mistakes (and fixes)
- Mistake: Too much assistance and no effort. Fix: Choose assistance that feels challenging by the final reps.
- Mistake: Tiny range of motion. Fix: Full controlled stretch at bottom and complete top position.
- Mistake: Fast drop on the way down. Fix: Use a 2–3 second eccentric on each rep.
Way #2: Resistance Band Assisted Pull-Ups
Band-assisted pull-ups are popular for a reason: inexpensive, portable, and effective when performed correctly.
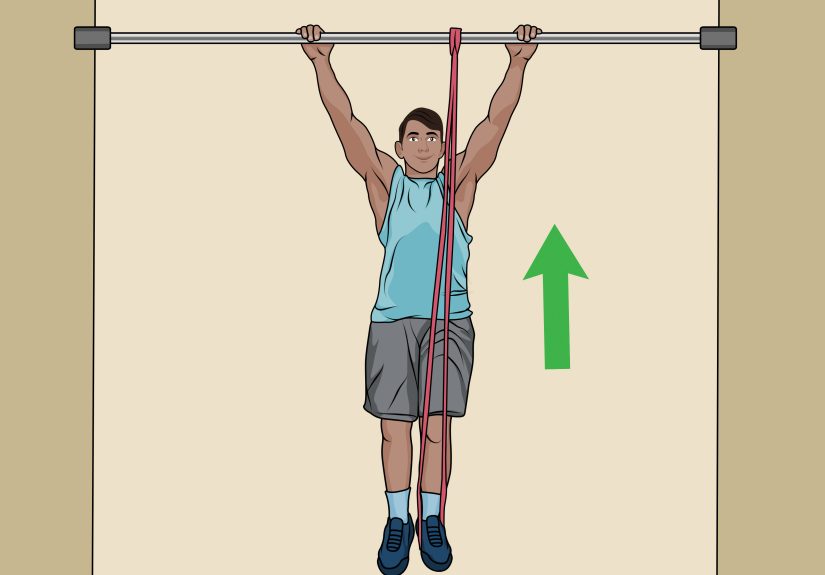
Loop a long resistance band over the bar, place one foot or knee in the band, and pull with control.
How to perform band-assisted pull ups
- Choose a loop band. Thicker band = more help.
- Secure one end over the bar so the hanging loop is stable.
- Grip the bar first, then place one foot (or knee) into the band carefully.
- Set shoulders and core before each rep.
- Pull up smoothly; lower with control without letting the band snap you upward or downward.
- Complete all reps, then step out safely.
Band method pros
- Portable: you can train at home, in parks, or in almost any gym.
- Easy progression: switch from thick to thinner bands over time.
- Excellent bridge to unassisted reps when paired with negatives.
Band method cons (and how to manage them)
- Variable assistance: Bands help more at bottom than top. Solution: slow eccentrics and top-position holds.
- Stability challenge: body may sway. Solution: brace abs, squeeze glutes, and pause before each rep.
- Setup risk: rushed setup can be awkward. Solution: always secure band first, then step in slowly.
Way #3: Foot-Assisted Pull-Ups + Negative Reps (Box/Bench Method)
No machine? No problem. A box or bench under the bar lets you assist with one foot while still practicing true pull-up mechanics.
Pair this with negatives (slow lowering reps) and you get one of the fastest strength builders for your first strict pull-up.
How to do foot-assisted pull-ups
- Place a stable box or bench under the pull-up bar.
- Grab the bar with your chosen grip and place one foot lightly on the box.
- Use just enough leg drive to help yourself up with clean form.
- At the top, reduce leg help and lower under control for 3–5 seconds.
- Repeat for 4–8 reps, keeping assistance minimal and consistent.
How to add negatives correctly
- Use the box to start in the top position (chin above bar).
- Step off and lower as slowly as possible with control.
- Aim for 3–8 seconds per descent, depending on strength level.
- Do 3–5 reps per set, resting well between sets.
Why this method is underrated
- Builds eccentric strength quickly, which transfers directly to full pull-ups.
- Teaches body control and top-position awareness.
- Works in minimal-equipment setups.
Which Assisted Pull-Up Method Should You Choose?
| Goal / Situation | Best Method | Why |
|---|---|---|
| Absolute beginner in commercial gym | Assisted pull-up machine | Most stable and easiest to progress precisely |
| Home workout or park training | Band-assisted pull-ups | Portable, cheap, and scalable |
| Need fastest transfer to strict reps | Foot-assisted + negatives | Strong eccentric overload and movement specificity |
| Shoulder feels cranky with one setup | Try neutral grip or different method | Joint comfort improves consistency and long-term progress |
A Simple 4-Week Assisted Pull-Up Progression
Train vertical pulling 2 times per week (for example: Monday and Thursday). Keep at least one day between sessions.
If your recovery is good, add light accessory pulling on a third day.
Week 1: Skill and control
- Assisted Pull-Up (your chosen method): 4 sets x 6 reps
- Negative Pull-Up: 3 sets x 3 reps (4-second descent)
- Dead Hang: 2 sets x 20–30 seconds
- Row variation: 3 sets x 10–12 reps
Week 2: Slight overload
- Assisted Pull-Up: 4 sets x 7 reps (or slightly less assistance)
- Negative Pull-Up: 3 sets x 4 reps (4–5-second descent)
- Top Hold (chin over bar): 3 sets x 8–12 seconds
- Row variation: 3 sets x 10 reps (slightly heavier)
Week 3: Strength focus
- Assisted Pull-Up: 5 sets x 5 reps (harder variation)
- Negative Pull-Up: 4 sets x 3 reps (5–6-second descent)
- Scapular Pull-Ups: 3 sets x 8 reps
- Biceps/forearm accessory: 2–3 sets
Week 4: First strict rep attempt
- Attempt 1 strict pull-up at start of session (after warm-up).
- Then Assisted Pull-Up: 4 sets x 5–6 reps
- Negative Pull-Up: 3 sets x 2–3 reps (slowest possible controlled descent)
- Dead Hang: 2 sets x max quality time
If you don’t hit a strict rep yet, that’s normal. Repeat the cycle with slightly harder settings and keep stacking quality weeks.
Programming Tips That Speed Up Results
1) Use “just enough” assistance
The sweet spot is reps that look clean but feel challenging. If you can talk through your set like a podcast host, reduce assistance.
2) Track one progression variable per week
Choose one: less assistance, more reps, better tempo, or better range. Changing all variables at once makes progress messy.
3) Pair with supportive accessories
- Horizontal rows (dumbbell/cable/inverted)
- Lat pulldowns with strict control
- Face pulls or rear-delt work
- Farmer carries and hangs for grip
- Core anti-extension work (planks, hollow holds)
4) Respect recovery
Pull-ups are demanding for elbows, shoulders, and forearms. Sleep, hydration, and rest days matter as much as effort.
Common Assisted Pull-Up Problems (and Quick Fixes)
“I feel everything in my arms, not my back.”
Start each rep by setting your shoulder blades down, then pull elbows toward your ribs. Imagine driving your elbows into your back pockets.
“I swing too much.”
Tighten abs and glutes before leaving the bottom. Pause briefly in the dead hang to reset body tension between reps.
“My grip gives up first.”
Add dead hangs, towel hangs, and farmer carries 2–3 times weekly. Grip often improves faster than people expect when trained directly.
“My elbows feel irritated.”
Reduce total volume for a week, use a neutral grip, and control eccentrics. If pain persists, get evaluated by a qualified clinician.
Extended Experience Section: What Real Training Journeys Teach About Assisted Pull Ups (500+ Words)
One consistent pattern shows up in almost every beginner pull-up journey: people underestimate technique and overestimate brute effort.
A lot of trainees start by “trying harder” on the bar for months, but they never practice a sustainable progression. The first breakthrough usually comes when they
switch from random attempts to assisted reps with clear form goals.
In one common gym scenario, a trainee can do 15 push-ups, hold a plank for over a minute, and still cannot perform one strict pull-up.
They assume they’re “not built for pull-ups.” After four to six weeks of machine-assisted reps, controlled negatives, and hangs, they hit their first strict rep.
Nothing magical happened genetically. They simply trained the right pattern at the right intensity.
The confidence jump after that first rep is huge. Suddenly pull-ups move from “impossible test” to “trainable skill.”
Another experience comes from people who rely only on thick bands. Bands are excellent tools, but some trainees become dependent on the bounce.
They fly through reps with speed, then stall on strict attempts. The fix is simple: keep bands, but add pauses at the top and slower descents.
As soon as tempo becomes controlled, transfer to bodyweight improves. It’s a good reminder that assistance should teach control, not replace it.
Many lifters also discover that grip is the silent deal-breaker. Their back is strong enough, but hands and forearms quit first.
When they add two short grip sessions per weekdead hangs, farmer carries, and bar holdstheir pull-up sets improve fast.
This experience often surprises people because grip feels like a “small detail.” In practice, it can be the bottleneck that decides whether a rep counts.
Shoulder comfort is another real-world lesson. Some people feel great with a pronated grip; others feel better with neutral handles.
The trainees who progress fastest are rarely the ones forcing one “perfect textbook” grip. They pick the variation that lets them train consistently,
pain-free, and with full control. Consistency beats ego every time.
There’s also a psychological side. A lot of beginners compare themselves to advanced athletes doing high-rep sets, weighted pull-ups, or flashy bar work online.
That comparison can kill motivation. But once they focus on personal metricsone less assistance plate, one extra controlled rep, one longer eccentricthey get momentum back.
Small objective wins create a feedback loop that keeps training sustainable.
Coaches often notice the same turning point: when trainees stop chasing the top position and start owning the full rep.
Full hang, stable mid-range, chin over bar, controlled descent. That complete rep quality creates long-term gains and fewer joint complaints.
In contrast, rushed half reps can feel productive in the moment but usually lead to plateaus.
One especially useful experience comes from people in busy gyms with limited equipment. They may not get the assisted machine every session.
Instead of skipping pull-ups, they rotate methods: machine one day, band another, foot-assisted negatives on the third week.
Progress still happens because the movement pattern remains consistent.
This flexibility helps people stay on track even when real life is messy.
Finally, the biggest lesson from real pull-up journeys is that success rarely looks dramatic day-to-day.
It looks like quiet repetition: warming up shoulders, logging sets, reducing assistance gradually, and showing up twice a week for months.
Then one day you jump to the bar, pull, and realize the rep is yours.
That moment feels sudden, but it was built by dozens of ordinary sessions done well.
Assisted pull-ups are not a detour from the goal. They are the route.
Conclusion
If your goal is a strict pull-up, the smartest move is not random max attemptsit’s structured assistance.
Start with one of the three methods (machine, band, or foot-assisted + negatives), train with quality and consistency, and progress a little each week.
Keep your form clean, track your effort, and respect recovery. You don’t need perfect genetics or superhero lats. You need a reliable plan and enough patience to let strength compound.
Your first strict pull-up is not a mystery. It is a process.