
Table of Contents >> Show >> Hide
- What Is Wall Molding and Trim?
- 11 Stylish Wall Molding and Trim Ideas to Try
- 1. Classic Picture-Frame Molding in the Living Room
- 2. Tall Board-and-Batten Accent Wall
- 3. Cozy Wainscoting for Dining Rooms and Hallways
- 4. Statement Ceiling with Crown Molding
- 5. Chair Rail with Two-Tone Paint
- 6. Minimalist Box Trim in the Bedroom
- 7. Modern Grid Panel Wall for a Home Office
- 8. Oversized Baseboards and Door Casings
- 9. Luxe Headboard Wall with Panel Molding
- 10. Hallway Makeover with Repeated Wall Panels
- 11. Curved, Fluted, or Specialty Trim for a Contemporary Twist
- Planning and Installing Wall Molding Like a Pro
- Real-Life Experiences: What You Learn from Wall Molding Projects
- The Bottom Line: Trim That Transforms
Blank walls are like un-iced cakes: technically fine, but definitely not living their best life. Wall molding and trim can take a flat, forgettable room and turn it into something that looks custom, intentional, and a little bit fancywithout needing a full gut renovation.
From classic wainscoting to sleek minimalist grids, today’s wall molding ideas work with almost any style, whether your home leans traditional, modern, farmhouse, or somewhere in the “I just want it to look expensive” category. Done well, trim adds architectural character, frames furniture and art, and can even help with resale value by making the space feel more finished and high-end.
Before we jump into 11 stylish wall molding and trim ideas you can actually try, let’s get clear on what molding is and how to choose the right style for your home.
What Is Wall Molding and Trim?
Wall molding (or moulding, if you’re feeling fancy) is decorative trim installed where surfaces meet or to break up a large, flat wall. It started as a practical way to hide gaps and protect plaster, but over time became a design tool for adding depth and detail. Common types include baseboards, crown molding, chair rails, picture rails, wainscoting, beadboard, and panel molding.
You’ll usually see molding made from three main materials:
- Wood: Durable, classic, and ideal if you want to stain it and show off the grain. Think poplar, fir, or alder for a warm, high-end look.
- MDF (medium-density fiberboard): Smooth, stable, and budget-friendly. Great if you plan to paint everything the same color as the wall or trim.
- Polyurethane or PVC: Lightweight and moisture-resistant, perfect for bathrooms, basements, or other spaces where humidity is an issue.
Most decorative wall trim can be installed as a weekend DIY if you’re comfortable measuring, cutting with a miter saw, and using construction adhesive and a nail gun. Just remember: measuring twice and caulking generously are the “secret sauce” for pro-looking results.
11 Stylish Wall Molding and Trim Ideas to Try
1. Classic Picture-Frame Molding in the Living Room
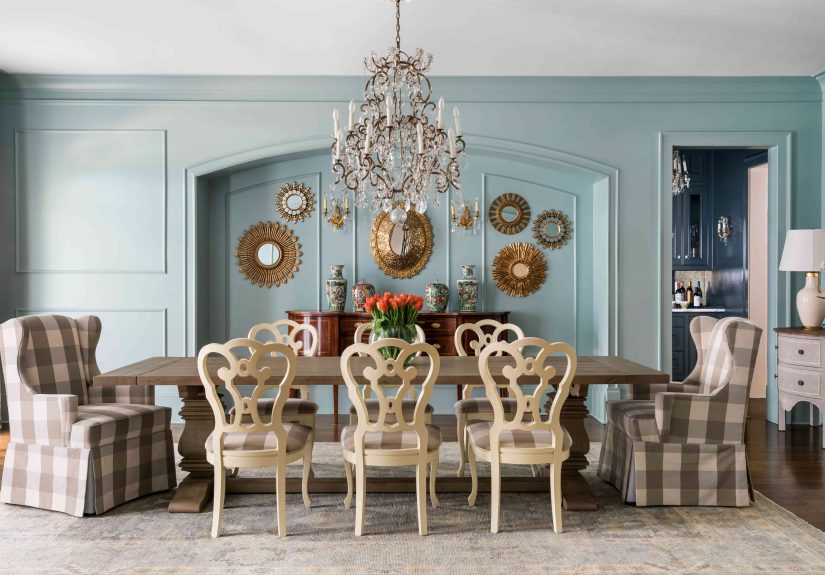
If you love tailored, Parisian-style interiors, picture-frame molding is your new best friend. This look uses simple rectangular “frames” applied directly to the wall to create panels. You can keep it subtle by painting the trim and wall the same color, or go bolder with contrast.
Where it works best: Living rooms, dining rooms, hallways, and formal entryways.
Style tip: Align the frames with architectural featureslike the top of a door casing or the height of a sofa backso everything feels intentional rather than random. Use slimmer trim for a modern look, or stack profiles (a base plus a cap) for added depth.
2. Tall Board-and-Batten Accent Wall
Board-and-batten is the ultimate “instant architecture” trick. Vertical battens (slim boards) divide the wall into even sections, creating a rhythm that looks both classic and current. It’s especially effective behind beds, sofas, or in entryways.
Why it works: The vertical lines draw the eye up, making ceilings feel taller. Painted in a moody colorlike deep green or charcoalit can turn a plain wall into a dramatic focal point.
DIY note: Use a level instead of trusting your floors and ceilings; older homes rarely have perfectly straight lines. Fill nail holes and caulk edges before painting for crisp, shadow-free seams.
3. Cozy Wainscoting for Dining Rooms and Hallways
Wainscoting is paneling that covers the lower portion of a walltraditionally installed to protect high-traffic areas from scuffs and chairs. Today, it’s just as popular for its visual charm as its practicality. Styles range from simple flat panels to beadboard and more decorative raised panels.
Where to use it: Dining rooms, stairways, kids’ rooms, and narrow hallways that need more personality.
Design tip: Paint the wainscoting a slightly darker or richer shade than the upper wall to ground the space and hide everyday wear. A crisp white wainscoting with a soft color above always feels timeless.
4. Statement Ceiling with Crown Molding
Crown molding sits at the joint where walls meet the ceiling, softening the transition and making the room feel more finished. Wide, layered crown looks traditional and grand, while slimmer profiles read more modern.
Why it’s worth it: Crown molding visually lifts the room and gives even a basic builder-grade space a custom, “this was totally intentional” vibe. High ceilings can handle chunkier profiles, while low ceilings benefit from narrow, simple lines.
Cost note: Price is driven by the material, profile complexity, and whether you DIY or hire a pro. Ornate or real-wood profiles cost more, but MDF or polyurethane options make it accessible.
5. Chair Rail with Two-Tone Paint
Chair rail is a horizontal strip of molding that runs around the room, traditionally to protect the walls from chair backs. These days, it’s a great tool for breaking up a tall wall and playing with color blocking.
Height tip: A classic rule of thumb is to place chair rail about one-third of the way up the wallroughly 32 inches from the floor in an 8-foot roomthough you can adjust based on your proportions.
Design idea: Try a darker color or bolder wallpaper below the rail and a lighter neutral above. This grounds the room and makes it feel more sophisticated without overwhelming the eye.
6. Minimalist Box Trim in the Bedroom
Love the idea of molding but not the fuss? Go minimal. Simple, evenly spaced rectangular boxesoften just a step in from the room’s cornerscan create a tailored, hotel-like feel with very little material.
Best for: Bedrooms, guest rooms, and modern apartments where you want subtle texture more than full-on traditional detail.
Color strategy: Paint the wall and trim the same color in a matte or eggshell finish so the look is all about shadows and depth rather than contrast.
7. Modern Grid Panel Wall for a Home Office
A grid-style panel wallthink evenly spaced squares or rectanglesfeels graphic and contemporary. It’s a popular choice behind desks, media units, or as a Zoom-friendly background that instantly looks more polished than a plain wall.
Practical perk: The grid can help visually organize the room, especially if you have bookcases, art, or storage that you want to align with clean lines.
DIY tip: Sketch your grid on paper, then lightly mark it on the wall with a level and pencil before you cut any trim. Consistent spacing makes or breaks this look.
8. Oversized Baseboards and Door Casings
If full wall paneling feels like too much, start at the floor. Tall baseboards and chunkier door casings can dramatically upgrade a room without touching the field of the wall at all.
Why it works: Bigger trim around doors and at the floor visually anchors the room and makes windows and openings feel more substantial. It’s also an excellent way to blend original and newer elements in older homes.
Budget tip: You can fake “taller” baseboards by stacking a simple board on top of your existing base, adding a small cap molding, and painting everything to match.
9. Luxe Headboard Wall with Panel Molding
Instead of buying an oversized headboard, you can build one right into the wall with panel molding. Think vertical or arched frames that echo the width of the bed and nightstands, maybe with wall sconces wired into the design.
Design idea: Paint the entire headboard wall a saturated colorlike navy, forest green, or warm taupewhile keeping the rest of the room lighter. The trim becomes a subtle outline that adds dimension behind your pillows.
Time-saving option: Precut wall-molding kits and paneling packages can speed up layout if you’re not in the mood to design from scratch.
10. Hallway Makeover with Repeated Wall Panels
Hallways are often an afterthought, but they’re perfect for wall molding. Repeated rectangular panels or half-height wainscoting along the length of a corridor can make it feel like a design moment instead of a tunnel you rush through.
Function bonus: The added trim helps protect walls from kids, pets, and everyday traffic. Choose a semi-gloss paint on the lower panels so it’s easier to wipe clean.
Lighting tip: Pair your hallway trim with sconces between panels for a boutique-hotel effect.
11. Curved, Fluted, or Specialty Trim for a Contemporary Twist
Modern molding isn’t limited to flat rectangles. Designers are playing with fluted panels, curved edges, and unusual profiles to bring texture and movement to otherwise plain walls. Used sparingly, these details feel fresh rather than fussy.
Where to use it: Small accent walls, entry niches, around a bar area, or behind open shelving where you want strong texture without busy color or pattern.
Keep it balanced: Because these profiles are more attention-grabbing, keep furniture and art simple so the wall detail remains the main event.
Planning and Installing Wall Molding Like a Pro
A stylish trim project is 50% design decisions and 50% sweat equity. Here are practical tips to get both parts right:
- Start with scale: Taller ceilings and larger rooms can handle bigger profiles and more complex patterns, while cozy spaces usually look better with simpler, slimmer trim.
- Respect the architecture: Match new molding to existing elements like window casings or stair railings so everything feels like it belongs to the same house, not a patchwork of styles.
- Use layout tools: Blue tape, laser levels, and full-size paper templates make it easier to visualize proportions before you commit with nails.
- Prep matters: Lightly sand glossy walls, repair dents, prime as needed, and always caulk where trim meets the wall and at joints. This hides gaps and makes even budget materials look upscale.
- Think long-term: Some real-estate pros warn that overly trendy DIY accent walls can hurt resale if they’re poorly installed or too specific to your taste. Focus on clean lines, solid construction, and classic layouts that can be easily repainted by the next owner.
Real-Life Experiences: What You Learn from Wall Molding Projects
On paper, wall molding seems simple: buy trim, nail trim, paint trim, enjoy compliments. In real life, there are a few lessons nearly everyone learns along the wayoften with a caulk gun in one hand and sandpaper in the other.
Lesson 1: The Planning Stage Is Not Optional
Almost every seasoned DIYer will tell you the same thing: the time you spend planning is what separates the “Whoa, did a designer do this?” wall from the “Oh no, we have to live with this” wall. That means sketching out your layout, measuring multiple times, and double-checking how the trim lines up with outlets, switches, vents, and existing casing.
Many homeowners find it helpful to mock up their molding pattern with painter’s tape before making a single cut. The tape temporarily outlines the boxes, rails, or panels, so you can live with the look for a day or two. It’s common to realize you want fewer, wider panels or a slightly higher chair rail once you see it full-scale.
Lesson 2: Caulk and Filler Are Your Best Friends
Even pros rarely get perfectly tight seams all the way around a roomwalls bow, corners are out of square, and trim can warp slightly. That’s where caulk and wood filler come in. Small gaps between the wall and trim disappear with a thin bead of paintable caulk smoothed with a damp finger. Nail holes and miter joints vanish after a bit of filler, sanding, and primer.
People who’ve done more than one molding project often say they now factor in just as much time for filling and sanding as they do for cutting and nailing. It feels a little tedious in the moment, but it’s the step that makes your trim look custom instead of obviously DIY.
Lesson 3: Paint Color Changes Everything
Another common experience: the wall looks “too busy” or “too flat” right after the trim goes upuntil the paint goes on. A single color over both wall and molding tends to calm everything down and highlight the shadows and depth instead of every seam. Homeowners who experiment with darker, richer colors on paneled or wainscoted walls often report that the room suddenly feels cozier and more intentional, even if nothing else in the space changed.
It’s also very normal to test more than one paint sample. Molding introduces extra shadows and angles, so a color that looked light on a flat wall might read darker once panels and boxes are added. Viewing samples at different times of day helps avoid surprises.
Lesson 4: Kits and Precut Options Lower the Stress
For people who are nervous about math-heavy layouts or precise angles, precut wall panel kits can be a game-changer. These packages include coordinated trim pieces sized to create a specific pattern, so you only have to worry about placement, not proportions. Online marketplaces and home centers now offer ready-to-go wainscoting and headboard-wall bundles, which can make a big project feel far more approachable for first-timers.
Experienced DIYers sometimes mix kits with custom pieces, using the kit for the main focal area (like behind the bed) and adding simpler, matching trim in other parts of the room for continuity.
Lesson 5: The “Hidden” Benefits Are Real
Beyond aesthetics, people who live with wall molding often appreciate a few unexpected perks. Lower wall panels and taller baseboards can hide scuffs in families with kids and pets, especially when painted in durable, wipeable finishes. Trim can also disguise older drywall or small imperfections that would otherwise stand out on a completely smooth wall.
There’s also a psychological benefit: many homeowners say that once paneling or crown goes up in a main room, the entire house suddenly feels more “finished,” even if other spaces are still a work in progress. That little boost of pride can be the motivation you need to keep going with other projects.
Lesson 6: Simple, Well-Executed Designs Age Best
Finally, people who have gone through multiple design cycles tend to agree on one thing: timeless trim beats trendy trim. Overly complicated patterns or extreme color contrasts can start to feel dated quickly, while simple rectangles, classic wainscoting, and clean crown molding hold up year after year. If you’re upgrading a home you might sell someday, it’s usually smarter to lean classic and let color and accessories express your personality.
In other words, it’s better to have a few clean, carefully installed boxes than a whole wall of fussy trim that doesn’t line up. Quality over quantity wins every time.
The Bottom Line: Trim That Transforms
Wall molding and trim are some of the most powerful tools you have for rewriting the story of your home’s interior. Whether you go for full-height paneling, a simple chair rail and paint combo, or a bold grid accent wall, you’re adding structure, rhythm, and character that plain drywall simply can’t compete with.
Start with one wall, respect the scale of your space, and take your time with layout and finishing work. Once you see what a difference good trim makes, you may find yourself eyeing every room and thinking, “Okay, what can we dress up next?”





