
Table of Contents >> Show >> Hide
- Why Build an Old-Timey Camera With a 3D Printer?
- The Old-Timey Camera Principle: A Box That Controls Light
- Choosing Your Camera Type
- Materials: What to Print With
- Essential Parts of a 3D Printed Old-Timey Camera
- Basic Build Workflow
- Exposure Tips for Pinhole Photography
- How to Make Your Camera Look Old-Timey
- Common Problems and How to Fix Them
- Why the Imperfections Are the Reward
- Experience Notes: What It Feels Like to Build and Shoot One
- Final Thoughts
There is something wonderfully ridiculous about using a humming, nozzle-slinging 3D printer to build a camera that belongs spiritually in a dusty attic, a 1905 expedition trunk, or the hands of a very serious person wearing a waistcoat. Yet that is exactly the charm of making an old-timey camera with new-timey tools. You take plastic filament, digital design files, a few screws, a little black paint, and the ancient magic of light passing through a tiny hole, and suddenly your desk looks less like a workspace and more like a miniature camera factory run by a Victorian inventor with Wi-Fi.
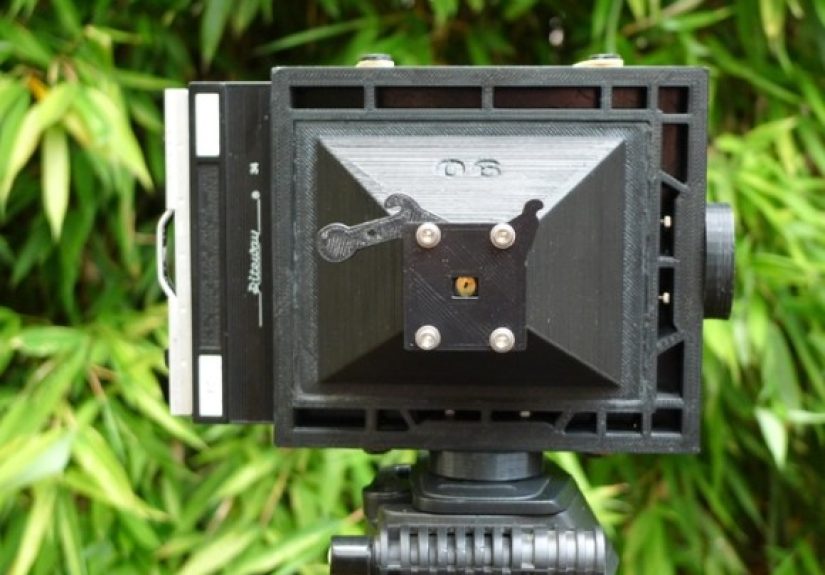
A 3D printed camera is not just a novelty. It is a real photography project that teaches optics, mechanical design, film handling, exposure, patience, and the noble art of not dropping tiny screws into carpet. Whether you want to build a pinhole camera, a 35mm film camera, a medium-format box, or a large-format-style camera body, a 3D printer can produce parts that are accurate enough, customizable enough, and wonderfully strange enough to make analog photography feel brand-new again.
This guide explains how to use a 3D printer to make a handmade film camera, what materials matter, how old camera principles still work, and why the final images may look imperfect in exactly the best way.
Why Build an Old-Timey Camera With a 3D Printer?
At first, the idea sounds backward. Cameras today are computational beasts. They autofocus, auto-expose, stabilize, recognize faces, and sometimes seem to judge your lunch before you photograph it. An old-timey camera does almost none of that. It is a light-tight box, a film plane, a lens or pinhole, and a shutter. That simplicity is the point.
A 3D printer gives you the freedom to design the box yourself. Instead of carving wood or machining metal, you can print a camera body in modules: front standard, back plate, film gate, spool holders, shutter door, grip, lens mount, knobs, viewfinder, and even decorative trim. If something does not fit, you adjust the file and print again. It is prototyping with consequences, and those consequences usually smell faintly like warm PLA.
The appeal goes beyond thrift. A 3D printed analog camera lets you choose the format. You can build a compact 35mm pinhole camera, a panoramic camera that exposes across sprocket holes, a medium-format box for 120 film, or a large-format-inspired body using sheet film holders. Some makers even design cameras around old lenses rescued from broken folders, enlargers, projectors, or thrift-store mysteries labeled “probably camera stuff.”
The Old-Timey Camera Principle: A Box That Controls Light
Every camera, no matter how fancy, follows the same basic rule: light must enter only when and where you want it. A pinhole camera uses a tiny aperture instead of a glass lens. A lens camera uses optics to focus light onto film. Both require a dark interior, a stable film plane, and a way to start and stop exposure.
The most basic old-timey design is the pinhole camera. It has no lens, no focusing mechanism, and no fragile shutter blades. A small hole allows light to project an inverted image onto film or photographic paper. The smaller the hole, the sharper the image may become up to a point, but it also reduces brightness and increases exposure time. Go too small, and diffraction softens the image. Go too large, and everything looks like it was photographed through soup. The sweet spot depends on the distance between the pinhole and the film.
For a beginner, a pinhole camera is the friendliest starting point because it has fewer moving parts. For someone who enjoys mechanical puzzles, a 3D printed film camera with a lens mount, shutter, and film advance system offers a deeper challenge. Either way, the goal is the same: make a box that lets in light only on purpose.
Choosing Your Camera Type
Option 1: 35mm Pinhole Camera
A 35mm pinhole camera is compact, affordable to feed, and easy to develop through common film labs. It is a great first build because the film cartridges are standardized, the frame size is familiar, and the parts can be printed on almost any desktop 3D printer. You will need a body, film path, take-up spool, rewind knob, pinhole plate, and a simple shutter flap or sliding cover.
The downside is precision. 35mm film is small, so tiny light leaks, scratches, or alignment errors become obvious. But that is also part of the charm. Your first roll may include ghostly streaks, uneven spacing, and one accidental photo of your shoes. Congratulations: you have entered the analog tradition.
Option 2: Medium-Format Camera
Medium-format cameras usually use 120 film, which gives you a larger negative and more forgiving image quality. A 3D printed medium-format body can be simple or sophisticated. Some designs use existing film backs and lenses, while others print more of the film transport system. The larger frame makes pinhole images look dreamy rather than merely blurry, which is excellent news for anyone who wants art instead of evidence.
Medium format also suits old-timey aesthetics beautifully. Square frames, soft corners, vignetting, and slow exposures all help create photographs that look like memories you found in a shoebox.
Option 3: Large-Format-Style Camera
If you want drama, build a large-format-style camera. This type can use sheet film holders, photographic paper, or alternative processes. A 3D printer can produce lens boards, film holder adapters, rails, focusing frames, and lightweight bodies. Large-format photography rewards patience and punishes arrogance. It is slow, tactile, and majestic, like making a sandwich with a telescope.
This route is better for experienced makers because alignment, rigidity, and light sealing matter more. But the results can be spectacular. Big negatives capture detail, texture, and tonal range in a way that makes even a rusty mailbox look like it has a complicated emotional life.
Materials: What to Print With
Material choice matters because cameras hate unwanted light. Dark PLA is popular because it prints easily and holds enough detail for camera parts. PETG can be tougher and more heat-resistant, but some filaments are surprisingly translucent. ABS can be durable, though it requires better ventilation and a printer setup that can handle warping. The word “black” on a filament spool does not automatically mean “photographically light-tight.” Plastic can betray you. Plastic has no loyalty.
For best results, print test strips and shine a bright flashlight through them. If you see glow, your camera will see it too. Increase wall thickness, use more perimeters, print with higher infill, and consider lining the interior with matte black paint, flocking paper, aluminum tape covered with black paint, or thin black cardstock. The interior should be non-reflective. Glossy plastic inside a camera can bounce light around and create haze, flare, or mysterious bright patches that look artistic only after you decide not to cry.
Essential Parts of a 3D Printed Old-Timey Camera
The Camera Body
The body must be rigid, light-tight, and easy to open for loading film. Rounded corners may look pretty, but flat mating surfaces are easier to seal. Print the body in sections if your printer bed is small, then join the parts with screws, glue, or heat-set inserts. Use labyrinth-style seams where possible. A labyrinth seam makes light turn corners before reaching the film, and light is famously bad at following instructions in the dark.
The Film Gate
The film gate determines the image area. It should hold film flat and expose only the frame you want. Rough edges can scratch film, so sand the gate lightly and remove print artifacts. A clean film path is critical. Film is not fond of being dragged across tiny plastic stalagmites.
The Pinhole or Lens Mount
For a pinhole camera, the aperture should be made in thin metal, not thick plastic. A small piece of aluminum from a soda can, brass shim, or thin foil can work. Drill or pierce the hole carefully, then sand away burrs. Mount the pinhole behind a larger printed opening. For a lens-based build, you need a mount that holds the lens at the correct flange distance. That distance determines focus. Guessing is fun until every photo looks like Bigfoot evidence.
The Shutter
A pinhole shutter can be as simple as a sliding cover. Because exposure times are often several seconds or longer, a handmade shutter is fine. For lens cameras, you may adapt an old leaf shutter, use a lens with a built-in shutter, or design a simple mechanical shutter. Reliability matters more than elegance. A shutter that works every time beats one that looks like a museum piece but exposes only when Mercury is in retrograde.
The Film Advance System
Film advance is where many DIY camera builds become spicy. You need to move film smoothly, keep tension, avoid scratches, and prevent overlapping frames. With 120 film, backing paper and frame numbers can help. With 35mm, sprocket holes can guide movement, but a printed advance mechanism must still be precise. Start simple. A knob, take-up spool, rewind knob, and frame counter marks may be enough for early builds.
Basic Build Workflow
Step 1: Pick a Proven Design
Before designing from scratch, study existing 3D printed camera projects. Look at pinhole cameras, open-source film camera bodies, modular medium-format systems, and DIY large-format builds. Proven designs teach you where the tricky parts live: film flatness, light seals, spool tension, lens alignment, and shutter reliability.
If you are new to camera making, start with a simple pinhole camera. A successful first roll is better than a half-finished mechanical masterpiece that has been “almost done” since last winter.
Step 2: Print Slowly and Accurately
Camera parts reward accuracy. Use a layer height that balances strength and detail. Add extra walls. Avoid thin single-wall areas. Print test pieces for critical parts such as caps, spools, film channels, and mating surfaces. If parts snap together too loosely, you get light leaks. If they fit too tightly, you get stress cracks, profanity, and possibly a new respect for tolerances.
Step 3: Make It Light-Tight
Before loading film, test the empty camera. Put a bright flashlight inside the body in a dark room and look for leaks. Then reverse the test by shining light from the outside while looking inside. Seal gaps with black tape, felt, foam, paint, or redesigned parts. Do not skip this step. Film is expensive enough without donating it to the Light Leak Research Institute.
Step 4: Load Film Carefully
Load film in subdued light if possible. Make sure the film advances smoothly and stays flat across the gate. Check that the back closes fully. If using photographic paper, load it in a darkroom or changing bag. Label your camera with its approximate focal length and aperture so you are not doing math in a field while a sunset laughs at you.
Step 5: Shoot, Develop, Adjust
The first roll is not a final exam. It is diagnostic evidence. Take notes for each exposure: lighting conditions, estimated time, film speed, and subject. When you get scans or develop prints, look for patterns. Are the frames uneven? Is one edge brighter? Are images too thin, too dense, or scratched? Each flaw points to a fix. Camera making is photography plus debugging, except the bugs are made of photons.
Exposure Tips for Pinhole Photography
Pinhole cameras have very small apertures, often around f/100, f/150, or even smaller. That means exposures are long. In bright sun, you may need several seconds. In shade, you may need much longer. Indoors, you may have enough time to make coffee, drink the coffee, and contemplate whether photography was a mistake.
Use a light meter app as a starting point, then convert the reading to your pinhole’s f-number. Many pinhole photographers use exposure charts or calculators. Remember that film reciprocity failure can make long exposures require more time than simple math suggests. If your calculated exposure is 30 seconds, the real exposure might need to be longer depending on the film. Bracket exposures when you can: shoot one normal, one shorter, and one longer. Film may be old-school, but it still appreciates options.
How to Make Your Camera Look Old-Timey
A 3D printed camera does not have to look like a plastic lunchbox. Add a faux leather wrap, wooden veneer, brass-colored screws, engraved labels, or a printed viewfinder hood. You can design decorative ribs, art deco panels, or box-camera styling directly into the model. Sand visible layer lines and finish the surface with primer and paint. For extra charm, add a tiny badge with a completely unnecessary name like “The Photon Wrangler 1902.”
Function should still come first. Do not sacrifice access to film chambers or adjustment screws just to add ornamental nonsense. Ornamental nonsense is welcome, but it must know its place.
Common Problems and How to Fix Them
Light Leaks
Light leaks appear as streaks, flares, fogged edges, or ghostly patches. Check seams, hinges, film doors, viewfinder openings, and the pinhole plate. Use foam tape, black felt, or redesigned overlapping joints. Also test the plastic itself for translucency.
Scratched Film
Scratches usually come from rough film gates, sharp printed edges, dust, or misaligned spools. Sand the film path gently, clean the interior, and ensure the film does not drag across support scars.
Blurry Images
With pinhole cameras, softness is normal, but extreme blur may mean the pinhole is too large, ragged, or thick. With lens cameras, check flange distance and film flatness. A beautiful lens cannot rescue a film plane that waves around like a tiny plastic hammock.
Overlapping Frames
Frame spacing issues come from inconsistent film advance. Mark your knob turns, add a counter window for 120 backing paper, or improve the take-up spool grip. Test with scrap backing paper before sacrificing a fresh roll.
Why the Imperfections Are the Reward
A 3D printed old-timey camera will not behave like a modern mirrorless camera. That is not failure; that is flavor. Pinhole images may be soft, wide, vignetted, and dreamlike. Lens-based DIY cameras may show flare, uneven frame spacing, or quirky edge sharpness. These flaws remind you that the image came from a handmade object, not a sealed corporate rectangle with a firmware update.
Analog photography is physical. Film advances. Shutters click. Tape peels. Screws loosen. Light sneaks through places it should not. Your 3D printer turns digital geometry into a tool for slow seeing. That is the real magic: you use modern precision to create old-fashioned uncertainty.
Experience Notes: What It Feels Like to Build and Shoot One
The first experience of making a 3D printed old-timey camera is equal parts confidence and suspicion. When the print finishes, the parts look official. They have corners, holes, grooves, and that satisfying “I made this” energy. Then you hold the body up to a lamp and realize cameras are basically vampires: one tiny leak and the whole thing becomes dramatic.
Assembly teaches patience immediately. A knob that looked perfect in the slicer may rub against the body. A film spool may need sanding. A back cover may close beautifully until you add felt, then suddenly it behaves like a suitcase packed by a raccoon. Small adjustments become the project. You learn to love test fitting. You also learn that “just one more quick print” is how entire evenings disappear.
The most memorable part is loading the first roll. It feels ceremonial. With a digital camera, you insert a card and move on with your life. With a handmade film camera, you thread film carefully, close the back like you are sealing a treasure chest, and then stare at the shutter as if it has moral responsibilities. Every exposure feels important because every exposure costs time, money, and a little emotional stability.
Shooting with a pinhole version changes how you see. You stop chasing instant results and start studying light. Bright sidewalks, cloudy skies, tree shadows, window frames, and still objects become more interesting. Moving people may turn into transparent ghosts. Cars become streaks. A dog that refuses to sit still becomes abstract expressionism with paws. Instead of snapping ten quick shots, you choose one scene and wait. That waiting is not empty; it is part of the photograph.
Developing or receiving the scans is the grand reveal. The first images may be uneven. One frame might be underexposed, another may have a crescent-shaped flare, and a third may be surprisingly beautiful for reasons you cannot fully explain. That is when the project becomes addictive. The camera is no longer just a printed object; it is a collaborator with habits. You start thinking about improvements: a better shutter slide, a smoother film gate, a wider frame, a cleaner pinhole, thicker walls, a more dramatic viewfinder, maybe a second body because obviously one homemade camera is not enough.
The best lesson is that photography does not need to be frictionless to be enjoyable. In fact, a little friction makes the process more meaningful. A 3D printed camera asks you to understand what the machine is doing. It makes you responsible for the light path. It turns mistakes into design feedback and successful photos into small victories. When an image finally works, it feels earned. You did not merely press a button; you built the button, the box, the hole, the path, and the problem. Then somehow, beautifully, light did the rest.
Final Thoughts
Using a new-timey printer to make an old-timey camera is the perfect meeting point between maker culture and analog photography. It is practical enough to produce real images, strange enough to keep you entertained, and educational enough to make every failed frame useful. You will learn about optics, tolerances, light sealing, exposure, film handling, and the quiet joy of building a tool that sees the world differently.
Start simple. Print a pinhole camera. Test for leaks. Load a roll. Take notes. Then improve the design. The first version does not need to be perfect; it only needs to teach you what version two should become. Before long, your modern 3D printer may become the most old-fashioned device in the room, quietly manufacturing little boxes that trap light the way photographers did long before screens started glowing in every pocket.
Note: This article is based on real-world 3D printed camera practices, analog photography principles, pinhole camera construction methods, and documented maker experiences from reputable photography and maker resources.





