
Table of Contents >> Show >> Hide
- What Oscilloscope Bits Actually Mean
- Why 12 Bits Feels Like a Big Deal
- The Secret Word: ENOB
- Where a Twelve-bit Oscilloscope Shines
- Where 12 Bits May Not Matter Much
- Vertical Scale: The Setting People Forget
- Noise: The Party Crasher
- Resolution Enhancement and Oversampling
- Sample Rate, Bandwidth, and Memory Still Matter
- Choosing Between 8-bit, 10-bit, 12-bit, and Beyond
- Real-World Experience: Living With a Twelve-bit Oscilloscope
- Conclusion: More Bits, Better Questions
- Note
- SEO Tags
There is a moment in every electronics hobbyist’s life when an oscilloscope stops being “that expensive screen with squiggly lines” and becomes the most important truth-teller on the bench. A multimeter tells you a voltage. A logic analyzer tells you whether a digital signal is high or low. But an oscilloscope shows you the drama in between: the ringing, the droop, the ripple, the overshoot, the mysterious bump that appears only when your project is already inside the enclosure. Naturally.
The title “Two Bits, Four Bits, A Twelve-bit Oscilloscope” sounds like a cheer shouted at a very nerdy football game, but it points to a real and important idea: resolution. In digital oscilloscopes, the number of bits in the analog-to-digital converter, or ADC, affects how finely the instrument can divide voltage into measurable steps. A 2-bit ADC gives you 4 possible vertical levels. A 4-bit ADC gives you 16. An 8-bit scope gives you 256. A 12-bit oscilloscope gives you 4,096 ideal vertical levels. That is a big jump, and not just on paper.
Still, buying a higher-bit oscilloscope is not like buying a bigger pizza. More bits do not automatically mean every measurement becomes deliciously accurate. The analog front end, noise floor, bandwidth, sampling rate, vertical scale, probe quality, and effective number of bits all matter. In other words, a 12-bit oscilloscope can be a precision microscope for voltage, but only when the rest of the measurement chain behaves itself.
What Oscilloscope Bits Actually Mean
In a digital oscilloscope, an incoming analog signal passes through the input circuitry, gets conditioned by amplifiers and attenuators, and then reaches an ADC. The ADC converts the continuously changing voltage into a stream of digital numbers. The bit depth tells you how many possible codes the converter can use to represent the signal vertically.
The math is simple: the number of levels equals 2 raised to the number of bits. A 2-bit converter has 22, or 4, levels. A 4-bit converter has 16. An 8-bit converter has 256. A 12-bit converter has 4,096. Each extra bit doubles the number of vertical levels, which means the ideal voltage step gets smaller.
A Simple Example: Measuring a 1-Volt Signal
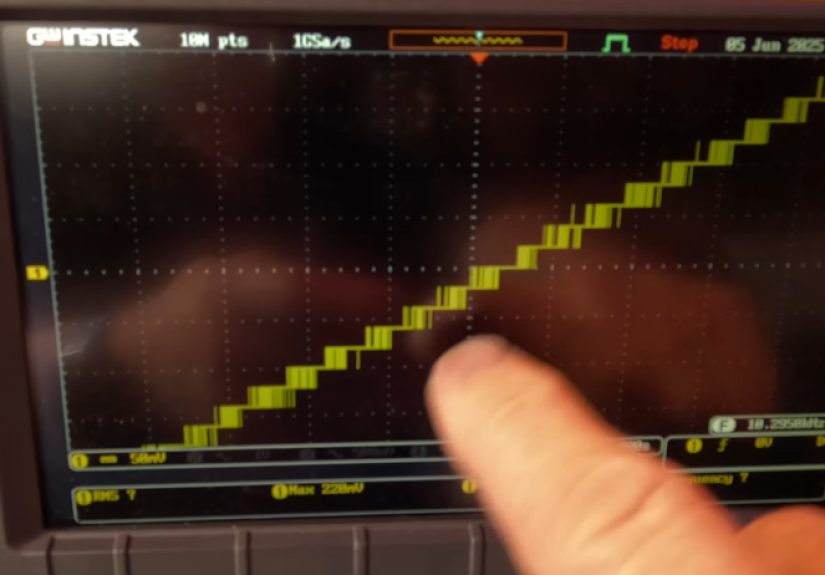
Imagine your oscilloscope is set to capture a 1-volt vertical range. With an 8-bit ADC, that range is divided into 256 levels. Each ideal step is about 3.9 millivolts. With a 12-bit ADC, the same 1-volt range is divided into 4,096 levels. Each ideal step is about 0.244 millivolts. That is like switching from a chunky staircase to a much smoother ramp.
This matters when you are trying to see small details riding on a larger signal. For example, a power rail might be nominally 5 volts, but you care about a 10-millivolt ripple. On a low-resolution display, that ripple may look like digital gravel. On a good 12-bit oscilloscope, it can become a visible and measurable waveform rather than a fuzzy rumor.
Why 12 Bits Feels Like a Big Deal
Traditional digital oscilloscopes often used 8-bit ADCs because speed was the priority. Capturing fast signals requires high sample rates and wide bandwidth. For decades, engineers accepted limited vertical resolution because the alternative was missing fast events entirely. In many digital debugging tasks, 8 bits is still enough. If you only need to know whether a clock line is alive, clean enough, and roughly the right amplitude, an 8-bit scope can do the job.
But modern electronics are not always so forgiving. Low-voltage power rails, high-efficiency switch-mode power supplies, sensor outputs, audio circuits, battery-powered devices, and precision analog front ends often require a closer look. A 12-bit oscilloscope gives you more vertical detail, which helps reveal subtle changes that can hide inside the quantization steps of an 8-bit instrument.
8-bit vs. 12-bit Oscilloscope Resolution
The most repeated comparison is this: 12-bit resolution provides 16 times as many vertical levels as 8-bit resolution. That does not mean the oscilloscope is automatically 16 times more accurate in every situation. It means the ADC can divide the same vertical range into 16 times more ideal voltage steps. Accuracy also depends on calibration, input noise, offset error, gain error, probe loading, and the quality of the oscilloscope’s analog design.
Think of bit depth as the number of measuring marks on a ruler. A ruler with more marks can show smaller differences, but only if the ruler is straight, your eyesight is decent, and the object is not wobbling around like a caffeinated squirrel. The same principle applies to oscilloscopes. More ADC codes help, but the entire system has to support that extra detail.
The Secret Word: ENOB
When comparing oscilloscopes, one of the most useful specifications is ENOB, or effective number of bits. ENOB estimates how many ideal bits the oscilloscope actually delivers after noise and distortion are taken into account. A scope may contain a 12-bit ADC, but its real-world performance might be closer to 8, 9, or 10 effective bits depending on bandwidth, settings, frequency, and signal conditions.
This is not a scandal. It is physics wearing a lab coat. Every oscilloscope has internal noise. Amplifiers generate noise. ADCs introduce quantization effects. Clock jitter affects high-frequency measurements. The front end may distort signals slightly. ENOB rolls those imperfections into a practical number that helps you compare instruments more honestly.
Why ENOB Beats Marketing Hype
A “12-bit oscilloscope” sounds impressive, and it often is. But a well-designed 10-bit scope with excellent front-end noise performance may outperform a noisy 12-bit scope in some measurements. Likewise, a 12-bit instrument with high ENOB across useful bandwidth can be a huge upgrade over a basic 8-bit model. The point is not to ignore bit depth. The point is to read bit depth together with ENOB, bandwidth, noise floor, sample rate, and vertical accuracy.
If the ADC bit depth is the headline, ENOB is the fine print that actually pays the bill.
Where a Twelve-bit Oscilloscope Shines
A 12-bit oscilloscope is especially useful when the signal contains small details that matter. The classic example is power integrity. Modern circuits often run from low-voltage rails such as 3.3 V, 1.8 V, 1.2 V, or lower. A small amount of ripple, sag, overshoot, or transient noise can cause unstable behavior. With higher vertical resolution, you can zoom into these small changes without turning the waveform into a blocky staircase.
Another strong use case is sensor measurement. Temperature sensors, pressure sensors, photodiodes, strain gauges, and other analog outputs may produce small voltage changes. If you are debugging an amplifier stage or checking whether noise is coming from the sensor, power supply, grounding, or layout, a 12-bit scope can show details that an 8-bit scope may smear or bury.
Audio and low-distortion analog work also benefit from more vertical resolution. If you are inspecting clipping, crossover distortion, noise, or tiny changes in waveform shape, more ADC levels give you a clearer view. The same applies to motor control, battery management systems, medical electronics development, and precision timing circuits where small amplitude changes can carry important clues.
Where 12 Bits May Not Matter Much
Not every bench needs a 12-bit oscilloscope. If your main work is basic digital logic, Arduino-level signals, serial decoding, checking whether PWM exists, or learning electronics fundamentals, a decent 8-bit scope may be perfectly useful. Many digital waveforms are large compared with the ADC step size. A 3.3 V square wave does not need 4,096 vertical levels just to confirm that it is square-ish and alive.
Bandwidth can also matter more than resolution. If you are measuring a fast edge, high-speed bus, RF signal, or transient event, insufficient bandwidth may distort the waveform before the ADC resolution even enters the conversation. A slow 12-bit oscilloscope is not automatically better than a faster 8-bit oscilloscope for every job. The best instrument is the one matched to the signal.
The Rule of Practical Measurement
Use higher resolution when amplitude detail matters. Use higher bandwidth and sample rate when time detail matters. Use good probes and proper setup always, because bad probing can make even an expensive oscilloscope look like it had a rough weekend.
Vertical Scale: The Setting People Forget
One of the easiest ways to waste oscilloscope resolution is to use the wrong vertical scale. If your waveform occupies only a small part of the screen, you are using only a small part of the ADC range. This reduces the number of available codes representing your signal. In simple terms, you paid for a full staircase but are walking on only the bottom few steps.
For better measurements, adjust the volts-per-division setting so the waveform fills much of the screen without clipping. This gives the ADC more of the signal to work with. It is one of the simplest habits that separates clean measurements from “why does this look like a barcode?” confusion.
Offset also matters. If you are measuring ripple on a DC rail, use offset to center or position the waveform while keeping the vertical scale tight enough to reveal small variations. Many modern oscilloscopes include features designed for exactly this kind of power rail measurement.
Noise: The Party Crasher
Noise is the reason a 12-bit oscilloscope does not always deliver 12 perfect bits in real life. If the instrument’s internal noise is larger than the smallest ADC step, those extra codes may bounce around instead of representing clean signal detail. This is why low-noise front-end design is so important in high-resolution oscilloscopes.
External noise matters too. Long ground leads, poor probing technique, unshielded wiring, nearby switching supplies, and messy bench setups can inject unwanted signals into your measurement. A higher-resolution scope may reveal that noise more clearly, which can be useful, but it can also surprise beginners. Sometimes the “problem” is not the circuit. It is the measurement setup wearing a fake mustache.
How to Get Cleaner Measurements
Use the shortest practical ground connection. Choose the correct probe attenuation. Match the probe and channel settings. Limit bandwidth when you do not need the full bandwidth. Average repeated waveforms when appropriate. Use high-resolution acquisition modes carefully. Keep loops small, especially when measuring power electronics. These habits can improve the quality of the waveform more than simply buying a shinier instrument.
Resolution Enhancement and Oversampling
Some oscilloscopes offer high-resolution modes, enhanced resolution, or resolution enhancement. These modes often use oversampling and digital filtering to reduce random noise and improve effective vertical resolution. They can be extremely useful for slower signals, repetitive measurements, and noise reduction.
However, there is a trade-off. Filtering can reduce bandwidth or smooth fast details. That may be exactly what you want when measuring slow ripple, but it may be the wrong choice when chasing a narrow glitch. The best practice is to understand what the mode does before trusting it. A smoothed waveform may look prettier, but pretty is not always the same as true.
Sample Rate, Bandwidth, and Memory Still Matter
A 12-bit oscilloscope is not only about vertical resolution. To capture a signal accurately, the scope also needs enough bandwidth to pass the frequency content of the signal and enough sample rate to digitize it properly. Memory depth matters when you need to capture long events at high sample rates. Triggering matters when you need to catch rare problems.
For example, debugging a switching power supply may require good vertical resolution to see ripple and transient behavior, but it also requires sufficient bandwidth to capture switching edges and ringing. Debugging serial communication may require protocol decoding, memory, triggering, and timing accuracy. A scope is a system, not a single number on a product page.
Choosing Between 8-bit, 10-bit, 12-bit, and Beyond
If you are choosing an oscilloscope, start with your signals. For general hobby work, education, and basic embedded debugging, an 8-bit scope with decent bandwidth and features can be a smart buy. For mixed analog and digital work, power rail testing, sensor circuits, and more serious design validation, a 10-bit or 12-bit scope becomes much more attractive.
For precision-heavy applications, also compare vertical noise specifications, DC gain accuracy, offset range, ENOB, bandwidth limits, probe ecosystem, math functions, FFT performance, serial decoding, and memory depth. A high-resolution ADC is valuable, but it should not be the only reason you choose one instrument over another.
A Practical Buying Checklist
Ask yourself: What is the smallest voltage detail I need to see? What is the fastest edge or highest frequency I need to measure? How many channels do I need? Will I measure power rails, sensors, audio, motors, or high-speed digital lines? Do I need isolated inputs, differential probes, current probes, protocol decoding, or deep memory? The answers will point you toward the right class of oscilloscope more reliably than a single flashy specification.
Real-World Experience: Living With a Twelve-bit Oscilloscope
The first time you use a good 12-bit oscilloscope after years with an 8-bit model, the difference can feel oddly quiet. Not boring quietmore like a clean workshop after someone finally labeled all the drawers. The waveform stops looking like a pixelated mountain range and starts looking like something you can reason about. Small ripples become visible. Slight overshoot becomes measurable. The little slope on a supposedly flat rail suddenly has the confidence to introduce itself.
One practical experience involves measuring ripple on a buck converter. On an 8-bit scope, the output looked acceptable at first glance. There was some fuzz, but nothing dramatic. After switching to a 12-bit instrument and tightening the vertical scale, the ripple shape became much clearer. It was not just random noise. There was a repeating pattern tied to the switching cycle, plus a smaller high-frequency component caused by layout and probing. That changed the debugging process. Instead of guessing, the measurement pointed toward loop area, capacitor placement, and probe grounding.
Another common experience appears in sensor projects. A microcontroller ADC may report unstable readings, and the first instinct is to blame the code. The code is innocent more often than we like to admit. With a higher-resolution oscilloscope, you may see low-level noise riding on the sensor output, or a small dip whenever another part of the circuit wakes up. That kind of evidence is powerful. It tells you whether to improve filtering, separate analog and digital grounds more carefully, adjust sampling timing, or clean up the power supply.
Audio work is also more pleasant with a 12-bit scope. When checking a small amplifier, the difference between a clean sine wave and a slightly flattened one can be subtle. Higher vertical resolution makes it easier to spot distortion before it becomes obvious. It also helps when comparing input and output signals, checking noise floors, or finding unwanted oscillation. The oscilloscope becomes less of a blinking gadget and more of a listening device for voltage.
That said, a 12-bit scope can also teach humility. It shows more, including the ugly parts. A long ground lead that looked harmless on an 8-bit scope may suddenly appear as a noise antenna. A breadboard power rail may look like a tiny thunderstorm. A cheap probe may become the villain in Act Two. Higher resolution does not magically improve the circuit; it improves your ability to see what is actually happening. Sometimes that is encouraging. Sometimes it is rude. Usually, it is useful.
The biggest lesson from using a 12-bit oscilloscope is that measurement technique matters more as instrument quality improves. You learn to scale the waveform properly, use bandwidth limits intentionally, choose averaging only when the signal allows it, and pay attention to probe placement. You learn that “more bits” is not just a spec; it is an invitation to measure more carefully. When you accept that invitation, debugging becomes less like fortune-telling and more like engineering.
Conclusion: More Bits, Better Questions
A 12-bit oscilloscope is not magic, but it can be a major upgrade for anyone who needs to see small voltage details clearly. Compared with an 8-bit scope, it offers far more ideal vertical levels, making it easier to inspect ripple, noise, sensor outputs, analog distortion, and subtle waveform behavior. But the real value depends on the complete measurement system: ENOB, front-end noise, bandwidth, sample rate, memory, probes, and user technique.
The best way to think about oscilloscope resolution is not “higher is always better.” The better question is, “What details am I trying to see?” If the answer involves tiny voltage changes hiding inside bigger signals, a twelve-bit oscilloscope may become your favorite bench companion. It will not fix your circuit for you, but it will stop letting your circuit hide behind chunky pixels. That alone is worth a cheer: two bits, four bits, twelve bits, measure more.
Note
This article is written for educational and web publishing purposes. It explains oscilloscope resolution in practical terms and avoids unnecessary source-link clutter while staying grounded in real test-and-measurement principles.






