Table of Contents >> Show >> Hide
- Why a Pi Zero Makes a Great Streaming Camera
- What You’ll Need
- Before You Start: Hardware + OS Prep
- Step-by-Step: Build a Low-Latency Streaming Camera (Recommended First Setup)
- Optional: Browser-Friendly Streaming with Picamera2 (MJPEG Web Stream)
- Optional: RTSP Streaming (Great for NVRs and Media Players)
- Performance Tips That Actually Matter
- Security Tips (Please Don’t Skip This Part)
- Troubleshooting: Fast Fixes for Common Problems
- Conclusion
- Extended Field Notes: Real-World Experiences and Lessons Learned (500+ Words)
Tiny board, tiny budget, big “I built this” energy. If you’ve got a Raspberry Pi Zero (or Zero 2 W) and a camera module, you can absolutely turn it into a practical streaming camera for a workshop, bird feeder, 3D printer, doorway, or just to keep an eye on your cat’s extremely suspicious relationship with your keyboard.
This guide walks you through a modern, reliable setup using the current Raspberry Pi camera stack (the rpicam tools, which replaced older libcamera-* command names on Raspberry Pi OS Bookworm). You’ll get a low-latency LAN stream first, then an optional browser-friendly MJPEG stream, plus tuning tips, security advice, and troubleshooting. It’s written for humans, not robots pretending they’ve never typo’d an IP address.
Why a Pi Zero Makes a Great Streaming Camera
A Pi Zero-based streaming camera shines when you want something:
- Small and low power (easy to hide, mount, or run from a battery project)
- Inexpensive compared with many dedicated IP cameras
- Flexible (LAN streaming, RTSP, MJPEG, motion detection, NVR integration)
- Hackable (custom scripts, triggers, overlays, logging, automation)
If you already own a Pi Zero W, start there. It can stream, but keep expectations realistic and start with modest resolution and frame rates. If you have a Pi Zero 2 W, nice the extra CPU headroom makes streaming smoother and setup less “interpretive art.”
What You’ll Need
- Raspberry Pi Zero W or Pi Zero 2 W
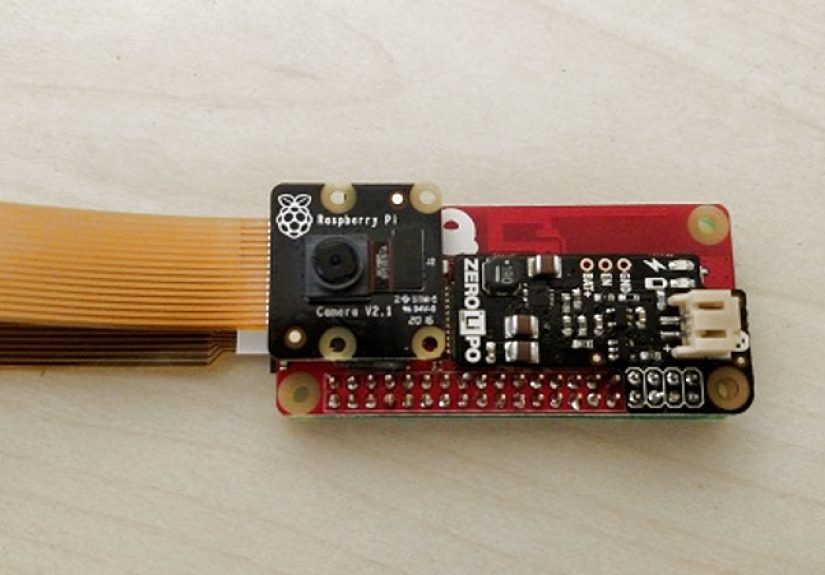
- Compatible Raspberry Pi camera module (official or supported third-party CSI camera)
- Correct camera ribbon cable/adapter for the Pi Zero connector
- microSD card (16GB+ recommended)
- Stable power supply (quality matters more than people admit)
- Wi-Fi access (or USB Ethernet adapter if you want a wired connection)
- A second device on the same network for viewing (laptop/desktop/phone)
Optional but useful: a case, tripod mount, IR lighting (for NoIR cameras), and a heatsink if you’re running nonstop in a warm enclosure.
Before You Start: Hardware + OS Prep
1) Connect the camera (while powered off)
Shut the Pi down completely, disconnect power, then attach the CSI ribbon cable carefully. The camera cable orientation matters, and it’s very easy to install it backward when you’re excited and caffeinated. Lock the connector tabs gently this is a streaming project, not a strength competition.
2) Install Raspberry Pi OS (Lite is fine)
Use Raspberry Pi Imager and set up:
- Wi-Fi SSID/password
- SSH enabled
- Hostname (example:
pizero-cam) - Username/password
Raspberry Pi OS Lite is a great fit for a headless streaming camera because it uses fewer resources. If you prefer a desktop preview during setup, standard Raspberry Pi OS is also fine.
3) Boot, update, and test the camera
SSH into the Pi, then run:
After reboot, test that the camera stack is working:
If you’re on an older guide and see libcamera-hello, that’s the old naming. On Bookworm, the current commands are rpicam-* (older names may still work via symlinks for now).
Step-by-Step: Build a Low-Latency Streaming Camera (Recommended First Setup)
This method creates a solid LAN stream using rpicam-vid. We’ll use an MPEG-TS stream over TCP because it’s broadly compatible and easier to open in VLC than raw H.264 streams.
Step 1: Find your Pi’s IP address
Example result: 192.168.1.56
Step 2: Start a stream from the Pi (TCP + MPEG-TS)
On the Pi, run this command:
What this does:
-t 0= run continuously-n= no local preview window (ideal for headless Pi Zero setups)--width/--height/--framerate= performance-friendly starting point--codec libav --libav-format mpegts= wraps the stream in a player-friendly format?listen=1= Pi waits for a client connection
Why not raw H.264? Because modern VLC support for unencapsulated H.264 is inconsistent, while MPEG-TS usually behaves better. This saves a lot of “it works on one laptop but not the other” drama.
Step 3: View the stream from another device
Option A (easy): VLC
Option B (low-latency testing): FFplay
If video looks choppy on a Pi Zero W, lower the resolution first (for example 640x480) before blaming your Wi-Fi, your router, your moon phase, or your life choices.
Step 4: Tune for Pi Zero performance
Use these starting presets (then adjust upward):
- Pi Zero W: 640×480 @ 10–20 fps, or 720p @ 10–15 fps
- Pi Zero 2 W: 720p @ 15–30 fps is often practical, depending on Wi-Fi and stream method
Streaming performance depends on camera model, network quality, encoding settings, and whether you’re doing extra work like overlays, web serving, or motion detection.
Step 5: Make it start automatically at boot (systemd)
Create a service file:
Paste this:
Enable and start it:
Boom: your Pi Zero is now a reboot-resistant streaming camera. That’s a fancy way of saying it comes back after power flickers instead of waiting for you to remember what terminal tab you used yesterday.
Optional: Browser-Friendly Streaming with Picamera2 (MJPEG Web Stream)
If you want a feed you can open in a browser (especially for quick local viewing), an MJPEG web stream is super convenient. The Raspberry Pi Picamera2 ecosystem includes MJPEG examples, including a simple streaming web server example.
Install Picamera2
Then use the Picamera2 MJPEG example (or your own Flask-based stream). A common pattern is a simple HTTP endpoint that serves multipart/x-mixed-replace MJPEG frames. This is great for dashboards and browser viewing on the same LAN.
When to choose MJPEG: easiest browser viewing, simple integration, quick debugging.
Trade-off: more bandwidth than efficient H.264/RTSP pipelines.
Optional: RTSP Streaming (Great for NVRs and Media Players)
If you’re integrating with an NVR, home automation, or a media tool that likes RTSP, you can publish an RTSP stream as well. One documented approach is to use rpicam-vid and pipe MPEG-TS into VLC acting as an RTSP server.
View from another machine:
If you need stronger RTSP features (authentication, multi-client handling, recording integration), many builders pair the Pi with a lightweight RTSP server package instead of improvising everything in one command.
Performance Tips That Actually Matter
Use a good power supply
Weird camera glitches, random disconnects, and “it worked once” behavior often trace back to unstable power. Cheap USB cables can be sneaky performance saboteurs.
Prefer 2.4 GHz Wi-Fi planning, not wishful thinking
The Pi Zero W uses 2.4 GHz Wi-Fi. Keep the camera in decent signal range, avoid crowded channels when possible, and don’t bury the Pi behind metal objects unless your project goal is “live stream from inside a toaster.”
Start small, then scale up
Begin at 640×480 or 720p. Once stable, increase frame rate or resolution one step at a time. Changing everything at once is how people end up debugging three problems while believing they only have one.
Keep background processes minimal
On a Pi Zero W especially, a headless setup with only the required services can noticeably improve consistency.
Security Tips (Please Don’t Skip This Part)
- Change default passwords and use strong credentials.
- Keep Raspberry Pi OS updated.
- Do not expose an unauthenticated raw camera stream directly to the public internet.
- Use a VPN, reverse proxy with authentication, or a secure tunnel if remote access is required.
- If using RTSP for local NVR only, restrict access via firewall/router rules.
A DIY camera is fun. An accidentally public DIY camera is how you become a cautionary Reddit post.
Troubleshooting: Fast Fixes for Common Problems
“Camera not detected”
- Power off and reseat the ribbon cable.
- Double-check cable orientation.
- Test with
rpicam-hello. - Confirm your camera is supported by the current camera stack.
Black screen or no video in VLC
- Use MPEG-TS encapsulation (as shown) instead of raw H.264.
- Verify the IP and port.
- Test with
ffplayto isolate player issues. - Check whether the stream service is actually running:
systemctl status pizero-streamcam
High latency
- Lower resolution and FPS.
- Use
ffplaywith low-latency flags for testing. - Avoid browser MJPEG if you need lower latency than a browser tab can comfortably provide.
- Reduce extra processing (recording, overlays, motion detection) on the same Pi.
Stream drops after a while
- Power supply/cable issue
- Weak Wi-Fi signal
- Thermal conditions inside an enclosure
- Service not set to auto-restart (fix with systemd
Restart=always)
Conclusion
Turning a Pi Zero into a streaming camera is one of those projects that feels far more impressive than the parts list suggests. With the modern rpicam tools, you can build a reliable low-latency camera feed for local monitoring, dashboards, or NVR use without needing a bulky computer.
Start with a simple LAN stream, get it stable, then layer on extras like browser MJPEG, RTSP, motion detection, or automation. The magic here isn’t just “video over Wi-Fi” it’s that you control the stack. And once you control the stack, the project can grow from “neat weekend build” into “actually useful thing I use every day.”
Extended Field Notes: Real-World Experiences and Lessons Learned (500+ Words)
In real-world Pi Zero camera builds, the most valuable lesson is that stability beats maximum specs. A lot of people start by aiming for 1080p at a high frame rate because the camera can technically do it. Then the stream stutters, Wi-Fi gets cranky, and the project turns into a troubleshooting hobby. The better strategy is to build from a “boring but reliable” baseline (like 640×480 or 720p at modest FPS), then scale upward only if the use case really needs it.
Another common experience: the camera isn’t the bottleneck you think it is. In many DIY setups, the limiting factors are actually the network environment, the player on the receiving device, or power quality. A Pi Zero camera stream can look surprisingly good when the Wi-Fi signal is stable and the playback path is simple. The same setup can look terrible when routed through a weak repeater, a noisy USB charger, or a browser tab with twenty-seven other tabs fighting for attention like caffeinated raccoons.
Builders also discover pretty quickly that browser convenience and low latency are not always the same goal. MJPEG is lovely because it opens in a browser and feels easy to demo. It’s perfect for a quick “is the camera alive?” view, a local dashboard, or simple monitoring pages. But when someone wants a more responsive feed for real-time monitoring, they often migrate toward better-optimized streaming paths (for example, media-player clients or RTSP workflows). This is not a failure of MJPEG; it’s just the classic engineering trade-off between convenience and efficiency.
One especially practical insight from Pi Zero projects is how much physical placement affects the outcome. Put the Pi in a good Wi-Fi location with line-of-sight to the router, and the same software suddenly looks “optimized.” Hide it inside a metal box behind a refrigerator (yes, people do this), and no amount of command-line wizardry fixes the packet loss. Mounting the camera securely, keeping the ribbon cable strain-free, and protecting the board from dust or accidental tugs often matters more than micro-tuning command flags.
People using Pi Zero cameras for birdhouses, printers, pet cams, or workshop monitoring also report that “set-and-forget” needs a little planning. A systemd service, automatic restart, and clear hostname save a lot of headaches later. So does documenting your own setup: write down the stream URL, resolution, port, and service name. Six weeks from now, Future You will not remember whether the feed was on 8554, 8080, or 8888. Future You is optimistic but unreliable.
Finally, the best experience-related takeaway is this: a Pi Zero streaming camera project gets better when you treat it like a small product, not a one-off demo. Add a stable mount. Use a proper power supply. Pick sane defaults. Secure remote access. Give it a useful name on the network. Test reboot behavior. These tiny choices turn a fun prototype into something genuinely dependable. And that’s the real win not just seeing video on a screen, but building a camera system that quietly does its job while you move on to the next project.