Table of Contents >> Show >> Hide
- Why a DIY Growth Chart Ruler Beats Marking the Wall
- Materials and Tools
- The “Super Easy” Step-by-Step Growth Chart Ruler
- Step 1: Decide Your Baseline (So Your Numbers Are Actually True)
- Step 2: Sand Like You Mean It (But Not Like You’re Polishing a Yacht)
- Step 3: Paint or Stain (Optional, But Highly Recommended)
- Step 4: Lay Out the Ruler Marks
- Step 5: Add Numbers and Personality
- Step 6: Seal It So It Survives Childhood
- Step 7: Mount It Safely (Yes, Safety Matters Here)
- How to Measure Height Correctly (So the Chart Isn’t Just Decorative)
- Design Ideas That Kids Actually Get Excited About
- Common Mistakes (And How to Avoid Them)
- Quick Cost and Time Reality Check
- FAQ
- Extra: Real-World Experiences People Have With DIY Growth Chart Rulers (500+ Words)
- Conclusion
Every parent swears they’ll remember how small their kid was… right up until the day you find a mysterious pencil mark on the
doorframe labeled “???” and you realize your home has become an archaeological site.
A DIY growth chart ruler fixes that problem in one clean, good-looking swoop: it tracks height, moves with you,
and turns “Wait… was that mark from 2022 or the dog?” into actual, date-stamped memories. Best part? You don’t need a workshop,
a woodworking degree, or a spiritual connection to a table saw. This is a beginner-friendly, “I can do this on a Saturday” project
with a big payoff.
Why a DIY Growth Chart Ruler Beats Marking the Wall
- It’s portable. Moving? Take it with you instead of photographing doorframes like they’re museum artifacts.
- It looks intentional. A giant ruler on the wall reads “cute and organized,” not “tiny gremlin lives here.”
- It’s accurate (when set up right). You’ll measure from the floor every time, not from a random trim edge.
- It becomes a keepsake. Dates, initials, little notesfuture-you will absolutely get misty over it.
Materials and Tools
This project is flexible. Use what you have, upgrade what you want, and ignore anyone who tells you it “must” be reclaimed
barn wood blessed by a craftsman named Hank.
Wood Options
- 1×8 or 1×10 board (6–7 ft long): Pine is budget-friendly and easy to work with.
- Poplar: Smoother grain, great for paint, usually straighter than bargain pine.
- Hardwood (oak/maple): Gorgeous, durable, costs more and takes more sanding patience.
Basics You’ll Need
- Tape measure (or long ruler) and pencil
- Sandpaper (120 and 220 grit) or sanding block
- Stain or paint (optional, but it levels up the look)
- Paint pen, permanent marker, or vinyl numbers/decals
- Clear protective finish (polyurethane or water-based clear coat)
- Level
- Stud finder (recommended) and screws
- Optional: straightedge, painter’s tape, stencils, small foam brush
The “Super Easy” Step-by-Step Growth Chart Ruler
Here’s the simple version: prep the board, make it pretty, mark your measurements correctly, seal it, and mount it safely.
The only “tricky” part is getting the measurement baseline rightso we’ll make that painless.
Step 1: Decide Your Baseline (So Your Numbers Are Actually True)
Most homes have baseboards, and most baseboards are not thrilled about being ignored. If your board sits on the baseboard,
it won’t sit flat. That’s why most DIY growth charts start above the floor.
The easy fix: choose a “bottom gap” (commonly 6 inches) so your board clears the baseboard and sits flush against the wall.
You will then mark your ruler so it still measures from the floor accurately.
- Measure your gap: Decide how far above the floor the bottom of the board will hang (example: 6″).
-
Align the tape measure with that gap: Place your tape measure on the board and line up the
6-inch mark on the tape with the bottom edge of your board. -
Now when you mark “1 foot” (12″) on the tape, it will land at 18 inches from the bottom of the board,
which correctly represents 12 inches from the floor.
If your baseboard is taller (or you want the board higher for cleaning, pets, or enthusiastic toddlers), use that gap number instead.
The rule is simple: bottom-of-board = your gap measurement on the tape.
Step 2: Sand Like You Mean It (But Not Like You’re Polishing a Yacht)
Quick sanding makes everything look more professional and helps stain/paint stick evenly. Start with 120 grit to smooth the board,
then finish with 220 grit so it feels nice to the touch (because kids will absolutely run their hands up and down it like it’s a theme park ride).
- Sand edges toosplinters are not a “memory-making feature.”
- Wipe off dust with a clean cloth (or vacuum) before finishing.
Step 3: Paint or Stain (Optional, But Highly Recommended)
Choose your vibe:
- Natural wood: minimal, modern, easy.
- Stain: warm and classic (also hides “oops” pencil marks better).
- Paint: great for bright kids’ rooms and playful themes.
Let it dry fully. Rushing is how you end up with fingerprints sealed into history like a tiny crime scene.
Step 4: Lay Out the Ruler Marks
This is the heart of the project. Take your time here and your chart will look crisp forever.
- Find the “floor zero” by using your gap: If your gap is 6″, align the tape so 6″ sits at the board bottom.
- Mark inches: Use a pencil to mark every inch line along one edge of the board.
-
Vary line lengths:
- Every 1 inch: short tick
- Every 6 inches: medium tick
- Every 12 inches (1 foot): long tick (and label it!)
- Use a straightedge: Draw clean lines across the board so ticks are consistent.
Pro tip: Label feet marks (1 ft, 2 ft, 3 ft…) and optionally label inches for the first two feet (where kids change fastest).
After that, foot markings plus ticks are usually plenty.
Step 5: Add Numbers and Personality
Make it cute without making it unreadable. You want “adorable,” not “escape-room clue.”
- Vinyl decals: super clean look, easiest for crisp numbers.
- Stencils + paint: budget-friendly, classic, and forgiving if you go slow.
- Paint pen: fast and simple; great for modern, hand-lettered style.
- Wood-burning tool (optional): permanent, rustic, and extremely “I own flannel now.”
Fun add-ons:
- Child’s name at the top (“Captain Growth Spurt” is also acceptable)
- Small icons at foot marks (stars, rockets, flowers, dinosaurs)
- A thin color stripe running down one edge for a designer touch
Step 6: Seal It So It Survives Childhood
Kids are basically weather systems. A clear protective coat keeps your markings from smudging and your board from getting grimy.
- Apply thin, even coats with the grain.
- Let dry, then lightly sand with 220 grit between coats for a smooth finish.
- Two coats is usually fine; three coats is extra durable for high-traffic areas.
If you’re choosing between finishes:
- Water-based clear coat: dries faster, lower odor, stays clearer on light wood.
- Oil-based polyurethane: very durable, can add a warmer/amber tone.
Step 7: Mount It Safely (Yes, Safety Matters Here)
Your growth chart shouldn’t wobble, tilt, or become something a kid can tug like a handle. Mount it securely.
- Find studs with a stud finder (best option for a solid hold).
- Mark your bottom gap on the wall (example: 6″ up from the floor).
- Level the board and screw into studs with appropriate screws.
- Alternative: use a French cleat system for easy removal (great for moving).
Place it where kids can stand straight against the wall, with enough clear floor space for accurate measuring.
Hallways and bedrooms work well. Avoid placing it behind doors unless you enjoy chaos.
How to Measure Height Correctly (So the Chart Isn’t Just Decorative)
The best growth chart is only as accurate as your measuring habit. Make it a fun ritualbirthday mornings, back-to-school day,
or the day after your kid announces, “I’m basically a teenager now.”
- Shoes off. Heels against the wall.
- Eyes looking forward, standing tall (no tiptoes, no “I swear I’m taller” poses).
- Use a flat object (book or level) on top of the head, perpendicular to the wall.
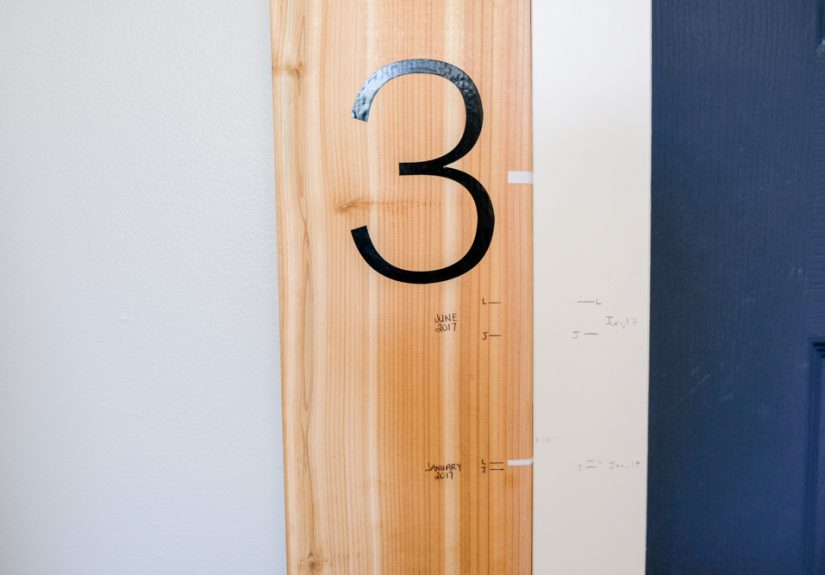
- Mark lightly in pencil first, then trace in pen once you’re sure.
- Add the date and initials. Future you will thank present you.
Design Ideas That Kids Actually Get Excited About
Theme-Based Styles
- Space explorer: planets at each foot mark, rocket at the top.
- Jungle: vines along the edge, animal icons at milestones.
- Minimal modern: black ticks, simple numbers, clean font.
- Rainbow ruler: each foot gets a different color band.
Memory-Friendly Upgrades
- Add a small photo strip area (first day of school photos are gold here).
- Include “milestone notes” (first bike ride, lost tooth, learned to swim).
- Use a tiny symbol system: star for “birthday,” lightning bolt for “growth spurt month.”
Common Mistakes (And How to Avoid Them)
Mistake 1: Starting at Zero on the Board
If the board is lifted above the floor, starting at “0” on the board makes every measurement wrong.
Use the gap method so measurements reflect true height from the floor.
Mistake 2: Not Letting Stain Dry Long Enough
If you stencil or add vinyl too early, paint can peel and decals can lift. Dry time isn’t “suggestion time.”
It’s the difference between “handmade heirloom” and “Pinterest fail speedrun.”
Mistake 3: Skipping the Protective Topcoat
Unsealed marker lines can smudge, especially in humid spaces or high-touch areas. Seal it and relax.
Mistake 4: Mounting Without a Level
A tilted ruler is basically telling the world, “Math is optional in this house.” Level it.
Quick Cost and Time Reality Check
- Budget version: board + sandpaper + paint pen + screws (often under $25–$40 depending on materials)
- Upgraded version: stain + vinyl numbers + clear coat + French cleat (often $40–$80)
- Time: about 1–3 hours of hands-on work, plus drying time
FAQ
How tall should the growth chart be?
Six feet is a common choice, but 7 feet gives you extra runway for tall kids (and the occasional adult who wants to “check something real quick”).
If you’re short on wall space, you can do 5 feet and still capture the childhood years.
Can I make a growth chart without power tools?
Yes. Most versions require only sanding, measuring, and mounting. If you can operate a tape measure and resist the urge to eyeball everything,
you’re good.
What’s the best way to make the numbers look professional?
Vinyl numbers are the cleanest. Stencils are a close second if you tape them down well and use a light touch with paint.
What if I mess up a measurement line?
Sand it lightly, touch up with paint or stain, and redo the line. If it’s a tiny error, you can also “design your way out”:
add a small icon or thicker tick to cover it. DIY is 30% skill and 70% creative cover-up.
Extra: Real-World Experiences People Have With DIY Growth Chart Rulers (500+ Words)
The funny thing about a Super Easy Kids Measuring Ruler DIY Growth Chart is that it starts as a weekend project and
quietly turns into a family tradition. People don’t just track heightthey track eras. You’ll see it in the little patterns:
the toddler years where the marks jump every few months, the “suddenly kindergarten” phase where time speeds up, and the slower,
steadier climbs that show up right when you stop expecting them.
One common experience: the first measurement is oddly emotional. You mount the chart, call your kid over, and suddenly
you’re realizing you’re building a record of time you can’t pause. Parents often start with a neat labeldate, height, initialsand
then, within a year, the notes get more personal: “first day of 1st grade,” “lost two teeth in one week,” “would only eat pasta for
a month (??).” The chart becomes part ruler, part journal.
Another classic experience is the kid participation factor. Younger kids love “helping,” which may include:
holding the tape measure backwards, trying to sand one specific spot for 20 minutes, or requesting glitter with the seriousness of a
courtroom attorney. Many families lean into it by assigning safe jobswiping dust, picking paint colors, choosing the top decoration
so the chart feels like theirs. And later, when they’re older, they remember that they “built it,” even if their main contribution was
aggressively selecting dinosaur stickers.
There’s also the moving-house moment, which is when DIY growth charts prove their genius. People who used to mark doorframes
often talk about the weird sadness of leaving those marks behind. A portable growth chart fixes that: you unscrew it, wrap it carefully,
and the “history” travels with you. Some families even take a quick photo of the chart in each home before movinglike a tiny museum exhibit
that changes locations but keeps the same collection.
The chart also becomes an unexpected sibling peace treaty (or, depending on your household, a sibling rivalry scoreboard).
Kids compare marks, argue about posture, accuse each other of secret tiptoeing, and demand “a re-measure” like it’s an official sporting event.
A simple strategy families use is to make measuring a ritual with clear rules: shoes off, back straight, no stretching, book on head.
It keeps things fair and turns the moment into a fun ceremony instead of a debate club meeting.
And yes, people commonly experience the DIY learning curve. Stain that looks perfect on the can may look darker on pine.
Paint pens sometimes bleed on unsealed wood. A stencil can lift if the surface is dusty or the stain isn’t cured. But the good news is that most
“mistakes” become part of the charm. A slightly imperfect line doesn’t ruin the chart; it reminds you it’s handmade. Plenty of DIYers even
intentionally choose a slightly rustic styledistressed edges, hand-drawn ticksbecause it’s more forgiving and feels warm and real.
The best part of these experiences is how the chart collects meaning over time. At first, it’s décor. Then it’s a yearly
habit. Then one day you notice the marks are higher than you expect, and you realize childhood doesn’t move in a straight lineit moves in jumps,
surprises, and growth spurts that show up right when you’re busy living. A growth chart ruler doesn’t stop time, but it does something close:
it helps you see it.
Conclusion
A Super Easy Kids Measuring Ruler DIY Growth Chart is one of those rare DIY projects that’s affordable, practical,
and emotionally priceless. Build it once, hang it securely, and let it do its quiet work for years: turning everyday growth into a story
you can actually keep.