
Table of Contents >> Show >> Hide
- Why signing a PDF on iPhone is so convenient now
- Step 1: Open the PDF from the right place
- Step 2: Decide whether you need a quick signature or a full signing workflow
- Step 3: Use Apple’s built-in Markup or form-filling tools
- Step 4: Create your signature on the iPhone screen
- Step 5: Place, resize, and clean up the signature
- Step 6: Fill in dates, names, checkboxes, and form fields
- Step 7: Save a new copy instead of overwriting the original
- Step 8: Share the signed PDF the smart way
- Step 9: Use a third-party app when Apple’s tools are not enough
- Step 10: Check legality, security, and document requirements before sending
- Common mistakes people make when signing PDFs on iPhone
- Quick example: signing a rental form on your iPhone
- Best practices for a cleaner, more professional signed PDF
- Experiences from real-life iPhone PDF signing situations
- Final thoughts
If you have ever opened a PDF on your iPhone and thought, “Great, now I need a printer, a pen, a scanner, and possibly a small miracle,” good news: you do not. Signing a PDF on iPhone is much easier than it used to be. In many cases, Apple’s built-in tools are enough. When they are not, several trusted apps can handle more advanced signing jobs without turning your afternoon into a paperwork horror movie.
This guide breaks the process into 10 simple steps, explains when the built-in iPhone tools work best, and shows when it makes sense to use a dedicated e-signature app instead. Whether you are signing a lease, a school form, a freelance contract, or that mysterious document your accountant sent with twelve exclamation points, this article will help you do it quickly and correctly.
Why signing a PDF on iPhone is so convenient now
The modern iPhone can do a lot more than send texts, doomscroll, and remind you that your screen time is embarrassing. It can also open PDFs, fill out fields, create reusable signatures, save signed files, and share them right back through Mail, Messages, Files, or cloud storage. For many users, the easiest way to sign a PDF on iPhone is through Apple’s Markup tools. On newer software, form-filling and signing can also be handled through Apple’s PDF viewing tools in supported apps.
That said, not every PDF signing situation is identical. Some documents only need your handwritten-style electronic signature. Others need dates, initials, multiple signers, tracking, or an audit trail. That is where apps like Adobe Acrobat, DocuSign, Dropbox Sign, Microsoft 365, Google Workspace, PandaDoc, signNow, Foxit, Nitro, and Signeasy can come in handy.
Step 1: Open the PDF from the right place
First, locate the document. Most people open a PDF from one of these places:
- The Mail app after receiving an attachment
- The Files app if the PDF is stored on your iPhone or iCloud Drive
- A cloud storage app such as Dropbox, Google Drive, or OneDrive
- A dedicated PDF or e-signature app such as Adobe Acrobat or DocuSign
If the document came through email, tap the attachment and let it open fully before you start hunting for the signing tools. Many people miss this step and wonder why the signature option is hiding like it owes them money.
Step 2: Decide whether you need a quick signature or a full signing workflow
Before you tap anything, ask one simple question: Do I just need to sign this, or do I need to fill and manage more than that?
A quick signature is best when:
- You only need to add your name, initials, or a date
- You want the fastest built-in option
- You do not need advanced tracking or a signing history
A full signing workflow is better when:
- The PDF has multiple fields and multiple signers
- You want an audit trail
- You need to send the document out for signature
- Your company already uses a platform like Adobe Acrobat Sign, DocuSign, or PandaDoc
This one decision saves time. Think of it as choosing between making toast and opening a bakery.
Step 3: Use Apple’s built-in Markup or form-filling tools
If you want the easiest no-download method, start with Apple’s built-in tools. In supported apps, you can use Markup to add a signature to a PDF. If your iPhone software and app support Apple’s PDF form tools, you may also see options to fill form fields before signing.
Look for icons such as:
- A Markup pen tip or marker icon
- A share button with editing options
- An Add or plus button once Markup opens
- A form filling option in supported PDF views
If you do not see Markup immediately, try tapping the PDF preview, the share button, or “Edit.” The exact placement can vary depending on whether the file is open in Mail, Files, or another app.
Step 4: Create your signature on the iPhone screen
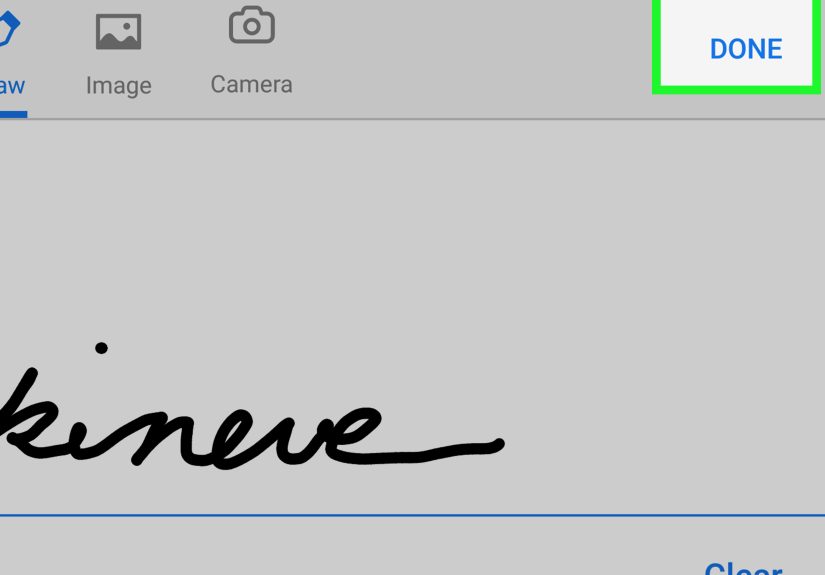
Once you are inside Markup, tap the Add button and choose Add Signature. Then use your finger to sign your name directly on the screen. If your first attempt looks like a squirrel slipped on ice, that is normal. Tap Clear and try again.
Here are a few tips to make the signature look cleaner:
- Sign a little slower than you think you should
- Use a stylus if you have one
- Write slightly larger than usual for better screen control
- Keep the signature simple and consistent
Apple lets you save signatures for later use, which is helpful if you sign forms often. You can even keep multiple saved signatures, such as a full signature and a set of initials.
Step 5: Place, resize, and clean up the signature
After creating the signature, place it where the document expects it. Drag it into position, then resize it by pulling the corners or dots around the signature box. The goal is to make it look natural, not like it parachuted into the page from another dimension.
As you adjust the signature, make sure it:
- Sits fully inside the signature line or box
- Does not cover important text
- Looks readable on a small screen and in zoomed-out view
- Matches the scale of the rest of the document
If needed, you can also change color or line weight in some Markup views. For most business forms, a simple dark signature works best.
Step 6: Fill in dates, names, checkboxes, and form fields
Many PDFs need more than a signature. You may need to enter your printed name, date, address, initials, or responses in fillable fields. On iPhone, this can be done either through Apple’s form tools in supported PDFs or through third-party apps designed for PDF form filling.
If the PDF is interactive, tap directly into the field and type. If it is not, you can often add text boxes manually with Markup or use a PDF editor app. This is especially useful for common documents such as:
- Rental agreements
- School permission slips
- Healthcare intake forms
- Employment onboarding paperwork
- Client service agreements
Double-check spelling, dates, and numbers before moving on. A perfect signature next to the wrong apartment number is still a problem.
Step 7: Save a new copy instead of overwriting the original
Once the PDF is signed, save it carefully. This is one of the smartest habits you can develop. Instead of replacing the original file, save a fresh version with a clear file name, such as:
- Lease_Agreement_Signed_Jordan.pdf
- W9_Completed_April_2026.pdf
- School_Form_Signed_Final.pdf
Why bother? Because life happens. Sometimes you realize you signed the wrong page, typed the wrong date, or accidentally sent the unsigned version to the one person who absolutely needed the signed one. Keeping the original and a labeled signed copy prevents unnecessary chaos.
Step 8: Share the signed PDF the smart way
After saving, send the signed PDF back through the method that makes the most sense:
- Reply in Mail if the PDF came as an email attachment
- Share from Files if you want to send it through Messages or another app
- Upload to cloud storage if a team needs access
- Export from a signing platform if you used a third-party app
If the document is important, review the attached file one last time before you hit send. You want the signed version, not the unsigned original sitting right next to it like an identical twin with bad timing.
Step 9: Use a third-party app when Apple’s tools are not enough
Apple’s built-in tools are excellent for personal and simple business use, but sometimes you need more muscle. A dedicated PDF or e-signature app is worth using when you need features such as:
- Requesting signatures from other people
- Tracking whether someone opened or signed the document
- Managing templates and repeat workflows
- Working with teams, storage integrations, and audit logs
- Handling multiple signers in a set order
Popular options include Adobe Acrobat, Adobe Acrobat Sign, DocuSign, Dropbox Sign, Microsoft 365, Google Workspace eSignature, PandaDoc, signNow, Foxit eSign, Nitro, and Signeasy. Each has a slightly different angle. Some are better for simple self-signing, while others are made for approvals, contracts, sales documents, or company-wide workflows.
Which option fits which situation?
If you just need to sign one document yourself, Apple Markup or Adobe Acrobat can be enough. If you need to send a contract to a client and track status, DocuSign, Adobe Acrobat Sign, Dropbox Sign, or PandaDoc may be a better fit. If your work already lives in OneDrive, Google Drive, or Dropbox, the tools tied to those ecosystems can feel more seamless.
Step 10: Check legality, security, and document requirements before sending
This step matters more than people think. Most everyday PDF signing on iPhone involves an electronic signature, which is different from a cryptographically verified digital signature. For many common agreements, an e-signature is perfectly acceptable. But some documents may require extra identity checks, witnesses, notarization, or specific compliance workflows.
Before sending, ask yourself:
- Does this recipient accept a standard e-signature?
- Do I need a time-stamped audit trail?
- Is this a government, legal, or financial document with stricter rules?
- Should I keep a copy in cloud storage and another offline copy?
If the document is sensitive, save it in a secure location and avoid sending it over channels you would not trust for personal information. Convenience is great. Convenience with caution is better.
Common mistakes people make when signing PDFs on iPhone
- Signing the wrong page because they never scrolled all the way down
- Using a huge signature that covers nearby text
- Sending a screenshot instead of the actual PDF
- Overwriting the unsigned original
- Forgetting to fill required date or printed-name fields
- Assuming every document accepts the same kind of signature
Avoid those mistakes and you will already look more organized than half the people in any group email thread.
Quick example: signing a rental form on your iPhone
Imagine your landlord emails a lease addendum. You open the PDF in Mail, tap into Markup, create your signature, place it on the signature line, add the date, and save a new file named Lease_Addendum_Signed. Then you reply to the email with the signed PDF attached. Total time: usually just a few minutes, no printer involved, no frantic search for a pen that actually works.
Now imagine the same form also needs your roommate’s signature and a timestamped record. That is when a service like DocuSign, Adobe Acrobat Sign, Dropbox Sign, or PandaDoc becomes much more useful than simple Markup.
Best practices for a cleaner, more professional signed PDF
- Zoom in before placing your signature
- Use a neat saved signature instead of redrawing every time
- Rename the file clearly after signing
- Review every page before sharing
- Use a dedicated signing app for legal or business workflows with multiple parties
- Keep both original and signed versions for your records
Experiences from real-life iPhone PDF signing situations
In real life, people usually discover how useful PDF signing on iPhone is at the exact moment they are away from a desk. Maybe they are standing in an airport line, sitting in a doctor’s office, waiting outside school pickup, or trying to send a contract before a client disappears into the mysterious void known as “I’ll circle back next week.” That is why the best signing method is often the one that feels fast, familiar, and hard to mess up.
For casual users, the built-in iPhone experience feels surprisingly friendly. Opening a PDF from Mail, tapping into Markup, and dropping in a saved signature can feel almost silly in how easy it is. There is a little thrill to it, honestly. One minute the document looks official and mildly intimidating, and the next minute you have signed it while still wearing sweatpants and reheating leftovers. Technology really does have its moments.
Students and parents often have some of the most practical use cases. School forms, permission slips, volunteer forms, sports waivers, and club paperwork tend to arrive when nobody has time to print anything. Signing on iPhone turns a “later tonight” chore into a two-minute task. That kind of convenience matters because small forms pile up. One quick signature on your phone can prevent that unpleasant realization at 10:45 p.m. that a field trip form is due tomorrow morning.
Freelancers and remote workers have a different experience. For them, signing PDFs on iPhone is less about convenience and more about momentum. A proposal, invoice acknowledgment, NDA, or onboarding packet can move forward the moment it arrives. There is no delay caused by stepping away from work, waiting to get back to a laptop, or asking someone to resend a file. When clients move fast, being able to sign and return a PDF from your phone can make you look responsive and polished, even if you are actually answering from a coffee shop with one bar of battery left.
Business users, though, usually learn the limits of basic signing pretty quickly. A handwritten-style signature added through Markup is great for simple documents, but when several people have to sign in sequence, or when a company needs proof of who signed and when, a dedicated e-signature platform starts to feel less like a luxury and more like a necessity. That is where the experience shifts from “I signed a PDF on my phone” to “I managed a document workflow on my phone.” Same device, very different level of seriousness.
Another common experience is realizing that file organization matters almost as much as the signature itself. Many people sign a document correctly and then lose track of it because the file name is vague, the download folder is crowded, or the signed copy gets mixed up with the original. Once you have done that once, you become a believer in naming files clearly and saving them in the right place. Nothing teaches discipline quite like searching your phone for “final_final_REALfinal.pdf.”
What makes signing PDFs on iPhone so useful overall is that it fits everyday life. It is not flashy. It is not dramatic. It just removes friction. And in the modern world, removing friction from paperwork is about as close to magic as many adults are going to get on a weekday.
Final thoughts
If you want the simplest way to sign a PDF on iPhone, start with Apple’s built-in Markup and form-filling tools. They are fast, convenient, and usually more than enough for routine forms. If your needs are more advanced, third-party apps can give you better control, better tracking, and better workflow management.
The smartest approach is not to chase the fanciest app. It is to choose the right tool for the document in front of you. For a quick one-person signature, keep it simple. For contracts, teams, and compliance-heavy paperwork, upgrade to a dedicated e-signature platform. Either way, your iPhone is fully capable of handling the job, and your printer can finally enjoy a well-earned break.





