Table of Contents >> Show >> Hide
- What Is a Real-Time Planet Tracker?
- How the Planet Tracker Works
- Important Components in a DIY Planet Tracker
- Real-Time Planet Tracking vs. Planetarium Apps
- Accuracy: What Actually Affects the Pointing?
- Best Use Cases for a Laser-Point Planet Tracker
- Laser Safety: The Part That Is Not Optional
- How This Project Teaches Real Astronomy
- Challenges Builders Should Expect
- Future Upgrades Worth Considering
- Experiences Related to Real-Time Planet Tracking
- Conclusion
There are two kinds of people in the world: people who look up at the night sky and say, “Wow,” and people who immediately ask, “Yes, but exactly where is Jupiter?” A real-time planet tracker with laser-point accuracy is built for the second group, though the first group usually wanders over five minutes later and asks to try it.
At its heart, this kind of planet tracker turns invisible astronomy math into a visible, physical pointer. Instead of opening a sky map app, pinching the screen, rotating your phone like you are trying to unlock a secret portal, and still wondering whether that bright dot is Venus or a plane, the tracker calculates where a planet should be and points toward it. The result feels a little like having a tiny robotic planetarium on your desk.
The idea became especially popular in maker circles because it combines several irresistible ingredients: Arduino-style electronics, celestial mechanics, GPS, sensors, servos, coordinate conversion, and a laser pointer used responsibly in a controlled demonstration. That is a buffet of nerd joy. More importantly, it teaches how real astronomical pointing systems work, from backyard GoTo telescopes to professional azimuth-elevation antennas.
What Is a Real-Time Planet Tracker?
A real-time planet tracker is a device or software-driven system that calculates the current position of a planet and translates that position into a direction a physical mechanism can follow. The planet might be Mars, Venus, Jupiter, Saturn, or any other visible solar system object. The “real-time” part means the calculation updates as time passes, because planets do not politely stay still while you finish soldering.
A practical tracker usually starts with three basic inputs: the observer’s location, the current time, and the target object. From there, the software calculates where the planet appears in the sky. That position may begin as right ascension and declination, the astronomy equivalent of longitude and latitude on the celestial sphere. For a motorized pointer, those sky coordinates are converted into altitude and azimuth: how high above the horizon to aim, and which compass direction to face.
Why “Laser-Point Accuracy” Sounds So Cool
The phrase “laser-point accuracy” does not mean the device magically defeats clouds, atmospheric distortion, sensor drift, or your cat walking across the workbench. It means the system aims with enough precision that a narrow pointer can show a target direction clearly. Indoors, that might be a laser dot on a ceiling or wall representing where the planet would be in the sky. Outdoors, serious safety rules apply, and lasers should never be aimed at people, animals, vehicles, or aircraft.
The real win is not the beam itself. The real win is the chain of logic: orbital data becomes coordinates; coordinates become angles; angles become servo movement; movement becomes a visible cue. That is the magic trick. The rabbit is mathematics, and the hat has a microcontroller in it.
How the Planet Tracker Works
A planet tracker is part astronomy lesson, part robotics project, and part “why is north suddenly over there?” adventure. Most systems follow a workflow that looks simple from a distance but contains plenty of clever engineering under the hood.
1. Get the Observer’s Location
Planet positions depend on where you are standing. A person in Florida and a person in Oregon can look at the same moment and see a planet at different heights and directions. A real-time tracker may use a GPS module to collect latitude, longitude, and sometimes altitude. A simpler version can accept the observer’s location manually.
Accurate location matters because the tracker is not only answering “Where is Mars?” It is answering “Where does Mars appear from this exact spot on Earth at this exact time?” That is a more personal question, almost like astronomy with a home address.
2. Track Time Precisely
Time is the quiet boss of planet tracking. The sky appears to move because Earth rotates, and the planets move along their own orbits around the Sun. Even a small time error can nudge the calculated pointing direction away from the intended target. A GPS module can provide accurate time, while many DIY systems also use real-time clock modules or internet time sources.
For visible planets, a slight delay may not ruin a casual demonstration, but a good tracker treats time with respect. In astronomy, “close enough” is how you end up confidently pointing at the neighbor’s chimney.
3. Calculate Planetary Position
The software must know where the planet is supposed to be. There are two common approaches. One approach uses orbital elements and astronomical formulas, often based on Keplerian motion, to estimate the planet’s position. This is excellent for educational projects because it shows how orbital mechanics becomes real pointing data.
The other approach uses ephemeris data from trusted astronomical services. Ephemerides are tables or computed outputs that provide positions of celestial objects over time. NASA’s JPL Horizons system is one of the best-known sources for high-accuracy solar system ephemerides. For advanced projects, using ephemeris data can improve reliability and reduce the burden of coding every orbital calculation from scratch.
4. Convert Coordinates Into Altitude and Azimuth
Right ascension and declination are great for star charts, but servos do not wake up in the morning excited to rotate to “14 hours of RA.” A pan-tilt mechanism needs practical angles. That is where altitude and azimuth come in.
Azimuth is the compass direction, measured around the horizon. Altitude, also called elevation, is the angle above the horizon. If the tracker knows your latitude, longitude, time, and the object’s celestial coordinates, it can calculate the altitude-azimuth position needed for the pointer.
This is the same basic concept behind many telescope mounts and large tracking antennas. The sky math may be celestial, but the motors still need ordinary instructions: turn this far, tilt that far, and please do not wrap the cable around the tripod like spaghetti.
5. Move the Pan-Tilt Mechanism
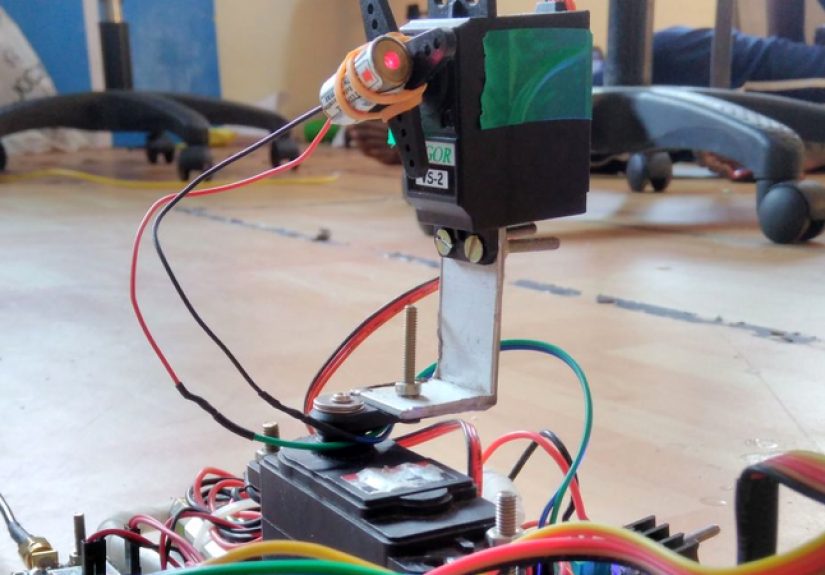
Once the target angles are known, the controller moves motors or servos. A typical DIY planet tracker may use one motor for horizontal rotation and another for vertical tilt. The design can be simple, such as a pan-tilt bracket, or more refined, using stepper motors, gear reduction, encoders, and calibration routines.
The hardware challenge is repeatability. A servo may say it moved to a certain angle, but mechanical backlash, mounting errors, loose screws, magnetic interference, or uneven surfaces can introduce pointing error. This is where good calibration turns a fun gadget into a surprisingly useful educational instrument.
Important Components in a DIY Planet Tracker
A real-time planet tracker does not require a spaceship budget. Many educational builds rely on common maker components. The exact parts vary, but the core categories are usually the same.
Microcontroller or Single-Board Computer
An Arduino Mega, ESP32, Raspberry Pi, or similar controller can act as the system’s brain. A microcontroller is often enough for servo control and basic calculations. A Raspberry Pi or small computer is useful when the project needs a richer interface, network access, larger datasets, or integration with planetarium software.
GPS Module
A GPS receiver can provide location and accurate time. This makes the device portable. Take it to a school science night, a backyard observing session, or a friend’s house, and it can recalculate the sky from the new position.
Orientation Sensors
Some builds use a magnetometer, gyroscope, and accelerometer, such as a 9-axis IMU module, to help determine the device’s orientation. These sensors can assist with auto-calibration, yaw correction, and tilt measurement. They are useful, but they can also be fussy. Magnetometers are famously suspicious of nearby metal, electronics, and anything that wants your compass reading to be wrong.
Motors and Mechanical Mount
Servo motors are common in beginner-friendly builds because they are easy to control. Stepper motors may offer smoother motion and better repeatability when paired with proper drivers and gearing. The mount should be rigid enough to avoid wobble. A tiny pointing error at the base can become a dramatic “Why is Saturn in the bookshelf?” error at the wall.
Display and Controls
Many systems use buttons, switches, rotary knobs, or small displays to choose a planet and mode. More advanced versions can use a web dashboard, phone app, or serial interface. A good interface matters because astronomy is already full of numbers. The control panel should not feel like filing taxes under a red flashlight.
Real-Time Planet Tracking vs. Planetarium Apps
Planetarium apps like Stellarium and other sky map tools are fantastic. They show the sky for your location, let you change the date and time, and identify objects quickly. Some versions can even communicate with compatible GoTo telescope mounts through standard telescope-control protocols.
A physical tracker serves a different purpose. It turns sky-position data into motion. That makes it especially powerful for classrooms, maker fairs, observatories, and hands-on learning. Students can see that coordinate systems are not abstract textbook decorations. They are instructions that can move a machine.
The best setup may combine both worlds. Use planetarium software for visualization and object selection, then feed coordinates to a physical mount. The app becomes the map; the tracker becomes the finger pointing at the sky.
Accuracy: What Actually Affects the Pointing?
Accuracy in a planet tracker is not one single number. It is the result of many small details behaving themselves at the same time. When they do, the tracker feels like magic. When they do not, it becomes a very confident liar.
Ephemeris Quality
Planetary position calculations can be approximate or highly precise. For casual observing, approximate formulas may be good enough. For tighter pointing, especially over long date ranges or for less obvious objects, high-quality ephemeris data is better.
Location and Time Accuracy
The device needs correct latitude, longitude, and time. A wrong time zone setting, stale GPS fix, or incorrect daylight-saving assumption can shift the result. Real-time tracking should always verify its clock before bragging about accuracy.
Calibration
The tracker needs a known reference direction. Many systems align to true north, level the base, and calibrate motor limits. If the base is not level or the zero position is wrong, every target inherits that mistake.
Sensor Drift and Magnetic Interference
IMU sensors can drift, and magnetometers can be confused by nearby metal or electrical fields. Sensor fusion algorithms can help smooth readings, but good physical placement and calibration are just as important.
Mechanical Error
Loose brackets, flexing plastic, cheap gears, and servo backlash can all reduce pointing precision. A sturdy mount is not glamorous, but neither is missing Jupiter by half a room.
Best Use Cases for a Laser-Point Planet Tracker
A real-time planet tracker is not just a gadget. It can be a teaching tool, a telescope assistant, a science fair centerpiece, and a gateway into serious astronomy and robotics.
Classroom Astronomy
Teachers can use a tracker to demonstrate how planets move across the sky, why location matters, and how coordinate systems work. The device can point to a ceiling or projected dome in an indoor planetarium-style activity. Students get to connect math with motion instead of simply memorizing vocabulary.
STEM and Maker Projects
This project is a beautiful mashup of coding, electronics, mechanics, data, and astronomy. It encourages debugging across disciplines. One bug may be in the coordinate conversion. Another may be in servo mapping. A third may be the very scientific discovery that the mounting tape was not, in fact, permanent.
Backyard Observing
Used safely and legally, a non-hazardous pointing system can help observers understand where a planet should be before they use binoculars or a telescope. For outdoor use, visual pointers, app overlays, or telescope mounts are often safer and more appropriate than open-beam lasers.
Telescope Alignment Practice
The same ideas behind planet tracking apply to GoTo telescope systems. Understanding altitude, azimuth, right ascension, declination, and alignment stars makes telescope setup less mysterious. A tracker can act as a practice platform before investing in more expensive astronomy gear.
Laser Safety: The Part That Is Not Optional
Lasers make demonstrations dramatic, but they also demand caution. A laser pointer should never be aimed at people, animals, vehicles, or aircraft. It should not be treated as a toy. For indoor demonstrations, low-risk, properly labeled devices and controlled beam paths are essential. For outdoor astronomy, many clubs and educators follow strict safety practices or avoid laser pointing entirely in crowded or aircraft-heavy areas.
The safest educational version of this project may not use an open laser beam at all. Alternatives include a small LED pointer, a mechanical arrow, a projected dot inside a closed box, or a screen-based visualization. The goal is to show direction, not to audition for a science-fiction movie with poor risk management.
How This Project Teaches Real Astronomy
The beauty of a real-time planet tracker is that it refuses to let astronomy stay flat. A textbook diagram of orbits is helpful. A phone app is convenient. But a physical tracker shows the chain from theory to reality.
When students choose Jupiter and watch a mount rotate, they are seeing the result of planetary motion, Earth rotation, coordinate transformation, and motor control. When the pointer misses, they learn something too: measurement matters. Calibration matters. Assumptions matter. Science is not a vending machine where you insert formulas and receive truth. It is a process of checking, correcting, and trying again.
That makes the project especially valuable. It is not only about finding planets. It is about learning how machines know where to look.
Challenges Builders Should Expect
Every planet tracker project eventually meets the same group of gremlins. The first is coordinate confusion. Right ascension, declination, altitude, azimuth, local sidereal time, and time zones can pile up fast. The second is mechanical calibration. If the tracker’s “zero” is wrong, the math may be perfect and the pointer still goes rogue.
The third challenge is smoothing motion. Planets move slowly, but a tracker may update in steps. Without careful mapping, the pointer can jitter or overshoot. Better code can ease motor movement, filter noisy sensor data, and prevent the system from twitching like it drank three espressos.
The fourth challenge is expectation management. A homemade tracker can be wonderfully accurate for learning and demonstration, but it is not automatically a professional observatory mount. Accuracy depends on component quality, calibration, software, and environment.
Future Upgrades Worth Considering
A basic tracker can point to the major planets. A more advanced tracker can do much more. Builders can add Wi-Fi control, a web interface, automatic ephemeris downloads, object search, telescope integration, or compatibility with planetarium software. Encoders can improve feedback. Stepper motors can improve precision. A camera can enable plate solving, where software compares a sky image to star catalogs and corrects pointing automatically.
Another exciting upgrade is satellite tracking. Satellites move much faster than planets, so the mechanical and software demands are higher. Still, the underlying idea is similar: obtain position data, convert it for the observer’s location, and move the mount accordingly. That is where a humble planet tracker begins to resemble the logic used in professional tracking systems.
Experiences Related to Real-Time Planet Tracking
The first experience many people have with a real-time planet tracker is surprise. You expect the project to be about electronics, but the first big lesson is humility. The sky is not a static wallpaper. It is a moving coordinate system, and the moment you try to point a machine at it, every casual assumption becomes suspicious.
One common experience is the “north problem.” A builder sets up the device, selects Venus, and watches the pointer move beautifully in the wrong direction. The motors work. The code runs. The display looks confident. Then someone realizes the base was aligned to magnetic north, not true north, or the magnetometer was sitting next to a metal table leg. Suddenly the project becomes less about planets and more about detective work.
Another memorable experience is seeing the calculation become physical for the first time. Even if the tracker points to a wall indoors, the moment it moves to represent Jupiter’s position, the room changes. The ceiling is no longer just a ceiling. It becomes a sky map. A corner of the room becomes west. The top of a bookshelf becomes suspiciously close to Saturn. That is the kind of hands-on moment that makes STEM learning stick.
Builders also learn that accuracy is a collection of small victories. The GPS must lock. The clock must be correct. The base must be level. The servo range must be mapped. The target must be above the horizon. The coordinate conversion must use the right units. Degrees and radians are tiny monsters waiting in the bushes. One wrong conversion can send Mars on a vacation to the floor.
For educators, the tracker creates excellent discussion. Students can compare the predicted position with a planetarium app, then ask why the two do or do not match. They can change the observer location and watch the pointing angles update. They can move time forward and see planets rise and set. Instead of treating astronomy as memorized facts, they experience it as a live system.
For hobbyists, the project offers a satisfying ladder of improvement. Version one may simply point in the approximate direction of bright planets. Version two may add a better mount. Version three may pull ephemeris data from an online source. Version four may connect to a telescope. Each upgrade teaches a new skill without making the earlier version feel wasted.
The most important experience, however, is learning to respect both the sky and the tools used to explore it. A real-time planet tracker should inspire curiosity, not carelessness. When lasers are involved, safety must come before spectacle. A responsible build can still feel magical. In fact, it feels more magical because it shows that precision and caution can coexist.
In the end, a real-time planet tracker with laser-point accuracy is more than a clever gadget. It is a bridge between code and cosmos. It lets a microcontroller whisper to the solar system, “I know where you are,” and then point with mechanical confidence. That is a pretty good trick for a pile of wires, motors, and math.
Conclusion
A real-time planet tracker with laser-point accuracy turns astronomy into something active, visible, and wonderfully hands-on. It combines planetary data, coordinate systems, sensors, motors, and careful calibration into a device that can show where planets appear in the sky. Whether used in a classroom, maker lab, science fair, or backyard astronomy setup, the project teaches far more than “where is Jupiter?” It teaches how location, time, math, and machines work together.
The best version of this project is accurate, safe, and educational. It respects laser safety, uses reliable astronomical data, and treats calibration as part of the learning process. Build it well, and you do not just make a pointer. You make a small machine that turns the solar system into an interactive experience.