
Table of Contents >> Show >> Hide
- What Are Felted Acorns, Exactly?
- Supplies Checklist (Pick Your Adventure)
- Prep Step: Clean and Sort Your Acorn Caps
- Method 1: Wet-Felted Acorns (Fast, Beginner-Friendly)
- Method 2: Needle-Felted Acorns (Sculpted and Satisfying)
- Method 3: Sewn Felt Acorns (No Felting Required)
- Decorating Ideas: Put Those Acorns to Work
- Storage and Care
- FAQ: Quick Answers Before You Start
- Common Crafting Experiences: The 500-Word “What It’s Really Like” Section
- Conclusion: Your Fall Decor, But Make It Handmade
Fall decorating is basically a competitive sport. The weather gets crisp, the candles come out, and suddenly everyone’s home looks like a cozy woodland cabin owned by a tasteful squirrel. If you want that warm, gathered-from-nature vibe without spending a small fortune on “artisan autumn accents,” felted acorns are your new best friend.
They’re tiny, charming, and weirdly addictive to make. You can go rustic and natural, bright and modern, or full “glam forest” with metallic caps. And because they’re soft wool, they don’t dent your table, scratch your bowls, or trigger a dramatic crash landing when the cat inevitably swats them off the shelf.
This guide walks you through three reliable ways to make felted acornswet felting, needle felting, and no-felting sewn feltplus pro tips, troubleshooting, and plenty of ideas for using your finished acorns in real-life fall decor.
What Are Felted Acorns, Exactly?
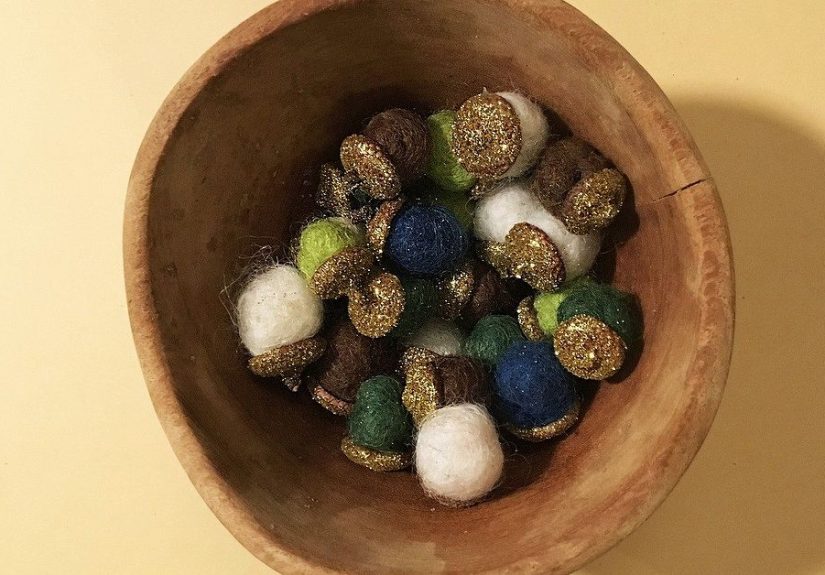
“Felted acorns” are usually a real acorn cap (the top) paired with a wool “nut” body that’s been felted into shape. Felt is created when fibers lock together into a dense fabric-like structure. With wool, that locking happens beautifully because wool fibers have microscopic scales that tangle and bind under friction, moisture, and pressure.
Most felted acorns fall into one of these categories:
- Wet-felted acorns: You roll wool roving with warm soapy water until it shrinks into a firm ball or oval, then glue it into a real cap.
- Needle-felted acorns: You sculpt wool with a barbed felting needlepoking it repeatedly to compress fibers into a sturdy shape.
- Sewn felt acorns: You cut felt shapes, stitch, and stuffgreat if you want zero sharp needles and a very “ornament” look.
Supplies Checklist (Pick Your Adventure)
Core supplies (all methods)
- Acorn caps (foraged or purchased)
- Wool (roving, batting, or felt sheetsdepends on the method)
- Adhesive (craft glue, tacky glue, or hot glue)
- Scissors
- Optional: twine, thin ribbon, embroidery floss, small eye pins, or floral wire for hanging loops
For wet felting
- Wool roving or batting (100% wool felts easiest)
- Warm water and dish soap
- A bowl and a towel (you’ll want the toweltrust me)
For needle felting
- Felting needles (a couple sizes is helpful; 36/38 for shaping, 40 for smoothing)
- Foam felting pad or brush mat
- Optional finger guards (your fingers will thank you)
For sewn felt acorns
- Felt sheets (wool-blend feels nicest, but craft felt works)
- Needle + thread (regular sewing needle, not felting)
- Stuffing (polyfill, scrap felt, or wool scraps)
Prep Step: Clean and Sort Your Acorn Caps
If you’re foraging, grab caps that are intact (no cracks) and not too crumbly. It’s normal for caps to vary in sizehonestly, that’s part of the charm. But it helps to sort them into “small,” “medium,” and “large” piles so you can match them to your felted bodies without playing acorn Tetris.
Quick cleaning routine:
- Brush off dirt and rinse caps briefly.
- Let them dry completely (a day or two in a warm, airy spot).
- If you’re worried about tiny hitchhikers, ask an adult to help you gently heat-dry caps on a lined baking sheet at low temperature and keep an eye on them. (Drying thoroughly is the real goal.)
Optional upgrades: Paint caps (metallic gold/copper is a fall classic), seal them with a clear craft sealer, or leave them natural for a woodland look. If you paint, make sure the caps are fully dry before gluing felt to them.
Method 1: Wet-Felted Acorns (Fast, Beginner-Friendly)
Wet felting is the “handmade magic trick” method. You start with a fluffy cloud of wool and end with a firm little felt nugget that fits perfectly inside an acorn cap. It’s also a great option if you want to make a bunch quickly for bowls, garlands, wreaths, or table scatter.
Step-by-step: wet-felt a wool “nut”
- Pull wool, don’t cut it. Tear off a small strip of roving/batting. Pulling keeps fibers loose and ready to tangle.
- Make a loose ball or oval. Roll it gently in your hands. Start about twice as big as your final sizefelting shrinks wool.
- Wet with warm soapy water. Mix warm water with a few drops of dish soap. Dampen the wool (don’t drown it).
- Start soft, then go firm. Roll lightly between fingertips at first so the outside “skins over.” Once it holds together, roll more firmly in your palms.
- Shape it like an acorn. For a classic acorn body, keep the bottom round and pinch/roll the top slightly narrower.
- Rinse and tighten. Rinse in cool water to remove soap. Squeeze in a towel, then roll again to firm up the shape.
- Dry completely. Set aside to dry (overnight is safest). Felt feels dry on the outside before the inside catches upgive it time.
Attach the cap
- Test-fit the felt body in a cap. If it’s too big, roll it between damp palms a bit more to shrink.
- Add a small bead of glue inside the cap.
- Press the felt body in and hold for a few seconds.
- Add a hanging loop (optional): glue in a short piece of twine, or insert an eye pin with a dab of glue.
Wet felting pro tips (aka “save yourself 20 minutes of confusion”)
- Too fuzzy? You started rolling too hard too soon. Next time, begin with feather-light rolling until the surface tightens.
- Too soft/squishy? Keep rollingfelt firms up with friction and time. Warmth helps, so re-dip in warm water occasionally.
- Want marbled color? Layer two colors of roving loosely, then roll. You’ll get a blended, tweedy look instead of one flat tone.
- Want uniform sizes? Weigh your wool on a kitchen scale or pre-portion into equal “fluffs.”
Method 2: Needle-Felted Acorns (Sculpted and Satisfying)
Needle felting is for people who enjoy turning chaos into order one tiny poke at a time. You sculpt wool by stabbing it with a barbed needle that tangles fibers together. The big advantage: control. You can make crisp acorn shapes, add color details, create stripes, and get a very polished finish.
Safety note: Felting needles are sharp and brittle. Work slowly, keep fingers out of the stabbing zone, and use a foam pad (and finger guards if you have them).
Step-by-step: needle-felt an acorn body
- Build a core. Pull off a chunk of wool roving and roll it into a loose egg shape.
- Stab straight down. On your foam pad, poke repeatedly with the needle. Keep your needle verticalsideways pressure is what breaks needles.
- Rotate and compress. Turn the piece often so it felts evenly. Your fluffy egg will shrink and firm up quickly once fibers lock.
- Refine the acorn silhouette. Make the bottom round and plump; narrow the top slightly so it nests into the cap.
- Add a smooth “skin.” Wrap a thin layer of wool around the shape and felt it in. Thin layers felt cleaner than one thick layer.
- Optional: add details. Needle felt subtle shading (darker near the cap, lighter at the tip) for a realistic look, or add bold stripes for modern decor.
Attach the cap and add a hanger
- Dry-fit your cap. If it’s loose, needle felt a bit more wool onto the top to widen it slightly.
- Glue the cap in place (tacky glue works well; hot glue is fast but sets instantly).
- For ornaments: insert a small loop of wire or an eye pin into the felt (add glue for security), then hide the entry point under the cap.
Needle felting troubleshooting
- Piece looks lumpy: Add a thin outer layer and use a finer needle to smooth. Rotate constantly.
- Wool won’t firm up: You may be using wool that’s too slippery (some superwash wools felt poorly). 100% non-superwash wool is easiest.
- Needle keeps bending/breaking: Slow down, keep the needle vertical, and don’t stab into hard surfaces beneath the foam.
- Cap keeps popping off: Clean the inside of the cap and use a glue that grabs (tacky glue or hot glue). Make sure the felt top fits snugly.
Method 3: Sewn Felt Acorns (No Felting Required)
If you love the look of felted acorns but don’t want to deal with soap bowls or stabbing motions, sewn felt acorns are your calm, orderly option. These look especially cute as ornaments, garlands, or gift toppers because you can add stitching details and patterns.
Simple sewn felt acorn pattern (basic approach)
- Cut the body. Cut two identical teardrop shapes from felt.
- Stitch around the edge. Blanket stitch looks adorable, but a simple whip stitch works too. Leave a small opening.
- Stuff lightly. Use polyfill or felt scraps. Don’t overstuffacorns look best with gentle curves.
- Close the seam. Stitch the opening shut.
- Add a cap. Cut a cap shape (or use a real cap). If using felt, stitch on a “lattice” look with embroidery floss.
- Add a loop. Sew or glue a small ribbon/twine loop at the top.
Style hack: Use a warm brown cap with a muted sage body for a “modern harvest” palette, or go full playful with mustard, rust, and deep teal.
Decorating Ideas: Put Those Acorns to Work
Once you’ve made a handful, you’ll realize felted acorns aren’t just a craftthey’re tiny décor employees who can work multiple shifts all season.
1) Bowl filler (classic for a reason)
Scatter felted acorns in a wood bowl with pinecones, dried orange slices, and a few cinnamon sticks. It looks curated, smells fantastic, and requires zero commitment.
2) Garland that doesn’t scream “kindergarten”
String felted acorns with wooden beads on twine. Keep colors tonal (creams, browns, soft greens) for a grown-up look. Hang on a mantel, mirror, or bookshelf.
3) Napkin rings and place settings
Make one or three small acorns, wire them together, and attach to a simple ring of twine or thin wire. It’s an easy way to make Thanksgiving feel special without buying fancy tableware.
4) Wreath accents
Glue felted acorns onto a grapevine wreath with faux leaves or real dried botanicals. A few metallic caps add sparkle without turning it into a disco pumpkin.
5) Gift toppers and tags
One felted acorn tied onto a package instantly says, “Yes, I’m the kind of person who has wrapping opinions.” (In the best way.)
Storage and Care
- Keep them dry. Wool can absorb moisture, and real caps can warp if stored damp.
- Store in a box. Tissue paper helps prevent squishing, especially for needle-felted shapes.
- Pet reality check: Felted acorns look like toys. If you own a cat, store your “bowl display” somewhere high… or embrace the chaos.
FAQ: Quick Answers Before You Start
Do I have to use real acorn caps?
Nope. Real caps add authentic texture, but felt caps (stitched or glued) look great too and are easier to make uniform for ornaments.
What wool works best?
For beginners, 100% wool roving or batting is easiest because it felts quickly and firmly. If your wool seems to resist felting, it may be treated (like superwash) or blended in a way that slows down bonding.
Is hot glue okay?
Yesespecially for fast assembly. Just be careful: hot glue sets quickly and can burn skin. If you want more repositioning time, use tacky glue and let it dry longer.
Common Crafting Experiences: The 500-Word “What It’s Really Like” Section
Here’s the part most tutorials don’t say out loud: making felted acorns tends to start as a “cute afternoon project” and ends with you guarding a growing pile of acorns like a tiny wool dragon. It’s one of those crafts where progress is fast enough to feel rewarding, but detailed enough to keep your brain happily occupied.
With wet felting, the first big experience is the texture shift. Wool starts out like a soft cloud that doesn’t want to listen to you. Then, after a minute or two of gentle rolling, the outside suddenly tightensalmost like the wool decides, “Fine, I’ll become a real object.” That moment is surprisingly satisfying. People often notice they either roll too hard too soon (hello, fuzzy lopsided pom-pom) or they baby it too long and wonder why it’s still squishy. The “aha” is learning the rhythm: light touch to form a skin, then firm palms to shrink and harden.
Needle felting has a different vibe. It’s more like sculpting, and the experience is all about control and patience. The first time you poke wool, it feels like nothing is happening… and then you realize the piece is shrinking and getting dense. Many makers find it oddly calming because it’s repetitive and focusedyour attention naturally narrows to the shape in your hand. The biggest “learning moment” is usually hand placement: you figure out quickly that your fingers should never be in front of the needle’s path. Once that clicks, you can relax and enjoy the process.
Another common experience: color confidence grows fast. At first, most people stick to realistic browns. Then someone tries mustard yellow, deep teal, or blush pink and realizes felted acorns can be modern decor, not just woodland realism. A fun trick is making a “palette bowl” of mini acornsfive in a gradient from cream to espresso, or a set that matches your living room throw pillows. Yes, that is a sentence that exists now. Fall does that to us.
For many households, felted acorns become a seasonal tradition because the supplies are simple and the results feel special. People often gather caps on a walk, then craft later with a mug of something warm nearby. The acorns become little memory markers: “These were the ones we made for Thanksgiving,” or “These are the metallic ones from the year we went full glam.” They’re also great “in-between time” craftssomething you can do while listening to a podcast, chatting with friends, or watching a comfort show.
Finally, there’s the experience of decorating with something you made. Felted acorns look best in groups, so they naturally encourage you to create a little more than you planned. But that’s the charm: a small craft that turns into a cozy, reusable fall collection you can bring out every yearno frantic last-minute store runs required.
Conclusion: Your Fall Decor, But Make It Handmade
Felted acorns hit the sweet spot: easy enough for beginners, interesting enough for experienced crafters, and cute enough to earn a permanent spot in your autumn decor rotation. Whether you wet felt a speedy batch, needle felt sculpted showpieces, or sew felt ornaments for a polished look, you’ll end up with soft, durable accents that bring instant fall charm to your home.
Now go forth and craft. And if someone asks where you bought them, you have full permission to say, “Oh these? I made them,” and then casually pretend you’re not secretly thrilled about it.





