Table of Contents >> Show >> Hide
- Why This Juicy Beer Can Chicken Recipe Works
- Ingredients for the Best Beer Can Chicken
- Equipment You Will Need
- How to Make Juicy Beer Can Chicken
- Temperature, Timing, and Doneness Tips
- Does the Beer Really Make It Juicy?
- Flavor Variations That Keep Things Interesting
- Best Side Dishes for Beer Can Chicken
- Common Mistakes to Avoid
- Can You Make Beer Can Chicken in the Oven?
- Conclusion
- Experiences and Lessons From Making Beer Can Chicken
- SEO Tags
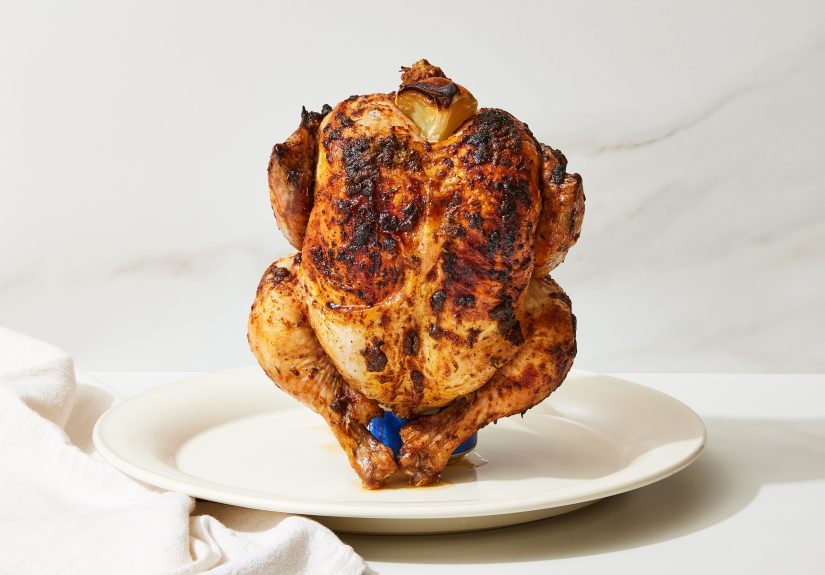
There are grilled chicken dinners, and then there is beer can chickenthe glorious, slightly ridiculous, deeply delicious bird that stands upright on the grill like it has somewhere important to be. It is part recipe, part backyard theater, and all reward. The skin turns bronze and crisp, the meat stays tender, and your patio suddenly smells like summer made a very good decision.
If you have ever wanted a juicy beer can chicken recipe that actually explains what works, what does not, and how to avoid serving a beautiful but suspiciously raw chicken, you are in the right place. This guide walks through the ingredients, equipment, temperature tips, seasoning ideas, and the real reason this method is so popular. Spoiler: it is not because the chicken is taking a spa day over a lager.
The magic comes from a few simple things done well: a dry surface for crisp skin, a bold spice rub, indirect heat, and a thermometer that tells the truth. The beer helps with aroma and old-school grill charm, but the real heroes are airflow, patience, and resisting the urge to carve the second the bird comes off the heat. Tragic? Yes. Tempting? Also yes.
Why This Juicy Beer Can Chicken Recipe Works
A good beer can chicken recipe is less about gimmicks and more about smart cooking. When the chicken cooks upright, hot air can circulate around more of the bird. That helps the skin brown evenly while the fat renders and drips away instead of pooling underneath the chicken like a greasy secret.
The second reason it works is indirect heat. Instead of blasting the chicken directly over flames, you let it roast gently on the grill. That gives the breast meat a better chance of staying moist while the thighs finish cooking. Add a flavorful dry rub, a little oil, and enough time to let the skin crisp, and you get the kind of grilled whole chicken that makes people hover near the cutting board “just to help.”
And then there is the thermometer. A thermometer is the kitchen equivalent of a brutally honest friend. It does not care that your chicken looks done. It cares whether the thickest part has actually reached a safe temperature. That honesty is what keeps this recipe juicy instead of dryor worse, dramatic in the wrong way.
Ingredients for the Best Beer Can Chicken
For the chicken
- 1 whole chicken, about 4 to 5 pounds
- 1 tablespoon olive oil
- 1 can lager or other mild beer, room temperature
For the dry rub
- 2 teaspoons kosher salt
- 2 teaspoons smoked paprika
- 1 teaspoon garlic powder
- 1 teaspoon onion powder
- 1 teaspoon black pepper
- 1 teaspoon brown sugar
- 1 teaspoon dried thyme
- 1/2 teaspoon cayenne pepper, optional
Optional flavor boosters
- 2 smashed garlic cloves
- 1 sprig rosemary or thyme
- A strip of lemon peel
This seasoning blend hits the sweet spot between savory, smoky, and just a little bold. You can absolutely swap in your favorite BBQ chicken rub, but the basic idea stays the same: salt for flavor, paprika for color, aromatics for depth, and a tiny touch of sugar to help the skin caramelize.
Equipment You Will Need
- A grill with a lid
- Instant-read meat thermometer
- Drip pan, if you want easier cleanup
- Beer can chicken stand or a sturdy can
- Tongs and heat-safe gloves
If you own a poultry roaster or vertical roasting stand, use it. It is sturdy, less fussy, and makes the whole setup feel slightly more professional and slightly less like a dare. If you are using a can, make sure the chicken stands securely before it goes on the grill. Nobody wants a mid-cook collapse. That is not rustic. That is just annoying.
How to Make Juicy Beer Can Chicken
Step 1: Prep the chicken
Remove the giblets if they are tucked inside the cavity. Pat the chicken very dry with paper towels. This matters more than people think. Wet skin steams. Dry skin crisps. Also, do not rinse the chicken. Just pat it dry and move on with your life like a food-safe adult.
Step 2: Season generously
Rub the chicken all over with olive oil. Mix the salt, smoked paprika, garlic powder, onion powder, black pepper, brown sugar, thyme, and cayenne. Sprinkle the rub over the entire bird, including inside the cavity. Use all of it. The chicken is large and not easily offended.
Step 3: Prepare the beer
Open the can and pour out about half the beer. You may save it, drink it, or stare at it while pretending this was always part of the plan. If you like, drop in the garlic, herb sprig, or lemon peel. Carefully lower the chicken onto the can or roasting stand so it sits upright.
Step 4: Set up the grill for indirect heat
Preheat your grill to about 375°F. Arrange the heat so the chicken cooks over indirect heat rather than directly above the flame or hottest coals. Place a drip pan underneath if you like. Put the chicken on the grill, close the lid, and let it roast undisturbed for about 1 hour 15 minutes to 1 hour 35 minutes, depending on the size of the bird and the steadiness of your grill temperature.
Step 5: Check the temperature
Insert an instant-read thermometer into the thickest part of the thigh without touching bone, and check the breast too. The chicken is done when the internal temperature reaches 165°F in the appropriate spots. If one area lags behind, keep cooking a little longer and check again.
Step 6: Rest before carving
Carefully remove the chicken from the grill and let it rest for 10 to 15 minutes. This is not the time to rush. Resting helps the juices redistribute so they stay in the meat instead of running all over your cutting board like a sad little puddle of regret.
Temperature, Timing, and Doneness Tips
The biggest mistake in whole chicken cookery is trusting appearances too much. Skin color is helpful, but it is not a lie detector. A gorgeous bird can still need more time, and an average-looking bird can be absolutely perfect inside.
As a rule, plan on roughly 15 to 20 minutes per pound at around 375°F, but use that only as a guide. Grill temperature swings, outside weather, and chicken size all affect the timeline. A 4-pound bird may finish a lot faster than a 5-pound bird, and windy weather can turn your grill into a moody coworker.
If the skin is browning too fast before the chicken is fully cooked, reduce the heat slightly. If the skin looks pale late in the cook, increase the heat for the final few minutes. Just do not wander away and suddenly remember dinner when you smell “extra smoky optimism.”
Does the Beer Really Make It Juicy?
Here is the honest answer: not as much as people love to claim. The name “beer can chicken” suggests the beer is steaming into the meat and transforming it from the inside like some kind of backyard wizardry. In reality, much of the juiciness comes from the vertical roasting position, indirect heat, rendered fat, and not overcooking the chicken.
That does not mean the beer is pointless. It can add aroma, moisture inside the cavity, and a little flavor nuance, especially when combined with herbs or citrus. It also helps support the bird if you are not using a separate stand. But if you are expecting the breast meat to taste like an IPA flight, your chicken is about to disappoint you politely.
The better way to think about it is this: the beer is part of the setup, but the seasoning, grill control, and temperature management do the heavy lifting. So yes, keep the beer. Just do not give it all the credit.
Flavor Variations That Keep Things Interesting
Classic barbecue
Use smoked paprika, brown sugar, garlic, onion, and black pepper. Serve with baked beans, coleslaw, and grilled corn for a full summer grilling recipe moment.
Lemon herb
Use rosemary, thyme, lemon zest, garlic, and black pepper. This version tastes bright, fresh, and slightly more “I own a citrus tree” than the classic.
Spicy Southwest
Add cumin, chili powder, oregano, and cayenne. Serve with charred limes, grilled peppers, and warm tortillas.
Sweet heat
Mix a little brown sugar with paprika, chili flakes, and mustard powder. Brush lightly with barbecue sauce during the final 10 minutes if you want sticky edges and maximum finger-licking commitment.
Best Side Dishes for Beer Can Chicken
A juicy beer can chicken recipe deserves sides that know their role. You want support, not competition. Great options include:
- Creamy coleslaw for cool crunch
- Grilled corn with butter and lime
- Potato salad or smashed potatoes
- Mac and cheese if nobody at your house believes in moderation
- Watermelon salad for a fresh contrast
- Skillet baked beans for smoky comfort
Leftovers are excellent too. Slice the chicken into sandwiches, shred it into tacos, fold it into pasta salad, or pile it over rice bowls. It is the kind of meal that keeps giving, which is nice because whole chickens deserve a better fate than one dramatic dinner and silence.
Common Mistakes to Avoid
- Skipping the drying step: Dry skin is your ticket to crispy skin.
- Using direct heat: That is how you get burnt skin and undercooked meat.
- Not checking temperature: Guessing is for board games, not poultry.
- Overstuffing the cavity: Keep it simple so heat can circulate.
- Carving too early: Resting makes a huge difference.
- Choosing a giant chicken: A moderate-sized bird is easier to cook evenly and fit under the lid.
Can You Make Beer Can Chicken in the Oven?
Yes. If the weather is rude, the grill is occupied, or mosquitoes have declared war, the oven is a perfectly respectable backup plan. Place the upright chicken in a roasting pan and roast at 350°F until it reaches a safe internal temperature of 165°F. You will still get juicy meat and nicely browned skin, though the grill adds a little extra smoke and outdoor bragging rights.
Conclusion
This juicy beer can chicken recipe works because it respects the basics. It seasons the bird boldly, cooks it gently, and relies on temperature instead of hope. The beer adds personality, the grill adds flavor, and the upright roasting method helps create crisp skin and tender meat that is easy to carve and hard to stop eating.
If you are cooking for a weekend barbecue, a casual family dinner, or a backyard gathering where somebody inevitably says, “Wow, that looks amazing,” this recipe is a winner. It is approachable enough for beginners, satisfying enough for grill fans, and dramatic enough to make you feel like the kind of person who casually produces restaurant-worthy chicken on a Saturday afternoon.
Experiences and Lessons From Making Beer Can Chicken
The first time many people make beer can chicken, the reaction is usually a mix of confidence and mild confusion. You season a whole chicken, set it upright on a can, and suddenly dinner looks like it belongs in a backyard cooking competition hosted by your funniest relative. It is impossible not to laugh a little. But then the lid closes, the chicken starts roasting, and the smell changes everything. What looked silly ten minutes ago now smells like the best decision of the weekend.
One of the most memorable parts of making beer can chicken is how social it feels. This is not a quiet, invisible dinner that disappears into the oven while everyone forgets about it. This recipe attracts attention. People wander over to the grill “just to check,” ask what rub you used, and somehow end up hanging around with a drink in hand like they have been appointed official chicken supervisors. It becomes part meal, part event.
There is also a small but meaningful thrill in learning that the recipe rewards patience more than fancy technique. You do not need a culinary degree, a secret marinade from a mountain cabin, or a grill the size of a compact car. You mostly need to keep the heat steady, use a thermometer, and resist overhandling the bird. That is a pretty satisfying lesson, especially for home cooks who want food that feels impressive without requiring a weekend-long emotional commitment.
Another common experience is discovering your own seasoning style. Some people make it smoky and sweet. Some go heavy on garlic and herbs. Some add cayenne like they are trying to wake up the entire neighborhood. Beer can chicken is wonderfully forgiving that way. Once you have the cooking method down, the flavor combinations become a fun part of the process. You start with one version, then next time you tweak the rub, swap the beer, add citrus, or try a different side dish. Before long, the recipe becomes yours.
Of course, every cook has at least one slightly chaotic beer can chicken memory too. Maybe the grill ran hotter than expected. Maybe the chicken leaned a little and had to be carefully rescued with tongs and determination. Maybe someone tried to carve it too soon and the cutting board turned into a juice waterfall. These moments are almost part of the charm. They make the successful cook feel earned, and they teach you what to do better next time.
That is probably the real reason this recipe sticks with people. Yes, the chicken is delicious. Yes, the skin is crispy and the meat can be outrageously tender. But the experience is bigger than the recipe card. It is the smell of smoke in the air, the sound of friends talking nearby, the satisfaction of pulling a beautifully browned bird off the grill, and the tiny moment of pride when everyone takes a bite and immediately goes quiet. That silence is not awkward. That silence means the chicken did its job.
So if you have never made beer can chicken before, go for it. And if you have made it a dozen times, make it again with a new rub or a new side dish and see what happens. The method is classic for a reason. It is simple, fun, a little dramatic, and consistently crowd-pleasing. In a world full of overcomplicated dinner ideas, that is worth celebratingpreferably with napkins nearby.